Table of Contents >> Show >> Hide
- Quick Answer: Why Is My Refrigerator Leaking Water Inside?
- Start Here First: Safety + Fast Triage
- How to Diagnose the Leak by Location
- Top Causes of Water Leaking Inside the Refrigerator (and How to Fix Them)
- 1) Clogged or Frozen Defrost Drain (Most Common)
- 2) Water Filter Installed Incorrectly, Damaged, or Worn Out
- 3) Loose or Leaking Water Supply Line / Inlet Valve / Internal Tubing
- 4) Ice Maker or Dispenser-Related Leaks
- 5) Dirty, Torn, or Loose Door Gasket (Condensation Problem)
- 6) Refrigerator Is Not Level
- 7) Condensation from Hot Food, Open Containers, or Frequent Door Openings
- Step-by-Step DIY Leak Fix Checklist (15–45 Minutes)
- When to Call a Professional Appliance Repair Tech
- How to Prevent Refrigerator Leaks in the Future
- Final Thoughts
- Extended Homeowner Experiences (Real-World Troubleshooting Notes)
You open the fridge to grab milk, and instead of breakfast you find a tiny indoor pool under the crisper drawers. Not ideal. A refrigerator leaking water inside is one of those problems that looks dramatic but is often fixable without a technicianif you know where to look first.
The short version: the most common cause is a clogged or frozen defrost drain. But it can also be a bad water filter seal, a loose supply line, an ice maker issue, a door gasket problem, or simple condensation from hot food and humid air. The trick is identifying where the water is showing up and matching that clue to the right fix.
In this guide, you’ll learn how to troubleshoot a refrigerator leak inside the fridge, what tools you’ll need, which repairs are safe to DIY, and when it’s time to call a pro. We’ll keep it practical, clear, and just a little funnybecause your spinach drawer already looks sad enough.
Quick Answer: Why Is My Refrigerator Leaking Water Inside?
The most common reasons a refrigerator leaks water inside are:
- A clogged or frozen defrost drain (the #1 culprit)
- A water filter that is loose, damaged, or not seated correctly
- A leaking ice maker fill tube or water line connection
- Condensation from a dirty/torn door gasket or poor door seal
- The refrigerator not being level
- Spills, open containers, or hot food creating excess moisture
- A damaged internal water reservoir or filter housing (on some models)
Start Here First: Safety + Fast Triage
Before you play appliance detective, do these basics:
- Unplug the refrigerator if water is near electrical parts, outlets, or wiring.
- Wipe up standing water so you can tell whether new water returns (and from where).
- Check if it’s actually a spill (juice box betrayal is more common than people admit).
- Remove food from the problem area so you can inspect drains, filters, and vents.
- Keep your model number handy because drain locations and panels vary by brand.
How to Diagnose the Leak by Location
Where the water appears often tells you what’s wrong. Use this cheat sheet before taking anything apart.
| Where You See Water | Most Likely Cause | What to Check First |
|---|---|---|
| Under crisper drawers / bottom of fresh food section | Clogged or frozen defrost drain | Drain hole, ice buildup, rear freezer panel area |
| Under freezer basket / ice sheet in freezer | Defrost drain blockage | Drain opening in freezer floor/back wall |
| Near water filter area | Loose, cracked, or misinstalled filter / O-ring issue | Filter seating, housing cracks, O-rings |
| Around ice maker or dispenser area | Fill tube issue, ice chute residue, trapped air, drip tray overflow | Ice chute, fill tube alignment, tray, couplers |
| Random droplets on shelves/walls | Condensation from door seal or hot food | Gasket condition, door closing, food storage habits |
Top Causes of Water Leaking Inside the Refrigerator (and How to Fix Them)
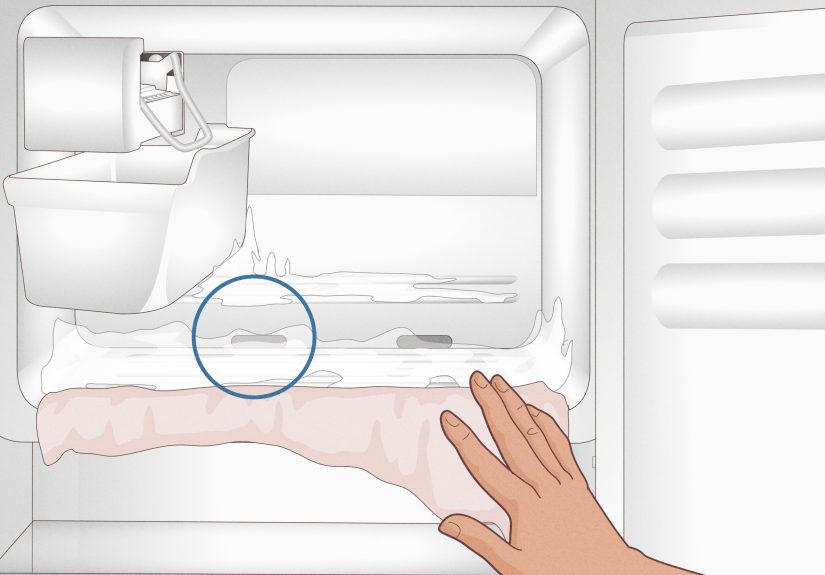
1) Clogged or Frozen Defrost Drain (Most Common)
During normal operation, your refrigerator periodically defrosts itself. That meltwater is supposed to travel through a defrost drain tube to a drain pan under the fridge, where it evaporates. If the drain is clogged with food debris, slime, or ice, the water backs up and ends up inside the fridge or freezer instead.
Signs this is your issue:
- Water pooling under crisper drawers
- Ice forming on the freezer floor or under a basket
- Water reappearing every day or two after you wipe it up
How to fix it:
- Unplug the fridge.
- Locate the defrost drain (often in the freezer, near the back-bottom area).
- Remove visible ice with a warm cloth (not sharp tools).
- Flush the drain gently with warm water using a turkey baster, squeeze bottle, or funnel.
- Use a flexible plastic straw or pipe cleaner to loosen debris (gentlyno metal stabbing).
- Repeat until water flows freely to the drain pan below.
If the drain keeps freezing, you may have an airflow, gasket, or defrost system issue causing repeated ice buildup. At that point, a service call may save you from playing “melt-and-repeat” every weekend.
2) Water Filter Installed Incorrectly, Damaged, or Worn Out
If your refrigerator has a water dispenser or ice maker, the filter area is a frequent source of slow leaks. A recently replaced filter that isn’t seated correctly can cause dripping, weak dispensing, or water collecting inside the compartment. Damaged O-rings, a cracked filter body, or a cracked housing can also cause leaks.
Signs this is your issue:
- Water appears soon after replacing the filter
- Leak is near the filter compartment or filter head
- Dispenser flow changed at the same time
How to fix it:
- Turn off the water supply if your model allows easy access.
- Remove the filter and inspect it for cracks or damaged O-rings.
- Reinstall the filter exactly as the manual specifies (twist/lock until seated).
- Check the housing for cracks.
- Replace the filter if damaged or if it won’t seat properly.
- Purge air from the system by dispensing water (especially after a fresh install).
Pro tip: Many leaks that “mysteriously” appear right after a filter change are not mysterious at allthey’re just a slightly crooked filter. Appliance drama, yes. Appliance mystery, no.
3) Loose or Leaking Water Supply Line / Inlet Valve / Internal Tubing
Refrigerators with ice makers or water dispensers rely on water lines, fittings, and an inlet valve. A loose connection, split plastic line, kinked tubing, or worn valve can leak water that sneaks into the fridge interior or shows up under drawers depending on the design.
Signs this is your issue:
- Leak appears when the ice maker cycles or dispenser is used
- Water is visible behind the fridge and also inside
- You hear a fill cycle and then notice dripping
How to fix it:
- Unplug the refrigerator and shut off the water supply.
- Pull the unit away from the wall carefully.
- Inspect the external water line for kinks, cracks, and wet fittings.
- Check the inlet valve area and nearby tubing for drips.
- Tighten loose fittings and replace damaged tubing.
- If the inlet valve is cracked or leaking, replace it (or call a technician).
If you see active dripping near electrical components or the valve assembly, don’t power the unit back on until the leak is resolved.
4) Ice Maker or Dispenser-Related Leaks
Sometimes the leak is “inside the fridge” but the actual culprit is the ice maker/dispenser system. Common causes include a misaligned fill tube, ice buildup in the chute, residual ice shavings melting, trapped air in the water line after a filter replacement, or a full dispenser drip tray spilling over.
Signs this is your issue:
- Drips happen near the dispenser area
- Leak started after changing the filter or reinstalling doors
- Ice maker area has frost, clumps, or mini icicles
- The dispenser tray fills quickly or spills
How to fix it:
- Check the dispenser drip tray and empty/clean it.
- Clear ice shavings or chunks from the chute.
- Dispense water several times to purge trapped air from the line.
- Inspect water couplers/lines (especially if doors were recently removed/reinstalled).
- Check that the ice maker fill tube is aligned and not frozen over.
- Confirm the fridge is level so meltwater drains correctly.
Also, note that one or two drops after dispensing water can be normal on some models. A steady drip, however, is your fridge asking for attention.
5) Dirty, Torn, or Loose Door Gasket (Condensation Problem)
A refrigerator door gasket keeps warm, humid air out. If it’s dirty, cracked, warped, or not sealing well, humid kitchen air gets inside and condenses on cold surfaces. That moisture can drip onto shelves, run down walls, and collect at the bottom of the fridge.
Signs this is your issue:
- Water droplets on walls or shelves (not just under drawers)
- More leaks on hot/humid days
- Door doesn’t feel like it “seals tight”
- Visible crumbs, grime, mildew, or cracks on the gasket
How to fix it:
- Clean the gasket with warm water and mild soap; dry thoroughly.
- Check for tears, flattened sections, or gaps.
- Test the seal with the paper test (close door on a sheet of paper and pull).
- Replace the gasket if damaged or no longer sealing.
- Make sure shelves/bins aren’t blocking the door from closing fully.
6) Refrigerator Is Not Level
If the fridge leans the wrong way, doors may not close correctly and water may not drain where it should. This can worsen condensation and create dispenser/ice-maker draining problems in some models.
How to fix it:
- Place a level on the fridge (front-to-back and side-to-side).
- Adjust leveling legs/rollers according to your owner’s manual.
- Many units are designed to tilt slightly backward so doors self-close.
Translation: if your fridge door swings open like it’s auditioning for a haunted house, check the level.
7) Condensation from Hot Food, Open Containers, or Frequent Door Openings
Not every puddle means a broken part. Putting hot food directly in the fridge, storing liquids in loosely covered containers, overpacking shelves, or leaving the door ajar can all create excess condensation. That water can run down and pool at the bottom.
How to fix it:
- Cool hot foods before refrigerating
- Use sealed containers for soups, sauces, and washed produce
- Avoid overpacking so air can circulate
- Check that drawers and shelves are fully seated so doors close properly
- Minimize long “staring into the fridge” sessions (we all do it)
Step-by-Step DIY Leak Fix Checklist (15–45 Minutes)
If you want a practical order of operations, use this checklist:
- Unplug fridge and wipe all visible water dry.
- Confirm it’s not a food spill or container leak.
- Inspect under crisper drawers for repeat pooling (defrost drain clue).
- Check freezer floor for ice sheet or ice buildup near drain area.
- Flush and clear the defrost drain.
- Inspect and reseat the water filter; examine O-rings and housing.
- Purge air from the water line by dispensing water several times.
- Check drip tray and ice chute for meltwater/ice shavings.
- Pull fridge out and inspect supply line, fittings, and inlet valve.
- Clean and inspect the door gasket; check fridge leveling.
- Plug back in and monitor for 24 hours.
When to Call a Professional Appliance Repair Tech
DIY is greatright up until it turns into a four-hour kitchen floor yoga class. Call a pro if:
- The leak returns after you clear the drain and reseat the filter
- The filter housing, water reservoir, or inlet valve appears cracked
- You suspect a hidden line leak inside the cabinet/door
- There’s repeated drain freezing (possible defrost system issue)
- You need major disassembly to access the drain on your model
- Water is reaching wiring, controls, or electrical components
- The refrigerator is under warranty (DIY disassembly may affect coverage)
How to Prevent Refrigerator Leaks in the Future
- Clean the door gasket regularly and inspect for cracks
- Replace water filters on schedule and install them carefully
- Flush the water line after filter replacement
- Check under drawers monthly for early signs of pooling
- Keep the defrost drain area free of food debris and ice buildup
- Verify the refrigerator stays level after moving/cleaning
- Store liquids in sealed containers and cool hot food first
Final Thoughts
If your refrigerator is leaking water inside, don’t panicand definitely don’t assume it needs to be replaced. In many cases, the fix is as simple as clearing a clogged defrost drain, reseating a water filter, or cleaning a door gasket. Start with the location of the water, follow a step-by-step diagnosis, and work from the easiest causes first.
Think of it this way: a fridge leak is usually less of a catastrophe and more of a “Hey, could you stop ignoring me?” message from your appliance. Handle it early, and you’ll save your food, your flooring, and your patience.
Extended Homeowner Experiences (Real-World Troubleshooting Notes)
One of the most common experiences homeowners report is finding water under the crisper drawers, wiping it up, and assuming it was just a spillonly for it to come back the next morning. In many cases, this turns out to be a clogged defrost drain. The pattern is usually the giveaway: the water keeps returning even when all containers are dry. People often describe a “mystery puddle” that appears every day or two, especially in top-freezer models. Once they clear the drain with warm water and remove a small blockage (food debris, ice, or sludge), the leak often stops immediately. The biggest lesson here is that repeat puddles usually mean drainage, not clumsiness.
Another very common situation happens right after a water filter replacement. A homeowner swaps the old filter, feels accomplished, closes the door… and a few hours later notices dripping near the filter compartment or dispenser area. This can be frustrating because the fridge was “fine before I fixed it.” In practice, the issue is often a filter that is slightly misaligned, not fully locked into place, or damaged during installation. Some users also report trapped air in the water line causing dispenser drips after the replacement. Reseating the filter and flushing the water line usually solves the problem. The takeaway: when a leak starts right after maintenance, always double-check the part you touched first.
A third experience shows up during hot, humid weather. Homeowners notice droplets on shelves, moisture on interior walls, or water collecting at the bottom of the fridgebut no obvious leak from a line or filter. In these cases, the cause is often condensation from warm air getting in through a door that isn’t sealing well. Sometimes the gasket is dirty; sometimes it’s slightly warped; sometimes a drawer isn’t fully pushed in, so the door never closes completely. Many people are surprised that something as small as a piece of lettuce in the door path can create enough of a gap to cause recurring moisture. Cleaning the gasket, checking the seal, and making sure the fridge is level often solves what looks like a “leak.”
Families with ice makers also share a very specific complaint: “It leaks only when we use the dispenser” or “There’s water around the ice bin but nowhere else.” In these cases, homeowners often discover melted ice shavings, a full drip tray, or air in the line after a filter change. Some report that holding the glass under the dispenser a couple of seconds longer reduces the drips dramatically. Others find that clearing the ice chute or cleaning the tray fixes front-of-fridge dripping that seemed much more serious. The key insight is that dispenser drips and interior leaks can feel related, but the source is often the chute/tray/dispenser behavior rather than a major internal failure.
Finally, there’s the “I tried everything, and it still leaks” experienceusually when the real issue is a cracked housing, damaged inlet valve, or a drain problem that requires deeper disassembly. This is where calling a professional becomes the smart move, not giving up. A good technician can pinpoint hidden leaks quickly and prevent water damage to flooring or cabinets. The homeowner win is knowing when to stop troubleshooting and get help before a minor leak becomes a kitchen repair project.