Table of Contents >> Show >> Hide
- What a “Sitting Abductor Exercise” Actually Trains
- Before You Start: A Quick Setup Checklist (So Your Hips Do the Work)
- Way 1: Seated Mini-Band Hip Abduction (The Classic “Knees Out”)
- Way 2: Seated Hip Abduction Machine (The Gym-Friendly Option)
- Way 3: Seated Isometric Hip Abduction (Belt/Strap “Push-Out Holds”)
- How to Fit Sitting Abductor Exercises Into a Real Program
- Troubleshooting: “Why Do I Feel This in the Front of My Hip?”
- Common Mistakes That Turn a Sitting Abductor Exercise Into a “Random Movement”
- Bonus: How to Make Seated Hip Abduction Carry Over to Real Life
- Experiences: What It’s Like Adding Seated Abductors to Your Week ( of Reality)
If your job description includes “professional sitter” (desk chair, car seat, couchno judgment), your hips are probably begging for a little attention. A sitting abductor exercise (aka seated hip abduction) is one of the easiest ways to wake up the outer-hip muscles that help keep your pelvis steady, your knees tracking nicely, and your lower body feeling less like a wobbly shopping cart.
The best part? You can train your hip abductors while seated, which means it’s beginner-friendly, joint-friendly, and surprisingly effective when you do it with intention (and not like you’re just “politely opening your knees”). Below are three practical ways to do a seated hip abductionband, machine, and isometricplus form cues, programming ideas, and the little tweaks that turn “meh” reps into “oh wow, that’s my glute medius.”
What a “Sitting Abductor Exercise” Actually Trains
Hip abduction means moving your thigh away from the midline of your bodythink “knee goes out to the side.” When you do a seated hip abduction exercise, you mainly target the outer-hip “stabilizer crew,” including the gluteus medius and gluteus minimus, with help from the tensor fasciae latae (TFL). These muscles aren’t just for aesthetics (though yes, they can help shape your outer hips); they’re critical for everyday stability, especially when you’re on one legwalking, climbing stairs, running, stepping off a curb like a confident adult, etc.
In real life, your hip abductors often work as stabilizers. They help keep the pelvis from dropping side-to-side and support lower-body alignment. If they’re undertrained, other areas may pick up the slack (hello, cranky knees or a low back that feels like it “does all the work”).
Before You Start: A Quick Setup Checklist (So Your Hips Do the Work)
Choose your seat
- Stable chair or bench with feet flat on the floor (no rolly office chair unless you enjoy chaos).
- Sit tall with a “stacked” posture: ribs over pelvis, head over shoulders.
Warm up (1–2 minutes)
- 10–15 slow bodyweight sit-to-stands or 30–60 seconds of gentle marching in place.
- A few easy hip circles or ankle rolls if you’ve been glued to your chair all day.
Safety notes
- If you have sharp hip pain, tingling/numbness, or pain that worsens with each rep, stop and consider professional guidance.
- If you have known hip abductor tendon irritation (outer hip pain), start lighter with small ranges and isometrics.
- You should feel effort in the outer hip/glutesnot pinching in the front of the hip or pain in the knee joint.
Way 1: Seated Mini-Band Hip Abduction (The Classic “Knees Out”)
This is the go-to resistance band hip abduction option: cheap equipment, easy setup, and a great way to learn what “outer hip engagement” feels like.
Equipment
- Mini band/loop band (light to medium to start)
- Sturdy chair or bench
Setup
- Place the band just above your knees (easier) or around your calves (harder).
- Feet flat, about hip-width, toes mostly forward.
- Sit tall and lightly brace your core like you’re about to laugh at a bad pun.
How to do it (step-by-step)
- Start with your knees closer together so the band has light tension.
- Without rocking your torso, press your knees outward against the band. Think: “spread the floor with my feet,” even though your feet stay planted.
- Pause for 1 second at your comfortable end range.
- Return slowly to the start. Don’t let the band snap you back like it’s mad at you.
Form cues that make it work
- Keep feet planted: If your feet slide or your heels lift, you’ll lose the hip focus.
- Stay tall: Avoid leaning way forward or slumping back unless you’re intentionally changing the emphasis.
- Control the return: The “in” portion mattersslow eccentrics help build control.
Common mistakes
- Rocking side to side to fake range of motion.
- Letting knees cave in fast at the bottom (free momentum isn’t a training plan).
- Feeling it only in the front of the hip (often TFL dominatingsee the troubleshooting section below).
Reps, sets, and progressions
- Beginner: 2–3 sets of 12–15 reps, controlled tempo.
- Strength focus: 3–4 sets of 8–12 reps with a thicker band and longer pauses.
- Burnout finisher: 1–2 sets of 20–30 small pulses (short range) after your main sets.
Progression ideas: move the band from above knees to calves, add a 2–3 second pause at the top, slow the lowering phase to 3–4 seconds, or perform “out-and-hold” reps (press out and hold for 5 seconds).
Way 2: Seated Hip Abduction Machine (The Gym-Friendly Option)
The hip abduction machine gets a lot of attention because it’s easy to feel and easy to load. It also gives you a consistent resistance profile, which can be great for building strengthif you set it up well and don’t turn it into a full-body interpretive dance.
Setup
- Adjust the seat so your hips and knees feel comfortable and supported.
- Place the outer thighs against the pads; feet on the footrests.
- Grip the handles to keep your torso stable.
- Start with a range you can controlno need to force an uncomfortable stretch.
How to use the seated hip abduction machine
- Sit tall with your back supported and core gently braced.
- Press the pads outward by driving your knees apart.
- Pause briefly at the end range without bouncing.
- Return slowly until the pads are close (or lightly touching, depending on machine).
Pro tips for better results
- Go lighter than your ego wants: you should control the entire rep, especially the return.
- Keep the torso quiet: if your shoulders are rocking, the hips aren’t getting the best stimulus.
- Use a smooth tempo: 1–2 seconds out, 1 second pause, 2–3 seconds back in.
Programming
- Strength: 3–4 sets of 8–12 reps (moderate-heavy, strict form).
- Hypertrophy/endurance: 2–4 sets of 12–20 reps (moderate load, constant tension).
- Isometric option: press out and hold 10–20 seconds for 2–4 rounds.
If you notice hip pinching in the front, shorten your range and stay more upright. If you feel your lower back taking over, reduce the load and refocus on slow, controlled reps.
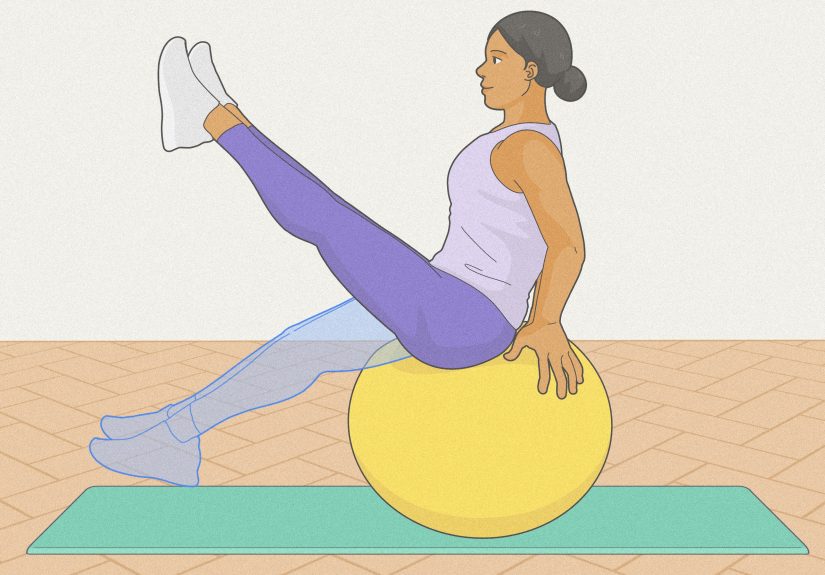
Way 3: Seated Isometric Hip Abduction (Belt/Strap “Push-Out Holds”)
Isometrics are the underrated superheroes of hip training. A seated hip abduction isometric lets you train the abductors without much joint motionhelpful if you’re easing into exercise, managing irritation, or just want a quick “wake up” drill that doesn’t require a gym.
Equipment
- A belt, yoga strap, or non-stretch strap (even a sturdy loop band can work)
- Chair
Setup
- Sit tall with feet flat and knees about hip-width.
- Loop the strap around your thighs, just above your knees, and secure it so it’s snug at your starting width.
How to do seated isometric hip abduction
- Brace your core lightly and keep your ribcage stacked over your pelvis.
- Press your knees outward into the strap as if you’re trying to “break the loop.”
- Hold the contraction for 5–10 seconds while breathing normally.
- Relax for 5–10 seconds and repeat.
What you should feel
- A strong contraction in the outer hips/glutes.
- No sharp pain, no cramping in the low back, and no knee joint discomfort.
Sets, reps, and progressions
- Starter protocol: 2–3 sets of 6–10 holds (5–10 seconds each).
- Progress: increase hold time to 15–20 seconds or add a stronger strap/band tension.
- Advanced: do “ramping” holds5 seconds at 50% effort, 5 seconds at 70%, 5 seconds at 90%.
How to Fit Sitting Abductor Exercises Into a Real Program
Seated hip abduction is excellent as a standalone strengthener, but it shines even brighter as part of a bigger plan: stronger hips that carry over to walking, running, lifting, and daily life.
Frequency
- 2–3 days/week for strength and muscle-building.
- 3–5 days/week for activation, rehab-style consistency, or short “movement snacks.”
Where it goes in your workout
- Warm-up/activation: 1–2 light sets before squats, deadlifts, or running.
- Accessory work: after your main lower-body lifts.
- Desk break: a quick band set to counteract long sitting sessions.
Three sample routines
1) The “Desk Job Reset” (5 minutes)
- Seated mini-band hip abduction: 2 sets of 15 reps
- Seated isometric abduction holds: 1 set of 8 holds (8 seconds each)
- Stand up and walk for 60 seconds
2) Gym Accessory Combo (10–12 minutes)
- Hip abduction machine: 3 sets of 12 reps (controlled tempo)
- Seated band abduction pulses: 2 sets of 25 pulses
3) Joint-Friendly Strength Builder (8–10 minutes)
- Seated isometric abduction: 3 sets of 6 holds (10–15 seconds each)
- Seated band abduction: 2 sets of 10 slow reps (3 seconds out, 3 seconds in)
Troubleshooting: “Why Do I Feel This in the Front of My Hip?”
If you mostly feel your front/outer hip (often the TFL) instead of the side-butt area (glute med/min), try these fixes:
- Sit taller and avoid a deep forward lean.
- Reduce range of motion and emphasize a squeeze at a comfortable end range.
- Keep toes more forward and don’t force extreme “knees out” if it causes hip pinching. A smaller, cleaner rep is usually more productive.
- Slow down the return phase and remove momentum.
Common Mistakes That Turn a Sitting Abductor Exercise Into a “Random Movement”
- Chasing max range with a wiggly spine (control beats circus tricks).
- Letting feet drift wider as you fatigue (keep your base consistent).
- Using the band like a slingshot (snap-back reps = less muscle control).
- Holding your breath (especially on isometricsbreathe like a functioning human).
Bonus: How to Make Seated Hip Abduction Carry Over to Real Life
Seated work builds strength and awareness, but your hips also need to stabilize you in standing and walking. Once seated hip abduction feels solid, consider adding a simple standing move later in your program (like lateral band walks or standing hip abduction) so your new strength shows up where it countsstairs, runs, and everyday single-leg moments.
Experiences: What It’s Like Adding Seated Abductors to Your Week ( of Reality)
Here’s what many people notice when they start doing a sitting abductor exercise consistentlyespecially if they’ve spent years collecting chair time like it’s a competitive sport.
Week 1: “Why is this so awkward?” The first few sessions often feel strangely uncoordinated. You sit down, put a band on, press your knees out…and your body tries to help in the least helpful ways. Your feet want to slide. Your torso wants to lean. Your brain negotiates: “Can we call that a rep?” The fix is usually simple: go lighter, slow down, and aim for control over range. Your abductors are small-ish stabilizers, not a deadlift PR. Let them learn.
Week 1–2: “Oh, there it is.” Once you find the right setupfeet planted, posture tall, controlled tempoyou’ll finally feel that burn on the side of your hips. It can be surprisingly intense, like your glutes just woke up and chose violence. Mild muscle soreness in the outer-hip area the next day is common when you’re new to seated hip abduction. The soreness usually settles as your tissues adapt, especially if you keep the volume reasonable.
Week 2–3: The sneaky posture benefits. People often report that standing feels a bit more “stacked” and stable, especially during stairs or when getting up from a chair. It’s not magicit’s motor control. When the abductors are stronger, your pelvis tends to wobble less in daily movement. Translation: fewer “why does my knee cave in?” moments and more “wow, that felt smooth.”
Week 3–4: You start craving quality reps. At this point, many folks realize the exercise is only as good as the form. When the band gets heavier, you can’t cheat as easilyyour body will try, but the band will snitch. This is where adding pauses and slower lowering phases pays off. A set of 12 controlled reps with a one-second squeeze often beats 30 chaotic flaps that look like you’re trying to fan a campfire with your knees.
How it fits into real life: Seated abductors are also ridiculously easy to “stack” onto habits. Do a set while your coffee brews. Do isometric holds while you’re on a call. Do band reps during TV time (bonus: you’ll feel superior to the characters making terrible life choices). The key is consistency: a little work, repeated often, beats one heroic workout followed by two weeks of “I’ll restart Monday.”
The biggest “aha” moment: Many people discover that hip strength isn’t just for athletes. It’s for anyone who walks, stands, climbs, carries groceries, or wants their lower body to feel like a coordinated team instead of a group project where only one person does the work. And if nothing else, your glutes will appreciate finally being invited to the meeting.


