Table of Contents >> Show >> Hide
- Why a Clogged Downpipe Is a Bigger Deal Than It Looks
- Easy Ways to Unblock a Downpipe Drain: 9 Steps
- Step 1: Confirm That the Downpipe Is Actually Clogged
- Step 2: Start With Safety, Not Heroics
- Step 3: Clear the Easy Stuff First
- Step 4: Clean the Gutter Above the Downpipe
- Step 5: Flush the Downpipe With a Garden Hose
- Step 6: Remove the Elbow or Extension if Needed
- Step 7: Use a Hand Auger or Plumber’s Snake for Stubborn Clogs
- Step 8: Test the Whole Drainage Path
- Step 9: Prevent the Next Clog Before It Starts
- When You Should Skip DIY and Call a Pro
- Common Mistakes to Avoid
- Final Thoughts
- Homeowner Experiences: What This Job Is Really Like in Real Life
- SEO Tags
Note: In standard American English, a “downpipe” is usually called a downspout. Same job, same clog, same leafy drama. This article uses both terms so nobody gets left standing in a puddle.
A blocked downpipe drain can turn a light rain into a full-blown home-maintenance melodrama. Water spills over the gutter, splashes against the siding, puddles near the foundation, and starts acting like it pays the mortgage. The good news is that many clogs are caused by simple things like leaves, twigs, grit, roof debris, and gunk packed into an elbow or extension. In other words, the problem often looks scarier than it is.
If you catch it early, you can usually unblock a downpipe drain with a few basic tools, a little patience, and the wisdom to avoid turning a simple fix into an acrobatic event. The goal is not just to get water moving again. It is to restore proper drainage, protect your foundation, reduce overflow, and prevent the next clog from showing up like an uninvited cousin at Thanksgiving.
Below are nine easy steps to clear a clogged downpipe drain safely and thoroughly, plus practical advice on what homeowners commonly experience when dealing with this soggy little nuisance.
Why a Clogged Downpipe Is a Bigger Deal Than It Looks
When a downpipe backs up, water has nowhere useful to go. Instead of traveling away from your house, it overflows at the gutter line or spills right near the base of the home. Over time, that can contribute to soil erosion, slippery walkways, basement moisture, stained siding, wood rot, and extra wear on the gutter system. A clogged downpipe can also make you blame the wrong thing. Many people assume the gutter is broken when the real villain is a compacted wad of leaves hiding inside the downspout elbow like it pays rent.
That is why the smartest approach is equal parts cleaning, testing, and prevention.
Easy Ways to Unblock a Downpipe Drain: 9 Steps
-
Step 1: Confirm That the Downpipe Is Actually Clogged
Before you start yanking elbows and dragging hoses around the yard, make sure the downpipe is the real problem. Common signs include water pouring over the gutter edge during rain, water backing up at the top opening, dripping seams, an overflow right where the downpipe meets the gutter, or pooling near the bottom outlet.
Take a quick walk around the house during or after a rainstorm. If one section gushes like a mini waterfall while the rest of the gutter system behaves normally, that section probably has a blockage. If you have an underground drain connection, look for water bubbling up or sitting around the base of the pipe. That is your house politely asking for help.
-
Step 2: Start With Safety, Not Heroics
This is the least glamorous step, which is exactly why it matters. Put on work gloves, eye protection, long sleeves, and shoes with good grip. If you use a ladder, place it on firm, level ground and never overreach. Keep three points of contact when climbing, and do not work near overhead power lines. Also, if your home is tall, your ground is uneven, or you hate heights with the passion of a thousand suns, hire a professional.
One-story homes and ground-based cleaning methods are usually the most DIY-friendly. Two-story homes, steep slopes, or icy conditions are where “I’ve got this” becomes “why is my ladder in the hydrangeas?” in record time.
-
Step 3: Clear the Easy Stuff First
Start at the bottom of the downpipe. Remove the downspout extension if you have one. Check for packed leaves, seed pods, roofing granules, mud, and random mystery sludge near the outlet. A surprising number of clogs live right there, especially after storms.
Use gloved hands or a small garden trowel to remove visible debris. If your downpipe has a strainer, leaf guard, or elbow screen, inspect that too. Sometimes the “clogged pipe” is really just a blocked opening. That is the home-maintenance equivalent of rebooting the router and discovering you forgot to plug it in.
-
Step 4: Clean the Gutter Above the Downpipe
A downpipe often clogs because the gutter feeding it is full of debris. If the trough above the downpipe is loaded with wet leaves and grit, flushing the pipe without cleaning the gutter first can simply push fresh debris right back into the blockage zone.
Scoop out large debris by hand or with a gutter scoop. Work toward the downpipe opening so you can see what is falling into it. If you prefer ground-level methods, a hose attachment, wet/dry vacuum attachment, or leaf blower setup can help with loose material. For stubborn sludge, manual removal is usually more effective than trying to blast everything into submission.
-
Step 5: Flush the Downpipe With a Garden Hose
Now it is time for the first real test. Use a garden hose with a spray nozzle and flush the gutter toward the downpipe. If the water exits freely at the bottom, congratulations: your clog may already be gone. If it backs up, drains slowly, or shoots out with all the confidence of a tired trickle, keep investigating.
You can also feed the hose into the downpipe from the bottom and spray upward. This works well for minor clogs and often loosens compacted leaves in elbows. Go slowly, because once the blockage gives way, the pipe may spit out a muddy bundle with the enthusiasm of a toddler launching applesauce.
For most homes, a regular hose is the best first choice. It is effective, inexpensive, and less likely to damage gutters than overly aggressive cleaning methods.
-
Step 6: Remove the Elbow or Extension if Needed
If flushing does not solve the problem, the clog may be trapped in a bend. Downpipe elbows are famous for collecting wet leaf pulp, roof grit, and tiny sticks that bond together into a plug with the structural confidence of concrete.
If your setup allows it, detach the lower elbow or short extension section and inspect inside. This is often the fastest way to reach the blockage directly. Clean the section thoroughly, rinse it out, and check that the remaining vertical pipe is open before reattaching everything.
Take your time and avoid bending the metal. A gentle approach beats turning a simple clog into a replacement project.
-
Step 7: Use a Hand Auger or Plumber’s Snake for Stubborn Clogs
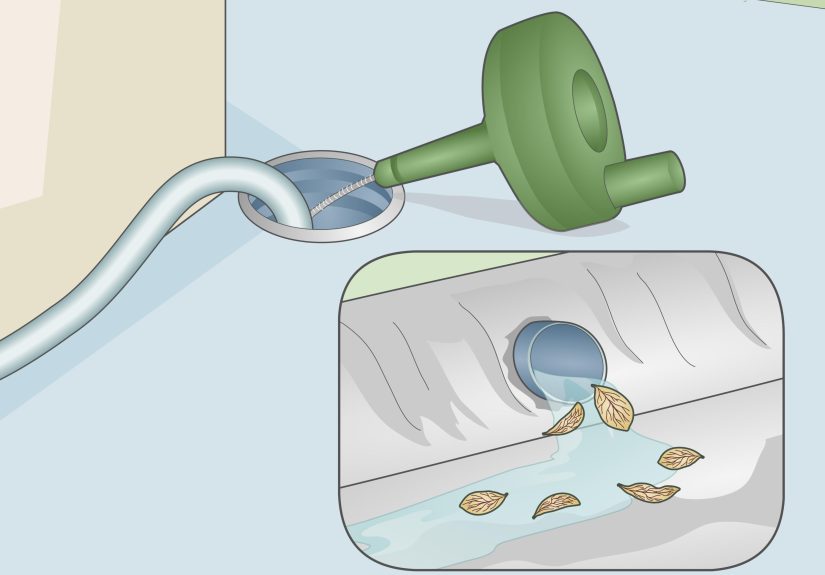
If water still will not move freely, it is time for a hand auger or plumber’s snake. Feed it carefully into the downpipe and rotate as you go. The goal is to break up the blockage and pull out the packed material, not to gouge the pipe like you are angry at it personally.
This method is especially useful for clogs buried deeper in the downpipe or lodged in elbows. Work in short passes. Pull the tool out, remove debris, and try again. Then flush the pipe with the hose once more to see whether the water now runs clean and fast.
Avoid pouring chemical drain cleaners into an outdoor downpipe. They are not a smart fix for leaf-and-dirt clogs, and you do not want harsh chemicals ending up in stormwater runoff. This is a mechanical blockage, not a sink full of shampoo and bad decisions.
-
Step 8: Test the Whole Drainage Path
Once the clog seems cleared, test the entire system. Run water through the gutter again and watch where it goes. It should move smoothly into the downpipe and discharge well away from the house. If water still stands in the gutter, the issue may not be a clog at all. You could have poor gutter slope, sagging sections, leaking joints, or an underground drain line that needs separate attention.
Also check the discharge point. A downpipe that empties too close to the foundation can still create trouble even after the clog is gone. Add or adjust an extension or splash block so runoff moves away from the house instead of collecting near it. Unblocking the pipe is only half the victory if the water still ends up where it should not.
-
Step 9: Prevent the Next Clog Before It Starts
The cheapest downpipe clog is the one you never have to clear. Inspect gutters and downspouts at least in spring and fall, and more often if your property has tall trees, pine needles, seed pods, or frequent storms. Trim branches that drop debris directly onto the roof. Clean the gutter before buildup becomes compacted. Check that downspout extensions stay attached and drain away from the foundation.
If you regularly battle leaves, consider adding a guard or screen system that suits your gutter style. Just do not assume gutter guards are magic. They reduce debris, but they do not eliminate maintenance completely. Even guarded systems still need occasional inspection, because nature is creative and apparently has a personal vendetta against clean drainage.
When You Should Skip DIY and Call a Pro
DIY is great until it is not. Call a professional if your house is more than one story and you are not comfortable on a ladder, if the clog appears to be in an underground drain line, if the downpipe is crushed or loose, or if overflow has already caused interior moisture, basement seepage, or foundation concerns.
You should also bring in help if you have repeated clogs in the same location. Chronic blockages often point to a larger design issue, such as poor slope, too few downspouts, a bad discharge point, or nearby tree debris overwhelming the system. Solving the symptom over and over is exhausting. Solving the cause is much better for your weekend schedule.
Common Mistakes to Avoid
Do not walk on the roof to clear a simple downpipe clog. Do not lean too far from a ladder. Do not blast old or fragile gutters with extreme pressure just because you found a pressure washer and a sense of adventure. Do not shove random metal rods into the downpipe and hope for the best. And absolutely do not pour outdoor debris and chemicals into a storm drainage system.
The best unclogging method is usually boring in the best way: remove debris, flush with water, open the elbow if needed, snake the stubborn sections, then test the flow. Practical beats dramatic nearly every time.
Final Thoughts
If you are dealing with a blocked downpipe drain, the smartest fix is usually a simple one. Work safely, start with visible debris, clean the gutter above the pipe, flush with a hose, and move to an auger only if the clog refuses to cooperate. Once the water flows again, check where it discharges and take a few preventive steps so the same problem does not come back next month wearing a wet crown of leaves.
A clear downpipe may not be the most glamorous home upgrade in the world, but it quietly protects your siding, landscaping, foundation, and sanity. And that is a pretty solid return on investment for a job that mostly involves gloves, water, and mildly insulting a pile of soggy leaves.
Homeowner Experiences: What This Job Is Really Like in Real Life
One of the most common experiences homeowners describe is the surprise factor. They notice a waterfall spilling over the side of the gutter during a storm and assume the whole gutter system is failing. Then they clean out one downpipe elbow and discover the entire crisis was caused by a compact ball of maple seeds, leaves, and black sludge roughly the size of a loaf of bread. That kind of discovery is equal parts gross and satisfying. It is also a reminder that drainage problems often start small and look much bigger from the ground.
Another frequent experience is underestimating how much debris can hide in the gutter above the downpipe. People will flush the downspout again and again, only to realize the real issue is the trough feeding it. Wet material compacts like mulch, especially after a season of rain. Once it begins breaking loose, the cleanup can feel like excavating a swamp from a narrow metal trench. Messy? Absolutely. Difficult? Usually not, as long as you stay patient and work in stages.
Many homeowners also discover that the lowest elbow is the usual troublemaker. Water can move through a straight section fairly well, but elbows trap heavy debris. This is why someone may think the clog is deep underground when it is actually sitting a foot above the ground in a bend. Taking apart that elbow often brings a strange sense of victory. It is the home-repair version of finding the missing sock in the dryer, except wetter and less adorable.
There is also the very real experience of learning what not to do. People who rush the job often end up soaked, splattered, or annoyed. Flush too hard without checking the outlet first, and the downpipe can burp out a muddy spray all over your shirt. Try to work from a bad ladder angle, and the task becomes stressful fast. Use too much force with a tool, and you risk denting the downspout. Most successful DIYers end up saying the same thing afterward: the job went better when they slowed down, cleared visible debris first, and tested the flow in logical steps.
Homeowners with lots of trees usually report a pattern rather than a one-time problem. Spring brings blossoms and seed pods. Fall delivers leaves. Winter can add ice and packed debris. In these cases, the best experience is not the dramatic unclog but the routine inspection that prevents one. A ten-minute check in the right season often saves an hour of messy work during the next storm.
And then there is the biggest lesson of all: a clogged downpipe rarely feels urgent until water starts threatening the foundation. Once homeowners see puddling near the house or dampness in the basement, the job suddenly becomes very important. That experience tends to change habits fast. After one bad overflow, people become much more loyal to seasonal gutter checks. Funny how one puddle can create a born-again maintenance enthusiast.