Table of Contents >> Show >> Hide
- Why Home Painting Matters More Than People Think
- Before You Paint: Make the Important Decisions First
- Prep Work: The Least Glamorous and Most Important Part
- How to Paint Interior Rooms the Right Way
- How Exterior Home Painting Differs
- Common Home Painting Mistakes to Avoid
- How to Make a Paint Job Last Longer
- DIY or Hire a Professional?
- Conclusion
- Real-Life Home Painting Experiences and Lessons Learned
Home painting sounds simple in the way that “making toast” sounds simpleuntil you burn the bread, drop the butter, and realize you bought the wrong kind of loaf. A fresh coat of paint can absolutely transform a house, but the difference between a finish that looks smooth and stylish and one that looks like it lost a fight with a roller usually comes down to preparation, timing, and technique.
Whether you are refreshing a bedroom, brightening a gloomy hallway, or giving your exterior a well-earned facelift, home painting is one of the most cost-effective ways to improve the look and feel of a space. It can make a small room feel bigger, an older home feel newer, and a tired exterior look cared for again. It also protects surfaces from everyday wear, moisture, sunlight, and general life chaos. In short, paint is both beauty product and bodyguard.
This guide walks through everything homeowners should know about home painting, from choosing the right paint and primer to avoiding common mistakes and getting results that actually last.
Why Home Painting Matters More Than People Think
Most people start painting for one reason: they are tired of looking at the current color. Fair enough. But home painting does more than change the vibe. Interior paint helps cover stains, scuffs, and little signs of daily living. Exterior paint helps protect siding, trim, and other materials from weather damage, moisture issues, and premature wear.
That means a good paint job is not just decorative. It is practical. A properly painted room is easier to clean, easier to maintain, and often more pleasant to spend time in. A well-painted exterior can boost curb appeal and help preserve the materials underneath. That is a pretty solid return for a project that mostly involves tape, patience, and eventually finding paint on your elbow three days later.
Before You Paint: Make the Important Decisions First
Choose the Right Type of Paint
Not all paint is the same, and this is where many DIY projects start wobbling. Interior paint is formulated differently from exterior paint. Exterior products are made to handle sunlight, temperature swings, and moisture, while interior paints are designed with different durability, cleanability, and finish expectations in mind. Using the wrong one is like wearing flip-flops to shovel snow: technically possible, strategically terrible.
For most interior walls, water-based latex paint is the go-to choice because it is easier to work with, dries faster, and typically has lower odor than older oil-based products. Oil-based options still have their place on certain trim, cabinets, or specialty surfaces, but for general home painting, latex does a lot of the heavy lifting.
Pick the Right Paint Sheen
Paint sheen affects both the look and performance of your finish. Flat or matte paint hides imperfections well, which makes it a favorite for ceilings and low-traffic walls. Eggshell and satin are popular for living rooms, dining rooms, hallways, and many bedrooms because they offer a little more durability without looking too shiny. Semi-gloss and gloss finishes are commonly used on trim, doors, cabinets, kitchens, and bathrooms because they are tougher and easier to wipe clean.
The shinier the finish, the more it tends to highlight surface flaws. That means high-gloss can look fantastic on a smooth door and absolutely ruthless on a bumpy wall. The paint is not being rude. It is just honest.
Do Not Skip Primer When It Is Needed
Primer is not a marketing prank invented to sell an extra can. It helps paint stick, improves coverage, seals porous surfaces, and can block stains. Primer is especially useful when you are painting over repairs, covering a dark color with a lighter one, working with new drywall, painting raw wood, or dealing with surfaces that have stains, odors, or a glossy finish.
Some products advertise “paint and primer in one,” and they can be useful in the right situations. But when the surface is tricky, damaged, stained, or dramatically changing color, a dedicated primer still earns its paycheck.
Prep Work: The Least Glamorous and Most Important Part
If home painting had a secret villain, it would be bad prep. Most poor results come from rushing straight to the fun part and ignoring the boring part. The boring part, unfortunately, is the whole reason the fun part works.
Clean First, Paint Second
Paint sticks best to a clean surface. That means walls should be free of dust, grease, grime, smoke residue, and random mystery spots that seem to appear only when you shine good lighting on them. Kitchens and bathrooms often need extra attention because residue builds up faster there.
For interior painting, a gentle cleaner and a clean rinse are often enough. Let the surface dry completely before moving on. Exterior painting usually requires more serious cleaning, whether that means hand washing, scrubbing, or carefully using a pressure washer depending on the surface and condition of the home.
Patch, Caulk, and Sand
Fill holes, dents, and cracks before you paint. Use spackle or patching compound for drywall flaws, caulk small gaps around trim, and repair peeling or damaged areas properly. Once repairs are dry, sand them smooth. Sanding also helps dull glossy surfaces so primer and paint can grip better.
This is where a lot of people start bargaining with the wall. “Maybe that bump will disappear under two coats?” It will not. Paint is good, but it is not a magician.
Protect the Space
Move furniture, remove outlet covers, protect floors with drop cloths, and tape off trim and edges if needed. Label hardware and keep screws together. These little steps save a shocking amount of frustration later. No one wants to finish a beautiful room and then spend half an hour wondering where the light switch plate went.
Be Extra Careful in Older Homes
If your home was built before 1978, be careful around old paint layers. Disturbing lead-based paint can create hazardous dust. In those cases, lead-safe practices matter, and large or risky jobs may be best handled by certified professionals. This is one area where “winging it” is not a charming personality trait.
How to Paint Interior Rooms the Right Way
Start With the Ceiling
When painting a room, many pros work from the top down: ceiling first, then walls, then trim. That way, any drips or splatter can be covered as you move through the project. Use a brush to cut in around edges, then roll large areas in manageable sections.
Cut In Carefully
“Cutting in” means painting a narrow border along corners, trim, and edges with a brush before using a roller. A quality angled brush gives you better control, and a steady hand beats a rushed one every time. The goal is a clean line, not a speed record.
Use a Roller With a Wet Edge
For walls, roll in sections and keep a wet edge so new passes overlap slightly before the previous paint starts drying. This helps avoid lap marks and patchy spots. Load the roller evenly, do not drown it, and resist the urge to keep re-rolling paint that is already starting to set.
Usually, two coats deliver the best color and durability. The first coat starts the story. The second coat fixes the plot holes.
Let Paint Dry Properly
Dry to the touch is not the same as fully cured. Follow the label directions for recoat time and cure time. Touching, scrubbing, or rehanging things too soon can damage the finish. Fresh paint needs a little personal space.
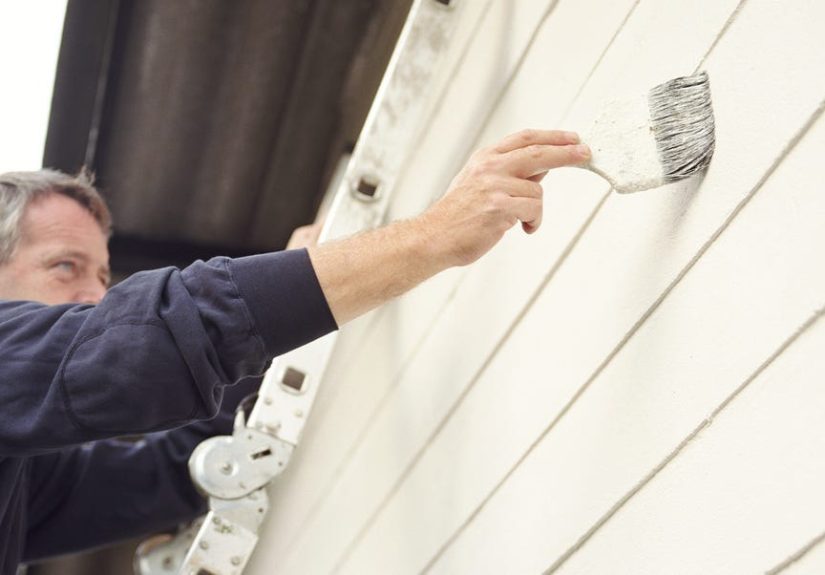
How Exterior Home Painting Differs
Exterior home painting is a bigger beast. It is less “cozy weekend refresh” and more “respect the weather, the ladder, and your own limitations.”
Watch the Weather
Do not paint exterior surfaces right before rain, during very humid conditions, or outside the temperature range listed by the manufacturer. Sun exposure, dew, wind, and overnight temperature drops all affect how paint cures. The can is not being dramatic when it gives instructions. It has seen things.
Repair Before Coating
Scrape peeling paint, sand rough edges, repair damaged siding or trim, and prime bare spots. Painting over failing material does not solve the problem. It just gives the problem a new color.
Follow a Logical Order
For exteriors, many painters work from top to bottom and try to stay in the shade when possible. That helps control drying and makes it easier to catch drips. Gutters, fascia, siding, trim, shutters, and doors may each need slightly different products or tools depending on the material.
Common Home Painting Mistakes to Avoid
Buying Cheap Tools
A bargain brush that sheds bristles into fresh paint is not saving money. Good rollers, brushes, and painter’s tape usually make the project faster, cleaner, and less aggravating.
Using the Wrong Nap or Brush
Smooth walls, textured walls, trim, cabinets, masonry, and siding all benefit from different tools. A roller cover with the wrong nap can leave too little paint or way too much texture. Matching the tool to the surface is one of those little details that makes a big difference.
Skipping Sample Colors
The color that looked sophisticated online can look surprisingly like cold oatmeal in your living room. Test paint samples in different lighting before committing to several gallons of anything.
Painting Over Problems
Mildew, water stains, peeling layers, smoke residue, chalky siding, and damaged drywall need proper treatment first. Otherwise the new finish may fail early or look uneven. Paint improves surfaces; it does not perform emotional healing for neglected walls.
How to Make a Paint Job Last Longer
Durability starts before the first coat and continues after the last one dries. Choose products appropriate for the room or exterior surface. Use primer when needed. Clean surfaces before painting. Respect dry times. Avoid harsh cleaning right away. For interiors, wipe marks gently and address moisture issues quickly. For exteriors, keep gutters working, trim back plants, and inspect problem areas before peeling spreads.
In kitchens, bathrooms, mudrooms, and kids’ spaces, durability matters as much as color. In these rooms, slightly more washable finishes often make sense. In quiet, low-traffic spaces, you can prioritize a softer look if that fits your style.
DIY or Hire a Professional?
Plenty of home painting projects are DIY-friendly. A small bedroom, a bathroom vanity, or an accent wall can be a very reasonable weekend project. But not every painting job is a noble solo mission. High ceilings, multi-story exteriors, extensive prep, damaged surfaces, or older homes with possible lead paint may be better left to pros.
The smartest approach is not always “Can I do this?” It is “Can I do this well, safely, and without turning my front yard into a stress documentary?” Hiring a professional can make sense when the scale, risk, or prep demands outgrow your time, tools, or patience.
Conclusion
Home painting is one of the best ways to upgrade a space without a full renovation, but the best results come from thoughtful planning rather than wild optimism. Pick the right paint for the surface, choose the right sheen, prep like you mean it, use primer when the job calls for it, and apply paint with patience instead of panic. Whether you are refreshing one room or repainting the entire exterior, the same truth applies: the finish is only as good as the foundation underneath it.
Do it carefully, and paint can make your home feel cleaner, brighter, newer, and more like yours. Do it carelessly, and you may learn an awful lot about sanding. Either way, the walls will remember.
Real-Life Home Painting Experiences and Lessons Learned
Anyone who has spent time on a home painting project eventually collects a strange little pile of stories. They are rarely glamorous, but they are useful. One homeowner starts with the innocent goal of painting a guest room and ends the weekend having repainted the trim, reorganized the closet, and developed a personal grudge against painter’s tape. Another thinks painting the front door will take one hour and is still outside by sunset, staring at brush marks and wondering why red paint behaves like it has trust issues.
A common experience is realizing that prep work feels unnecessarily fussy right up until the moment it saves the day. You patch a dent, sand a rough spot, wipe the wall twice, and wonder whether you are overdoing it. Then the roller glides on smoothly and the finished wall actually looks polished, not patchy. Suddenly the boring prep steps seem less like chores and more like insurance.
Lighting is another great humbler. A color that looked warm and elegant in the store can look completely different at home in morning sun, afternoon shadow, and evening lamplight. Many people learn this after confidently painting an entire room and then discovering the “soft greige” they chose reads more like “confused mushroom.” Sampling first may not feel exciting, but it beats repainting an entire wall because the color shifted from cozy to cafeteria.
Then there is the lesson of tool quality. Plenty of people try to save money with the cheapest brush or roller they can find. That usually works for about twelve minutes. After that, the brush sheds, the roller splatters, and the whole project becomes an accidental abstract art performance. Better tools do not guarantee perfection, but they make good results much easier to reach.
Painting also teaches patience in a very specific and slightly annoying way. You apply the first coat, stand back proudly, and immediately notice streaks, dull patches, or uneven coverage. Panic arrives. Then the paint dries, the second coat goes on, and things settle down. Many painting disasters are really just “I judged the job too early” moments. Fresh paint often looks worse before it looks better.
Exterior painting brings its own set of experiences. People often discover that weather is the real project manager. A perfect plan can be derailed by wind, surprise humidity, a sudden drizzle, or siding that stays damp longer than expected. The best exterior painters learn to work with the forecast instead of arguing with it. The sky usually wins that debate.
Perhaps the biggest lesson from real home painting experience is that a successful project is rarely about speed. It is about sequence. Clear the room. Clean the surface. Repair the flaws. Prime where needed. Paint in the right order. Let things dry. Touch up carefully. Clean up thoroughly. None of that is flashy, but it works. And when the room is done, the trim is crisp, the color feels right, and the space suddenly looks refreshed, the effort feels worth it. Even the paint on your forearm starts to feel like a badge of honor.