Table of Contents >> Show >> Hide
- Why Proper Keyboard Stand Adjustment Matters
- Before You Adjust the Stand
- How to Adjust an X-Frame Keyboard Stand
- How to Adjust a Table Keyboard Stand
- How High Should a Keyboard Stand Be?
- Common Mistakes to Avoid
- X-Frame vs. Table Stand: Which Is Better?
- Real-World Experiences and Lessons From Adjusting Keyboard Stands
- Conclusion
- SEO Tags
If your keyboard stand feels wobbly, too high, too low, or suspiciously determined to attack your knees, you are not alone. A badly adjusted keyboard piano stand can turn a relaxing practice session into a full-body complaint. Your wrists get cranky, your shoulders rise like you are bracing for impact, and your sustain pedal ends up somewhere near another zip code.
The good news is that learning how to adjust a keyboard piano stand is not complicated. Whether you use an X-frame keyboard stand or a table-style stand, the goal is the same: create a setup that feels stable, comfortable, and sensible for your keyboard, your bench, and your playing style. Once the stand height, width, and position are dialed in, everything gets easier. Your posture improves, your hands relax, and your instrument stops bouncing around like it is auditioning for a trampoline commercial.
In this guide, you will learn how to adjust both X-frame and table keyboard stands, how to find the right height for sitting or standing, what mistakes to avoid, and how to troubleshoot common problems like wobble, slipping, and awkward pedal placement. By the end, you should be able to build a setup that feels less like “temporary chaos” and more like “yes, I am a keyboard player who has my life together.”
Why Proper Keyboard Stand Adjustment Matters
A keyboard stand is not just a thing that holds your instrument off the floor. It affects your posture, comfort, technique, and even how long you can play without feeling tired. If the stand is too low, your wrists bend upward and your shoulders hunch. If it is too high, your elbows flare out and your forearms do extra work they did not volunteer for.
For most players, the sweet spot is simple: when your hands rest on the keys, your forearms should feel roughly level, your wrists should stay neutral instead of drooping or lifting sharply, and your shoulders should remain relaxed. Your feet should rest comfortably on the floor, with enough room to reach the pedals without twisting like a pretzel in a talent show.
Stand design matters too. X-frame stands are popular because they fold easily, travel well, and are quick to set up. Table-style stands, sometimes called platform or Z-style/table stands depending on the model, usually offer better legroom, a wider support base, and more stability for heavier digital pianos, workstations, and 88-key keyboards. Choosing the right style is useful, but adjusting it correctly is what makes the setup actually work.
Before You Adjust the Stand
Check the Keyboard Weight and Size
Not all stands are built for all keyboards. A lightweight 61-key controller is one thing; a heavy 88-key stage piano is another beast entirely. Before adjusting anything, make sure the stand is appropriate for your instrument’s size and weight. In general, single-X stands are better for lighter keyboards, while double-X or table-style stands are often the safer choice for larger or heavier boards.
Decide Whether You Will Play Sitting or Standing
This sounds obvious, but many players forget it and set the stand first, then try to force their body to match. That is backward. Your playing position should determine the stand height, not the other way around. If you mostly play seated at home, set the stand for seated posture. If you gig standing up, build the setup for that. Trying to split the difference usually creates a setup that satisfies no one.
Set the Bench Height First
If you use a bench or stool, adjust that before fine-tuning the stand. Your bench height changes the angle of your elbows, wrists, and shoulders. If you raise or lower the bench after the stand is set, you will probably need to redo everything anyway. It is like making your bed and then deciding to replace the mattress. Technically possible. Emotionally annoying.
Look at the Floor
Uneven floors are sneaky. Carpet, stage risers, old wood floors, and rehearsal rooms with mysterious slants can all make a good stand feel unstable. If your stand includes adjustable feet or leveling screws, use them. A stable stand on a weird floor is still possible. A wobbly stand on a weird floor is how legends begin, but not the good kind.
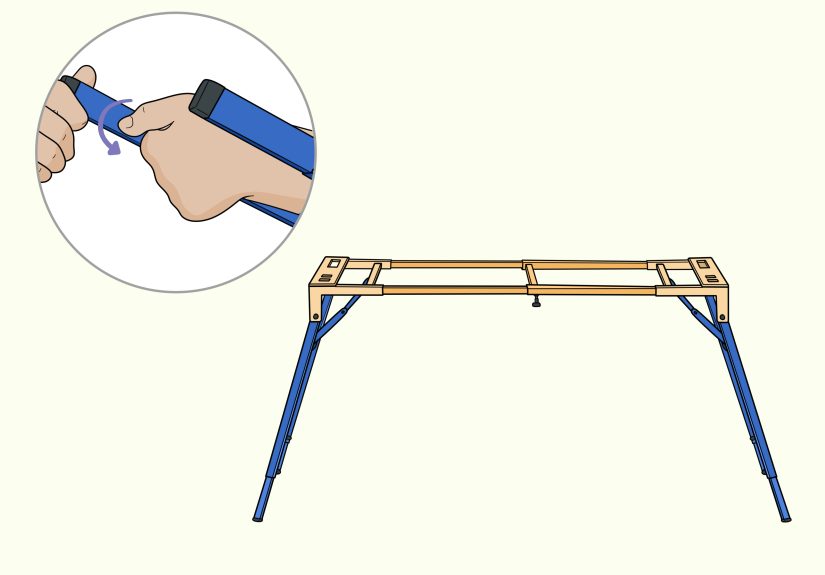
How to Adjust an X-Frame Keyboard Stand
An X-frame stand uses crossing support bars and usually changes height by widening or narrowing the frame. Many models use a pull knob, trigger lock, clutch, or spring-loaded lever. The details vary by brand, but the setup logic is basically the same.
Step 1: Unfold the Stand Fully
Open the stand on a flat surface and make sure both legs are fully extended and evenly positioned. If the stand looks twisted or one side is slightly ahead of the other, fix that now. A crooked starting position creates instability later.
Step 2: Unlock the Height Mechanism
Locate the locking system. On some X-frame stands, you will pull a center knob or trigger. On others, you lift a spring-loaded lever or release a clutch. Hold the stand securely while unlocking it so it does not snap into a new position unexpectedly.
Step 3: Choose the Height
To raise or lower an X-frame stand, you usually change the width of the “X.” A narrower frame raises the keyboard higher. A wider frame lowers it. Start with a medium setting, then compare it with your bench height and natural playing position.
For seated playing, the stand should usually sit low enough that your elbows stay relaxed and your forearms feel close to level with the keys. For standing playing, set it high enough that you are not leaning forward or collapsing your shoulders. Avoid extremes. If the stand is so low that your knees collide with the crossbar, or so high that your wrists are climbing uphill, keep adjusting.
Step 4: Lock It Firmly
Once you find the rough height, lock the mechanism completely. This part matters more than people think. “Mostly locked” is not locked. Tighten the knob, engage the clutch, or seat the lever fully according to the design. Give the stand a small shake test before placing the keyboard on it.
Step 5: Align the Support Arms
Many X-frame stands include rubber sleeves or end caps on the top arms. Adjust them so the keyboard rests securely and evenly across both sides. The instrument should not sit off-center, hang too far forward, or rest on bare metal. If the sleeves slide, center them before loading the keyboard.
Step 6: Place the Keyboard and Test for Bounce
Put the keyboard on the stand gently, then play a few loud chords and octave jumps. If the stand bounces excessively, flexes, or rocks side to side, the height may be too extreme or the stand may be too light-duty for the instrument. In many cases, lowering the stand slightly or switching from a single-X to a double-X model improves stability right away.
How to Adjust a Table Keyboard Stand
A table-style keyboard stand usually has two side frames connected by horizontal supports. Some models adjust height only. Others adjust both height and width. This design is popular for heavier keyboards because it often provides more legroom, a more solid feel, and better support for pedals and cables.
Step 1: Open the Stand and Set the Width
If your table stand includes adjustable crossbars or telescoping supports, widen or narrow the frame to match the keyboard. The support points should sit under the instrument securely without sticking out awkwardly. The keyboard should feel centered and balanced from left to right.
Step 2: Adjust the Leg Height Evenly
Raise or lower both sides to the same height unless the stand specifically includes independent leveling for uneven floors. Some models use knobs, pins, or locking screws with height markings. Match both sides carefully so the keyboard does not tilt. A tilted keyboard may look dramatic, but unless you are on tour with fog machines and six backup synths, it is usually not the goal.
Step 3: Use the Leveling Feet
Many table stands include adjustable feet or screws at the bottom. If the stand rocks, do not ignore it. Use those features. Level the stand until all contact points sit firmly on the floor. This is one of the biggest advantages of table-style stands, especially in studios, churches, rehearsal spaces, and older venues where floors are rarely perfectly even.
Step 4: Check Knee and Pedal Clearance
Sit down and slide into playing position. One reason players love table stands is the extra room underneath. Make sure your knees do not hit the frame and your feet can move naturally between sustain, soft, or expression pedals. If the crossbar or side supports interfere, adjust the width or reposition the keyboard slightly.
Step 5: Load the Keyboard and Recheck Height
After placing the keyboard on the stand, sit or stand in playing position and reassess. Sometimes a stand feels perfect until the instrument is actually on it. Your hands may need a small height correction once the keyboard is in place. Fine-tune as needed, then lock all fasteners firmly.
How High Should a Keyboard Stand Be?
For Seated Playing
When seated, aim for a setup where your forearms are roughly parallel to the floor or slightly angled down toward the keys. Your elbows should feel comfortably bent, often close to a right angle. Your wrists should stay straight and relaxed, not collapsed below the keybed or cocked upward. Your shoulders should not lift. Your feet should rest naturally on the floor, with easy pedal access.
If your hands feel cramped, your wrists ache, or you notice yourself hunching, the stand height is probably wrong. In many cases, the problem is not dramatic. A change of an inch or two can completely transform the setup.
For Standing Playing
For standing, the keyboard should sit at a height that lets your elbows bend naturally without forcing the shoulders upward. Many players prefer the keys a little below elbow height. That creates a relaxed arm position and reduces fatigue during longer performances. If you are reaching down too far, your back may round. If you are reaching up, your wrists and shoulders may tense. Neither is ideal.
Common Mistakes to Avoid
- Adjusting the stand before the bench: Always set your seating first if you play seated.
- Ignoring the stand’s weight capacity: Heavy keyboards need sturdier support.
- Using the highest or lowest setting without testing: Extreme positions often reduce stability.
- Forgetting to tighten locks fully: A loose knob can turn a stable stand into a bad memory.
- Skipping the shake test: Better to find a wobble during setup than during the chorus.
- Neglecting pedal placement: A perfect hand position means less if your foot has nowhere to go.
X-Frame vs. Table Stand: Which Is Better?
If portability is your top priority, an X-frame stand is hard to beat. It folds fast, travels easily, and works well for light to mid-weight keyboards. It is especially practical for casual gigs, classrooms, and players who need something simple and compact.
If stability, legroom, and support for a heavier instrument matter more, a table-style stand often wins. It usually provides a broader base, cleaner pedal space, and less bounce under energetic playing. Many seated players and studio users prefer it for exactly those reasons.
So which is better? The honest answer is the one that fits your keyboard, your body, and your routine. A good stand is not the fanciest one. It is the one you forget about while playing because nothing hurts and nothing wiggles.
Real-World Experiences and Lessons From Adjusting Keyboard Stands
One of the funniest things about keyboard stands is that almost everyone assumes setup will take thirty seconds, right up until it takes twenty minutes and a small identity crisis. In real life, adjusting a keyboard piano stand is usually a game of tiny corrections. You lower it a notch, sit down, play a chord, frown thoughtfully, raise it again, move the bench, test the pedal, and suddenly you are acting like an ergonomics detective with a very specific case file.
A common experience with X-frame stands is discovering that the height you thought looked right is not the height that feels right. Many players set the stand visually, place the keyboard on top, and only then realize their knees are making contact with the center brace every time they shift position. That is especially common with seated players using smaller X-stands at lower settings. The lesson is simple: always sit down and physically test the position before declaring victory.
Another real-world issue is bounce. A stand may feel stable when you gently tap a few keys, but energetic playing tells the truth. Fast octave passages, left-hand accents, or enthusiastic chord stabs can expose a stand that flexes more than expected. Players with 88-key digital pianos often notice this on lighter single-X stands. The practical takeaway is that “technically holds the keyboard” is not the same as “feels solid while playing.” Stability during performance matters more than stability during polite tapping.
Table-style stands tend to earn praise from people who are tired of fighting for knee room. Once a player switches from an X-frame to a table stand, the extra space underneath often feels like moving from economy to business class. There is more room for legs, more room for pedals, and usually less interference from center braces. That can be especially helpful for adult beginners, taller players, or anyone practicing for long periods and needing a setup that does not gradually annoy every joint in the body.
There is also the classic uneven-floor surprise. At home, the stand may feel flawless. At a church, coffee shop, school stage, or rehearsal room, the same stand suddenly wobbles like it drank three espressos. This is where adjustable feet, leveling screws, or even a quick repositioning on a flatter patch of floor can save the day. Experienced players learn to test the stand after it is fully loaded, not just when it is empty, because the keyboard’s weight can reveal movement that was easy to miss before.
Perhaps the most valuable experience players report is that comfort improves performance more than they expected. Once the keyboard is at the right height, wrists stop fighting, shoulders settle, and practice feels longer in a good way, not a painful one. You focus more on timing, phrasing, and sound because your body is not constantly sending complaint letters. In other words, a properly adjusted stand does not just support the keyboard. It supports better playing.
Conclusion
Learning how to adjust a keyboard piano stand is one of those small skills that makes a big difference. With an X-frame stand, focus on height, locking security, centered support, and bounce control. With a table stand, pay attention to height, width, leveling feet, and legroom. In both cases, build the setup around your body and your keyboard, not around guesswork.
The best setup is stable, comfortable, and easy to repeat. When your forearms are in a natural position, your wrists stay neutral, your shoulders remain relaxed, and your pedals are within easy reach, you are in business. Not glamorous business, perhaps. No dramatic spotlight. No stadium applause. But definitely the kind of business where your keyboard stays put and your back does not send passive-aggressive messages later.
Take a few extra minutes to get the stand right. Your technique, your comfort, and your future self will be grateful.