Table of Contents >> Show >> Hide
- Quick Safety Note (Because Gravity Doesn’t Care)
- Tools and Materials Checklist
- Before You Start: Pick the Right Felt for Your Shed
- Step-by-Step: How to Attach Roof Felt on a Shed in 15 Steps
- Step 1: Choose a dry day and check the forecast
- Step 2: Measure the roof and plan your layout
- Step 3: Strip old felt and fix the deck
- Step 4: Clean and prep the surface
- Step 5: Install drip edge (highly recommended)
- Step 6: Decide if you need extra protection at eaves/valleys
- Step 7: Snap a chalk line for a straight first course
- Step 8: Roll out the first course along the eave
- Step 9: Fasten the felt correctly (and don’t “overkill” it)
- Step 10: Overlap the next course properly
- Step 11: Detail the rakes (edges) so wind can’t peel your felt
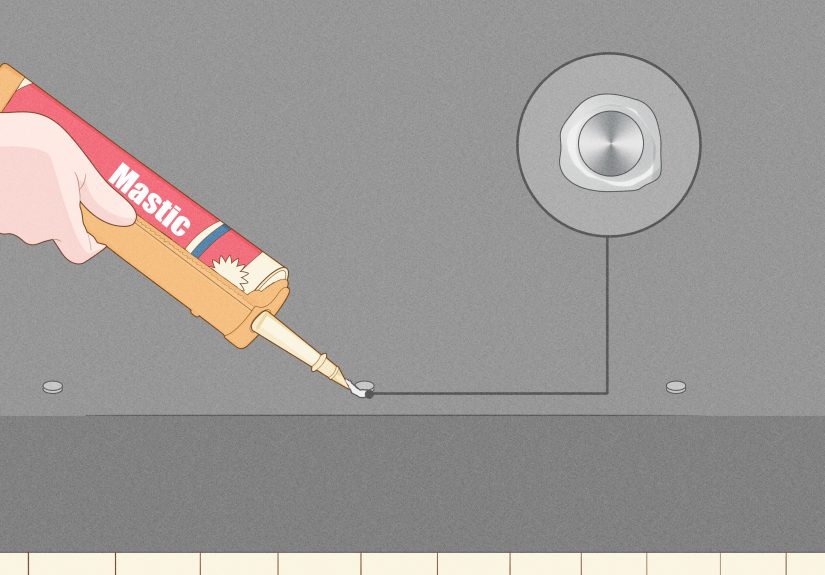
- Step 12: Cut around penetrations and seal smartly
- Step 13: Add the ridge treatment (for gable roofs)
- Step 14: If felt is your final roof covering, cement seams and edges
- Step 15: Final inspection and “leak-proofing” checks
- Common Mistakes (So You Don’t Recreate Them Like a Tradition)
- FAQ
- Real-World Lessons: What People Wish They Knew Before Felting a Shed Roof (Extra Experience Section)
- Conclusion
A shed roof is basically a hat for your stuff. And roof felt? That’s the “raincoat layer” that helps your shed stay dry when the weather decides to get dramatic.
Whether you’re re-felting an older shed or finishing a brand-new roof deck, doing this right is the difference between “nice weekend project” and
“why is my rake floating in a puddle?”
In this guide, you’ll learn how to attach roof felt in 15 clear, beginner-friendly stepsplus pro tips on overlaps, fasteners, edges, and ridges.
I’ll also cover the two most common shed scenarios:
(1) felt as a weather barrier under shingles, and (2) mineral-surfaced roll felt as the final roof covering (common on sheds).
Quick Safety Note (Because Gravity Doesn’t Care)
Even small sheds can cause big injuries. Wear grippy shoes, use a stable ladder, and avoid working in wind or rain.
If your shed roof is steep, consider a safety harness or at least a helper to play “spotter” instead of “I’ll call 911 later.”
Tools and Materials Checklist
- Roof felt (asphalt-saturated felt or synthetic underlayment) or mineral-surfaced roll roofing for shed tops
- Cap nails (recommended for synthetic) or galvanized roofing nails (for traditional felt/roll roofing)
- Hammer or roofing nailer (optional), utility knife with sharp blades
- Chalk line, tape measure, straightedge
- Drip edge (metal flashing) for eaves/rakes (highly recommended)
- Roof cement / asphalt mastic (especially for roll roofing seams and edge sealing)
- Tin snips (for drip edge), gloves, and a small hand broom
Before You Start: Pick the Right Felt for Your Shed
Traditional asphalt felt (#15 or #30)
Budget-friendly and common. It tears more easily than synthetic, especially if you yank it around in cold weather.
Great as an underlayment; also used in multi-layer shed roofing systems.
Synthetic underlayment
Stronger, lighter, and often safer to walk on. Most manufacturers specify cap fasteners (cap nails/cap staples) to prevent pull-through.
If your shed roof might be exposed for a while before shingles go on, synthetic usually tolerates that betterwithin its rated exposure window.
Mineral-surfaced roll roofing (common “shed felt” top layer)
If your shed roof finish is felt (not shingles), you’re likely using mineral-surfaced roll roofing.
This is designed to be the outermost layer and typically needs careful seam placement and roof cement at vulnerable edges.
Step-by-Step: How to Attach Roof Felt on a Shed in 15 Steps
Step 1: Choose a dry day and check the forecast
Felt goes down best when the deck is dry and the wind isn’t trying to turn your underlayment into a kite.
If you can’t comfortably lay a sheet of paper on the roof without it flying away, reschedule.
Step 2: Measure the roof and plan your layout
Measure the shed roof length and slope height. Plan to install from the lowest edge (eave) upward so every overlap sheds water “shingle-style.”
Fewer seams = fewer leak opportunities, so plan long runs when possible.
Example: On an 8×10 shed with a simple slope, you might only need a few courses. On a gable roof, you’ll run courses up both sides and finish at the ridge.
Step 3: Strip old felt and fix the deck
Remove old felt, nails, staples, and any loose debris. Replace rotted or delaminated plywood/OSB.
Felt can’t “heal” bad deckingif the base is soft, the roof will fail early and rudely.
Step 4: Clean and prep the surface
Sweep the roof deck. A gritty deck can telegraph bumps through felt and reduce adhesion where you use roof cement.
If the deck is resinous or dusty, a quick brush-off makes a bigger difference than people expect.
Step 5: Install drip edge (highly recommended)
Drip edge helps water leave the roof cleanly instead of curling under and rotting your fascia. The common best-practice approach is:
drip edge under the underlayment at the eaves and over the underlayment at the rakes.
Overlap drip edge pieces in the direction water flows. Fasten per product guidance (often every 8–12 inches).
Step 6: Decide if you need extra protection at eaves/valleys
Many sheds don’t have valleys, but if yours does (or if you’re in a snow/ice region), consider a self-adhered waterproof barrier along the eaves
and in valleys before felt goes down. It’s cheap insurance in the exact places water loves to bully your roof.
Step 7: Snap a chalk line for a straight first course
A crooked first course makes every course above it look like it’s slowly drifting into the neighbor’s yard.
Snap a line parallel to the eave so your felt runs straight and your overlaps stay consistent.
Step 8: Roll out the first course along the eave
Start at the lowest edge. Let the felt overhang slightly (commonly about 1/4–1/2 inch) unless your drip edge/roofing system specifies otherwise.
Keep it flatwrinkles can channel water and create weak spots.
Step 9: Fasten the felt correctly (and don’t “overkill” it)
Use fasteners suited to your material:
- Synthetic underlayment: cap nails/cap staples are commonly recommended to prevent tearing and pull-through.
- Traditional felt: galvanized roofing nails often work well; caps are still a great upgrade on windy sites.
Drive fasteners flushnot angled, not cratered, not sticking up like tiny hazards.
Place more fasteners on edges and overlaps, fewer in the field (follow your product’s nailing pattern if provided).
Step 10: Overlap the next course properly
Overlaps matter because water will absolutely exploit shortcuts.
A common rule of thumb is at least 2 inches of horizontal lap and about 4 inches at end laps,
with larger overlaps on lower-slope roofs or where manufacturers specify.
Stagger end seams so you don’t stack them in a vertical “leak highway.”
Step 11: Detail the rakes (edges) so wind can’t peel your felt
Along the sloped side edges (rakes), keep felt tight and well-fastened. If you installed drip edge at the rake,
the felt commonly runs beneath it or is covered by it depending on the sequence you choseeither way, aim for “shingle fashion” water flow.
Wind is the villain here. Extra fasteners near edges and clean folding/trimming go a long way.
Step 12: Cut around penetrations and seal smartly
If your shed roof has vents, pipes, or odd hardware, cut the felt neatly around them.
Avoid giant gaps. Use compatible flashing and a modest amount of roof cement where appropriatethink “sealed,” not “tar sculpture.”
Step 13: Add the ridge treatment (for gable roofs)
For a gable shed roof, you’ll meet at the ridge. Run felt up both sides.
Then install a ridge cap strip of felt/roll roofing that covers the peak, centered, and fastened on both sides.
Place the ridge lap away from prevailing winds when possible.
Step 14: If felt is your final roof covering, cement seams and edges
If you’re installing mineral-surfaced roll roofing (the typical “shed felt” top layer), treat seams like they’re guilty until proven waterproof:
- Use roof cement under laps where specified by the roll roofing system.
- Keep laps facing away from prevailing wind when you can.
- Seal exposed nail heads on the top surface if the system calls for it.
- Don’t place seams where water concentrates (near low points or against a wall).
Step 15: Final inspection and “leak-proofing” checks
Walk the roof carefully and look for:
- Wrinkles or bubbles that could trap water
- Fasteners not driven flush
- Loose edges (especially at rakes/eaves)
- End laps lined up in a column (move or reinforce them)
- Unsealed cuts around penetrations
If shingles will go over this, keep the felt intact and dry until the final roofing goes on.
If felt/roll roofing is the final layer, consider a gentle hose test (not a pressure washerthis isn’t a driveway).
Common Mistakes (So You Don’t Recreate Them Like a Tradition)
Installing upside-down overlaps
If your overlaps face the wrong way, you’ve basically installed a system designed to funnel water inward. Always work bottom-to-top.
Stapling without caps on synthetic underlayment
Synthetic is strong, but fasteners can still tear through in wind. Caps spread the load and reduce failures.
Skipping drip edge “because it’s just a shed”
Sheds still rot. Drip edge is one of the cheapest upgrades for the longevity of your roof edges and fascia.
Not adjusting for low-slope roofs
Lower slopes shed water more slowly, so you generally need better overlap discipline and more attention to vulnerable edges.
If your shed is close to flat, consider whether a different roofing system (like a self-adhered membrane) is more appropriate.
FAQ
How many layers of felt should a shed roof have?
If felt is under shingles: typically one layer of underlayment (plus any required ice/water barrier in specific zones).
If felt/roll roofing is the final covering: many systems use base + cap or reinforced detailing at edges and ridge.
Follow the product instructions for your specific roll roofing.
Should I use #15 or #30 felt?
#30 is thicker and more tear-resistantoften a good idea on sheds that see wind, branches, or lots of foot traffic during installation.
#15 can work as underlayment in milder conditions, but it’s easier to damage if you’re not careful.
Can I felt a shed roof in cold weather?
You can, but materials may be stiffer and more prone to cracking or wrinkling. Keep rolls stored in a warmer space before installation,
and be extra gentle when unrolling and fastening.
Real-World Lessons: What People Wish They Knew Before Felting a Shed Roof (Extra Experience Section)
The first thing most DIYers learn is that roof felt has two personalities: calm, cooperative, and easyright up until the moment a breeze shows up.
Then it becomes a full-size sail with an attitude. The “experience lesson” here is simple: stage your materials. Pre-cut what you can. Keep a few
cap nails or roofing nails in your pouch so you can tack corners quickly before the wind invents new problems.
Another common experience: the roof deck tells on you. People assume felt will hide minor bumps, but it’s more like a mirror than a blanket.
If your deck has raised nail heads, swollen OSB edges, or a plywood corner that’s lifting, the felt will telegraph itand that bump is where water
can sit, seams can lift, and your “quick job” becomes a repeat performance. Taking ten minutes to flatten, replace, or re-fasten decking feels boring
in the moment, but it’s one of the biggest quality upgrades you can make.
Overlaps are where real-life roofs win or lose. On paper, “overlap a few inches” sounds casual. In reality, overlaps are your roof’s drainage system.
People who’ve had to re-do a shed roof after a storm tend to remember two things forever: always overlap so water flows over, not under, and never
stack end seams into a vertical line. Seams aligned above each other create a tidy little path for water to travel, and water loves tidy.
If you’re using mineral-surfaced roll roofing as the final top layer (classic shed felt), the lived-in wisdom is that edges and ridges deserve extra love.
Most shed leaks start at the perimeter: the eaves where runoff is constant, the rakes where wind tries to peel materials back, and the ridge where two
slopes meet and temperature swings are harsh. People who’ve done this a few times will often use roof cement carefully at critical seams and pay attention
to nail placement so fasteners aren’t sitting in the direct “water lane.” It’s not about slathering tar everywhere; it’s about putting reinforcement where
the roof is most likely to get bullied.
Then there’s the “sharp blade” lesson. DIYers regularly start with a fresh utility knife blade, feel unstoppable, and thenhalfway throughwonder why the
felt is tearing instead of cutting. Felt dulls blades fast. Swapping blades mid-project is not a sign of weakness; it’s a sign you enjoy clean cuts and
not shouting at building materials.
Finally, the best experience-based tip is embarrassingly simple: slow down for the first course. If the first run is straight, tight, and well-fastened,
everything above it goes faster and looks better. If the first run is crooked, you’ll spend the rest of the day “correcting” it, which is a polite way
of saying “inventing creative trim shapes to hide mistakes.” When people say roofing is 80% prep, they’re not being poetic. They’re being haunted.
Conclusion
Attaching roof felt to a shed isn’t complicatedbut it is picky. Get the deck solid, run courses from the bottom up, respect overlaps, fasten correctly,
and detail edges and ridges like they’re the VIP section of your roof (because they are).
Do it once, do it right, and your shed will stay dry, sturdy, and blissfully free of surprise indoor puddles.