Table of Contents >> Show >> Hide
- What Is a Spaghetti Bridge and Why Build One?
- Before You Start: Rules, Safety, and Materials
- Step 1: Choose a Bridge Design and Sketch It
- Step 2: Build Strong Spaghetti Trusses
- Step 3: Add the Deck and Cross-Bracing
- Step 4: Let the Bridge Cure Completely
- Step 5: Test Your Spaghetti Bridge
- Troubleshooting: Why Did My Spaghetti Bridge Break So Fast?
- Fun Variations and Classroom Activity Ideas
- Real-World Lessons from a Pile of Broken Pasta
- Experience Corner: Lessons from Building Spaghetti Bridges
- Conclusion
Dry spaghetti snaps if you look at it funny, so the idea of building a bridge out of it sounds about as sensible as making a car out of potato chips. And yet, students all over the world build spaghetti bridges that can hold stacks of textbooks, sand buckets, and even hundreds of pounds of weight in formal competitions.
This guide walks you through how to build a spaghetti bridge step by step. You can follow it for a science fair, a classroom STEM challenge, or a just-for-fun experiment at home. We will talk about design ideas, materials, gluing techniques, testing, and even how to capture “with pictures” moments for a wikiHow-style tutorial of your own.
What Is a Spaghetti Bridge and Why Build One?
A spaghetti bridge is a scale model bridge built from uncooked pasta (usually spaghetti) and some kind of adhesive such as white glue, wood glue, or hot glue. The finished structure spans a fixed gap and is tested by adding weight until it breaks. The winner in contests is usually the bridge that carries the most load relative to its own weight.
Why do teachers and engineers love this project so much?
- It turns abstract physics into something you can hold. You can literally see where forces travel and where things fail.
- It uses the engineering design process. You define the problem, brainstorm, design, test, and iterate.
- It is inexpensive and classroom-friendly. Spaghetti and glue are way cheaper than steel and concrete.
- It’s a competition people remember. Famous spaghetti bridge contests (like those at Okanagan College and universities) have been running for decades.
Translation: you get to make a huge mess, break things on purpose, and call it “STEM learning.”
Before You Start: Rules, Safety, and Materials
Check Your Competition Rules First
If you are building for a formal spaghetti bridge competition, read the rules like a lawyer reads fine print. Different contests specify:
- Span length – Common spans are 50–100 cm (20–40 inches).
- Allowed materials – Usually regular spaghetti and a specific glue only. No tape, wires, or sneaky toothpicks.
- Maximum bridge weight – Often under 250–750 grams, including any loading plate or hooks.
- Maximum height or depth – To keep designs realistic, contests often limit overall height (for example, 50 cm).
- How loads are applied – Some use a central hanging bucket; others use distributed weights on top.
Your design should fit comfortably inside these boundaries. There is nothing worse than building a gorgeous, record-breaking bridge that gets disqualified because it is 1 cm too tall.
Basic Materials and Tools
For a home or classroom project, you can keep it simple. Most activity guides recommend some variation of the list below.
- 1–2 boxes of dry spaghetti (regular round type, not flat noodles)
- Glue: white glue, wood glue, or low-temperature hot glue sticks
- Wax paper or plastic wrap (to protect your templates and table)
- Graph paper and pencils for your design
- Ruler or measuring tape
- Small clamps or clothespins (optional but helpful for holding joints while they dry)
- Hobby knife or scissors (to cut spaghetti pieces)
- Two supports like chairs, desks, or stacks of books to serve as “river banks”
- Weights for testing: coins in a cup, small sandbags, or a bucket you can fill gradually
Safety Tips
- Use low-temp hot glue with younger kids and supervise closely.
- Keep fingers away from knife blades while trimming spaghetti.
- During testing, stay clear of the area under the bridge. When it fails, pieces can fly.
- Clean up broken spaghetti promptly so nobody skids across the room on stray noodles.
Step 1: Choose a Bridge Design and Sketch It
You do not need to be a civil engineer to design a spaghetti bridge, but stealing ideas from civil engineers is highly encouraged.
Think in Triangles and Trusses
Real bridges rely on shapes that resist bending, especially triangles. That is why many educational resources and competition guides recommend truss bridgesthink of patterns like Pratt, Warren, or Howe trusses, which are basically rows of interconnected triangles.
A few beginner-friendly options:
- Simple beam bridge: A flat deck with reinforcing “girders” underneath. Easy to build, but not the strongest.
- Warren truss bridge: Repeating equilateral triangles along the side. Very popular in contests.
- Pratt or Howe truss: Triangles with vertical members and diagonal bracing. Great for learning about tension and compression.
- Arch or A-frame bridge: Curved or triangular top chords that echo the bending moment shapeadvanced but efficient.
Draw Your Bridge to Scale
On graph paper, draw one side view of your bridge at full scale. If your span is 50 cm, your drawing should show 50 cm from one support to the other. Then:
- Mark the positions of supports, top chord, bottom chord, and verticals.
- Fill the space with evenly sized triangles.
- Count how many spaghetti pieces each member will requireremember, you can bundle several strands for extra strength.
Once you like the design, tape your drawing to a board and cover it with plastic wrap or wax paper to protect it from glue. This will become your construction template.
Step 2: Build Strong Spaghetti Trusses
Your side trusses are the backbone of the entire bridge, so give them some love.
Bundle Spaghetti for Strength
Spaghetti is much stronger along its length than across it. Many guides suggest gluing 2–6 strands together to create thicker “members” and using more strands in high-stress areas like the top and bottom chords.
- Pre-build bundles: Lay several strands side by side on wax paper, add a thin bead of glue, and gently press them together. Keep them straight while they dry.
- Cut to length: Once cured, trim the bundled pieces to match your template dimensions.
- Label your parts: Use a pencil on the wax paper or sticky notes so you know which pieces go where.
Assemble Each Truss on the Template
- Place the bottom chord bundle along the span line of your template.
- Glue on verticals and diagonals, matching your triangle pattern.
- Finish with the top chord bundle, making sure each joint is fully glued.
- Use small weights or clothespins to hold pieces in place while the glue dries.
Try to keep glue joints neat. Extra glue adds weight but not always strength, and some competitions score bridges based on the load-to-weight ratio.
Build two identical trusses. Imagine you’re making a left and right wall for your bridge.
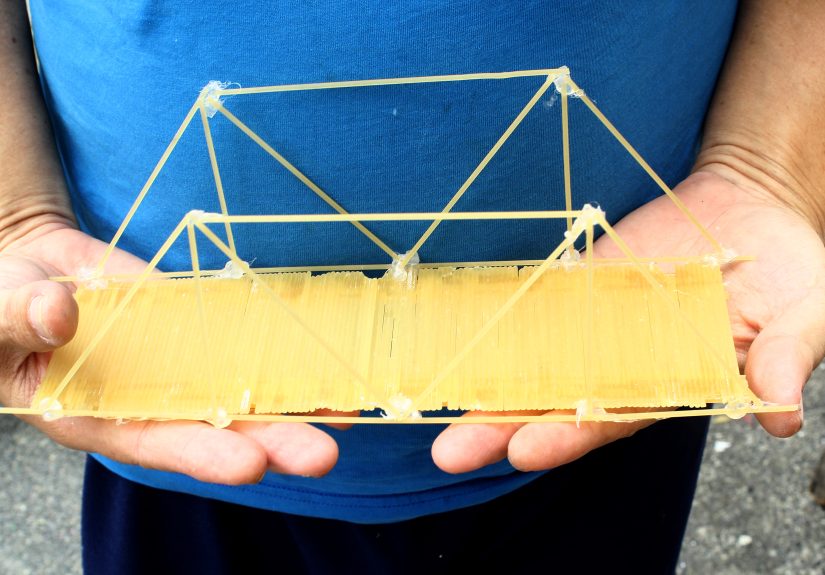
Step 3: Add the Deck and Cross-Bracing
Now it is time to turn two flat trusses into a 3D bridge.
Set Up Your “River Banks”
Place two stools, boxes, or stacks of books the required distance apart. These represent the edges of your gorge, river, lava pit, or whatever dramatic backstory you’ve invented for your bridge.
- Carefully stand each truss upright with its ends resting on the supports.
- Use temporary supports (books or blocks) to keep them parallel.
Glue the Deck
- Lay spaghetti bundles across from one truss to the other to form the deck.
- Glue each deck member at both ends where it meets the trusses.
- Add additional longitudinal pieces along the deck to stiffen it, especially where weight will be applied.
Add Top and Bottom Cross-Bracing
Just like a ladder needs rungs, your bridge needs cross-bracing:
- Bottom cross-braces: Diagonal pieces connecting the bottoms of the trusses keep them from spreading apart.
- Top cross-braces: Short diagonals linking the tops help prevent twisting.
Many competition and classroom guides stress the importance of this “out-of-plane” bracingwithout it, bridges often fail by twisting, even if the side trusses are strong.
Step 4: Let the Bridge Cure Completely
This is the hardest step: doing nothing.
White or wood glue can take 12–24 hours to reach near-full strength, depending on humidity and how thickly you applied it. Place the bridge somewhere safe where pets, siblings, and rogue soccer balls cannot reach it. If you test too early, you might be measuring “half-cured glue strength” instead of true design strength.
Use the wait time to prepare your test rig and, if you want that authentic “with pictures” vibe, set up your camera or phone tripod for documenting the destruction.
Step 5: Test Your Spaghetti Bridge
Time for the most dramatic part: seeing how much your bridge can hold before it fails.
Set Up a Testing Station
- Place your supports the correct distance apart and set the bridge on top.
- Check that only the ends of the bridge touch the supportsno sneaky center supports allowed.
- Place a loading plate, hook, or small container at the specified loading point (usually the center of the span).
Add Weight Gradually
- Start with a small weight to make sure everything is stable.
- Add weight in small incrementscoins, metal washers, water in a bucket, or sand.
- Record the total weight after each increment.
Watch for signs of distress: cracking sounds, sagging, or joints that start to open. Eventually, the bridge will fail. In competitions, bridges are loaded “to destruction,” meaning you keep going until something snaps.
Calculate Performance
If you want to get nerdy (highly recommended), calculate:
- Maximum load carried (weight at failure).
- Bridge weight (measure before testing).
- Efficiency = load carried ÷ bridge weight.
A high-efficiency bridge carries many times its own weight. Some contest champions have held hundreds of kilograms while weighing less than a kilogram themselves.
Troubleshooting: Why Did My Spaghetti Bridge Break So Fast?
Every broken bridge is a free engineering lesson. Here are common failure modes and what they usually mean.
- Top chord buckled (crumpled on top): Compression failure. Next time, use thicker bundles or make the truss taller so forces are spread out.
- Bottom chord snapped in the middle: Tension failure. Add more strands to the bottom chord, or adjust the truss so the bottom is not carrying so much tension.
- Joints peeled apart: Weak glue connections. Make sure joints have full glue contact and are completely dry. Avoid giant blobs that only stick to one side.
- Bridge twisted sideways: Not enough cross-bracing. Add diagonals between trusses on top and bottom.
- Random piece snapped for no reason: Spaghetti is a natural product; some strands just have hidden flaws. Designing with redundancy (more than one load path) helps.
Many competition tips also emphasize keeping your design simple and symmetrical, minimizing unnecessary members, and using just enough glue to make strong joints without adding excess weight.
Fun Variations and Classroom Activity Ideas
Once you master the basic spaghetti bridge, you can mix things up to keep students engaged. Many STEM programs and teacher guides suggest variations such as:
- Time-limited challenge: Give teams 30–45 minutes and a fixed number of spaghetti pieces. See how constraints spark creativity.
- Different connectors: For younger students, use mini marshmallows or modeling clay as joints instead of glue. It’s less precise but very visual and hands-on.
- Theme bridges: Assign real-world inspirations like “mountain canyon bridge” or “city highway overpass” to connect with actual civil engineering examples.
- Data-driven redesign: Have students build, test, collect data, then redesign based on what failed. This mirrors professional engineering practice.
- Photo and video documentation: Encourage students to capture each build step and failure in photos, then turn them into a wikiHow-style “with pictures” guide as a final project.
Real-World Lessons from a Pile of Broken Pasta
Believe it or not, your noodle contraption connects to serious engineering concepts:
- Statics and forces: How loads move through members and into supports.
- Material behavior: Spaghetti’s tension and compression limits may be low, but they behave like those of real materials at a smaller scale.
- Trade-offs: Making a bridge stronger usually means more materialand more weight. You learn to balance strength and efficiency.
- Iteration: Rarely does the first design win. Real engineers test, fail, tweak, and try again.
- Teamwork and communication: On group builds, success depends on how well people share ideas and divide tasks, not just on who can wield the glue gun fastest.
In other words, a spaghetti bridge is a tiny, crunchy version of real civil engineering.
Experience Corner: Lessons from Building Spaghetti Bridges
After you build one spaghetti bridge, you understand the steps. After you build three or four, you start to understand the behavior. Here are some experience-based insights that tend to show up once you have broken a few dozen pasta structures.
1. Pictures Reveal What Your Eyes Miss
Taking photos at each stage is not just for making a wikiHow-style tutorial; it is also a sneaky diagnostic tool. When you review close-up shots of your joints, you see messy glue blobs, tiny gaps between bundled strands, or braces that are slightly crooked. Those small imperfections often become the exact locations where the bridge fails under load. By comparing “before testing” pictures with “after failure” photos, you can literally circle the weak spots and improve your next design.
2. Symmetry Is Your Silent Best Friend
On paper, it might seem fun to experiment with asymmetrical shapes, especially if you are going for a dramatic artistic effect. In practice, experienced builders learn fast that symmetry is your friend. When both sides of the bridge mirror each other, loads distribute more evenly. Bridges that are even slightly lopsided tend to twist as soon as weight is added, which means they fail early for reasons that have nothing to do with the strength of the main truss.
3. The “Ugly but Strong” Phase Is Real
Many students go through an “ugly but strong” phase where the bridge is sturdy but looks like it lost a fight with a glue factory. That’s okay. Over time, builders learn to apply glue more carefully, use smaller joints, and pre-plan how members come together so that the structure is both efficient and visually clean. Looking back at early builds can be encouragingyou can clearly see how your craftsmanship improves from one project to the next.
4. Failure Sounds, Not Just Looks
With experience, you start to hear failure before you see it. Bridges often give warning signs in the form of tiny cracking sounds as individual spaghetti strands fracture or joints begin to peel. During testing, pausing after each weight increment and just listening teaches students to be careful observers. That awareness is similar to how real engineers use sensors and monitoring systems to catch issues in full-scale bridges before they become major problems.
5. Iteration Beats Inspiration
The first design is usually based on inspirationsomething you saw online, a diagram from a textbook, or a classic Warren truss sketch. Later designs are based on data. Students start saying things like, “The last bridge failed where the top chord met the diagonal, so let’s double that joint,” or “We used too much glue in the center; let’s trim weight there and reinforce near the supports instead.” This mindset shiftfrom copying a layout to refining a tested ideais exactly how professional engineering projects evolve.
6. Team Dynamics Matter as Much as Design
Another pattern that emerges with repeated builds is the impact of team roles. Groups that naturally divide tasksone person sketching, one cutting, one gluing, one documentingtend to produce cleaner, stronger bridges than teams where everyone grabs spaghetti and improvises. Adding a “photographer” role for capturing each step (and the final failure) can also help students feel involved, especially if they are nervous about using tools or glue.
7. The Real Win Is Curiosity
The most powerful experience from spaghetti bridge projects is not holding a trophy; it is the moment when someone sees their bridge fail and says, “Wait, why did it break there?” That question leads to discussions about compression, tension, shear, and material limits. Students who may have started the project just for fun often leave with a genuine curiosity about civil engineering, architecture, or physics. That kind of curiosity is the real bridge being builtone between everyday life and the world of engineering.
So whether your spaghetti bridge holds a mountain of weight or collapses under the first textbook, you gain something valuable: hands-on experience with design, failure, and improvement. Take lots of pictures, keep your old sketches, and treat every broken strand of pasta as a note for your next, better bridge.
Conclusion
Building a spaghetti bridge is part science experiment, part art project, and part friendly competition. You sketch a design, bundle noodles into beams, glue them into trusses, add cross-bracing, let everything cure, then slowly load your creation until it failsideally in a dramatic but educational way. Along the journey, you learn how real bridges work, how forces move through structures, and how small changes in design can make a big difference in strength.
Whether you are preparing for a school contest, designing a classroom STEM unit, or just testing how strong pasta can be, the process offers endless chances to experiment and improve. And if you document each step “with pictures,” you will not only have great evidence of your engineering skillsyou might just inspire the next builder to pick up a box of spaghetti and start designing.
SEO META DATA


