Table of Contents >> Show >> Hide
- BIOS vs. UEFI: What You’re Actually Changing
- Before You Start: A Quick Safety Checklist
- How to Enter BIOS/UEFI on a Windows PC
- How to Navigate BIOS/UEFI Without Accidentally Summoning Chaos
- Common BIOS Settings You Might Actually Want to Change
- 1) Change Boot Order (Example: Boot from USB to Install Windows)
- 2) Enable Virtualization (VT-x / AMD-V / SVM)
- 3) Enable TPM 2.0 (Trusted Platform Module)
- 4) Enable or Disable Secure Boot
- 5) Enable XMP/EXPO (RAM Profile) Carefully
- 6) Fan Curves, Thermal Modes, and Power Settings
- 7) Small-but-Useful Settings: Time, Storage Mode, and Peripherals
- Save, Exit, and Confirm Your Changes in Windows
- Troubleshooting: When BIOS Changes Don’t Go as Planned
- Best Practices (So You Don’t Have to Learn the Hard Way)
- Conclusion
- Real-World Experiences: What It’s Like Changing BIOS Settings
The BIOS (or, more accurately on most modern PCs, UEFI) is the behind-the-scenes “control room” that wakes up your hardware, checks that everything is alive, and decides what to boot. Think of it like your PC’s pre-flight checklistexcept instead of a pilot’s calm voice you get a blue/gray screen, cryptic options, and a keyboard that suddenly feels like it’s wearing oven mitts.
Changing BIOS settings can solve real problems (booting from a USB drive, enabling virtualization for WSL2/Hyper-V, turning on TPM 2.0, adjusting fan curves), but it can also create new ones if you flip switches at random like you’re on a game show. This guide walks you through getting into BIOS/UEFI safely, changing common settings, and getting back to Windows without sweating through your shirt.
BIOS vs. UEFI: What You’re Actually Changing
People still say “BIOS,” but most Windows PCs from the last decade use UEFI firmware. Functionally, you’re doing the same kind of work: controlling startup behavior, security features, and hardware-level options before Windows loads. UEFI usually supports mouse input, prettier menus, and modern boot/security features like Secure Boot. Older “Legacy BIOS” menus are text-heavy and strictly keyboard-driven.
You don’t need to memorize the difference to change settings, but you should know this: firmware settings affect whether Windows can boot. That’s why we’ll move carefully, change only what you need, and keep an escape plan (a.k.a. “Load Defaults”).
Before You Start: A Quick Safety Checklist
- Save your work and close anything important. You’ll be restarting.
- Know your goal (boot from USB, enable virtualization, turn on Secure Boot, etc.). Don’t wander.
- Write down current settings you touch (or take a photo with your phone). Future-you will be grateful.
- If BitLocker is enabled, be prepared: some firmware changes can trigger recovery prompts. Make sure you can access your recovery key if needed.
- Change one thing at a time, then boot into Windows and verify it worked.
How to Enter BIOS/UEFI on a Windows PC
You’ve got three main ways to get into BIOS/UEFI. Pick the method that fits your situation and your patience level.
Method 1: Enter UEFI Firmware Settings from Windows (Windows 11/10)
This is the cleanest option when Windows boots normallyno frantic key-mashing required.
- Open Settings.
- On Windows 11: go to System → Recovery. Find Advanced startup and choose Restart now.
- On the blue menu: choose Troubleshoot → Advanced options → UEFI Firmware Settings.
- Select Restart. Your PC will reboot straight into firmware setup.
If you see “UEFI Firmware Settings,” you’re golden. If you don’t, your PC may be set to legacy mode, or the firmware may not expose that shortcut. In that case, use the startup key method below.
Method 2: Use the BIOS Key During Startup (The “Tap Dance” Method)
This works even if Windows won’t bootassuming your keyboard timing is better than your morning coffee skills.
- Shut down the PC completely (don’t just restart if Fast Startup is being weird).
- Turn it on and immediately start tapping the setup key repeatedly.
- If you see a boot logo, keep tapping until the setup screen appears.
Common BIOS/UEFI keys by brand:
- Dell: F2 for Setup, F12 for one-time boot menu
- HP: Esc for Startup Menu, then F10 for BIOS Setup
- Lenovo: F1/F2 (varies), sometimes a Novo button on laptops
- ASUS: F2 or Delete
- Acer/MSI/Gigabyte (common patterns): F2 or Delete
Laptop note: some models require Fn + F2 (because laptop manufacturers enjoy making simple things exciting). If tapping doesn’t work, try holding Fn while tapping the function key.
Method 3: Use the One-Time Boot Menu (When You Don’t Want to Commit)
If your goal is to boot from a USB drive just once (installer, recovery tools), use the boot menu instead of changing permanent boot order. It’s usually F12 (Dell) or Esc (many systems), but your splash screen may tell you.
How to Navigate BIOS/UEFI Without Accidentally Summoning Chaos
Most firmware interfaces have the same patterns:
- Arrow keys move through menus; Enter selects; Esc goes back.
- F10 often means “Save and Exit.”
- You’ll usually find a Save & Exit tab/menu and a Load Defaults option.
- Some UEFI screens have an “EZ Mode” and an “Advanced Mode.” If you can’t find a setting, switch to Advanced.
Common BIOS Settings You Might Actually Want to Change
Here are the most useful settings, what they do, and how to change them without turning your PC into a decorative paperweight.
1) Change Boot Order (Example: Boot from USB to Install Windows)
Boot order decides which device your PC tries first: your SSD, a USB drive, a DVD drive, or the network. If you’re installing Windows or running diagnostics, you may need USB at the toptemporarily or permanently.
- Enter BIOS/UEFI.
- Find the Boot menu/tab.
- Locate Boot Priority / Boot Order.
- Move USB Storage (or the specific USB device) above the internal drive.
- Save & Exit, then try booting.
Pro tip: If you only need USB once, prefer the one-time boot menu so you don’t forget later and wonder why your PC is desperately trying to boot from a USB mouse dongle.
2) Enable Virtualization (VT-x / AMD-V / SVM)
Want to run Hyper-V, WSL2, Android emulators, or certain virtual machine tools? You’ll likely need hardware virtualization enabled in firmware.
- Enter BIOS/UEFI.
- Look under Advanced, CPU Configuration, or Security.
- Enable the setting named something like:
- Intel Virtualization Technology (VT-x / VMX)
- AMD SVM (or AMD-V)
- Save and reboot into Windows.
To verify in Windows, check Task Manager (“Virtualization: Enabled”) or confirm your virtualization feature (Hyper-V/Virtual Machine Platform) can be turned on without errors.
3) Enable TPM 2.0 (Trusted Platform Module)
TPM 2.0 supports security features like BitLocker and is a requirement for Windows 11 on most systems. Sometimes the hardware is present but disabled in firmware.
- Enter BIOS/UEFI.
- Check under Security or Advanced.
- Enable TPM-related options, which may be labeled:
- TPM / TPM Device
- Intel PTT (Platform Trust Technology)
- Firmware TPM / fTPM (common on AMD systems)
- Save and reboot.
In Windows, you can verify TPM using the TPM management tool (search tpm.msc) or Windows Security device details.
4) Enable or Disable Secure Boot
Secure Boot is a firmware security feature designed to help ensure only trusted boot software loads at startup. Windows 11 leans on Secure Boot as part of its security baseline. Turning it on can also be required by some games with strict anti-cheat systems.
The catch: Secure Boot typically expects your system to use UEFI mode (not Legacy/CSM). If your firmware is set to Legacy/CSM and you flip to UEFI without prepping the disk layout, Windows may refuse to boot. So treat this setting with respect, like a sleeping cat on your keyboard.
- Enter BIOS/UEFI.
- Find Boot or Security settings.
- Set Boot Mode to UEFI (if applicable) and locate Secure Boot.
- Set Secure Boot to Enabled (or Disabled if troubleshooting compatibility).
- Save and reboot.
5) Enable XMP/EXPO (RAM Profile) Carefully
If your RAM is rated for faster speeds than it’s currently running, enabling XMP (Intel-oriented naming) or EXPO (common on AMD platforms) can improve performanceespecially in gaming and some productivity workloads.
- Enter BIOS/UEFI.
- Find Memory/Overclocking settings (names vary: AI Tweaker, OC, Extreme Tweaker, etc.).
- Select an XMP/EXPO profile (often “Profile 1” is the safer default).
- Save and reboot.
Important: XMP/EXPO is still a performance profile change. If your system becomes unstable, revert the setting or load defaults.
6) Fan Curves, Thermal Modes, and Power Settings
Many BIOS/UEFI setups offer fan profiles (Silent/Standard/Performance) or manual fan curves. If your PC sounds like a jet engine while checking email, a quieter profile can helpjust watch temperatures. On desktops, you may also see CPU power limits or “Smart Fan” settings.
7) Small-but-Useful Settings: Time, Storage Mode, and Peripherals
- Date/Time: Fixes clock drift if the system time is wrong.
- Storage controller mode: Options like AHCI/RAID may appeardon’t change this unless you know exactly why, because it can prevent Windows from booting.
- Integrated peripherals: Enable/disable onboard audio, Wi-Fi, Bluetooth, USB behavior, etc.
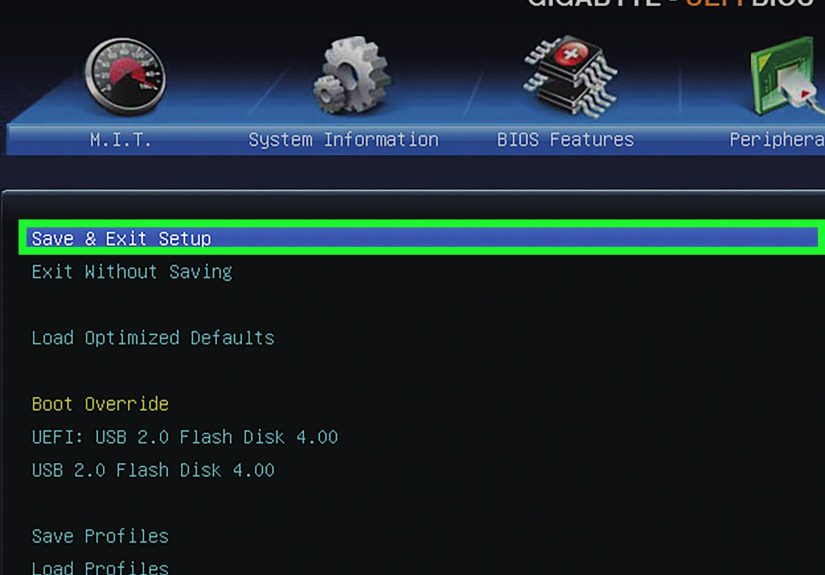
Save, Exit, and Confirm Your Changes in Windows
When you’ve made your change, use Save & Exit (often F10) and let the PC reboot. Once back in Windows:
- Confirm the behavior you wanted (USB boots, virtualization works, TPM is present, etc.).
- If you changed security-related settings, be ready for BitLocker recovery prompts (if enabled).
- Keep notes on what you changed, in case you need to reverse it later.
Troubleshooting: When BIOS Changes Don’t Go as Planned
Problem: You Can’t Enter BIOS (Windows Boots Too Fast)
Use Method 1 (Advanced startup → UEFI Firmware Settings). This bypasses the “blink-and-you-miss-it” boot window entirely.
Problem: The PC Won’t Boot After a Change
Don’t panic. Most of the time, you can recover.
- Wait a minute: some systems retrain memory after RAM profile changes and may reboot a few times.
- Re-enter BIOS and undo the last change (or choose Load Defaults).
- If you can’t get into BIOS normally:
- Look for a BIOS reset or Clear CMOS procedure specific to your system.
- On desktops, clearing CMOS may involve a motherboard jumper or removing the CMOS battery briefly (with power disconnected).
- After resetting, boot into Windows and re-apply changes more cautiously (one at a time).
Problem: Secure Boot/TPM Options Are Missing
Some settings only appear when the system is in UEFI mode, or after a firmware update. Also, menus vary wildly by manufacturer. If you can’t find a setting:
- Switch from “EZ Mode” to “Advanced Mode.”
- Check both Security and Advanced sections.
- Look for manufacturer-specific naming (PTT, fTPM, Firmware TPM).
Best Practices (So You Don’t Have to Learn the Hard Way)
- Change only what you need. BIOS is not a “see what happens” playground.
- One change per reboot makes troubleshooting dramatically easier.
- Use the boot menu for one-time boots instead of permanently changing boot order.
- Know your reset plan before experimenting with performance profiles like XMP/EXPO.
- When in doubt, defaults are your friend. “Load Optimized Defaults” exists for a reason.
Conclusion
Changing BIOS/UEFI settings on a Windows PC isn’t hardit’s just a little intimidating because the stakes feel higher than toggling a normal Windows setting. But if you enter firmware the safe way (Advanced Startup or the correct hotkey), change only what you intended, and keep a rollback option in mind, you can handle boot order tweaks, virtualization, TPM, Secure Boot, and performance profiles with confidence.
Real-World Experiences: What It’s Like Changing BIOS Settings
The first time most people enter BIOS, the emotional arc is basically: curiosity → confusion → mild dread → sudden respect for anyone who builds PCs for fun. You reboot, hammer a key like you’re trying to win a carnival game, and thenbamyou’re in a menu that looks like it was designed by someone who thinks “user-friendly” means “alphabetical order.”
One of the most common “why is this happening to me” moments is trying to boot from a USB drive. You create a perfectly good installer, plug it in, reboot… and Windows loads anyway, smug as ever. That’s when you discover the difference between changing permanent boot order and using a one-time boot menu. In real life, the boot menu is the hero: you tap the boot-menu key, pick your USB device, do your install or recovery task, and then your PC goes back to normal next reboot. No lingering mystery later when the computer pauses at startup searching for a USB drive that isn’t there (which always happens when you’re already late).
Virtualization is another classic. People install Docker, Android emulators, or try to enable WSL2, and suddenly Windows is throwing errors about virtualization features. The fix is usually simpleenable Intel VT-x or AMD SVM in firmwarebut the hunt can feel like a scavenger quest. On one system it’s under “Advanced,” on another it’s in “Security,” and on another it’s under “CPU Features” with a name that sounds like a sci-fi side character. The payoff is instant though: once you enable it and reboot, the same tools that refused to run will often behave like nothing ever happened.
Secure Boot and TPM changes tend to be the most nerve-wracking because they sit in that “security + bootability” category. In practice, the safest path is to read carefully and avoid flipping UEFI/Legacy modes casually. Plenty of people have learned the hard way that switching boot modes can make Windows disappear (it’s still there, it’s just not booting). The best habit I’ve seen is the simplest: take photos of every screen you change. It’s low-tech, but it turns a stressful “what was it set to?” into a calm “oh yeah, it was UEFI with CSM disabled.”
Then there’s the performance crowd enabling XMP/EXPO. When it works, it feels like free performance: RAM runs at its rated speed and games can smooth out a bit. When it doesn’t, you get the full BIOS experience: memory retraining loops, a failed boot, then a firmware message about restoring safe settings. That’s why “one change per reboot” is such a lifesaver. Enable the profile, reboot, test stability. If it’s unstable, revert. If you changed five things at once, troubleshooting becomes a guessing game you did not ask to play.
Finally, the unsung real-world skill: knowing how to recover. Most people never need to clear CMOS, but the folks who do are unforgettableusually because their story begins with, “So I changed one setting and my PC wouldn’t start…” The good news is that modern systems are more resilient than they feel. Between “Load Defaults,” built-in recovery behaviors, and documented CMOS reset steps, you can usually get back to a working state. The best experience you can have with BIOS is a boring one: you make the change you intended, you reboot, everything works, and you never have to think about firmware again. That’s the dream. And yes, it’s achievable.


