Table of Contents >> Show >> Hide
- Why a Five Strand Braid Is Worth Learning
- What You Need Before You Start
- How to Do a Five Strand Braid: 13 Steps
- Step 1: Start with brushed, detangled hair
- Step 2: Add light texture if your hair is slippery
- Step 3: Decide where the braid will sit
- Step 4: Gather your hair into one section
- Step 5: Divide the hair into five even strands
- Step 6: Cross the far right strand over the strand next to it
- Step 7: Continue that same strand under the middle strand
- Step 8: Switch to the far left strand
- Step 9: Move that strand under the middle strand
- Step 10: Repeat the pattern from right to left
- Step 11: Keep your tension even as you braid
- Step 12: Secure the end with an elastic
- Step 13: Finish and shape the braid
- Common Five Strand Braid Mistakes to Avoid
- Tips for Different Hair Types and Lengths
- How to Make the Braid Look Even Better
- What It Feels Like to Learn a Five Strand Braid: Real Experiences and Practical Lessons
- Final Thoughts
- SEO Tags
Note: This tutorial is written for braiding your own hair, but the same method works beautifully on someone else. It may even work better on someone else, because their arms are not attached to your shoulders and therefore do not file formal complaints halfway through.
If you have already mastered a basic three-strand braid and flirted with a fishtail braid like a true overachiever, the five strand braid is your next great hair adventure. It looks intricate, polished, and a little bit fancy without requiring a stylist, a red carpet invite, or a degree in knot engineering. Once you understand the rhythm, this braided hairstyle becomes much less “mysterious wizard math” and much more “oh, I can absolutely do this before brunch.”
The secret to learning how to do a five strand braid is not speed. It is order. When your hair is detangled, lightly textured, and divided into neat sections, the braid starts to make sense. Instead of thinking of it as a wildly complicated plait, think of it as a repeating pattern: outside strand goes over one section, under the next, then switch sides and do the same thing again. That simple pattern is what creates the woven, basket-like effect that makes a five strand plait look so impressive.
In this step-by-step braid tutorial, you will learn exactly how to create a five strand braid in 13 easy steps, plus how to avoid the most common mistakes, make the braid look fuller, and adapt the style for different hair types and lengths. Whether you want a neat side braid, a boho braid for a wedding guest look, or just a cool style for a regular Tuesday, this guide will help you get there without losing your patience or your favorite hair tie.
Why a Five Strand Braid Is Worth Learning
A five strand braid has serious visual payoff. It looks more elevated than a basic braid, but it still uses the same core idea: controlled sections, repeated movement, and a little tension. The finished look is flatter and wider than a traditional three-strand braid, which makes it especially pretty for thick hair, highlighted hair, and long hair where the woven pattern can really show off.
It is also surprisingly versatile. You can wear it sleek and structured for a polished hairstyle, or pull it apart slightly for a softer, fuller braid that feels more romantic. You can braid straight down the back, sweep it over one shoulder, start from a ponytail, or use the technique as a feature braid inside an updo. In other words, this is not a one-trick braid. It is more like the Swiss Army knife of braided hair.
What You Need Before You Start
Before jumping into the 13 steps, gather a few basics: a brush or wide-tooth comb, a rat-tail comb for parting if you want clean sections, one or two small elastics, and a light texturizing spray or dry shampoo if your hair is silky or freshly washed. Hair that is too slippery tends to slide around, which can make a five strand braid feel harder than it actually is.
If your hair is curly, coily, or textured, a leave-in conditioner or lightweight styling cream can help smooth and moisturize while keeping the strands manageable. If your hair is very fine, a little texture is your best friend. If your hair is very thick, section clips can keep the extra hair from joining the party before it is invited.
How to Do a Five Strand Braid: 13 Steps
Step 1: Start with brushed, detangled hair
This is not glamorous, but it is essential. Brush through your hair gently from the ends upward to remove knots. A five strand braid depends on clean sectioning, and tangles will throw off the pattern faster than you can say, “Why is one piece suddenly hiding?” Smooth hair is easier to grip, easier to separate, and much less likely to turn into a tiny nest halfway down the braid.
Step 2: Add light texture if your hair is slippery
If your hair was washed five minutes ago and feels like silk pajamas, add a bit of texturizing spray, dry shampoo, or a lightweight styling product. This gives the strands more grip, which helps the sections stay distinct. You do not want crunchy hair, just enough texture so the braid does not slide apart while you work.
Step 3: Decide where the braid will sit
A side braid is often easiest for beginners because you can actually see what your fingers are doing. Pull your hair over one shoulder if you want the simplest setup. If you prefer a braid down the back, that works too, but your arms may start sending strongly worded messages. For first-timers, side braid wins for visibility and sanity.
Step 4: Gather your hair into one section
Bring all your hair together where you want the braid to begin. You can start loose, or secure the hair into a low ponytail first if you want more control. There is no shame in using a ponytail as training wheels. In fact, it is a smart way to learn the movement without worrying about the braid collapsing at the top.
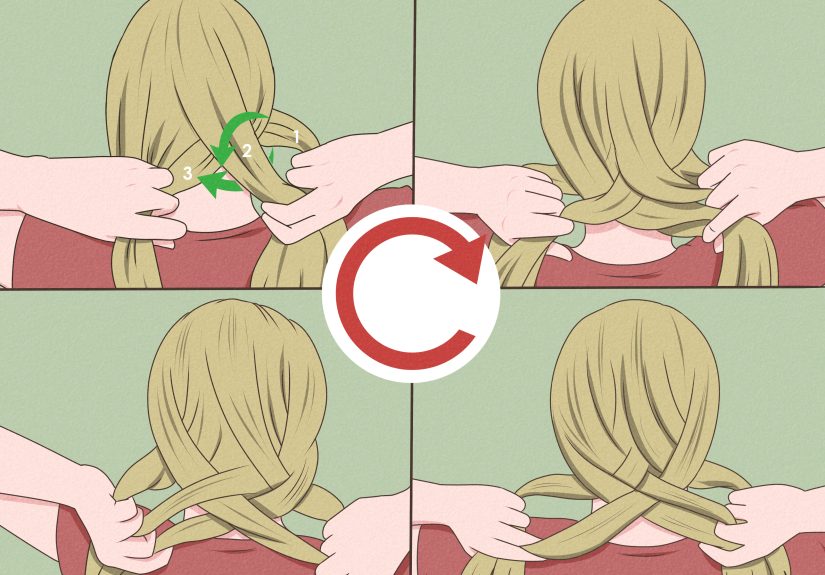
Step 5: Divide the hair into five even strands
This is the moment when the braid becomes real. Separate your hair into five sections of roughly equal size. Hold them from left to right as strands 1, 2, 3, 4, and 5. Try to keep the sections distinct and untwisted. If your fingers start to feel like they are playing a piano piece they never rehearsed, that is normal. Keep going.
Step 6: Cross the far right strand over the strand next to it
Take strand 5 and move it over strand 4. It is now no longer the outer strand, which is a little rude, but necessary. Focus only on the movement in front of you rather than the whole braid. The trick is to make one clean move at a time.
Step 7: Continue that same strand under the middle strand
Now take that same strand and move it under strand 3. This over-then-under motion is what creates the signature woven look. After this step, pause and gently tighten the sections so the braid stays organized. Small adjustments now save major confusion later.
Step 8: Switch to the far left strand
Take strand 1 and move it over strand 2. You are now mirroring what you did on the right side. If it helps, say the pattern in your head: right side over one, under one; left side over one, under one. Repetition is your new best friend.
Step 9: Move that strand under the middle strand
Continue with the same left strand and pass it under the center strand. Once you have done that, gently tighten everything again. The middle of the braid should start looking woven rather than twisted. If the sections look messy, stop and separate them before continuing. A ten-second reset is better than trying to fix a mystery later.
Step 10: Repeat the pattern from right to left
Now the braid becomes a rhythm. Always take the outside right strand over one section and under the next. Then take the outside left strand over one section and under the next. Repeat that sequence all the way down. Do not rush. Five strand braids reward calm hands and steady tension, not frantic speed and heroic optimism.
Step 11: Keep your tension even as you braid
Even tension matters more than perfection. If one strand is pulled tight and the others are loose, the pattern can buckle or look uneven. Try to apply the same gentle pressure each time you move a section. Think “firm but kind,” not “battle with your own hair.” If the braid begins to drift, stop, separate the strands again, and resume the pattern.
Step 12: Secure the end with an elastic
Once you reach the bottom, hold the braid firmly and tie it off with a small elastic. Clear elastics work well if you want the braid to look clean and uninterrupted. If your ends are layered, do not panic. A little hairspray, styling cream, or a few strategic pins can help keep shorter pieces tucked in.
Step 13: Finish and shape the braid
At this point, you can leave the braid neat and sleek, or gently tug on the outer edges to make it look wider and fuller. This technique, often called pancaking, creates a softer, more voluminous finish. Pull lightly from the sides, working from top to bottom. Then smooth flyaways near the crown and mist lightly with hairspray if you want longer hold. Congratulations: you just made a five strand braid, which is the hair equivalent of casually solving a puzzle in public.
Common Five Strand Braid Mistakes to Avoid
The most common mistake is losing track of the outer strands. When that happens, stop immediately instead of hoping your hair will somehow forgive you. Separate the sections clearly and restart from the last step you remember. Another common issue is braiding hair that is too clean and slippery. Texture helps a lot, especially for fine hair.
Uneven strand size can also make the pattern disappear. If one piece is much thicker than the others, the braid will look lopsided. And finally, do not grip the hair so tightly that your fingers freeze into decorative claws. You want control, not a full upper-body workout.
Tips for Different Hair Types and Lengths
If you have long hair, lucky you: the pattern will show beautifully down the length of the braid. If your hair is medium length, start with a side braid or a ponytail base for more control. If you have layers, use a styling cream before braiding and expect a few soft pieces to escape. That is not failure; that is texture.
For curly or coily hair, work with moisturized, stretched, or well-defined hair if you want the pattern to be more visible. For fine hair, add grip before you begin and gently pancake the finished braid for fullness. For thick hair, divide the five sections carefully and use clips if needed so the strands do not merge into a crowd scene.
How to Make the Braid Look Even Better
Once you know the basic technique, you can dress it up in all sorts of ways. Add a ribbon as one of the five strands for a woven effect. Start the braid from a low side ponytail for easier control. Wrap a tiny piece of hair around the elastic to hide it. Pull out face-framing pieces for softness, or keep everything sleek for a more structured finish.
You can also turn the braid into a bun by coiling it at the nape and pinning it in place. That gives you a braided updo that looks much more complicated than it really is, which is arguably one of the best reasons to learn any hairstyle.
What It Feels Like to Learn a Five Strand Braid: Real Experiences and Practical Lessons
The first time most people try a five strand braid, it feels a little chaotic. Your fingers are learning new choreography, your strands seem to switch identities every three seconds, and there is usually a brief moment when you wonder whether all braids were invented by someone with twelve fingers and unlimited confidence. That reaction is normal. In fact, it is almost part of the process.
A common beginner experience is discovering that the braid makes much more sense once you stop staring at the whole thing. Looking at all five sections at once can feel overwhelming. Looking at just the outer strand you are moving next is much easier. Many people improve quickly when they focus only on one instruction at a time: over one, under one, switch sides, repeat. It sounds simple because, eventually, it is.
Another very real experience is arm fatigue. If you are braiding your own hair down the back of your head, your shoulders may start negotiating an early exit. That is why side braids are such a game changer for practice. When the braid is pulled over your shoulder, you can actually see the pattern develop, your hands can work in front of you, and your chances of muttering dramatic monologues decrease significantly.
People also tend to notice a huge difference based on hair texture and prep. On second-day hair or lightly textured hair, the braid usually holds shape better and the strands stay separate. On freshly washed, ultra-soft hair, the sections can slide around more. That does not mean your hair is “wrong” for the style. It just means prep matters. A little dry shampoo or texture spray can turn a frustrating attempt into a smooth one.
There is also a confidence curve with this braid. The first attempt may look uneven. The second may be better at the top and messy at the bottom. By the third or fourth try, your hands begin to remember the pattern before your brain fully catches up. That is the magic moment. Once muscle memory kicks in, the five strand braid stops feeling like a puzzle and starts feeling like a technique.
Many people find that perfection is not actually the goal. A slightly loose, softly pancaked braid can look more modern and wearable than one that is ultra-tight. Small imperfections often make the style look more relaxed and intentional. So if a few wisps escape or the braid looks a touch bohemian instead of mathematically perfect, that is not a disaster. That is a vibe.
In real life, the five strand braid becomes one of those hairstyles that gets compliments because it looks difficult. Friends may assume you had help. Coworkers may ask how long it took. The funny part is that once you know the pattern, it can become just another go-to style in your rotation. Fancy-looking, yes. Secretly manageable, also yes. That is exactly the kind of hairstyle worth learning.
Final Thoughts
Learning how to do a five strand braid is really about learning a pattern and trusting repetition. Once you understand the over-one, under-one rhythm from each outer side, the style becomes far less intimidating. Start with detangled hair, use a little texture if needed, braid over one shoulder for better visibility, and take your time. Soon enough, this intricate-looking braid will feel completely doable.
So yes, the five strand braid looks impressive. But the bigger win is this: it is impressive and learnable. That sweet spot is where the best hairstyles live.