Table of Contents >> Show >> Hide
- What You Need Before You Start
- How to Draw an Apple in 15 Steps
- Step 1: Study the Apple Before You Draw
- Step 2: Lightly Sketch the Basic Shape
- Step 3: Add the Top and Bottom Indentations
- Step 4: Refine the Contour Line
- Step 5: Draw the Stem
- Step 6: Identify the Light Source and Highlight
- Step 7: Block in the Midtones
- Step 8: Build the Core Shadow
- Step 9: Darken the Creases and Recessed Areas
- Step 10: Draw the Cast Shadow
- Step 11: Add Reflected Light
- Step 12: Create Surface Texture
- Step 13: Strengthen the Darkest Values
- Step 14: Clean Up the Edges
- Step 15: Add Final Details and Check Accuracy
- Tips for a More Realistic Apple Drawing
- Common Mistakes to Avoid
- Why Drawing an Apple Is Great Practice
- Experiences Related to “How to Draw an Apple: 15 Steps”
- Conclusion
- SEO Tags
An apple is one of those classic drawing subjects that seems almost suspiciously simple. It is round-ish, shiny, and usually sitting there like it has nowhere better to be. Easy, right? Then you start drawing, and somehow your apple turns into a tomato with commitment issues. The good news is that learning how to draw an apple is one of the best ways to understand shape, contour, shading, texture, and realism without wrestling a complicated subject into submission.
This step-by-step guide will show you exactly how to draw an apple in 15 clear steps. Whether you are a beginner sketching in a notebook or a hobby artist trying to improve realistic fruit drawing, this tutorial will help you build better observation skills and cleaner technique. By the end, you will know how to create a believable apple drawing with highlights, shadows, form, and texture instead of a lonely red circle pretending to be fruit.
What You Need Before You Start
You do not need a fancy art studio or a dramatic artist scarf to draw a good apple. You just need a few basic materials and a little patience.
- A graphite pencil or two, such as HB and 2B or 4B
- An eraser
- Drawing paper or a sketchbook
- A sharpener
- An actual apple or a clear photo reference
- Optional: blending stump, colored pencils, or a soft tissue
If possible, place a real apple on a table under a single light source. This makes the highlights and shadows easier to see, and that matters a lot when you want your apple drawing to look three-dimensional instead of flat.
How to Draw an Apple in 15 Steps
-
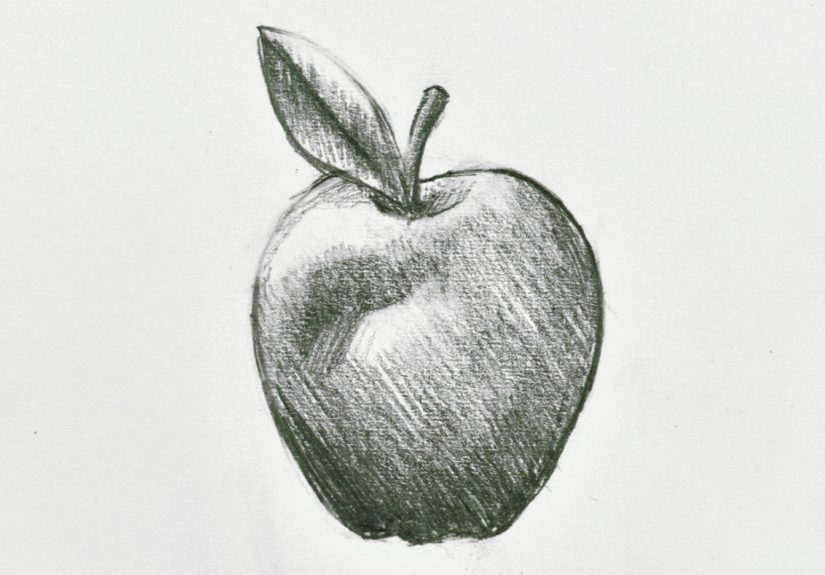
Step 1: Study the Apple Before You Draw
Before your pencil touches the paper, spend a minute really looking at the apple. Notice that it is not a perfect circle. Most apples are slightly wider in the middle, narrower near the bottom, and dented at the top where the stem grows. Some lean to one side. Some are lumpy. Nature loves variety and has never once asked permission from geometry.
This first observation stage helps you avoid a stiff, generic fruit outline. It also trains your eye to see the apple as a form with volume, not just a symbol.
-
Step 2: Lightly Sketch the Basic Shape
Start with a very light outline. Think of the apple as a squashed sphere or a rounded oval with a bit more personality. Use loose strokes instead of one heavy line. This makes it easier to correct the shape as you go.
Do not worry about perfection yet. At this point, you are building the overall silhouette. Keep your marks light and simple so the drawing stays flexible.
-
Step 3: Add the Top and Bottom Indentations
Now shape the top of the apple where the stem sits. Most apples have a small inward curve there, not a flat top. Add a subtle indentation at the bottom too. These little dips are important because they make the fruit look like an apple instead of a holiday ornament.
Think of this as moving from “round object” to “recognizable apple.” Tiny structural changes do a lot of heavy lifting here.
-
Step 4: Refine the Contour Line
Go around the outline again and refine the contour. Make the edges slightly uneven if your reference shows bumps or asymmetry. A realistic apple drawing usually has organic curves rather than machine-made smoothness.
This is also a good time to check proportions. Is the apple too tall? Too skinny? Leaning like it had a long day? Fix it now before details arrive and get emotionally attached.
-
Step 5: Draw the Stem
Add the stem emerging from the top indentation. Keep it narrow, slightly irregular, and gently angled if needed. The stem should feel planted inside the apple, not taped on as an afterthought.
If your reference includes a leaf, you can lightly sketch it now, but it is perfectly fine to keep the drawing focused on the apple itself.
-
Step 6: Identify the Light Source and Highlight
Decide where the light is coming from. If the light is coming from the upper left, the brightest part of the apple will usually sit somewhere on that side. Lightly mark the highlight area so you remember to keep it mostly untouched.
This step is crucial for realistic drawing because highlights help describe form. They tell the viewer where the light hits most directly and make the apple feel glossy and round.
-
Step 7: Block in the Midtones
Use gentle pencil strokes to add the middle values across the apple. Avoid the brightest highlight and keep the pressure light. You are not diving into dramatic darkness yet. You are simply giving the fruit a base tone.
Work in the direction of the form when possible. Curved strokes can help the apple feel more rounded, while random scratchy marks can make it look rough in all the wrong ways.
-
Step 8: Build the Core Shadow
On the side opposite the light source, add the core shadow. This is the darker band that helps describe the roundness of the apple. It is usually not right on the outer edge. Instead, it often sits slightly inside the form, where the surface turns away from the light.
Use a softer pencil if you have one and deepen the value gradually. Smooth transitions matter. A harsh jump from light to dark can make the apple look cut out instead of curved.
-
Step 9: Darken the Creases and Recessed Areas
Add a bit more shading in the top indentation around the stem and in the lower dimple if your reference shows it. Recessed areas often catch less light, so they appear darker. This adds structure and makes the apple feel solid.
Be careful not to overdo it. You want depth, not a mysterious cave where tiny drawing explorers disappear forever.
-
Step 10: Draw the Cast Shadow
Now draw the shadow the apple casts on the table or surface beneath it. The cast shadow anchors the apple in space. Without it, your fruit may look like it is floating in an existential void.
Make the shadow darkest closest to the apple and softer as it moves away. Its direction should match the light source you chose earlier. A believable cast shadow makes a huge difference in realistic fruit drawing.
-
Step 11: Add Reflected Light
Inside the darker side of the apple, leave or lift a faint lighter area near the lower edge if your reference shows reflected light. This happens when light bounces off the table or nearby surfaces back onto the apple.
Reflected light is subtle. It is not as bright as the highlight, but it helps create a more convincing form. This small detail often separates a decent apple sketch from a polished one.
-
Step 12: Create Surface Texture
Apples are not always perfectly smooth. Some have tiny speckles, soft streaks, or gentle patches of uneven tone. Use controlled marks to suggest this texture without turning the whole apple into sandpaper.
Try light stippling, faint broken lines, or soft layered shading. Keep the texture consistent with the form so it wraps around the apple instead of sitting flat on top of it.
-
Step 13: Strengthen the Darkest Values
Step back and look at your drawing. Where are the darkest darks? Usually they appear in the stem cavity, the deepest part of the core shadow, and the cast shadow near the base. Strengthen those areas carefully.
Good value contrast makes the apple pop. If every area is similar in darkness, the drawing will feel dull. If the range is too extreme everywhere, it can feel messy. Aim for balance.
-
Step 14: Clean Up the Edges
Use your eraser to tidy stray lines and sharpen selected edges. Not every edge should be equally crisp. A few soft edges make the drawing feel more natural, while sharper edges can guide the viewer’s eye.
This is also a great time to refine the highlight. Lift a little graphite if needed so the bright area feels fresh and believable.
-
Step 15: Add Final Details and Check Accuracy
Compare your drawing with the apple one last time. Check the width, the top indentation, the stem angle, the highlight shape, and the shadow direction. If something feels off, it usually is. Trust your eye.
Make the final adjustments, then stop. Yes, stop. Overworking is how many nice apple drawings become muddy fruit tragedies. A finished drawing should look intentional, not exhausted.
Tips for a More Realistic Apple Drawing
Use Simple Shapes First
If you jump into details too early, your proportions may wander off without you. Start with the biggest shape, then build smaller features into it. This is one of the most reliable drawing habits for beginners.
Think in Values, Not Just Lines
A line drawing can be lovely, but realistic apple drawing depends heavily on value. Light, middle tone, dark tone, highlight, and shadow are what create volume. When you learn to see those clearly, your fruit gets dramatically better.
Check Negative Space
Look at the empty space around the apple, not just the apple itself. This helps you judge the silhouette more accurately. It is a surprisingly powerful trick when your outline starts feeling slightly wrong but you cannot tell why.
Keep Your Pencil Pressure Under Control
Heavy lines early in the process can make the drawing stiff and hard to fix. Light construction lines give you room to adjust. Think of them as polite suggestions rather than permanent declarations.
Common Mistakes to Avoid
- Drawing a perfect circle: Real apples are organic and slightly irregular.
- Ignoring the light source: Random shading makes the form confusing.
- Forgetting the cast shadow: The apple may look like it is hovering.
- Making every edge hard: Soft edges help create realism.
- Overblending everything: Too much blending can erase texture and flatten the drawing.
- Skipping observation: The best drawing shortcut is still careful looking.
Why Drawing an Apple Is Great Practice
If you want to improve your drawing skills, an apple is a fantastic place to start. It teaches you how to simplify a subject into basic shapes, refine contour lines, see value changes, and render light and shadow. It also gives you a chance to practice texture and proportion on a subject that is forgiving enough for beginners but rich enough for more advanced study.
In other words, the humble apple is not just snack material. It is a tiny art teacher with a stem.
Experiences Related to “How to Draw an Apple: 15 Steps”
Many beginners have the same experience the first time they try to draw an apple: they think it will take five minutes, and then the apple quietly exposes every weakness in their observation skills. The outline looks fine at first glance, but the top indentation is too shallow, the shadow leans the wrong way, and the highlight sits in a place that makes no sense. That can feel frustrating, but it is actually a useful turning point. An apple is simple enough to reveal mistakes clearly, and that makes it one of the best subjects for growth.
One common experience is realizing that drawing from memory is wildly different from drawing from observation. Most people “know” what an apple looks like, so they draw the symbol in their head: a round shape, a stem, done. But when they slow down and look at a real apple, they notice all the little surprises. One side may bulge more than the other. The stem may tilt. The bottom dimple may be off-center. The color and texture may shift across the surface. That moment of noticing is often when drawing starts becoming less about guessing and more about seeing.
Another very relatable experience is learning how much lighting changes everything. Put the apple under soft room light, and the shadows feel gentle. Shine a lamp from one side, and suddenly the core shadow, reflected light, and cast shadow become much more obvious. Beginners often say their drawings improved the moment they stopped using vague lighting and started working from a single clear light source. It is not magic. It just makes the structure easier to read.
There is also the emotional side of the process. Drawing an apple can be oddly humbling. You start confident, erase the outline six times, stare at the stem like it personally offended you, and then eventually discover that the drawing looks better when you relax and build it in layers. That experience teaches patience in a way few tutorials can. Artists often improve not because they suddenly become brilliant overnight, but because they stop rushing the ugly middle stage.
With repeated practice, many people notice a very satisfying shift. Their first apple drawing may look flat and overly outlined. Their second may have better proportions. By the third or fourth, they begin to understand where the darkest darks belong, how to soften transitions, and why a tiny reflected light can make the form feel believable. The improvement is usually visible. That is one reason drawing apples remains a favorite classroom exercise. Progress shows up fast enough to be motivating.
Some artists also discover that apples are great for experimenting with style. One person may prefer a clean graphite rendering with smooth shading. Another may use cross-hatching for a more textured look. Someone else may add colored pencil in thin layers to capture red, green, and golden tones. Because the subject is familiar, artists feel free to play. That freedom can build confidence, especially for beginners who feel intimidated by portraits or complex still lifes.
Perhaps the most useful experience of all is realizing that a successful drawing does not come from drawing faster. It comes from observing better. An apple teaches that lesson quietly but effectively. It asks you to compare shapes, judge angles, notice edges, and respect light. Those same skills carry into drawing pears, bottles, faces, hands, and just about everything else. So yes, learning how to draw an apple in 15 steps may seem small. In practice, it is often the beginning of much bigger artistic progress.
Conclusion
Learning how to draw an apple is more than a beginner exercise. It is a practical lesson in contour, form, value, texture, and observation. By breaking the process into 15 manageable steps, you can go from a rough sketch to a realistic apple drawing without feeling overwhelmed. Start light, pay attention to the shape, respect the light source, and build your values gradually. That is the recipe.
And unlike some creative projects, this one comes with a convenient snack model. Just try not to eat the reference before you finish the shading.


