Table of Contents >> Show >> Hide
- The 5 Simple Steps at a Glance
- Step 1: Plan Like a Good Neighbor (Rules, Registration, and “Don’t-Be-That-Hive” Basics)
- Step 2: Choose Your Hive and Gear (Beginner Setup That Actually Works)
- Step 3: Pick the Right Location (Sun, Wind, Water, and “Please Don’t Sting the Mail Carrier”)
- Step 4: Get Bees the Smart Way (Nuc vs. Package, Buying Tips, and Timing)
- Step 5: Manage the Colony for Health (Inspections, Swarm Prevention, and Mite Monitoring)
- Your first-year inspection rhythm
- What you’re checking in every inspection
- When to add another box
- Varroa mites: the tiny problem you can’t ignore
- Swarm prevention (because your bees might try to start a new city)
- Pesticides and pollinator safety (your yard is not a chemistry experiment)
- Winter prep (even if winter is months away)
- Common Backyard Beekeeping Mistakes (So You Can Skip the Expensive Lesson)
- Real-World Beginner Experiences (500+ Words of What New Beekeepers Commonly Run Into)
- Conclusion
Starting a backyard beehive sounds like a wholesome hobbyright up until you realize you’re basically becoming the landlord of a tiny, flying city with strong opinions about real estate, weather, and whether your neighbor’s birdbath is “public water.” The good news: beginner beekeeping doesn’t have to be complicated. If you focus on the right five steps, you can set up a healthy hive, be a good neighbor, and give your garden a serious pollination glow-up.
This guide walks you through a simple, real-world plan for how to start a beehive in your backyard, including what to buy, where to place your hive, how to get bees safely, and what first-year management actually looks like. (Spoiler: bees are productive, but they’re not fully self-managing. Neither are teenagers, and yet here we are.)
Quick heads-up: Bee stings happen. If you or someone at home has a history of serious allergic reactions, talk with a clinician before you keep bees. If you’re under 18, loop in a parent/guardian for safety, local rules, and help lifting heavy hive boxes.
The 5 Simple Steps at a Glance
- Plan like a good neighbor: Check local rules, register if required, and design for “nuisance-free” beekeeping.
- Choose your hive and gear: Start with beginner-friendly equipment (and don’t cheap out on the veil).
- Pick the right location: Sun, wind protection, water, and a safe flight path matter more than fancy landscaping.
- Get bees the smart way: Buy from reputable local sources; choose between a nuc and a package.
- Manage for health (not vibes): Inspect regularly, prevent swarms, monitor mites, and prep for the seasons.
Step 1: Plan Like a Good Neighbor (Rules, Registration, and “Don’t-Be-That-Hive” Basics)
Before you buy anything, do the boring-but-important stuff: figure out what’s allowed where you live. In the U.S., beekeeping rules can come from several places:
local city/county ordinances, HOA rules, and state-level apiary regulations (including registration and inspections in some states).
Check three things before you commit
- Local ordinances/HOA: Some places limit hive numbers, require setbacks, or specify fencing/flight path management.
- State registration: Many states require registration (often annually or on a schedule), especially to help manage disease outbreaks and coordinate inspections.
- Your yard reality: Kids’ play areas, sidewalks, pools, barking dogs, and “my neighbor’s patio is five feet away” situations all affect hive placement.
Design for “nuisance-free” beekeeping
A successful backyard beekeeper isn’t just keeping beesthey’re managing bee behavior in a human neighborhood. Two common issues create most complaints:
(1) bees seeking water and (2) bees flying through people-space.
- Water: Provide a reliable water source early in spring so your bees “imprint” on it. If you wait until they’ve discovered the neighbor’s dripping faucet, they will not accept your late apology.
- Flight path: Use fencing, hedges, or a screen near the hive entrance to encourage bees to fly up and overrather than straight across a walkway like tiny commuter drones.
Pro tip: Start with two hives (if you can)
Many reputable beekeeping educators recommend starting with two colonies. It’s not because they’re trying to upsell you into bankruptcy.
It’s because two hives let you compare: “Is this colony weak, or is it just a rainy week?” You can also borrow a frame of brood or food from one hive to help the other in a pinch.
If your budget only allows one hive, consider pairing up with a mentor or a local beekeeping club so you’re not troubleshooting alone.
Step 2: Choose Your Hive and Gear (Beginner Setup That Actually Works)
There are several hive styles, but for most beginners, the easiest path is to start with the industry standard:
the Langstroth hive (8-frame or 10-frame). The biggest advantage is simple: parts are widely available, interchangeable,
and every beekeeping class on Earth knows how to teach with them.
Your beginner hive checklist
Here’s what most backyard beekeepers use to start one hive:
- Bottom board (often screened for ventilation/mites)
- Hive bodies (usually a deep box for brood; many beginners start with one deep and add as needed)
- Frames + foundation (wax or plasticopinions are spicy; either can work)
- Inner cover + outer cover
- Entrance reducer (helps smaller colonies defend themselves)
- Feeder (internal/top feeders are popular for beginner management)
- Hive stand (keeps boxes off wet ground and saves your back)
Protective gear and tools (the “don’t learn the hard way” category)
- Veil: Your #1 confidence builder. A good veil turns panic into “calm science.”
- Gloves: Useful early on. Many keepers later switch to lighter gloves for better dexterity.
- Jacket or suit: Especially helpful if you’re nervous or working in hot weather when bees can be extra spicy.
- Hive tool: Frames get glued together with propolis. This tool is basically your crowbar of peace.
- Smoker + fuel: Used correctly, smoke calms bees so inspections are safer and smoother.
Budget reality
Startup costs vary widely, but a realistic beginner plan is to expect a few hundred dollars per hive depending on whether you buy assembled boxes,
choose premium protective gear, and add helpful extras like feeders, a stand, and a mite-monitoring kit.
You can reduce costs by buying used woodenware (with caution) or building boxes, but always prioritize safety gear and bee health supplies.
Step 3: Pick the Right Location (Sun, Wind, Water, and “Please Don’t Sting the Mail Carrier”)
Your hive location influences nearly everything: colony stress, moisture issues, winter survival, neighbor complaints, and how fun (or terrifying) inspections feel.
A good spot won’t necessarily be the prettiest spot. It will be the spot that makes your bees easy to live with.
What a “good hive spot” looks like
- Morning sun: Helps bees get flying earlier and can reduce dampness.
- Afternoon shade (or dappled shade): Helpful in hot climates so the colony doesn’t waste energy air-conditioning.
- Wind protection: A fence, shrubs, or a building can reduce wind stress.
- Avoid low, damp areas: Cold air and moisture collect in low spotsbad news for overwintering.
- Solid, level base: Hives get heavy. Tilt slightly forward so rain drains out, not in.
Control the flight path (your secret backyard superpower)
If the entrance points directly at a walkway, your bees may “commute” through human space. Instead:
- Face the entrance toward a barrier (fence/hedge/screen) a few feet away so bees fly upward quickly.
- Keep hives away from doors, patios, playsets, and property lines when possible.
- Place hives where you can work them comfortablybecause avoiding your hive is a weird strategy for a hobby you paid for.
Provide water early (and make it bee-friendly)
Bees need water for cooling the hive and feeding brood. If you don’t offer a reliable source, they’ll find oneoften the one that annoys your neighbors.
Set up a shallow container with floating corks, wood, or stones so bees can land without drowning. Refill it consistently, especially during hot or dry spells.
Think ahead: access and lifting
A full hive box can be heavy. Choose a location you can reach with a cart or wheelbarrow.
Also think about where you’ll stand during inspections, where you’ll temporarily set boxes, and how you’ll work if the ground is muddy.
The best hive site is the one you can manage regularlybecause consistency beats perfection in beekeeping.
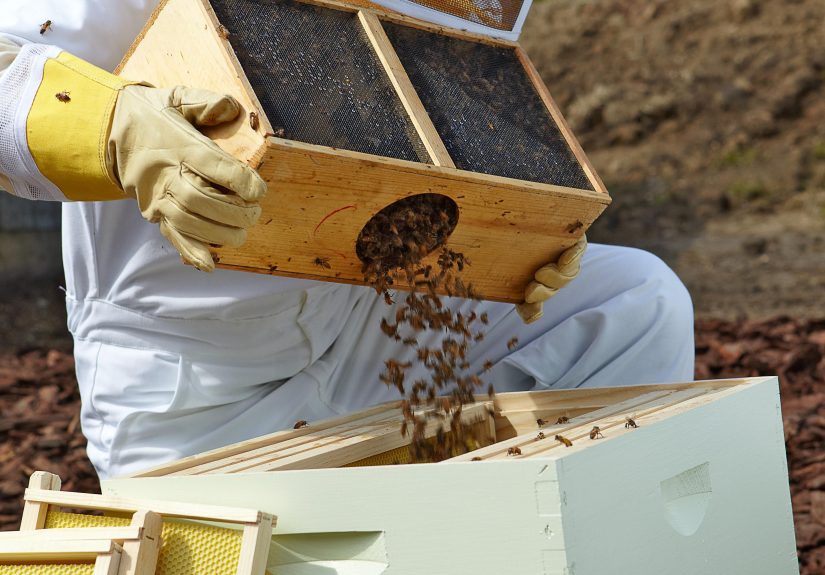
Step 4: Get Bees the Smart Way (Nuc vs. Package, Buying Tips, and Timing)
You’ve got two common beginner-friendly options for acquiring honey bees: a package or a nucleus colony (“nuc”).
Yes, you can catch a swarm. No, that doesn’t mean you should as your beginner planunless you have a mentor, proper equipment, and a backup plan for what you might be bringing home.
Option A: Nucleus colony (nuc)
A nuc is a small working colony (often 5 frames) with a laying queen, brood, and some stored food.
Pros: Builds up faster, queen is already accepted, and you can see evidence of a healthy start.
Cons: Typically costs more, and quality depends heavily on the seller.
Option B: Package bees
A package is a screened box of bees with a queen in a separate cage.
Pros: Often more available, sometimes less expensive upfront.
Cons: Usually needs more feeding/support early on, and the colony must draw comb from scratch before it can really expand.
What to look for when buying bees
- Local or regionally adapted stock: Bees raised in your region often perform better in your climate.
- Reputable seller: Ask about disease management, mite monitoring, and how queens are bred/mated.
- Avoid mystery bees: Bargain bees can come with bargain problemsmites, disease, or a queen that disappears like a magician’s assistant.
Timing: order early, install at the right moment
In many parts of the U.S., bees are ordered months ahead for spring installation. Your goal is to install when daytime temperatures are consistently mild enough for bees to fly,
forage begins, and you can feed if nectar is scarce.
Installation basics (keep it calm and simple)
- Have your hive assembled, level, and ready before the bees arrive.
- Feed as needed, especially for packages and during cold/rainy stretches when bees can’t forage.
- Check within the first week to confirm the queen is released and laying (your first “is this working?” milestone).
Step 5: Manage the Colony for Health (Inspections, Swarm Prevention, and Mite Monitoring)
Here’s the part new beekeepers don’t always expect: you don’t “set and forget” a beehive. You observe and respond.
The first season is about helping your colony build comb, grow population, and store enough food while you learn what “normal” looks like.
Your first-year inspection rhythm
In spring and early summer, many beginners inspect about every 7–10 days (weather permitting). The goal isn’t to micromanage
it’s to catch problems early and add space before the bees feel crowded.
What you’re checking in every inspection
- Queen-right signs: Eggs/young larvae and a consistent brood pattern are reassuring.
- Food stores: Nectar and pollen coming in? Or are they burning through reserves?
- Space: Are frames being drawn? Do you need to add a box so the colony doesn’t get congested?
- Temperament: Are they calm, defensive, or suddenly “choose violence”? Sudden defensiveness can signal stress.
- Pests and disease clues: Keep notes and learn graduallyno one becomes a brood-disease detective overnight.
When to add another box
A common rule of thumb: add space when the colony is actively using most frames (often around 70–80% drawn/covered with bees).
Giving room at the right time helps reduce swarm pressure and supports honey storage.
Varroa mites: the tiny problem you can’t ignore
In the U.S., Varroa destructor is one of the biggest factors behind colony losses. The key concept is simple:
don’t guessmonitor. Mite levels can look “fine” until they’re suddenly not.
Common monitoring methods include an alcohol wash/soap wash or a powdered sugar roll using a standardized sample size.
Treatment thresholds and timing can vary by season and region, so the smart move is to follow current guidance from your local extension office or an experienced mentor,
and use vetted varroa management tools and labels correctly.
Swarm prevention (because your bees might try to start a new city)
Swarming is natural reproduction for honey bees, and it often happens when colonies are crowded in spring. You can reduce swarm pressure by:
- Adding space before the hive is packed wall-to-wall with bees.
- Keeping inspections consistent during peak buildup.
- Maintaining good ventilation and managing congestion in the brood nest.
Pesticides and pollinator safety (your yard is not a chemistry experiment)
Backyard bees forage widely, which means pesticide exposure can happen even if you personally never spray. You can still reduce risk:
- Use integrated pest management in your own yard: start with non-chemical controls when possible.
- If you must treat plants, avoid spraying open blooms, minimize drift, and apply when bees are less active (often evening), following the label carefully.
- Communicate with neighbors and landscapers so they know you keep bees and can time applications more safely.
Winter prep (even if winter is months away)
Strong winter colonies are built in late summer and fall. That’s when you confirm the colony has:
enough population, a healthy queen, manageable mite levels, and adequate food stores for your climate.
Winter strategies vary by region (from insulation to ventilation to feeding), so treat local guidance as your north star.
Common Backyard Beekeeping Mistakes (So You Can Skip the Expensive Lesson)
- Skipping water: Then acting surprised when bees love the neighbor’s pool more than your garden hose.
- Buying bees before equipment is ready: Bees arrive on their schedule, not yours.
- Over-inspecting: Constantly tearing the hive apart stresses bees and crushes learning momentum.
- Under-inspecting: The opposite problemignoring mites and space needs until the hive spirals.
- Not keeping notes: Your memory is not a data system. Write down what you saw and what you did.
Real-World Beginner Experiences (500+ Words of What New Beekeepers Commonly Run Into)
The first year of backyard beekeeping is a mix of wonder, confusion, and the sudden realization that your bees did not read your plans. Below are common experiences
beginner beekeepers reportshared here as practical “expect this” moments, so you’re less likely to panic at totally normal bee behavior.
1) The “Are they mad at me?” phase
Many beginners interpret normal hive noise as anger. Bees hum louder when you open the hive, and they may bump your veil or fly in tight circles.
That doesn’t automatically mean your bees are aggressiveit often means they’re alert. Confidence usually increases when you tighten up your inspection routine:
move calmly, use smoke correctly, avoid crushing bees, and work during good weather when foragers are out. A surprising number of “mean hive” stories turn out to be
“cold, windy day + rushed inspection + gloves that smelled like panic.”
2) The “Why is everything sticky?” discovery
Propolis is basically bee glue, and it shows up everywhere. Frames stick. Covers stick. Your hive tool becomes your best friend.
Beginners often worry they’re doing something wrong because everything feels “gummed up.” In reality, propolis is normal and even helpful for the colony.
The practical lesson is to embrace the right tools: a solid hive tool, slow leverage (not yanking), and a place to set frames so you’re not balancing them like a circus act.
3) The water drama you didn’t predict
New beekeepers frequently learn about water needs the hard way: bees hovering over a fountain, visiting a pet bowl, or clustering at a drip line.
The fix is usually simpleadd a dedicated water source with safe landing spots and keep it consistently filledbut the timing matters.
If bees already love a neighbor’s water source, it can take patience (and consistency) to retrain them. This is also where neighbor communication helps:
a friendly heads-up and a proactive water plan can prevent a small annoyance from turning into a major complaint.
4) The first time you can’t find the queen
This is practically a beekeeping rite of passage. Beginners often believe that if they don’t see the queen, the queen is gone.
Experienced keepers rely more on signs than sightings: eggs, young larvae, and a healthy brood pattern are strong clues that the queen is present and doing her job.
Over time, your eyes get better at scanning frames methodically, spotting eggs, and noticing how the bees behave around queen-right brood.
Until then, it’s okay to slow down and use a checklist rather than turning every inspection into a frantic “Where’s Waldo?” speedrun.
5) The “I thought I’d get honey this year” expectation reset
Many beginners imagine backyard beekeeping as a honey faucet. In real life, first-year colonies often spend a big portion of their energy drawing comb and building population.
Whether you harvest honey in year one depends on your region, nectar flow, weather, colony strength, and how early the hive gets established.
A healthier mindset is to treat the first year as your foundation year: build strong comb, keep mites under control, and help the colony store enough food.
If you do harvest, keep it modestbecause nothing ruins the “sweet hobby” vibe like realizing you harvested their winter pantry.
6) The “beekeeping community is half the hobby” surprise
Beginners who thrive often plug into a local beekeeping club, mentor network, or extension program. Not because you can’t learn online,
but because local seasons and local problems are… local. Clubs help with swarm calls, equipment swaps, and quick answers that prevent rookie mistakes from becoming colony losses.
A lot of people also find the community aspect surprisingly funlike a book club, but everyone occasionally shows up wearing a veil and talking about mites.
If you expect a learning curve (and a few chaotic moments), you’re already ahead. Backyard beekeeping is one of those hobbies where small, consistent actions
add up: steady inspections, careful placement, respectful neighbor management, and a realistic plan for pests. Your bees don’t need you to be perfect.
They need you to be attentive.
Conclusion
Starting a beehive in your backyard can be simpleif you do the right simple things. Check local rules and plan for neighbors,
choose beginner-friendly equipment, place the hive with sun/wind/water/flight path in mind, buy bees from reputable sources,
and manage the colony with regular inspections and mite monitoring. Do that, and you’re not just “keeping bees.”
You’re building a healthy, sustainable backyard apiary that can thrive season after season.
And if you ever feel overwhelmed, remember the most comforting truth in beekeeping:
the bees have been doing this for millions of years. You just need to learn how to stop getting in their way.