Table of Contents >> Show >> Hide
Some home upgrades cost a fortune. Others require a contractor, a mood board, and the emotional stamina of a kitchen renovation. And then there is the humble vintage lampshade: small, charming, slightly dusty, and wildly capable of stealing the show. Reviving a vintage lampshade is one of those decorating projects that feels equal parts practical and theatrical. You are not just cleaning an old object. You are rescuing atmosphere. You are restoring glow. You are telling the sad, tired shade in the corner, “Congratulations, you are about to become interesting again.”
A well-restored shade can bring softness to a room, add character to a lamp base that deserves better days, and turn a flea market find into something that looks curated instead of accidental. Better still, vintage lampshade restoration is often approachable for beginners. You do not need a workshop the size of a garage or the patience of a museum conservator. What you do need is a careful eye, a gentle hand, and the willingness to admit that not every fringe trim from 1978 deserves a comeback.
This guide walks through how to assess, clean, recover, repair, and style an old shade so it feels fresh without losing its soul. Whether you found a pleated beauty at an estate sale, inherited a delicate fabric shade from a grandparent, or pulled a slightly tragic lamp out of the attic, here is how to bring it back to life.
Why a Vintage Lampshade Is Worth Saving
There is a reason decorators still get excited about older shades. Vintage pieces often have details that are hard to fake well: tapered silhouettes, scalloped edges, stitched trim, unusual proportions, and materials that add warmth instead of the flat, mass-produced look that newer shades can sometimes have. A revived shade can soften modern furniture, make a thrifted lamp base feel deliberate, and add that collected-over-time quality designers love.
There is also the sustainability factor. Instead of tossing an old shade and buying something brand new, reviving a vintage lampshade lets you reuse the frame, preserve a favorite shape, and avoid turning a potentially beautiful object into landfill filler. It is decorating with a conscience, but with better lighting.
And then there is the emotional payoff. Restoring a shade is deeply satisfying because the before-and-after is dramatic. A yellowed, wrinkled, sagging old shade can become crisp, textured, and stylish with a few smart choices. It is the lighting version of a glow-up montage, only with less dramatic music and more fabric glue.
Start With an Honest Assessment
Check the Frame First
Before you buy fabric, trim, or a heroic amount of optimism, inspect the frame. If the metal frame is bent beyond easy reshaping, rusted through, or coming apart at the welds, restoration may be more trouble than it is worth. Minor bends are usually manageable. A frame that is structurally sound but cosmetically worn is exactly what you want. Think “quirky and salvageable,” not “one sneeze away from collapse.”
Look closely at the top ring, spider fitter, washer fitter, or clip-on mechanism. The shape matters, but the fit matters even more. If the hardware is unstable, a newly recovered shade will still be annoying to use. Beauty is wonderful. A crooked lampshade that wobbles every time someone walks by is less wonderful.
Decide Whether to Clean, Recover, or Fully Rebuild
Not every vintage shade needs the same treatment. Some only need a careful dusting and light stain removal. Others need new fabric but can keep the original frame and silhouette. The roughest cases may require removing the old covering, replacing brittle lining, and essentially rebuilding the shade around its bones.
Ask yourself three questions:
- Is the original exterior material attractive enough to save?
- Is the lining cracked, stained, or shedding?
- Does the shade still suit the lamp base and the room where you plan to use it?
If the answer to the first is yes, clean it gently. If the second is yes, recovery may make more sense. If the third is no, congratulations: you have a valid design excuse to reinvent the whole thing.
How to Revive a Vintage Lampshade Step by Step
1. Clean It Like It Is Old, Because It Is
The quickest way to ruin a vintage shade is to clean it too aggressively. Older shades can be made from fabric, paper, silk-like synthetics, fiberglass, parchment-style material, or natural fibers. Each one behaves differently, which is a polite way of saying one wrong move can turn “refreshing” into “disaster.”
Start with dry cleaning methods first. Use a microfiber cloth, a soft brush, or a cool hair dryer setting to remove loose dust. Pleated shades may need a soft paintbrush to get into tight folds. If the shade is delicate, embellished, or made of paper, this may be all the cleaning it can safely handle.
Fabric shades in decent condition can sometimes be spot-cleaned with a gentle cloth and mild soapy water, but always test a hidden area first. If the color bleeds, the glue softens, or the surface puckers, stop immediately. Paper shades should never be treated like washable fabric. A dry method is safer, and small marks may lift with an art gum eraser. If the shade has old adhesive seams or fragile lining, water can turn a manageable project into a mushy regret.
One of the smartest restoration habits is simple: clean the least aggressive way first. Dust, assess, and then decide whether the shade is truly dirty or just old-looking. Those are not the same thing. Dirt can leave. Bad choices linger.
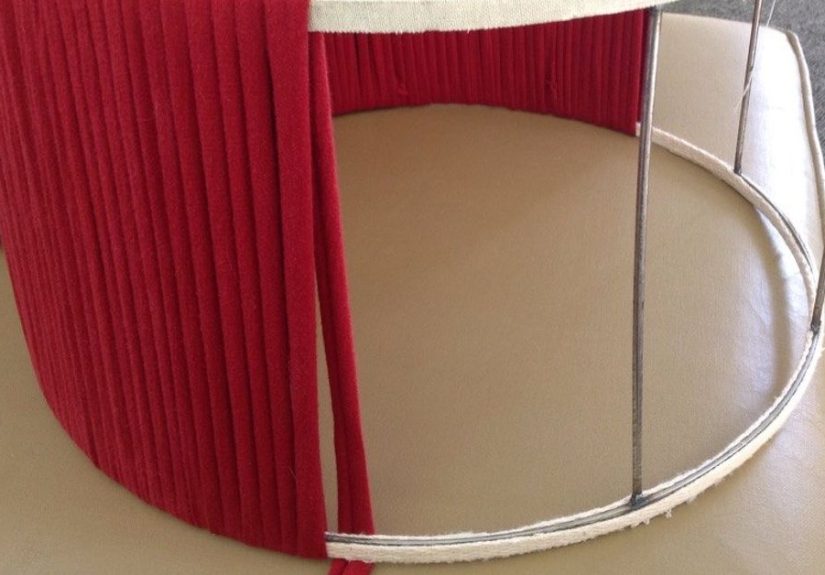
2. Strip Away What No Longer Serves the Shade
If you are recovering the shade, remove old trims, ribbons, fringe, and damaged fabric carefully. Work slowly so you do not warp the frame underneath. Some old coverings peel away in satisfying sheets. Others cling like they pay rent. In stubborn spots, patience matters more than force.
Once the frame is exposed, wipe it down gently and inspect for rust or bends. Minor rust can often be cleaned off and sealed. Small bends may be reshaped by hand. At this stage, you are not chasing perfection. You are creating a clean, stable structure for the new surface.
If the lining is brittle or discolored, remove that too. A fresh exterior over a crumbling interior is like putting lipstick on a haunted house. Technically possible. Spiritually unwise.
3. Make a Pattern Before You Cut Anything Expensive
One of the best lampshade makeover tricks is wonderfully low-tech: use the old shade shape to make a new pattern. Roll the shade on paper to trace the curve, then add extra material around the edges so you can wrap the new covering neatly inside. This is especially important on tapered shades, where guessing the shape tends to produce weird, lopsided outcomes.
When choosing new material, think about both style and light quality. Linen, cotton, and lightweight textiles usually create a soft, cozy glow. Decorative paper can look crisp and tailored. Wallpaper scraps can be gorgeous on statement lamps. Vintage scarves, embroidered remnants, and leftover fabric from drapes or pillows can create a custom look that feels intentional rather than crafty.
The key is balance. A highly patterned shade works best when the lamp base is relatively calm. An ornate ceramic or brass base often looks better with a simple, textural shade. If both the base and the shade are shouting, your lamp stops looking chic and starts sounding argumentative.
4. Recover the Shade With Care
Lay your chosen material face down, position the pattern, and cut carefully. Dry-fit the covering before gluing anything. This gives you a chance to catch alignment issues, pattern mismatches, or the universal crafting surprise known as “why is one side suddenly shorter?”
Apply adhesive sparingly and evenly. Too little can cause lifting, but too much can bleed through fabric, wrinkle paper, or create visible lumps. Smooth the material gradually as you attach it, working section by section rather than trying to tackle the whole shade in one dramatic move. Slow and steady wins the lighting race.
Wrap extra fabric or paper over the top and bottom edges for a cleaner finish. If the interior will be visible, take even more care here. A vintage shade can look charmingly imperfect on the outside, but messy inner edges make the project feel unfinished.
5. Add Trim Without Making It Look Like a Costume
Trim is where a restored lampshade either becomes fabulous or goes off the rails. Braid, ribbon, grosgrain, fringe, tassels, and bias tape can all work beautifully, especially when they echo details elsewhere in the room. A little contrast can add depth. Tone-on-tone trim can make a plain shade look expensive. Decorative edging can also hide seams and give the project a polished finish.
But restraint matters. If you are using a dramatic trim, let that be the statement. If your fabric already has pattern, texture, or embroidery, skip the extra fuss. Vintage style works best when it looks collected, not overworked. You are aiming for “designer found treasure,” not “craft fair panic purchase.”
Styling a Revived Shade So It Looks Intentional
Once your restored shade is complete, step back and consider the whole lamp. A shade should complement the base in scale, shape, and mood. In general, a table lamp shade often looks best when its height is around two-thirds the height of the base and its width relates comfortably to the lamp’s widest part. That rule is not a law, but it is a reliable starting point when something feels visually off.
Shape matters too. Drum shades feel cleaner and more modern. Empire shades lean classic. Oval shades can work well on flatter lamps or in tighter spaces. Pleated or scalloped shades bring instant personality, especially when paired with vintage ceramic, turned wood, or brass bases.
Color is where the fun begins. For a moody room, try deep olive, rust, tobacco, or faded floral patterns. For cottage or grandmillennial interiors, stripes, block prints, and soft chintz-style florals feel right at home. For a cleaner transitional look, choose textured neutrals such as flax, oat, cream, or warm white. Even a simple shade can feel special if the fabric has slub, weave, or stitched detail.
And for the love of ambiance, pair the revived shade with the right bulb. A harsh bulb can make a beautiful shade feel clinical. Softer, warm-toned LED light usually flatters vintage materials better and produces less heat, which is especially helpful for older or more delicate shades.
Common Mistakes to Avoid
- Skipping the test clean: Never assume a vintage shade can handle water just because it looks sturdy.
- Choosing fabric that is too heavy: Thick material can fight the curve of the frame and create bulky seams.
- Ignoring scale: A beautifully restored shade can still look wrong if it is too tall, too narrow, or too dramatic for the base.
- Using a hot bulb: Older shades and delicate materials benefit from cooler-running LED options.
- Over-trimming: Fringe is fun. Five different trims at once is a cry for help.
- Reattaching before fully dry: Moisture and electricity are a terrible decorating duo.
Conclusion
Reviving a vintage lampshade is one of the smartest ways to add character to your home without spending like you accidentally wandered into a designer showroom. It blends restoration, styling, and storytelling in one compact project. With the right approach, you can keep the shape and charm that made the shade worth saving while updating the material, trim, and finish so it works in a modern room.
The best restored shades do not look brand new. They look loved, considered, and just distinctive enough to make someone ask, “Wait, where did you get that?” That is the sweet spot. Whether you keep things simple with a gentle clean or go full lampshade restoration with fresh fabric and trim, the result is the same: better light, more personality, and the deep satisfaction of rescuing something that still had plenty of glow left in it.
Experiences From Reviving a Vintage Lampshade
The thing nobody tells you about restoring an old lampshade is how quickly it becomes personal. At first, it seems like a small decorating task. You pick up an old lamp at a thrift store because the base has good bones, or because the shape is weird in a delightful way, or because it costs less than a fancy coffee drink and seems impossible to resist. Then you get it home, set it on a table, and start noticing details: the faded braid, the slightly crooked seam, the way the light still glows warmly through tired fabric. Suddenly, this is no longer clutter. It is a tiny design rescue mission.
One of the most memorable parts of reviving a vintage lampshade is the moment the dust comes off and the personality starts showing. A shade that looked dull and forgettable can reveal pleats, texture, or a silhouette that feels much more special than anything on a big-box shelf. Even when the original material is too far gone to save, the frame often tells you exactly what kind of character the finished piece should have. Some shades want crisp linen and tailored trim. Others practically beg for floral fabric and a little fringe drama.
There is also a lot of trial and error involved, which is a polite way to say you may glue something slightly crooked and spend ten minutes pretending it is “artfully offbeat.” Restoring old shades teaches patience fast. It teaches you to test cleaners first, to dry-fit fabric before committing, and to stop trying to force a material that clearly hates curves. It also teaches you that small details matter more than grand gestures. The neat fold on the inner rim, the right width of trim, the warm bulb you choose at the end: those are the things that make the finished lamp look elevated.
Perhaps the best experience is what happens after the project is done. The revived lamp starts pulling more visual weight in the room than you expected. It softens a dark corner. It makes a bookshelf feel styled. It turns a basic side table into a little moment. Guests notice it, even if they are not design people. They may not say, “What a successful lampshade makeover,” because that would be a wildly specific compliment, but they will notice the atmosphere it creates.
And that is really the joy of it. Restoring a vintage lampshade is not just about saving money or checking off another DIY project. It is about creating a home that feels layered, thoughtful, and slightly more human. Old objects carry a kind of visual memory. When you revive one instead of replacing it, you keep that memory alive while making it useful again. That is part craft, part decorating, and part quiet rebellion against throwaway culture. Not bad for a lamp shade that looked doomed under a layer of attic dust.


