Table of Contents >> Show >> Hide
- What Is the Vulcania Italian Clay Bean Pot?
- Why Clay Pots Make Beans Taste Better
- Key Features to Know Before You Start
- How to Season a Vulcania-Style Terra Cotta Bean Pot
- How to Cook Beans in a Vulcania Italian Clay Bean Pot
- Three Bean-Pot Recipes That Feel Like Italy (Even If You’re in Sweatpants)
- Troubleshooting: When Beans Misbehave
- Cleaning and Care: Keep Your Bean Pot Happy
- Food-Safety Reality Check: Lead, Glazes, and What to Look For
- Beyond Beans: What Else This Pot Does Well
- Buying Tips: How to Choose the Right Vulcania Pot for Your Kitchen
- Experiences With a Vulcania Italian Clay Bean Pot (What Home Cooks Commonly Notice)
- Conclusion
If you’ve ever cooked a pot of beans that tasted fine but somehow… emotionally unavailable, you’re not alone. Beans can be picky. They want gentle heat, steady moisture, and enough time to become creamy without turning into beige confetti. That’s where the Vulcania Italian Clay Bean Pot earns its reputation: it’s built to do the slow, even cooking that beans secretly cravewithout you hovering like a nervous stage parent.
Vulcania’s terra cotta cookware is associated with Tuscany and is often described as being made from volcanic soil, with production dating back to the early 1900s. In practical kitchen terms, that heritage translates into a thick-bellied clay pot that holds heat steadily and encourages a low, calm simmer. It’s the opposite of “boil aggressively and hope for the best,” which is also the opposite of how beans like to be treated.
What Is the Vulcania Italian Clay Bean Pot?
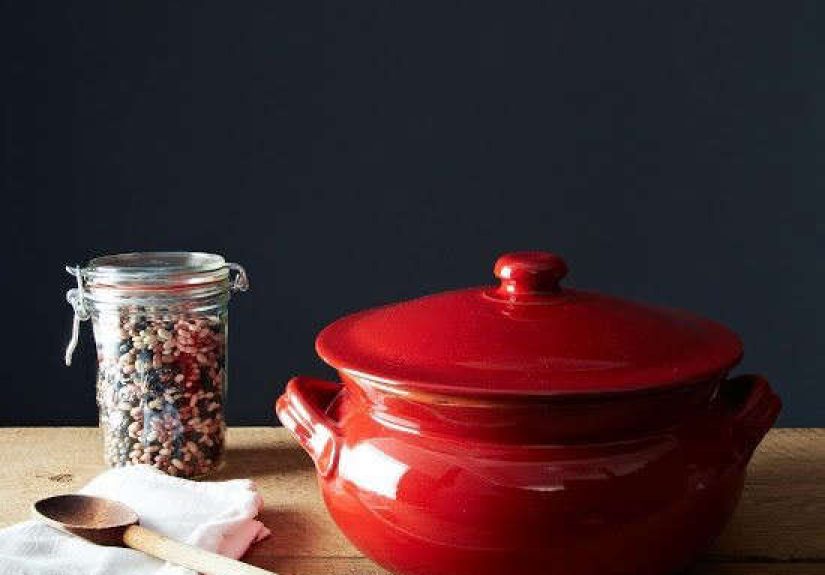
The Vulcania Italian Clay Bean Pot is a terra cotta (earthenware) cooking pot designed for long-simmering dishesespecially beans. A frequently cited version measures about 10.25 inches in diameter and 5.25 inches tall with a capacity around 6 quarts, and it’s commonly paired with an optional heat diffuser to spread stovetop heat more evenly.
Its defining shape is not just for looks: a rounded belly helps circulate heat and liquid, while a narrower opening helps limit evaporation so your pot stays “brothy” instead of “mysteriously dry.” Translation: fewer emergency water refills and less chance of scorching at the bottom.
Why Clay Pots Make Beans Taste Better
Clay cooking is famous for two big reasons: thermal mass and gentle heat delivery. Once warmed, earthenware holds heat steadily, which helps maintain a controlled simmer instead of bouncing between “nothing is happening” and “I have created a bean volcano.” When beans cook at a calmer temperature, their skins stay more intact and the interiors soften more evenlyhello, creamy texture.
Many bean-focused cooks love clay because it encourages “low and slow” cooking without constant babysitting. That slow approach is also why clay pots are popular globallytagines, donabe, cazuelasbecause steady heat and moisture build deep flavor without drying foods out.
Key Features to Know Before You Start
1) It’s made for low heat (and rewards patience)
A clay pot heats differently from metal. With stainless steel, you can crank the heat up, then dial it back. With clay, the best practice is the reverse: start low and increase gradually. That prevents cracking and avoids scorching once the pot stores heat.
2) A heat diffuser is not “extra,” it’s “smart”
Many clay cookware sellers recommend using a diffuser (sometimes called a flame tamer) to spread heat and reduce hot spots. For electric cooktops, a diffuser is often considered essential; for gas, it’s helpful insurance and makes low simmer control much easier. If you’ve ever tried to keep beans from boiling too hard on a powerful burner, you already understand why.
3) It needs seasoning before first use
Seasoning strengthens many terra cotta pots and helps them handle stovetop heat more safely. Some guidance includes soaking the pot, rubbing with garlic, and slowly warming water in the pot (either on very gentle heat with a diffuser or in a low oven) for a couple of hours.
How to Season a Vulcania-Style Terra Cotta Bean Pot
Always follow the care instructions that come with your exact pot, but a common seasoning approach for high-fired terra cotta cookware looks like this:
- Soak the pot in water for about 2 hours (this hydrates the clay gradually).
- Rub the interior with a cut garlic clove (optional, but traditional and pleasantly aromatic).
- If the exterior has unglazed areas, lightly oil those surfaces (some makers recommend olive oil).
- Fill the pot about three-quarters with water and warm it slowly: either on very low heat with a diffuser or in a low oven for a couple of hours.
- Cool down gradually (turn the oven off and let it cool inside, or let it cool on the stove).
The goal is not to “cook” the pot. The goal is to build confidence between you, heat, and claylike a group project, but less awkward.
How to Cook Beans in a Vulcania Italian Clay Bean Pot
Below is a reliable, clay-pot-friendly method that balances modern bean science with classic comfort-food instincts. This works beautifully for cannellini, navy, pinto, black beans, chickpeas, and similar dried legumes.
Step 1: Sort, rinse, and (usually) soak
Sort your beans to remove small stones or broken pieces, then rinse. Soaking is optional depending on the bean, age, and your schedule. Many cooks skip soaking for thin-skinned beans, but larger, thicker-skinned beans often benefit from soaking for more even cooking.
Step 2: Try a salt brine (yes, salt!)
Old advice said “don’t salt beans until the end.” More recent testing shows that salting the soaking water can improve seasoning and texture. A practical rule: about 1 tablespoon kosher salt per quart of water for soaking. After soaking, drain and rinse, then cook with fresh water and adjust salt later.
Step 3: Load the pot (and don’t skimp on aromatics)
For a 6-quart pot, start with 1 pound of dried beans (about 2 cups, depending on variety). Add:
- 1 onion (halved),
- 3–5 garlic cloves (smashed),
- 1 bay leaf,
- a sprig of rosemary or thyme (especially good for Tuscan-style beans),
- optional: a chunk of carrot or celery for sweetness.
Cover with water by about 1–2 inches. Clay pots help reduce evaporation, but beans still need enough liquid to soften evenly.
Step 4: Heat slowly (this is the clay-pot “cheat code”)
Place the pot on the stove with a diffuser if you have one. Start on low heat and increase gradually over about 5 minutes until you reach a gentle simmer. Avoid a rolling boilbeans cooked at a furious boil tend to split and shed skins.
Step 5: Simmer gently until tender
Cooking times vary widely based on bean type and age. In general:
- Black beans: roughly 60–90 minutes (sometimes longer)
- Navy beans: 60–120 minutes
- Chickpeas: 90–150+ minutes
- Cannellini: 60–120 minutes
The best doneness test is texture: a bean should crush easily and taste creamy, not chalky. Add salt to taste once beans are close to tender, adjusting gradually.
Optional turbo tip: a tiny pinch of baking soda
If your beans are stubborn (often older beans), a small pinch of baking soda in the soaking water (or cooking water) can speed softening. Don’t overdo ittoo much can make beans taste soapy and mess with texture. Think “pinch,” not “season like it’s salt.”
Three Bean-Pot Recipes That Feel Like Italy (Even If You’re in Sweatpants)
1) Tuscan-style cannellini beans (“fagioli all’uccelletto” vibes)
Cook cannellini beans with garlic, rosemary, and a bay leaf. Near the end, stir in a spoonful of tomato paste and a glug of olive oil. Finish with black pepper. Serve with crusty bread and the satisfied expression of someone who definitely owns a linen napkin (even if you don’t).
2) Smoky navy beans with a “baked bean” energy
Add onion, a bay leaf, smoked paprika, and a small piece of smoked meat (or a dash of liquid smoke if you must). Sweeten lightly with maple syrup or brown sugar. Keep the simmer gentle so the sauce thickens without burning.
3) Chickpeas for week-long meal prep
Cook chickpeas with onion, garlic, and a bay leaf. Save the cooking liquid for soups. Use chickpeas for hummus, salads, grain bowls, and quick skillet dinners. Your future self will call you a genius (and your wallet will agree).
Troubleshooting: When Beans Misbehave
“My beans are still hard!”
- They may be old. Increase time, keep a gentle simmer, and consider the baking-soda pinch next time.
- Acid slows softening. If you added tomatoes, vinegar, or wine early, wait until beans are tender next time.
- Hard water can be a factor; filtered water may help in some areas.
“My beans are splitting and the pot looks like a bean crime scene.”
- Too vigorous a boil. Dial it down. Clay holds heatsmall adjustments matter.
- Overstirring can break skins. Stir gently, and not constantly.
“I scorched the bottom.”
- Use a diffuser, especially on electric or powerful gas burners.
- Start lower and heat more graduallyclay cooking is patient by design.
Cleaning and Care: Keep Your Bean Pot Happy
Clay cookware is durable when treated well, but it dislikes dramaespecially temperature drama. Use these habits to extend the life of your Vulcania-style pot:
- Cool gradually before washing. Don’t rinse a hot pot with cold water.
- Skip harsh scrubbers. Use a soft abrasive pad if needed, and soak stuck-on bits in warm water first.
- Be careful with detergents. Some clay cookware guidance notes that porous materials can absorb detergent and later release it. Hand washing is often recommended even if the pot is technically dishwasher safe.
- Dry thoroughly before storing to prevent odors and moisture issues.
Food-Safety Reality Check: Lead, Glazes, and What to Look For
Reputable makers often specify that their cookware is lead- and cadmium-free. That matters because improperly formulated or fired glazes can leach lead into food, especially if the surface is worn, chipped, or cracked. U.S. health agencies warn that lead can leach from some ceramic ware under certain conditions, and the FDA strongly advises against using pottery for food if testing shows leachable lead.
Practical safety habits:
- Buy from reputable sellers who state the pot is food-safe and lead/cadmium compliant.
- Retire the pot from food use if you see chips, cracks, or heavy glaze wear.
- Avoid using decorative/ornamental ceramics for cooking unless clearly labeled food-safe.
Beyond Beans: What Else This Pot Does Well
Calling it a “bean pot” is like calling a great jacket a “zipper holder.” Yes, beans are the headliner, but the pot’s strengthssteady heat, moisture retention, cozy simmeringmake it great for:
- Soups and stews (minestrone, lentil soup, chicken soup)
- Braised vegetables (greens with garlic and olive oil, ratatouille-style mixes)
- Slow-simmered sauces when you want gentle bubbling instead of splatter city
- Grains like farro or barley (start low, stir occasionally)
Buying Tips: How to Choose the Right Vulcania Pot for Your Kitchen
If you’re shopping specifically for Vulcania, you’ll see a few sizes and finishes. Some are glazed inside and partially unglazed outside (which can develop a darker patina over time), while others may be more fully glazed. Consider:
- Capacity: A 6-quart size is a sweet spot for 1 pound of beans plus broth and aromatics.
- Cooktop type: If you cook on electric, plan on a diffuser. If you cook on gas, a diffuser still makes simmer control easier and reduces hot-spot risk.
- Handle design: Full pots get heavy. Good side handles are not a luxury.
- Care comfort: If you hate fussy cookware, clay can still workjust accept “low heat” as a lifestyle.
Experiences With a Vulcania Italian Clay Bean Pot (What Home Cooks Commonly Notice)
Clay-pot cooking tends to create the same set of “oh wow” moments for a lot of peoplefollowed by a couple of “oh no” lessons that you only need to learn once. Here are experiences that many home cooks describe after switching from metal stockpots to a Vulcania-style clay bean pot.
The first surprise is how calm the simmer feels. With stainless steel, you often chase the heat: turn it up, turn it down, crack the lid, stir, repeat. In a clay pot, once the heat settles in, the pot behaves like it’s on your team. The bubbles are smaller, slower, and more consistent. It’s the difference between a busy highway and a scenic back roadboth get you there, but one is way less stressful.
The second surprise is the texture. Beans cooked gently often come out creamy inside without shedding their skins. A lot of cooks say they start making “simple beans” more often because the results taste restaurant-level with basic aromatics. You’ll notice it most with cannellini or navy beans: the broth thickens naturally, turning silky without needing a blender or starch slurry. That’s not magicit’s steady heat plus timebut it feels like magic when you spoon it over toast.
Then there’s the learning curve: heat patience. Many people’s first clay-pot mistake is heating too aggressively at the start (because we’ve all been trained by metal pans). Clay wants a slower warm-up, and once it’s hot, it stays hot. Cooks often describe the “aha” moment as realizing that low heat doesn’t mean slow progress; it means controlled progress. After a few uses, you’ll start recognizing the exact flame level or knob position that produces a gentle simmerand you’ll wonder why you ever tolerated bean geysers.
Another common experience: the diffuser becomes your best friend. People who cook on electric especially tend to treat the diffuser like part of the pot, not an accessory. It reduces hot spots and makes the pot feel more predictable. Even on gas, many cooks keep using a diffuser simply because it makes “low and steady” easier to maintainparticularly for long simmers when you’d rather read a book than babysit dinner.
Finally, clay pots change the rhythm of cooking. You may start soaking beans earlier, planning dinners that simmer while you do other things, and saving bean broth because it tastes too good to pour out. Plenty of cooks say the pot nudges them toward more from-scratch mealsnot because it’s fussy, but because it makes humble ingredients feel special. The experience is less “weeknight speed-run” and more “slow kitchen comfort,” even if the rest of your day is chaos.
Conclusion
The Vulcania Italian Clay Bean Pot is for anyone who wants beans that taste deeply seasoned, turn creamy without falling apart, and cook at a gentle simmer that feels almost effortless once you learn the low-heat rhythm. With proper seasoning, a smart approach to gradual heating, and (ideally) a diffuser, it becomes a dependable pot for beans, soups, stews, and slow comfort cooking that tastes like it took more effort than it did. Which is basically the best kind of kitchen flex.