Table of Contents >> Show >> Hide
- Quick Supply Checklist (So You Don’t Have to “Run Out for One Thing”)
- 15 Easy Passover Crafts and DIY Decorations
- 1) Printable Paper Seder Plate (Instant Centerpiece, Zero Dishwasher Risk)
- 2) Painted “Real” Seder Plate (Keepsake That Doesn’t Require Pottery Class)
- 3) Toy Seder Plate for Pretend Play (Because Toddlers Love “Ritual Snacks”)
- 4) DIY Miriam’s Cup (A Craft That Actually Belongs on the Table)
- 5) Foam Flower Photo Placemats (Seder Table Decor + Grandparent Bait)
- 6) Homemade Matzah Holder (DIY That Looks Like You Tried)
- 7) Decorated Afikomen Bag (The Craft That Powers the Entire Night)
- 8) Ten Plagues Finger Puppets (Educational… But Make It Adorable)
- 9) Ten Plagues Seder Sticks (Table Props That Double as Kid Jobs)
- 10) DIY “Plague Goody Bags” (Dollar Store Theater, Big Seder Energy)
- 11) Matzah Box Makeover (Upcycle the Box, Upgrade the Table)
- 12) Passover Activity Placemats (Decor + Distraction, the Dream Combo)
- 13) Seder Night Bingo (Turn Ritual Into a Game Without Being Weird)
- 14) Pesach Door Hanger (A “We’re Celebrating Here” Welcome Sign)
- 15) No-Stress Passover Centerpiece (The One That Doesn’t Compete With the Food)
- How to Make These Passover DIYs Look “Styled” (Even If You’re Not That Person)
- of Real-Life Crafting “Experience” (A.K.A. What Usually Happens)
- Conclusion
Passover (Pesach) is a holiday with big themesfreedom, storytelling, springtime renewaland a tiny theme that somehow becomes gigantic:
crumbs. If you’re already elbow-deep in pre-holiday tidying, crafts are the secret weapon: they keep kids busy, make your Seder table
look intentional (even if you’re running on matzah and vibes), and turn the Passover story into something hands-on.
Below are 15 easy Passover crafts and DIY decorations you can pull off with basic supplies, minimal drama, and a high chance of hearing,
“Can we make another frog?” (Yes. You can. Frogs are inevitable.)
Quick Supply Checklist (So You Don’t Have to “Run Out for One Thing”)
Most of these Passover crafts use what you already haveor what you can grab at a dollar store or craft aisle without needing a second mortgage.
Here’s the “buy once, craft all week” list:
- White cardstock + construction paper (blue, green, red, brown)
- Markers, crayons, colored pencils
- Glue sticks + school glue + tape
- Scissors (and kid scissors if you value your sanity)
- Paper plates, popsicle sticks, yarn/ribbon
- Optional “fancy” extras: paint pens, stickers, foam sheets, beads, craft wire
15 Easy Passover Crafts and DIY Decorations
Each idea includes a quick “why it works” so you’re not just craftingyou’re quietly winning at meaningful holiday vibes.
1) Printable Paper Seder Plate (Instant Centerpiece, Zero Dishwasher Risk)
A paper Seder plate is the ultimate last-minute win: it teaches the symbols, entertains kids, and looks cute on the tablewithout the fear
of anyone “helping” by dropping your real plate.
- Materials: printed Seder plate template (or draw your own), scissors, tape/glue, crayons/markers
- Time: 15–30 minutes
- How-to: Color the plate, cut out the symbolic foods, and tape them into place. For older kids: label each symbol (karpas, maror, charoset, etc.).
- Pro tip: Print a second one in black-and-white so kids can color during the “why is this night so long?” portion of the Seder.
2) Painted “Real” Seder Plate (Keepsake That Doesn’t Require Pottery Class)
Turn a plain white plate into a personalized Seder plate using non-toxic paint pens. It’s easy enough for kids, classy enough for adults,
and sentimental enough to make grandparents misty.
- Materials: plain white plate, non-toxic paint pens, pencil (optional), paper towels
- Time: 30–60 minutes plus drying time
- How-to: Sketch light guidelines, then write or draw the symbols and labels. Keep it simple: six sections + small icons.
- Design idea: Add a spring border (tiny leaves) to nod to renewalPassover is basically freedom + spring cleaning.
3) Toy Seder Plate for Pretend Play (Because Toddlers Love “Ritual Snacks”)
A pretend-play Seder plate is perfect for toddlers who want to participate but shouldn’t be trusted with horseradish.
Use air-dry clay or polymer clay to make tiny “foods.”
- Materials: clay (air-dry or polymer), sturdy plastic plate, stickers, toothpicks (adult use)
- Time: 30 minutes plus drying/baking time
- How-to: Make small shapes: green “karpas,” brown “charoset,” white “egg,” etc. Place stickers on the plate to mark spots.
- Safety note: Skip tiny parts for kids under 3. Big, chunky shapes only.
4) DIY Miriam’s Cup (A Craft That Actually Belongs on the Table)
Many modern Seders include a Miriam’s Cup (often filled with water) to honor Miriam and the role of women in the Exodus story.
This craft turns a simple goblet into a sparkly, meaningful ritual object.
- Materials: glass goblet, blue beads, small bell, craft wire, gold/silver paint pen
- Time: 20–40 minutes
- How-to: String beads onto wire, secure, then wrap around the stem. Add a small bell and write “Miriam’s Cup” in English or Hebrew.
- Make it easier: Use pipe cleaners instead of wire for younger kids.
5) Foam Flower Photo Placemats (Seder Table Decor + Grandparent Bait)
These placemats work because they’re both decoration and a kid “project” you can proudly display. Add a photo and suddenly it’s heirloom-level cute.
- Materials: foam sheets or paper flowers, cardstock, family photos, glue
- Time: 30–45 minutes
- How-to: Glue flowers around the border, add the child’s name, and attach a photo in the corner.
- Bonus: Laminate if you want them to survive grape juice spills with dignity.
6) Homemade Matzah Holder (DIY That Looks Like You Tried)
A matzah holder is peak “low effort, high impact.” It also prevents the classic matzah avalanche when someone reaches for “just one more.”
- Materials: cardstock or felt, ribbon, stickers/markers, hole punch
- Time: 20–30 minutes
- How-to: Fold cardstock into a standing sleeve, punch holes, and tie with ribbon. Decorate with “Matzah” + doodles.
- Style tip: Use blue/white/gold accents for a clean, modern Passover look.
7) Decorated Afikomen Bag (The Craft That Powers the Entire Night)
The afikomen hunt is the MVP of kid engagement. Make the bag together, then use it at the Sederinstant buy-in.
- Materials: felt or fabric squares, needle/thread or fabric glue, markers, ribbon
- Time: 30–60 minutes
- How-to: Stitch or glue three sides, turn right-side out, decorate with “Afikomen” and bold patterns.
- Absolutely-not tip: Glitter sounds fun until it haunts your house like a tenth plague.
8) Ten Plagues Finger Puppets (Educational… But Make It Adorable)
The Ten Plagues can get intense. Finger puppets make it interactive without turning the Seder into a bedtime horror story.
Kids can “act out” the plagues in a controlled, giggly way.
- Materials: printable puppets or hand-drawn templates, cardstock, scissors, tape
- Time: 20–40 minutes
- How-to: Color, cut, and tape into loops that fit fingers. Assign kids “plague roles” during the reading.
- Parent win: You get participation without negotiating screen time at the table.
9) Ten Plagues Seder Sticks (Table Props That Double as Kid Jobs)
Make simple “plague signs” on sticks. When each plague is mentioned, kids hold up the matching sign.
It’s basically a holiday-approved cue-card system.
- Materials: paper circles, markers, glue, skewers or craft sticks (blunt ends preferred)
- Time: 30–45 minutes
- How-to: Draw icons (frogs, hail, darkness). Glue two circles around the stick so it’s sturdier.
- Safety: If using skewers, bury sharp points inside paper layers and keep away from tiny kids.
10) DIY “Plague Goody Bags” (Dollar Store Theater, Big Seder Energy)
This is the craft that feels like a party favor but secretly supports your goal of “kids stay engaged until dinner.”
Fill small bags with silly, symbolic items for each plague.
- Materials: small paper bags, stickers, cheap toys/candy substitutes
- Time: 20–30 minutes
- How-to: Label bags “10 Plagues Kit.” Add things like toy frogs, sunglasses for darkness, red stickers, etc.
- Budget tip: One “kit” can be shared by siblings if you frame it as teamwork, not scarcity. (May the odds be ever in your favor.)
11) Matzah Box Makeover (Upcycle the Box, Upgrade the Table)
A matzah box is already the right size, shape, and “Passover-branded.” Let kids decorate it, then use it to serve matzah like you planned it all along.
- Materials: empty matzah box, wrapping paper or contact paper, markers, tape
- Time: 15–25 minutes
- How-to: Cover the box neatly, then decorate with symbols (waves, bricks, matzah). Cut a flap for easy serving.
- Looks fancy because: It’s coordinated and uprightlike a centerpiece that also holds snacks.
12) Passover Activity Placemats (Decor + Distraction, the Dream Combo)
Printable placemats are a lifesaver: they look festive and keep hands busy while adults do the “important talking.”
Choose levels based on agecoloring for littles, word searches for older kids.
- Materials: printable placemat, crayons/markers
- Time: 2 minutes to print, 20+ minutes of peace
- How-to: Put one at each kid’s seat. Add a small baggie of crayons so nobody “needs” yours mid-Seder.
- Extra: Slip into a clear page protector for spill protection.
13) Seder Night Bingo (Turn Ritual Into a Game Without Being Weird)
Bingo keeps kids listening for key moments: “four questions,” “cup of wine,” “matzah,” “afikomen,” “Elijah.”
It’s surprisingly effectiveand no one has to do interpretive dance.
- Materials: bingo printable, small markers (beans, buttons, paper squares)
- Time: 10 minutes setup
- How-to: Hand out cards. When kids spot an item or moment, they mark it. Winner gets a small prize or first pick of dessert.
- Make it meaningful: Use symbols that reinforce the story rather than random holiday clip art.
14) Pesach Door Hanger (A “We’re Celebrating Here” Welcome Sign)
A simple door hanger sets the mood before anyone even sits down. Plus, it’s a great pre-Seder “arrival activity.”
- Materials: cardstock, scissors, markers, ribbon
- Time: 20 minutes
- How-to: Cut a door-hanger shape, decorate with “Chag Pesach Sameach” or “Happy Passover,” add symbols (matzah, wine cup, parsley).
- Optional upgrade: Add a mini “Seder schedule” on the back so guests know what to expect.
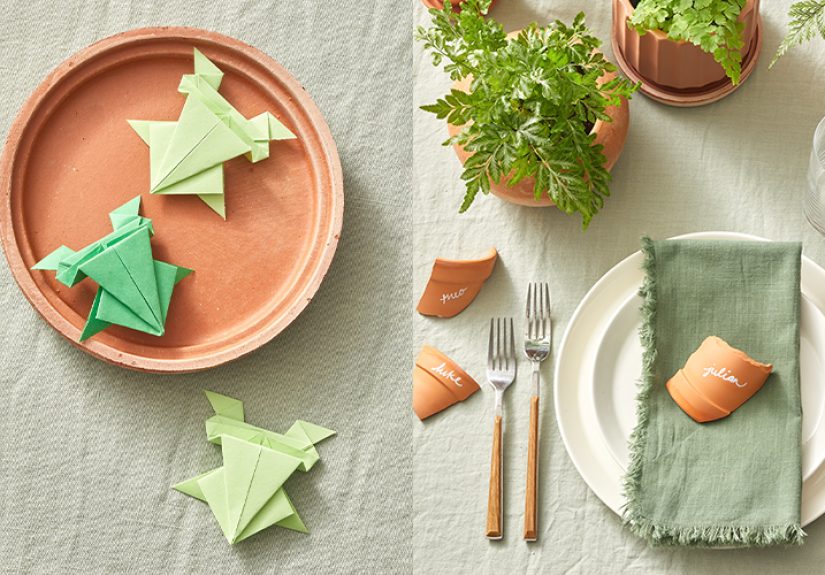
15) No-Stress Passover Centerpiece (The One That Doesn’t Compete With the Food)
Passover tables don’t need towering florals. A simple centerpiece reads “spring” and “special night” without blocking conversation or the brisket.
- Materials: a candlestick or small vase, greenery (real or faux), a few lemons, small cards
- Time: 10–15 minutes
- How-to: Place a single candlestick or vase in the center, add greenery around it, tuck in lemons for color, and add place cards or tiny symbol labels.
- Crafty twist: Have kids make the place cards with little drawings of each Seder symbol.
How to Make These Passover DIYs Look “Styled” (Even If You’re Not That Person)
The secret to cohesive DIY Passover decorations is repeating just a few elements:
- Pick a color trio: blue + white + gold, or green + white + kraft paper.
- Repeat one symbol: waves (Sea of Reeds), bricks (slavery/freedom), or matzah shapes.
- Cluster, don’t scatter: group items in threes (cups, candles, small vases) so it reads intentional.
- Give kids a “craft zone”: one corner of the table or a side station keeps the main Seder area calmer.
of Real-Life Crafting “Experience” (A.K.A. What Usually Happens)
Here’s the part nobody puts on the supply list: Passover crafting often happens in the exact emotional weather system known as
“pre-holiday momentum.” The house is getting cleaner, the calendar is getting tighter, and the kids have suddenly developed a deep curiosity
about glue viscosity. If you’re doing DIY Passover decorations, the best “experience-based” strategy is to think in short, winnable rounds.
One craft that takes 15 minutes and makes the table look festive will do more for your joy than a three-hour masterpiece that ends with
someone crying (adult or childno judgment).
Families who craft successfully for Passover tend to build little traditions around it. A common rhythm is: one “table craft” (placemats,
place cards, or a centerpiece piece), one “story craft” (plagues puppets, Seder plate), and one “game craft” (bingo, activity sheets).
That mix keeps the holiday balanceddecor you can see, meaning you can talk about, and something that buys you time during the longer parts of
the Seder. And if you’re hosting, time is the rarest ritual object of all.
You’ll also notice that kids love crafts that have a job later. Afikomen bags, finger puppets, plague sticks, and placemats feel important
because they aren’t just artthey’re equipment. When a child knows, “I made the thing we’re using tonight,” participation goes up and side
conversations go down. Even shy kids often become surprisingly confident when they’re holding the “darkness” puppet or presenting their handmade
Miriam’s Cup like a museum curator.
Another universal Passover-crafting truth: the simplest projects create the most compliments. A decorated matzah box on the table reads like a
deliberate design choice. Place cards with tiny matzah drawings look charming and personal. A calm, low centerpiece makes the whole table feel
elevated. Meanwhile, the complicated craft that required seventeen steps and a glue gun will be admired for 11 seconds and then gently moved
aside so someone can reach the salt water.
Finally, the best “experienced” move is planning for the moment things go off-script. If a bead breaks, switch to stickers. If paint takes too
long to dry, declare it “modern art” and move on. If kids get restless, hand them the Passover activity placemat and a handful of crayons like
you’re distributing tiny, colorful peace treaties. Passover is about telling a story of resilience and freedomso if your crafting night is a bit
messy, you’re accidentally on-theme.
Conclusion
Easy Passover crafts and DIY decorations don’t have to be complicated to be meaningful. Whether you’re making a Seder plate, decorating an
afikomen bag, or setting out kid-friendly placemats, the goal is the same: bring the story to life and make the table feel warm, festive,
and family-made. Choose a few projects that fit your crew, keep it simple, and rememberif it looks good from three feet away, it’s a success.
(That’s not a craft rule. That’s a life rule.)