Table of Contents >> Show >> Hide
- Before You Start: Know What’s Worth Saving
- Paint, Stain, and Surface Changes
- 1. Paint the cabinets a fresh, modern color
- 2. Try a two-tone cabinet scheme
- 3. Paint just the island
- 4. Refinish stained wood instead of painting it
- 5. Use peel-and-stick wood-look film on flat fronts
- 6. Paint the cabinet interiors or backs
- 7. Add wallpaper or contact paper inside glass-front cabinets
- Door and Front-Face Updates
- Hardware and Trim That Make Cabinets Look Custom
- Functional Upgrades That Also Improve the Look
- 21. Install under-cabinet lighting
- 22. Add pull-out shelves inside lower cabinets
- 23. Add rollout trays for pots, pans, or pantry items
- 24. Create a plate rack, tray divider, or spice zone
- 25. Replace one upper section with true open shelving
- 26. Style the cabinet tops and surrounding details with intention
- How to Choose the Right DIY Cabinet Update
- What These DIY Cabinet Updates Feel Like in Real Life
- Final Thoughts
If your kitchen cabinets are functional but look like they’ve been emotionally supporting the house since 1997, take a breath before you price out a full replacement. In many kitchens, the cabinet boxes are still perfectly usable. The real problem is usually cosmetic: tired paint, dated doors, sad little knobs, awkward storage, and a general vibe that says, “I came free with the builder package.”
The good news is that a smart DIY kitchen cabinet update can completely change the room without turning your home into a renovation crime scene. A few weekends, some patience, and the willingness to get acquainted with sandpaper can deliver a surprisingly high-end kitchen cabinet makeover. Below are 26 practical, stylish ways to update cabinets you already own, plus real-world lessons that make the difference between “fresh and custom” and “why is my drawer pull crooked?”
Before You Start: Know What’s Worth Saving
DIY cabinet updates work best when your cabinets are structurally sound. If the boxes are badly warped, water-damaged, or falling apart, replacement may be the smarter route. But if the cabinets open, close, and hold plates without drama, you can likely transform them with paint, trim, hardware, storage upgrades, and a few clever surface changes.
Paint, Stain, and Surface Changes
1. Paint the cabinets a fresh, modern color
This is still the heavyweight champion of budget-friendly updates. A new cabinet color can make oak look current, laminate look intentional, and dark wood feel lighter. White, warm greige, muted green, deep navy, and soft taupe are all strong choices. It is amazing what happens when the cabinets stop looking tired and start looking edited.
2. Try a two-tone cabinet scheme
Paint lowers one color and uppers another for contrast without chaos. A common move is darker base cabinets and lighter uppers, which helps anchor the room while keeping the kitchen airy. Two-tone cabinets also make a standard layout look more custom, like you definitely hired a designer instead of a playlist and sheer determination.
3. Paint just the island
If painting every cabinet feels like a commitment issue in project form, start with the island. A contrasting island color creates a focal point and gives you the biggest visual payoff for less labor. It is a smart halfway step for homeowners who want a bold change without giving every cabinet door the full spa treatment.
4. Refinish stained wood instead of painting it
Not every cabinet needs to be covered up. If you have real wood doors with good grain, refinishing can warm them up, tone down orange undertones, or deepen the finish for a richer look. This approach works especially well in traditional, farmhouse, and organic-modern kitchens where natural wood still earns its keep.
5. Use peel-and-stick wood-look film on flat fronts
For rental-friendly kitchens or low-risk experimentation, peel-and-stick finishes can mimic wood grain or solid color surprisingly well on flat cabinet surfaces. It is not a forever upgrade, but it is a fun, affordable way to modernize a dated finish without sanding your entire weekend into oblivion.
6. Paint the cabinet interiors or backs
If you want a little personality without repainting the whole kitchen, add a contrasting color inside cabinets or on the back panel of open shelves. It gives depth, highlights dishes or glassware, and makes even a small cabinet update feel thoughtful. Think of it as the kitchen equivalent of a bright lining inside a tailored jacket.
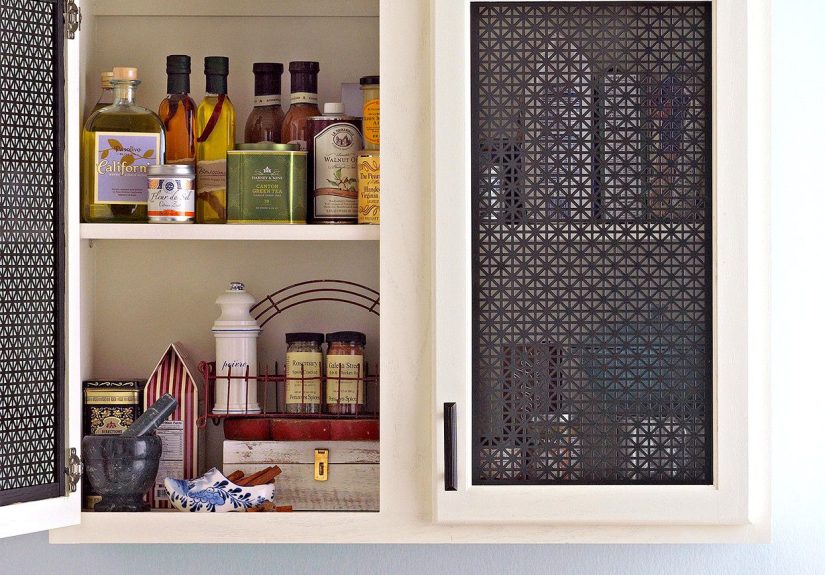
7. Add wallpaper or contact paper inside glass-front cabinets
This works beautifully behind glass doors or open cabinets. A subtle stripe, floral, grasscloth look, or geometric print adds detail without clutter. It is an especially clever trick in older kitchens where the cabinet shape is plain but the bones are still good.
Door and Front-Face Updates
8. Reface the cabinet fronts
Cabinet refacing is ideal when the boxes are solid but the doors are hopelessly dated. You keep the existing structure and update visible surfaces with veneer, new doors, and matching drawer fronts. It costs more than paint but much less than full replacement, and the finished result can look remarkably new.
9. Replace only the cabinet doors
If your cabinet boxes are in good shape, swapping doors alone can dramatically change the style. Slab fronts feel modern, Shaker fronts feel timeless, and beadboard fronts add cottage charm. This is one of the best ways to fake a full renovation without paying for one.
10. Remove some upper cabinet doors for open shelving
Take off a few upper doors and suddenly the kitchen feels lighter, more open, and less top-heavy. This works best if you can keep the visible items neat and attractive. Open shelving is gorgeous until it becomes a public exhibit titled Mugs I Forgot I Owned.
11. Add glass inserts to selected doors
Instead of replacing every door, cut out the center panel on a few uppers and install clear, frosted, or fluted glass. This introduces texture, reflects light, and breaks up a wall of solid cabinetry. It is especially effective in smaller kitchens that need visual breathing room.
12. Add trim to plain slab doors
Builder-grade flat doors can look more custom with applied molding. Thin trim can create a Shaker-style frame, panel effect, or a more traditional profile. It is a small material cost for a big style upgrade, especially after paint ties everything together.
13. Create an arched or decorative panel detail
If you want a trend-forward update, add a curved trim detail to cabinet fronts. Arched panels can soften a boxy kitchen and make basic cabinetry feel more bespoke. Used sparingly, this detail looks elevated. Used everywhere, it can start to feel like your cabinets joined a theater troupe.
14. Swap exposed hinges for hidden or soft-close hinges
Old hinges date cabinets fast. Replacing them with concealed hinges gives a cleaner look, and soft-close hardware adds a more premium feel every single day. This is one of those updates that seems minor until you realize the kitchen sounds less like a drawer-based percussion section.
Hardware and Trim That Make Cabinets Look Custom
15. Replace outdated knobs and pulls
New cabinet hardware is one of the easiest, cheapest upgrades you can make. Brass warms things up, matte black feels modern, polished nickel looks classic, and mixed metals can work when repeated intentionally. The right pull can make old cabinets feel deliberately styled rather than merely still here.
16. Use longer pulls for a more upscale look
Even if you keep the same finish, scaling up hardware changes the cabinet profile. Longer pulls often read cleaner and more contemporary than tiny knobs, especially on wide drawers. Just make sure the proportions suit the door size unless you want your hardware to look like it is overcommitting.
17. Add crown molding at the top
Crown molding instantly makes stock cabinets feel more built-in. It draws the eye up, closes the awkward gap at the ceiling line, and adds polish to short or plain upper cabinets. When color-matched to the cabinetry, it creates that expensive custom effect people assume required a much larger invoice.
18. Add light rail molding underneath uppers
Light rail hides under-cabinet fixtures and gives the bottom edge of upper cabinets a finished appearance. It is a subtle detail, but subtle details are often what separate “DIY” from “Did a designer touch this?”
19. Dress up the toe kick
Toe kicks are usually ignored, which is exactly why updating them can be so effective. Paint them to match, contrast them for drama, or add a decorative trim profile for a furniture-like look. It is an underappreciated spot with surprising visual influence.
20. Add furniture feet or base trim to island cabinets
On an island or end cabinet, furniture-style feet can make standard cabinetry feel freestanding and custom. Pair that with trim around the base and suddenly your island looks less like a box and more like a proper piece of furniture.
Functional Upgrades That Also Improve the Look
21. Install under-cabinet lighting
Under-cabinet lighting improves task lighting, adds warmth, and makes countertops look better at night. LED strip lights or puck lights are approachable DIY options. It is one of those upgrades that makes the kitchen feel instantly more luxurious, even if dinner is still boxed mac and cheese.
22. Add pull-out shelves inside lower cabinets
This does not change the exterior much, but it dramatically improves how your kitchen works. Pull-out shelves make deep base cabinets more usable and reduce the need to crawl into them like you are searching for treasure behind a Dutch oven.
23. Add rollout trays for pots, pans, or pantry items
Rollout trays are especially helpful in wide cabinets that become black holes for cookware. Organizing the inside of your cabinets makes the kitchen feel upgraded even when the change is not immediately visible. Function matters. Pretty cabinets that do not work are just decorative frustration.
24. Create a plate rack, tray divider, or spice zone
Small internal organizers can turn a chaotic cabinet into an efficient one. Vertical dividers for trays and cutting boards, spice risers, or a simple plate organizer make everyday use easier. You are not just updating cabinets; you are upgrading your relationship with Tuesday-night cooking.
25. Replace one upper section with true open shelving
If removing doors feels temporary, remove a small section of upper cabinetry entirely and install wood shelves. This works best on a short run, near a window, or above a coffee station. It breaks up a heavy wall of cabinets and adds display space without requiring a full remodel.
26. Style the cabinet tops and surrounding details with intention
Sometimes the cabinet update is not only on the cabinet. A new backsplash edge, coordinated shelf styling, fresh paint on nearby walls, and thoughtful countertop organization can make old cabinets look newly relevant. Cabinets never exist in isolation. They either belong to the room, or they drag it down with them.
How to Choose the Right DIY Cabinet Update
If your budget is tight, start with paint, hardware, and lighting. If your doors are the real problem, replace or reface fronts. If the kitchen feels visually heavy, remove a few upper doors or convert one section to open shelves. If the cabinets look fine but function badly, focus on pull-outs and organizers first. The smartest kitchen cabinet makeover is the one that solves the biggest annoyance in your kitchen, not the one that looks best on someone else’s social media feed.
What These DIY Cabinet Updates Feel Like in Real Life
Here is the part people do not always mention in glossy before-and-after photos: cabinet updates are usually less about one magical transformation and more about a series of small, smart decisions that add up. The first experience most homeowners have is surprise. Once the doors come off, the kitchen instantly looks more tired than expected. That is normal. The middle of a cabinet project is not where beauty lives. Beauty returns later, usually after primer.
Another common experience is discovering that prep is the entire game. Cleaning greasy cabinet doors is humbling. You think they are clean until the rag says otherwise. Sanding feels repetitive, labeling doors feels unnecessary right up until it becomes absolutely necessary, and patching old hardware holes can test your faith in symmetry. But these unglamorous steps are what make painted or refaced cabinets look durable instead of temporary.
Many DIYers also learn that cabinet hardware is weirdly emotional. You can stare at fifty brass pulls and suddenly feel unable to make any decision at all. Then you install one sample, step back, and realize the kitchen either looks ten years newer or like it is trying too hard. This is why templates matter. A beautiful pull installed crooked is still a crooked pull, and your eye will find it every single morning.
Open shelving creates its own educational journey. At first, it feels airy and stylish. Then you realize your everyday dishes need to look reasonably coordinated, and your random souvenir mug collection may not be the statement you hoped for. The best real-life open shelving is part storage, part editing exercise. A few bowls, some glassware, maybe a plant. Not every object in your possession needs stage time.
Painted cabinets also teach patience, which is rude but useful. Doors may feel dry quickly, but that does not mean they are ready for hard use. Rehanging them too early can lead to smudges, chips, or sticking edges, which is a heartbreaking way to end a productive weekend. The happiest outcomes usually come from people who wait longer than they want to, reinstall carefully, and treat the finish gently for the first week.
Perhaps the most satisfying experience, though, is realizing you did not need a total demolition to love your kitchen more. New doors, better lighting, smarter storage, and fresh color can shift the entire mood of the room. The kitchen starts to feel intentional again. More current. More like the version of your home you thought you needed a giant renovation budget to achieve. Often, you did not need new cabinets. You just needed to stop underestimating the ones you already had.
Final Thoughts
You do not need a full tear-out to get a fresh kitchen. The best DIY kitchen cabinet updates focus on what people actually see and use every day: color, door style, hardware, lighting, and storage. Whether you paint everything, reface the fronts, add trim, or simply swap out tired knobs, your cabinets can look dramatically better without being hauled to the curb. That is good news for your budget, your timeline, and your future self, who would probably prefer not to wash dishes in the bathtub during a full renovation.