Table of Contents >> Show >> Hide
- Before You Preserve Dill: A 2-Minute Prep That Actually Matters
- Method 1: Refrigerate Dill the “Bouquet” Way (Best for 5–14 Days)
- Method 2: Freeze Fresh Dill (Best for 3–6 Months of Big Flavor)
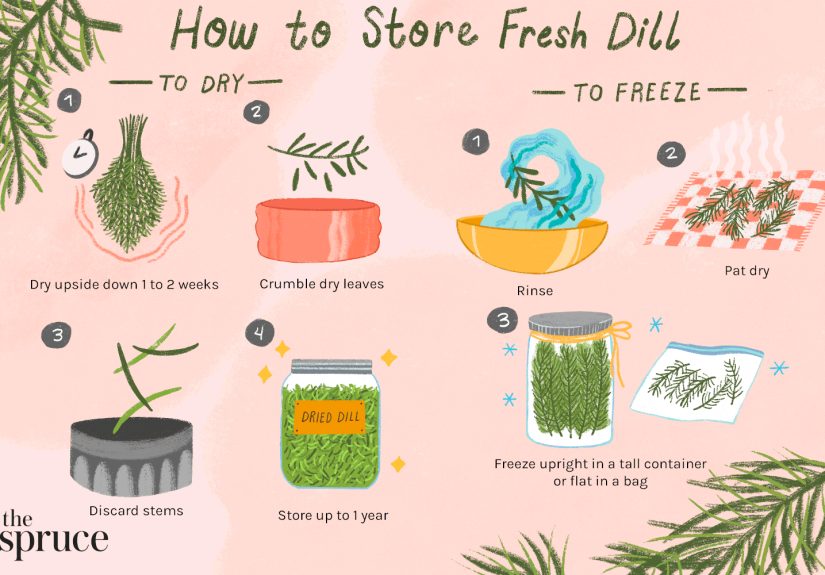
- Method 3: Dry Dill (Best for Pantry Convenience)
- Quick Decision Guide: Which Preservation Method Should You Use?
- Common Mistakes That Make Dill Die Faster
- Conclusion: Make Dill LastWithout Turning Your Fridge Into a Herb Cemetery
- Real-Life Kitchen Experiences With Preserving Dill (The “This Actually Happens” Section)
Fresh dill is basically the drama kid of the herb drawer: one minute it’s perky and ready for its close-up, the next it’s collapsed into a sad, fragrant tumbleweed.
The good news? Dill is easy to preserve once you treat it like what it really istender greens with a short attention span.
Below are three reliable, kitchen-tested ways to preserve fresh dill so you can keep that bright, grassy, slightly anise-y flavor on standby for soups, sauces,
potatoes, pickles, and everything that wants to taste like summer.
Before You Preserve Dill: A 2-Minute Prep That Actually Matters
Dill “preservation” works best when you start with dill that’s clean, dry, and not already halfway to compost.
Here’s the quick prep that improves every method in this article.
- Sort it: Pull off any slimy, blackened, or yellowing fronds. They won’t magically improve later.
- Trim the ends: Snip 1/4 inch off the stems so they can take up moisture (especially for fridge storage).
-
Rinse only if needed: If it’s gritty (garden dill often is), rinse quickly under cool water.
If it’s already clean, you can skip the rinse and just wipe/dust it off. - Dry like you mean it: Water clinging to fronds speeds up fridge rot and freezer ice crystals. Pat dry well or spin gently.
Method 1: Refrigerate Dill the “Bouquet” Way (Best for 5–14 Days)
If you want dill that still looks like dill (not a frozen confetti situation), refrigeration is your first move.
The goal is simple: keep stems hydrated while keeping the leafy tops from getting soggy.
Step-by-step: How to store fresh dill in the fridge
- Trim stem ends and remove tight rubber bands or twist ties.
- Place dill stems upright in a jar or tall glass with 1–2 inches of water (leaves should stay above the waterline).
- Loosely cover the tops with a plastic bag (or reusable produce bag) to hold humidity without sealing in funk.
- Refrigerate on a shelf where it won’t get crushed (this is not a “shove it in the crisper and pray” situation).
- Change the water every day or two, and re-trim stems if they start looking tired.
Alternate fridge method: The paper towel wrap (great for tight spaces)
No jar space? Wrap dill loosely in a slightly damp paper towel, then place it in a breathable bag or partially closed zip-top bag.
The towel keeps fronds from drying out; the not-fully-sealed bag helps prevent slime.
How to tell it’s time to toss or trim
- Good: bright green fronds, clean herbal smell, stems firm.
- Trim and continue: a few wilted fronds, slightly soft stems, minor yellowing near the bottom.
- Stop pretending: slimy stems, strong “fermented” odor, widespread black spots.
Best uses for refrigerated dill: salad dressings, yogurt dips, garnish, chopped into egg salad or tuna salad, finishing soups right before serving,
and anything where you want that fresh, lively flavor.
Method 2: Freeze Fresh Dill (Best for 3–6 Months of Big Flavor)
Freezing is the MVP method when you have more dill than you can reasonably eat before it wilts.
Frozen dill won’t be pretty for garnishing (it softens), but the flavor holds up beautifully in cooked dishes.
Option A: Flash-freeze whole sprigs (fast and low-effort)
- Dry the dill thoroughly.
- Lay sprigs or fronds in a single layer on a baking sheet lined with parchment.
- Freeze until firm (about 30–60 minutes).
- Transfer to a freezer bag or airtight container, press out extra air, label, and freeze.
Why it works: Flash-freezing keeps dill from turning into one giant frozen clump, so you can pinch off what you need.
Option B: Chop-and-bag “dill confetti” (best for quick weeknight cooking)
- Strip fronds from thicker stems (save stems for stock or potato boiling water).
- Chop fronds to your preferred size.
- Spread in a thin layer inside a freezer bag and freeze it flat.
- When you need dill, break off a chunk (like snapping chocolate, but greener and less emotionally satisfying).
Option C: Dill cubes (best for soups, sauces, and zero-waste vibes)
This method turns dill into pop-in flavor boosters. You choose the liquid based on what you cook most often:
- Water or broth: perfect for soups, beans, rice, and boiled potatoes.
- Oil or melted butter: best for sautés, roasted vegetables, eggs, and pan sauces.
- Finely chop dill.
- Spoon about 1 tablespoon of dill into each ice cube tray well.
- Top with your chosen liquid, press dill down so it’s mostly covered.
- Freeze solid, then pop cubes into a labeled freezer bag.
Important safety note: Herb-and-oil mixtures should be kept refrigerated or frozen (not stored at room temperature).
Keep dill oil cubes frozen until you’re ready to cook.
How to cook with frozen dill (without sadness)
- Add it directly to heat: stir into soups, stews, sauces, and braises.
- Finish smart: for the freshest aroma, add frozen dill near the end of cooking.
- Skip it as garnish: thawed dill looks limpbecause it is. Use it where flavor matters more than looks.
Pro tip for freezer flavor: The biggest enemy is air. Press out extra air in bags, freeze dill flat, and label with the date.
Method 3: Dry Dill (Best for Pantry Convenience)
Drying dill gives you a shelf-stable “dill weed” you can shake into dressings, rubs, and quick sauces year-round.
The tradeoff: dried dill is more muted than fresh or frozen. Think “supporting actor,” not “lead role.”
Drying method 1: Dehydrator (most consistent results)
- Remove thick stems and spread fronds in a single layer on dehydrator trays.
- Dry at a low herb setting (generally around 95–115°F) until fronds crumble easily.
- Cool completely, then crumble and store in an airtight jar away from light and heat.
Drying method 2: Air-drying (old-school and effective)
- Bundle small bunches of dill with string or a rubber band (not too thickair needs to move).
- Hang upside down in a dry, dark, well-ventilated spot.
- When fronds crumble easily, strip leaves from stems and store airtight.
Drying method 3: Oven-drying (when you’re impatient)
- Set oven to its lowest possible temperature.
- Spread dill on a lined baking sheet in a thin layer.
- Dry with the door slightly cracked if needed for airflow, checking often to avoid toasting the flavor away.
How to use dried dill without overdoing it
- Start small: dried dill is concentrated, but also less “bright.” Add, taste, then add more.
- Best matches: ranch-style dips, potato salad, cucumber salad, salmon rubs, creamy soups, and quick pickles.
- Flavor boost trick: rub dried dill between your fingers before adding to release aroma.
Quick Decision Guide: Which Preservation Method Should You Use?
- Want fresh-looking dill for salads and garnish? Choose Refrigeration (Method 1).
- Want the best flavor for cooking all month? Choose Freezing (Method 2).
- Want a pantry option you can shake on anything? Choose Drying (Method 3).
Common Mistakes That Make Dill Die Faster
- Storing it wet: Moisture trapped in a bag leads to slimy dill.
- Crushing it in the crisper: Dill bruises easily, and bruised herbs degrade quickly.
- Freezer burn: Air exposure steals flavor. Press out air and store airtight.
- Overheating while drying: High heat can flatten dill’s delicate aroma.
Conclusion: Make Dill LastWithout Turning Your Fridge Into a Herb Cemetery
Preserving fresh dill is less about fancy equipment and more about choosing the right method for how you actually cook.
If you want crisp fronds for finishing, refrigerate dill like a bouquet. If you cook with dill often, freeze it (whole, chopped, or in cubes) and treat yourself
to stress-free weeknight flavor. And if you want dill on demand in January, dry it and keep a jar in the pantry.
However you preserve it, the real win is using the whole bunchfronds for flavor, stems for stocks and boiled potatoes, and zero guilt when you open the fridge
and don’t find a sad green puddle.
Real-Life Kitchen Experiences With Preserving Dill (The “This Actually Happens” Section)
Most dill problems start the same way: you buy a big bunch for one recipe (say, tzatziki or potato salad), use two heroic sprigs, and then the rest gets shoved
into the fridge like an afterthought. A few days later, you rediscover itflattened, damp, and giving off the faint aroma of regret. That’s usually the moment
people decide dill is “high maintenance,” when really it just needs a plan.
The bouquet method is the one that surprises people the most because it feels almost too simple. But once you’ve seen dill stand up in a jar of water like it’s
auditioning for a cooking show, it’s hard to go back. It’s especially helpful during weeks when you’re cooking in burstssalad one day, eggs the next, then a
last-minute soup situation. Having dill that’s still green and usable makes those “What can I throw together?” meals taste intentional, like you meant to be
organized all along.
Freezing is the method that tends to convert the chronic herb-wasters. It’s not glamorous, but it’s practical. Picture a weeknight when dinner is already running
late: the pasta water is boiling, the sauce is “fine” but missing something, and you’re not emotionally prepared to chop anything complicated. That’s when a pinch
of frozen chopped dill earns its keep. The flavor wakes up creamy sauces, brightens soups, and makes simple roasted potatoes taste like they came with a plan and
a budget.
Dill cubes are the most “future you” friendly. People often expect them to be fussy, but the payoff is real. One cube can turn a basic pot of beans into
something fragrant, or give a quick pan sauce that fresh-herb finish without needing to keep a bunch alive in the fridge. Water-based cubes are great for soups
and broths; oil-based cubes are a small luxury for sautés and sheet-pan dinners. The key experience lesson here is labelingbecause mystery green cubes are fun
until you realize you’ve accidentally added mint to something that wanted dill.
Drying dill tends to be the “winter habit” that sneaks up on people. The first time you reach into the pantry and find your own dried dill, it feels oddly
satisfyinglike you’ve outsmarted seasonal produce. It’s not a perfect substitute for fresh (dried dill is softer in flavor), but it’s extremely handy in
everyday cooking: salad dressings, creamy dips, rubs for fish, and quick pickles. It’s the difference between “This needs something” and “This tastes finished.”
The most common real-world takeaway? You don’t need to pick one method forever. Many home cooks do a split strategy: keep a portion fresh in the fridge for
garnish and salads, then freeze the rest for cooked meals. If you grow dill, that approach becomes even more valuable because dill can arrive in wavesone week
you have none, the next week you have enough to perfume the entire neighborhood. Preserving it is simply making sure that the “too much dill” week pays rent
during the “no dill anywhere” week.
And honestly, preserving dill isn’t just about saving money (though it helps). It’s about keeping your cooking flexible. When you have dill ready to gofresh,
frozen, or driedyou’re more likely to make the meal you actually want, not the meal your wilting herbs force you into.


