Table of Contents >> Show >> Hide
- Before You Loop: Pick Your “Repeat Style”
- Way 1: Duplicate on the Timeline (Fastest for Simple Repeats)
- Way 2: Nest the Clip, Then Repeat the Nest (Best for Easy Updates)
- Way 3: Automate to Sequence (Best for Lots of Repeats, Fast)
- Make the Repeat Look Good: Seamless Loop Tricks That Actually Work
- Bonus: Loop Playback While You Edit (So You Don’t Lose Your Mind)
- Real-World Experiences: of Looping Lessons (a.k.a. Things I Learned the Loud Way)
- Conclusion
You’d think Adobe Premiere Pro would have a big friendly “LOOP THIS CLIP FOREVER” buttonpreferably next to a smaller “MAKE IT SEAMLESS AND ALSO WIN AN OSCAR” button. Reality check: Premiere is powerful, but it’s not psychic. If you want a clip to repeat, you build the loop yourself.
The good news: repeating a clip in Premiere Pro is easy once you know the right workflow for your situation. The better news: you can do it without turning your timeline into a spaghetti bowl of copied clips and regret. Below are three practical, editor-approved ways to repeat (loop) a clip in Premiereplus tips for making the loop look intentional, not like your computer sneezed duplicates all over the timeline.
Before You Loop: Pick Your “Repeat Style”
“Repeat a clip” can mean two different things:
- Hard repeat: The clip ends, then starts again. (Great for backgrounds, patterns, simple B-roll.)
- Seamless loop: The end blends into the beginning so viewers can’t spot the restart. (Great for social loops, ambient visuals, motion graphics.)
All three methods below can do both. The difference is how quickly you can build itand how painful it is to change later.
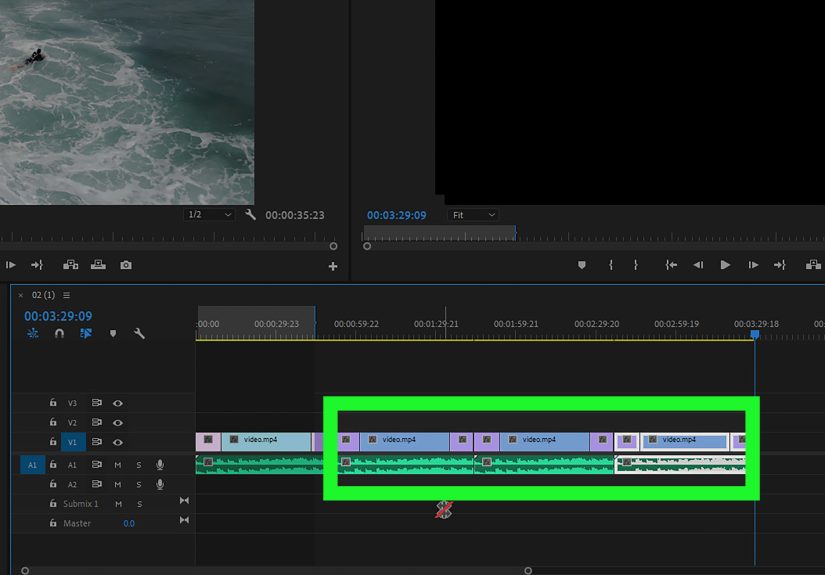
Way 1: Duplicate on the Timeline (Fastest for Simple Repeats)
If you only need a clip repeated a handful of times, this is the quickest approach: duplicate the clip directly on the timeline. This method is perfect for looping a short background shot, repeating a reaction shot, or extending a visual beat to match music.
Option A: Alt/Option-Drag (The “Speed-Runner” Method)
- Drop your clip into the timeline and trim it to the exact section you want to loop.
- Turn on Snapping (the magnet icon) so copies lock cleanly to the end of the previous clip.
- Hold Alt (Windows) or Option (Mac), then click-drag the clip to the right. Release your mouse to drop a duplicate.
- Repeat until you’ve filled the needed duration.
Pro tip: If duplication feels “glitchy,” try starting the drag first and then holding Alt/Option while continuing the drag. It sounds like a secret handshake because… it kind of is.
Option B: Copy/Paste (The “Keyboard-First” Method)
- Select the clip (or a group of clips).
- Copy: Ctrl/Cmd + C
- Move the playhead to where you want the next repeat to start (Snapping helps).
- Paste: Ctrl/Cmd + V
- Paste again as needed.
When Way 1 is the Best Choice
- You need a quick repeat and you probably won’t change the clip later.
- You’re building a rough cut and just need “more of this shot” right now.
- You’re repeating a simple graphic, B-roll beat, or short audio sting.
Common Pitfalls (and How to Avoid Them)
- Accidental gaps: Turn on Snapping, zoom in, and make sure clip edges butt cleanly together.
- Audio clicks at the loop point: Add tiny audio crossfades (even 2–6 frames can save your ears).
- “It looks obviously repeated”: Cut on action, add a subtle cutaway, or use a seamless loop trick (more on that below).
Way 2: Nest the Clip, Then Repeat the Nest (Best for Easy Updates)
If there’s a chance you’ll tweak the clip latercolor, speed, text, effects, timingnesting is your best friend. Think of a nested sequence as a “container clip.” You repeat the container, and any changes inside update everywhere. It’s like cloning, but with fewer ethical dilemmas.
Step-by-Step: Create a Loop-Friendly Nest
- Put the clip (or a trimmed portion) into its own sequence. Name it something obvious like LOOP_BASE.
- In your main edit sequence, bring that sequence in like it’s a normal clip (drag it from the Project panel to the timeline).
- Duplicate the nested sequence on the timeline (Way 1’s Alt/Option-drag works great here).
- Need to adjust the original? Double-click any nested instance to open the source sequence, edit it once, and watch all repeats update.
Why Nesting is a Power Move
- One change updates all repeats: Perfect for graphics, stabilized shots, speed changes, and “client asked for the 12th revision.”
- Cleaner timeline: Instead of repeating six layered clips, you repeat one neat “super clip.”
- Great for seamless loops: You can refine the loop point inside the nest without re-copying everything.
Bonus: Update All Instances with Source Clip Effects
If your repeats are the same media used in multiple places and you mainly need an effect applied everywhere (say, a color tweak or blur), consider applying it as a Source Clip effect so every instance of that clip inherits the change. It’s a huge timesaver when the same shot appears across multiple sequences.
When Way 2 is the Best Choice
- You’re repeating a clip with effects and you want one place to adjust them.
- You’re looping a mini “package” (video + audio + graphics) multiple times.
- You’re building templates: intro blocks, title sequences, social loop segments, branded bumpers.
Way 3: Automate to Sequence (Best for Lots of Repeats, Fast)
Need the same clip repeated 30, 60, 120 times? Manually pasting is a one-way ticket to Carpal Tunnel City. That’s where Automate to Sequence shines: you pre-select a bunch of project items and Premiere lays them into the timeline for you.
How It Works (In Plain English)
Automate to Sequence places selected clips into a sequence based on selection order, either sequentially (one after another) or at markers. It can also add transitions automatically. The trick for repeating one clip: you give Premiere multiple “instances” of that clip to place.
Step-by-Step: Repeat a Clip with Automate to Sequence
- In the Project panel, create multiple instances of the same clip item (copies referencing the same media).
- Select those instances in the order you want them placed (left-to-right/top-to-bottom organization matters).
- Open (or create) the target sequence and position the playhead where repeats should start.
- Click Automate to Sequence and choose Sequential Placement.
- Optional: add default video/audio transitions automatically or set clip overlap if you want built-in crossfades.
When Way 3 is the Best Choice
- You’re building long backgrounds for events, livestreams, or stage screens.
- You’re creating “patterned” edits: repeating beats, stingers, or short animated loops.
- You want a fast, consistent layout without hand-aligning every duplicate.
Editor Tips for Keeping It Clean
- Name your clip instances clearly: e.g., LOOP_01, LOOP_02, LOOP_03… so you can track them.
- Use a dedicated bin: Keep the repeated items separate so your project panel doesn’t become a junk drawer.
- Combine with nesting: Automate nested sequences for maximum “edit once, update everywhere” power.
Make the Repeat Look Good: Seamless Loop Tricks That Actually Work
A repeated clip is easy. A repeated clip that doesn’t scream “I AM A LOOP” is the real flex. Here are practical ways to make your Premiere Pro loop feel smooth and intentional:
1) Cut on Motion and Match the Action
If the subject is moving, cut when the motion direction and speed are similar at both ends. Viewers forgive a lot when motion continues naturally.
2) Use a Short Cross Dissolve (When It Makes Sense)
For ambient shots (water, crowds, clouds, bokeh lights), a subtle cross dissolve can hide the “end-to-start” jump. Keep it short so it feels like a natural blend, not a dream sequence.
3) Roll the Cut to Find the Sweet Spot
If you’re looping with audio or rhythmic visuals, adjust the edit point using a rolling edit so the transition happens on a beat. Sometimes moving the cut by just a few frames turns “noticeable loop” into “wait… is this infinite?”
4) “Boomerang” Loop for Social
For short clips, a back-and-forth loop can feel smoother than a hard restart: place the clip, duplicate it, reverse the duplicate, and butt it up to the end of the original. The motion returns naturally, which often plays great on Reels, TikTok, and looping GIF-style exports.
Bonus: Loop Playback While You Edit (So You Don’t Lose Your Mind)
Sometimes you don’t need to build repeatsyou just need Premiere to play the same section over and over while you fine-tune an edit point. Set an In and Out range, enable loop playback in the Program Monitor settings, and let it cycle while you adjust timing, transitions, or audio. It’s the closest thing to that mythical “loop button”… and it saves a shocking amount of sanity.
Real-World Experiences: of Looping Lessons (a.k.a. Things I Learned the Loud Way)
The first time I had to loop a clip for a client, I did what every optimistic editor does: I copied the clip a few times, hit play, and thought, “Nailed it.” Two minutes later the client asked, “Can we make it ten minutes?” That’s when you discover that copy/paste is less of a workflow and more of a lifestyle choicelike owning a pet cactus and still managing to overwater it.
My biggest early mistake was ignoring the loop point. I’d repeat a beautiful drone shot, export it, and then watch the final playback where the horizon visibly “teleported” every four seconds. The fix wasn’t fancy: it was choosing a better section to loop. I started trimming the clip to moments where the motion was consistentno sudden pans, no big parallax shift, no subject entering/exiting frame right at the cut. It’s wild how much “seamlessness” comes from simply picking the right two frames to shake hands.
Then there’s audioaudio is where loops go to get exposed. Even when the video loop looks fine, the sound can give it away with a tiny pop or an awkward restart. The first time I looped applause for an event video, I learned that crowd noise is basically a lie detector. A micro crossfade (sometimes literally a few frames) can make the difference between “continuous ambience” and “copy machine malfunction.” For music, I got in the habit of looping on beats and using a rolling edit to slide the cut until it feels musical instead of mechanical.
Nesting was my “why didn’t anyone tell me this sooner” moment. I once had a repeating segment with color correction, a mask, and text. The client wanted the text changed across every repeat. Past Me would have updated each instance manually and aged five years in one afternoon. Nested sequences saved the day: update once inside the nest, everything refreshes. If you do any kind of branded contentlower thirds, title animations, repeated social segmentsnesting is the difference between editing and performing repetitive clerical work.
Finally, Automate to Sequence became my secret weapon for long loops. I used it for a stage backdrop where the same subtle animation needed to repeat for an entire set. Instead of dragging copies for twenty minutes, I prepared the instances, automated them in seconds, and spent the rest of the time polishing the loop point like a responsible adult editor. Moral of the story: the best loop is the one that’s fast to build, easy to update, and so smooth nobody notices it’s looping. Which, honestly, is also what I want from my Mondays.
Conclusion
Repeating a clip in Premiere Pro isn’t complicatedit’s just about choosing the right method: duplicate on the timeline for quick repeats, nest for easy global updates, and Automate to Sequence when you need a whole army of repeats fast. Add a little finesse at the loop point (motion matching, short dissolves, audio crossfades), and your “repeat” becomes a professional loop.


