Table of Contents >> Show >> Hide
- What an Enchantment Table Does (and Why You Want One)
- Materials You Need (Plus the “Hidden Costs” Everyone Forgets)
- How to Make an Enchantment Table in Minecraft: 12 Steps
- Optional (But Honestly the Point): Power It Up to Level 30
- How Enchanting Works (So You Don’t Waste XP Like a Goblin)
- Best Early Enchants to Aim For (Practical Picks)
- Troubleshooting: Common “Why Isn’t This Working?” Moments
- 500-Word Experience Add-On: What Players Learn After Their First Enchanting Room
- Conclusion
- SEO Tags
In Minecraft, progress is basically a three-stage life cycle: wooden tools → iron tools → “I deserve nice things”. An Enchantment Table (officially called an Enchanting Table) is the “nice things” machine. It’s where your gear stops being “adequate” and starts being “why yes, I do break 47 blocks per second.”
This guide combines best practices from widely read U.S. gaming/tech guides and official support-style resources, then rewrites it into a clean, copy-ready tutorial. No fluff, no plagiarism, and only the kind of magic that comes from diamonds, obsidian, and you pretending you weren’t nervous in that first lava cave.
What an Enchantment Table Does (and Why You Want One)
An Enchantment Table lets you spend experience levels and lapis lazuli to add enchantments to tools, weapons, armor, and books. Think faster mining, extra durability, more damage, better protection, and quality-of-life upgrades that turn the grind into a victory lap.
You can technically enchant with just the tablebut if you want the good stuff (a.k.a. the high-tier options), you’ll eventually pair it with bookshelves to boost the table’s power up to the max tier.
Materials You Need (Plus the “Hidden Costs” Everyone Forgets)
Core crafting recipe
- 4 Obsidian
- 2 Diamonds
- 1 Book
Hidden costs (because Minecraft loves plot twists)
- A Diamond Pickaxe to mine obsidian (so you’ll need at least 3 more diamonds just to make the pick).
- Lapis Lazuli to actually enchant items.
- XP levels (the green number you swear you’ll protect… right up until a creeper exists).
How to Make an Enchantment Table in Minecraft: 12 Steps
- Place (or craft) a Crafting Table.
If you’re still crafting on a 2×2 grid, today is the day you evolve. Use 4 wooden planks to craft a Crafting Table. - Find sugar cane near water.
Sugar cane grows next to water in many biomes. Grab a bunchyou’ll want backups because paper disappears fast. - Craft paper.
Put 3 sugar cane in a row on your Crafting Table to make 3 paper. - Get leather (politely… or not).
Leather commonly comes from cows. You only need 1 leather for a book, but you’ll likely want more later for bookshelves, so don’t stop at one. - Craft a book.
Combine 3 paper + 1 leather to craft 1 book. Congratulationsyou can now write absolutely nothing in it (but it’s still useful). - Gear up for a diamond run.
Bring torches, food, a weapon, and ideally a water bucket. Diamonds spawn deep underground in modern versions, and the environment down there is basically “lava with opinions.” - Mine at diamond-friendly depths and collect at least 5 diamonds.
You need 2 diamonds for the table and 3 diamonds for a Diamond Pickaxe. Many modern guides recommend mining deep below sea level; diamonds are especially common in the lower layers (often around the deep slate range). - Craft a Diamond Pickaxe.
Put 3 diamonds across the top row and 2 sticks down the center column. This is the tool that makes obsidian stop laughing at you. - Create obsidian by mixing water and lava.
Find a lava pool and pour water so the lava source blocks convert into obsidian. (Tip: “source blocks” matter. Flowing lava may not give you the blocks you need.) - Mine exactly 4 obsidian.
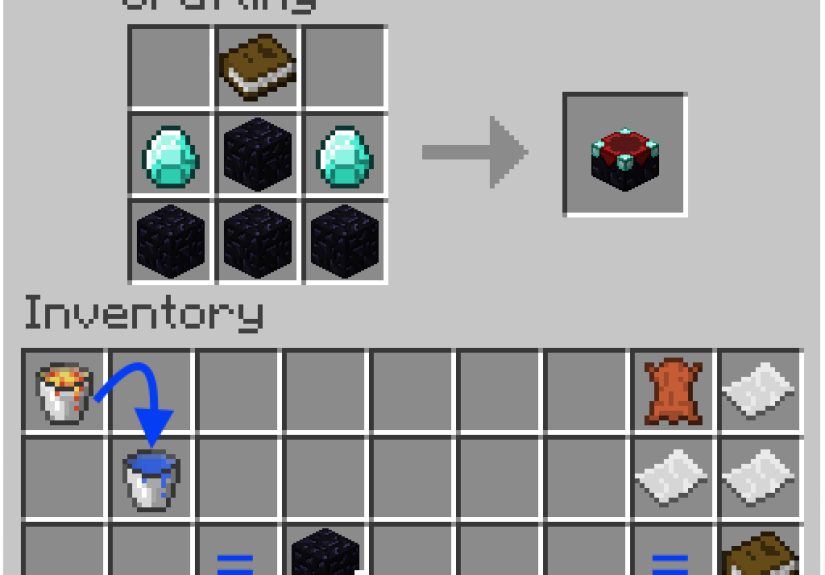
Use your Diamond Pickaxe. Obsidian is tough and takes a moment to breakdon’t let go early or you’ll reset the progress. Get 4 blocks into your inventory. - Craft the Enchantment (Enchanting) Table in the correct pattern.
On a 3×3 Crafting Table grid:- Top row: Book in the middle.
- Middle row: Diamond on the left, Obsidian in the middle, Diamond on the right.
- Bottom row: 3 Obsidian across.
If it looks like a “T” made of expensive materials, you’re doing it right.
- Place it downand plan your next upgrade (bookshelves).
Put the table somewhere safe and convenient. You can start enchanting immediately, but if you want the strongest options, you’ll add bookshelves next.
Optional (But Honestly the Point): Power It Up to Level 30
To unlock the highest-tier enchanting options (commonly called “level 30” enchants), you’ll want 15 bookshelves. More than 15 doesn’t increase the power cap; 15 is the magic number.
Quick bookshelf recipe
Each bookshelf costs 6 wooden planks + 3 books. Yes, that means a full setup is book-hungry. The good news: once you build it, you keep it forever (unless you rage-mine your own library, which is between you and your therapist).
Simple level-30 layout that works
- Put the Enchantment Table in the center.
- Place bookshelves in a ring around it with a one-block air gap between shelves and table.
- Common build: a 5×5 outline of shelves with one opening as an entrance.
- Visual clue: you’ll see floating glyph particles drifting from shelves to the table when it’s properly boosting.
How Enchanting Works (So You Don’t Waste XP Like a Goblin)
You pay with XP levels + lapis lazuli
When you open the table UI, you’ll place an item in the left slot and lapis in the right. The game offers three enchant options, each costing some XP levels and typically 1–3 lapis. Higher-tier options require higher player level (and a properly boosted table with shelves).
The “three options” are a preview, not a promise of everything
The menu shows a hint of what you might get, but enchantments are still partly randomized. If you don’t like your choices, you can “reroll” by enchanting something cheap (even a throwaway book) so the table refreshes its offerings.
Those weird runes are not judging you (probably)
The enchantment text is written in a stylized “rune” alphabet (commonly noted as the Standard Galactic Alphabet in many guides). It’s mostly flavorcool wizard vibes, zero practical warning about your next bad roll.
Best Early Enchants to Aim For (Practical Picks)
Tools
- Unbreaking for durability (always useful).
- Efficiency for faster mining and building.
- Fortune (when you can get it) for better resource yieldespecially diamonds, redstone, lapis.
Armor
- Protection as your “general insurance policy.”
- Unbreaking so your gear survives your learning curve.
Weapons
- Sharpness for reliable extra damage.
- Unbreaking because fights are messy.
One important reality check: not every enchantment is obtainable directly from the Enchantment Table. Some high-value enchants (like Mending) are commonly obtained via villagers, loot, or other methods, not as a straightforward table roll.
Troubleshooting: Common “Why Isn’t This Working?” Moments
- “My table won’t show level 30 enchants.”
Double-check that you have 15 bookshelves and a one-block air gap between the shelves and the table. Also remove anything sitting in that gap (even “harmless” decorations can interfere). - “I can’t collect obsidian.”
You must mine it with a Diamond Pickaxe (or better). Anything weaker breaks it without dropping the block. Also: it takes timekeep mining until it fully breaks. - “I’m out of lapis.”
Lapis is mined from lapis ore. Grab a stack when you see itenchanting burns through it faster than you expect. - “The enchant options are trash.”
Welcome to the casino. Enchant something cheap to refresh options, or enchant books and apply them selectively later.
500-Word Experience Add-On: What Players Learn After Their First Enchanting Room
The first time most players build an Enchantment Table, it’s usually placed wherever there’s spacenext to a furnace, across from a chest, slightly too close to the doorway so you bonk into it every time you sprint indoors. It works… but it doesn’t feel like power yet. Then the bookshelf phase begins, and that’s where the “experience” part kicks in.
Experience lesson #1: the table is cheap compared to the library. The table needs one book. A full “level 30” setup needs fifteen bookshelves, and each shelf needs three books. Suddenly, sugar cane becomes your most emotionally important crop. Players often end up building a little riverside paper farm, not because it’s glamorous, but because it’s the difference between “I can enchant once” and “I can keep enchanting until I get what I want.” If your base has a wheat farm, a cow pen, and sugar cane along the shoreline, you’re basically living the enchanting lifestyle.
Experience lesson #2: the enchanting room becomes the heart of your base. You might start with a “temporary” corner, but the moment you see those glowing glyph particles drifting from shelves to the table, you’ll want it to look good. Players often upgrade from a messy ring of shelves into a full-on library: wood beams, lanterns, cozy carpet, maybe even a hidden basement for storage and anvils. It’s one of the few Minecraft builds that’s both functional and vibe-heavylike a workshop, but with wizard energy.
Experience lesson #3: you don’t enchant for perfectionyou enchant for momentum. Early on, people get stuck waiting for the “perfect” enchant and hoarding levels like they’re priceless antiques. In practice, you’ll progress faster by taking good-enough rolls (like Unbreaking or Efficiency), using them to mine quicker, and letting the stronger gear help you earn more XP safely. A solid “pretty good” pickaxe can speed up mining so much that you reach your next enchanting milestone twice as fast.
Experience lesson #4: books are your strategy buffer. Enchanting books can feel like spending resources on a mystery box, but it’s also how players avoid ruining their favorite gear with a bad roll. Many experienced players enchant books first, store the useful ones, and only commit enchantments to a prized tool when they have a plan. Even if you don’t go full spreadsheet-mode, keeping a chest labeled “Good Books” is a surprisingly satisfying habit.
Finally, the classic experience: your first truly great enchant feels like a mini-boss victory. The moment you land a tool that mines faster, lasts longer, and makes cave trips safer, the game’s pace changes. You stop feeling like you’re surviving Minecraft and start feeling like you’re running it. And that, honestly, is the whole reason the Enchantment Table is worth the hassle.
Conclusion
Crafting an Enchantment Table is a milestone: it means you’ve graduated from “stone age panic” to “I have a plan.” Gather the book, mine the diamonds, pull obsidian out of lava’s cold grip, craft the table, then power it with 15 bookshelves for top-tier enchants. From there, enchanting becomes a loop: upgrade gear, earn XP faster, upgrade more gear, repeat until you’re basically a walking patch notes update.


