Table of Contents >> Show >> Hide
- What Is Code::Blocks, Exactly?
- Why Code::Blocks Is Still Popular
- Before You Download: Pick the Right Version
- How to Download Code::Blocks
- How to Install Code::Blocks Without the Classic Mistakes
- Your First Project in Code::Blocks
- Understanding the Main Parts of the Interface
- How to Use Code::Blocks for Real Work
- Debugging in Code::Blocks
- Common Code::Blocks Problems and How to Fix Them
- Best Practices for Using Code::Blocks
- Is Code::Blocks Still Worth Using Today?
- Experiences and Lessons From Using Code::Blocks
Code::Blocks has been helping beginners write their first C and C++ programs for years, and honestly, it still does one thing very well: it gets out of the way and lets you code. In a world full of giant IDEs that feel like they want to launch a spaceship before they compile a simple Hello, World!, Code::Blocks remains refreshingly straightforward. It is lightweight, practical, and beginner-friendly, yet still capable enough for class assignments, small projects, debugging sessions, and day-to-day practice.
This guide walks through everything you need to know about Code::Blocks: what it is, how to download the right version, how to install it without stepping on the usual rake, how to create your first project, and how to use its most important features. By the end, you should know not only how to make Code::Blocks run, but how to make it work for you instead of against you.
What Is Code::Blocks, Exactly?
Code::Blocks is an open-source integrated development environment, or IDE, mainly used for C, C++, and sometimes Fortran. The key word here is environment. It gives you a place to write code, organize files, build projects, run programs, and debug errors. What it does not do by itself is act as the compiler. That is the first big thing many beginners miss.
Think of Code::Blocks as the workshop and the compiler as the tool inside the workshop. If the workshop is neat but there is no saw, nothing gets cut. In practical terms, that means you need both the IDE and a compiler toolchain, such as MinGW on Windows, for everything to work smoothly.
That separation sounds technical, but it actually helps. Once you understand that Code::Blocks manages your workflow while the compiler turns your source code into an executable program, setup becomes much less mysterious and error messages become a lot less dramatic.
Why Code::Blocks Is Still Popular
Even with newer editors everywhere, Code::Blocks still hangs around for good reasons. It starts quickly, runs well on modest machines, has a familiar project-based layout, and gives students a clean path from “I just installed this” to “I built my first program.” Many instructors still use it because it teaches core programming habits without burying students in extra features they do not need on day one.
Another advantage is that Code::Blocks supports classic desktop-style programming workflows. You can create console projects, add source files, manage headers, set compiler options, and use a debugger with breakpoints and watches. That makes it a solid learning tool because it reveals the building blocks of software development instead of hiding them behind magic buttons.
Before You Download: Pick the Right Version
This is where many new users accidentally begin their journey with confusion, annoyance, and the emotional energy of someone who just plugged a toaster into a USB port. Code::Blocks downloads usually come in more than one flavor, and the names matter.
The version with a compiler
If you are on Windows and you do not already have a working C or C++ compiler installed, the easiest option is the package that includes MinGW. This is usually the best choice for beginners because it bundles the IDE and the compiler together. One download, one installer, fewer mysterious errors, fewer opportunities for regret.
The version without a compiler
If you already have GCC, MinGW, or another supported compiler on your system, you can download the smaller package without the bundled compiler. That version is useful for advanced users, but for most beginners it is basically the scenic route to the “compiler not found” message.
So here is the simple rule: if you are unsure, download the Code::Blocks installer that includes MinGW. On Windows, that is usually the safest and fastest path to actually writing code instead of troubleshooting toolchain paths for an hour.
How to Download Code::Blocks
Windows
Go to the official Code::Blocks downloads page and choose the binary release. From there, select the Windows installer that includes MinGW. Save the file, run it, and accept the default installation options unless you have a specific reason to customize them.
During installation, the program may ask where to place shortcuts and whether it should open when setup is complete. That part is routine. The more important detail is making sure you installed the package that actually includes the compiler. That single decision prevents a huge percentage of beginner setup problems.
macOS
Code::Blocks can run on macOS, but setup is usually less convenient than on Windows because the compiler toolchain often needs to be handled separately. In many cases, macOS users rely on Xcode command line tools or another compiler package outside the IDE. If you are learning on a Mac, pay close attention to compiler availability after installation.
Linux
Linux users often have an easier time with the compiler side because GCC is commonly available through the system package manager. Installing Code::Blocks through your distribution’s software tools can be straightforward, but you should still verify that the compiler and debugger are both detected correctly inside the IDE.
How to Install Code::Blocks Without the Classic Mistakes
Installation itself is usually easy. The tricky part is verifying that Code::Blocks can see the compiler after installation. Once the program opens, it may auto-detect the toolchain. Great. Let it. Software that volunteers to be helpful should not be interrupted.
After launch, create a quick test project and try to build it. Do not skip this step. A successful test build tells you more than a cheerful splash screen ever will. If the build fails and complains about a missing compiler, go into compiler settings and use the auto-detect option or point the IDE to the compiler installation directory manually.
That quick test is your setup reality check. If it works, you are ready. If it fails, it is much better to fix the problem now than after you have already written three pages of code and attached your hopes to it.
Your First Project in Code::Blocks
Once Code::Blocks is installed, the best way to start is with a console application project. This gives you a proper folder structure, a project file, and a source file ready for editing. Sure, you can create an empty file manually, but a real project helps you learn how the IDE is supposed to work.
Step 1: Create a new project
Open Code::Blocks and choose Create a new project or go to the File menu and select New > Project. Choose Console application. Select the language you want, usually C or C++, then name the project and choose a folder where it should live.
Step 2: Open the main source file
In the left project pane, expand the Sources folder and open the default file, often named main.cpp. This is where you will write your first test program.
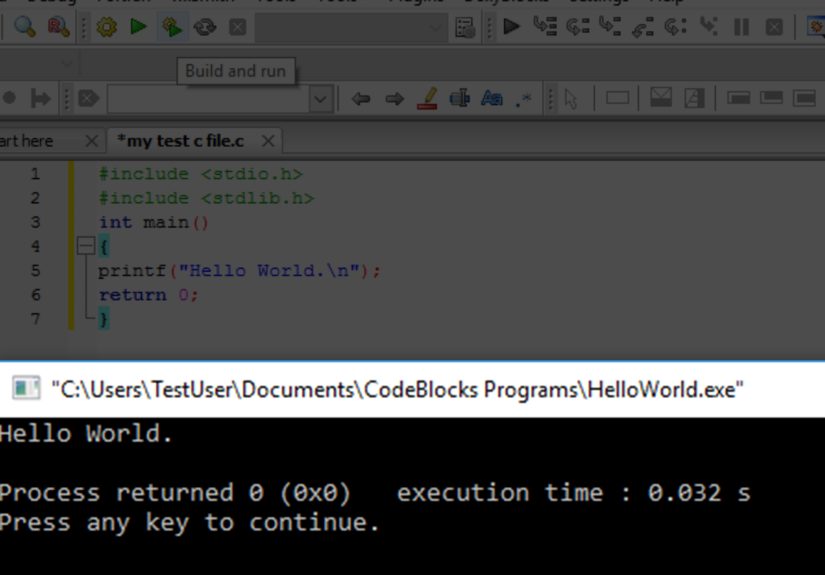
Step 3: Write something tiny but real
This tiny program is not exciting, but it is useful. If it builds and runs, your editor, project setup, compiler, and run command are all basically working together. That is a great start.
Step 4: Build and run
Use the Build and Run option instead of just Run. This matters more than beginners often realize. Run may execute the last compiled version, while Build and Run makes sure the newest code gets compiled first. In other words, it helps you avoid that weird moment where the program acts like it never read your latest changes because, well, it did not.
Understanding the Main Parts of the Interface
Editor window
This is the central area where you write and edit code. You can open multiple files in tabs, which is helpful once your projects start using headers and several source files.
Management pane
This side panel shows your project tree, including source files, headers, and other resources. It is the control center for navigating projects without playing file hide-and-seek.
Build log and messages
At the bottom of the window, Code::Blocks shows compiler output, warnings, and errors. Read this area carefully. New programmers sometimes treat compiler messages like cursed scrolls written in fire. They are not always friendly, but they are usually trying to help.
How to Use Code::Blocks for Real Work
Create separate projects for separate tasks
One project per assignment or program is a smart habit. It keeps files organized, makes debugging easier, and helps you avoid a folder full of suspiciously named files like program_final_really_final_v2.cpp.
Turn on line numbers
Line numbers make debugging and error tracking much easier. When the compiler says something is wrong on line 37, it helps if line 37 exists in visible reality instead of only in the compiler’s imagination.
Use proper file names
Name projects and files clearly. A file called student_grades.cpp is much more useful than test3.cpp. Future-you will be grateful. Present-you may not care, but future-you has seen things.
Save often
Yes, this advice is old. Yes, it is still correct. Save your files before building, and keep project folders somewhere easy to find. Good programming includes boring habits that quietly prevent disasters.
Debugging in Code::Blocks
Debugging is where Code::Blocks becomes more than just a typing box. Once your project is compiled with debugging information, you can place breakpoints, run the debugger, inspect variable values, and step through code line by line. That turns a vague “something is wrong” feeling into actual evidence.
Use breakpoints
A breakpoint tells the program to pause at a specific line. This is useful when you want to inspect what your code is doing before it crashes, loops forever, or produces an answer that belongs in another dimension.
Use watches
Watches let you track variables during execution. If a variable starts at 5 and somehow becomes 927 while you were only trying to add two numbers, the watches window helps you catch the exact moment your logic left the building.
Step through the program
Use debugger controls such as step into, step over, and step out to move through the program. This lets you follow the code path in order and understand which function is being called, what values are being passed, and where the output starts going sideways.
Common Code::Blocks Problems and How to Fix Them
Problem: Compiler not found
This usually means you installed the IDE without a compiler or Code::Blocks failed to detect it. Open compiler settings, run auto-detect, or reinstall the bundled MinGW version on Windows. This is the single most common setup issue.
Problem: Program runs but the console window closes too fast
If your console output flashes and disappears, add a final input line for testing or run the executable from a terminal. Some build settings also affect console behavior, but in beginner projects this issue is usually just a timing problem.
Problem: I changed the code, but the old output still appears
You probably clicked Run instead of Build and Run. Compile the latest version before running it. Old executables are faithful to old code, not to your intentions.
Problem: Too many warnings
Good. Warnings are often valuable. Read them. They can reveal type mismatches, unused variables, risky conversions, or logic mistakes before those issues become bigger problems.
Best Practices for Using Code::Blocks
- Keep one project per task or assignment.
- Use Build and Run when testing new changes.
- Read compiler errors from top to bottom.
- Enable warnings and treat them seriously.
- Use debugging tools instead of guessing.
- Keep project folders organized and backed up.
These habits matter more than flashy features. A neat workflow beats a messy genius routine almost every time.
Is Code::Blocks Still Worth Using Today?
Yes, especially for beginners, students, and anyone learning core C or C++ development. It is not the trendiest IDE in the room, and it does not try to be. But it remains useful because it focuses on the essentials: writing code, compiling it, organizing projects, and debugging what broke.
For larger professional workflows, some developers move to more modern environments with heavier plugin ecosystems and deeper integrations. That is fine. But Code::Blocks still earns its place as a practical learning IDE and a perfectly capable tool for many small and medium coding tasks.
If your goal is to understand how C or C++ programs are built and run, Code::Blocks is still a strong place to start. It shows you the workflow clearly, teaches the relationship between code and compiler, and does not drown you in features before you know what a compiler error means.
Experiences and Lessons From Using Code::Blocks
One of the most common experiences beginners have with Code::Blocks is a surprisingly emotional one: relief. That sounds dramatic for an IDE, but it is true. Many first-time programmers install several tools, get lost in extensions, or end up staring at a terminal full of commands they do not understand. Then they open Code::Blocks, create a console project, hit Build and Run, and finally see a program work. That moment matters. It turns programming from an abstract idea into something concrete and achievable.
Another frequent experience is the famous “Why is my new code not running?” crisis. This usually happens when someone edits the source file, forgets to rebuild, and keeps clicking Run. Code::Blocks teaches a valuable lesson here: code changes do not magically become executable changes. You must compile them. That may sound obvious later, but in the beginning it is a major learning milestone. The IDE makes this lesson visible in a way that is actually helpful.
Students also tend to appreciate the project pane more than they expect. At first, it just looks like a file tree. Later, once programs grow beyond one file, that panel becomes a sanity-preserving device. Seeing headers, source files, and resources grouped clearly helps new programmers understand program structure. It also reduces the chaos that comes from dumping everything into one folder and pretending that will somehow stay organized.
Debugging in Code::Blocks is another area where real experience changes how people think about programming. Beginners often believe debugging means staring intensely at the screen until the bug feels guilty and leaves. Then they discover breakpoints, stepping, and watches. Suddenly, debugging becomes an investigation instead of a guessing game. That shift is huge. It teaches patience, logic, and the habit of gathering evidence before making changes.
There is also a practical lesson that comes from setup trouble. Plenty of users accidentally install the version without the compiler and hit a wall immediately. Frustrating? Absolutely. Useful in the long run? Also yes. It teaches that programming tools come in layers: editor, IDE, compiler, linker, debugger. Once you understand those layers, many “mysterious” errors stop being mysterious. Code::Blocks is actually pretty good at teaching that distinction because it sits right at the center of the workflow.
Experienced students often say that Code::Blocks feels especially useful in courses because it is stable, predictable, and focused. It may not have every modern convenience, but it does not overwhelm you with options either. In many cases, that is exactly what learners need. They need a tool that helps them practice syntax, logic, input and output, loops, functions, arrays, and debugging without constantly inviting them to customize fifty unrelated settings.
Perhaps the best real-world lesson from using Code::Blocks is that good programming is not about fancy software. It is about understanding the process: write, save, compile, test, debug, improve, repeat. Code::Blocks supports that rhythm very well. It may not be glamorous, but neither is brushing your teeth, and both are excellent habits with long-term benefits.
Note: For the smoothest setup, always verify whether the installer includes a compiler before downloading. On Windows, the bundled MinGW package is usually the simplest choice for beginners.