Table of Contents >> Show >> Hide
- Why the Compute Module 5 Makes Sense for Robotics
- The Hardware Core: What CM5 Brings to the Table
- CAN Bus: The Robot’s Reliable Conversation Line
- The IMU: Giving the Robot a Sense of Balance
- Software Stack: Linux, ROS 2, and Real-World Control
- Designing a CM5 Robot Controller Board
- Where This Controller Fits Best
- Specific Example: A CM5 Controller for Smart Motors
- Practical Build Tips for Developers
- Security and Maintainability
- Why This Trend Is Exciting
- Field Notes and Build Experience: What You Learn After the First Robot Moves
- Conclusion
A good robot controller is a little like a great stage manager: it should know where everyone is, send the right signals at the right time, keep chaos from turning into a tragic ballet, and preferably not burst into smoke when the motors get dramatic. That is why the Raspberry Pi Compute Module 5, or CM5, is such an interesting foundation for serious robotics projects. It brings the performance of the Raspberry Pi 5 family into a compact system-on-module format, leaving builders free to design the carrier board they actually need.
Instead of forcing a robot designer to bolt a full single-board computer into a chassis and work around ports that may not fit, the Compute Module 5 lets the controller become part of the robot’s nervous system. Add the right power supply, CAN bus hardware, inertial sensing, motor interfaces, and connectors, and the CM5 becomes more than a small Linux computer. It becomes a high-level robot brain ready for perception, communication, telemetry, and motion coordination.
The idea has already inspired real projects, including the Overlord-style robot controller built around the CM5, CAN communication, and an onboard IMU. That design points to a larger trend: robotics developers want the comfort of Linux, the ecosystem of Raspberry Pi, and the reliability of machine-oriented interfaces in one compact package.
Why the Compute Module 5 Makes Sense for Robotics
The Compute Module 5 is not just a Raspberry Pi 5 with a different outfit. It is a system-on-module designed for embedded and industrial products. The module includes a 64-bit Arm processor running at 2.4GHz, along with configurable memory, optional wireless connectivity, and eMMC storage options. For a robot controller, that combination matters because robotics workloads are rarely one simple task.
A mobile robot may need to read motor feedback, process IMU data, talk to smart actuators, stream camera frames, run a ROS 2 node graph, log diagnostics, and maintain a network connection all at once. A tiny microcontroller can handle real-time loops beautifully, but it may struggle when asked to run computer vision, mapping, web dashboards, software updates, and higher-level planning. The CM5 gives the robot a Linux-capable control layer without forcing the entire machine to depend on a bulky desktop-class computer.
Small Module, Big Design Freedom
The real magic is not only raw compute power. It is the carrier-board model. A Compute Module needs an IO board or a custom carrier PCB to expose power, GPIO, USB, Ethernet, PCIe, MIPI camera/display lanes, UART, SPI, I2C, and other interfaces. That may sound like extra work, but in robotics, extra work often means extra freedom.
A robot does not always need two full-size HDMI ports sticking out of its body like tiny robot ears. It may need rugged connectors, a 24V input stage, CAN terminals, emergency-stop routing, an IMU placed near the center of motion, and mounting holes that actually match the chassis. The Compute Module approach lets designers remove what they do not need and build around what the robot truly requires.
The Hardware Core: What CM5 Brings to the Table
At the heart of the Compute Module 5 is the same general performance class that made the Raspberry Pi 5 a major step forward. The processor is powerful enough for high-level robotics software, yet compact enough to fit into embedded designs. Available RAM options make it possible to choose a lightweight configuration for simple control systems or a larger-memory model for perception-heavy robots.
Storage is another practical advantage. CM5 variants with onboard eMMC are useful when reliability matters. MicroSD cards are convenient for experiments, but robots vibrate, lose power unexpectedly, and occasionally meet walls with enthusiasm. Soldered eMMC is often a better fit for a controller that needs to survive repeated boot cycles and field use.
Interfaces That Matter in a Robot Controller
Robotics is all about interfaces. Motors, encoders, sensors, cameras, batteries, and safety systems need clean communication paths. The CM5 supports common embedded buses such as I2C, SPI, UART, PWM-capable GPIO, PCIe, USB, and MIPI camera/display connections through a suitable carrier board. That makes it practical to combine a high-level Linux controller with lower-level hardware dedicated to timing-sensitive jobs.
A well-designed CM5 robot controller might use SPI for a CAN controller, I2C for environmental or orientation sensors, UART for servo buses or debugging, USB for LiDAR or depth cameras, and Ethernet or Wi-Fi for telemetry. PCIe opens the door to fast storage or specialized expansion. The result is a robot platform that can grow from a bench prototype into a more polished machine without throwing away the entire control architecture.
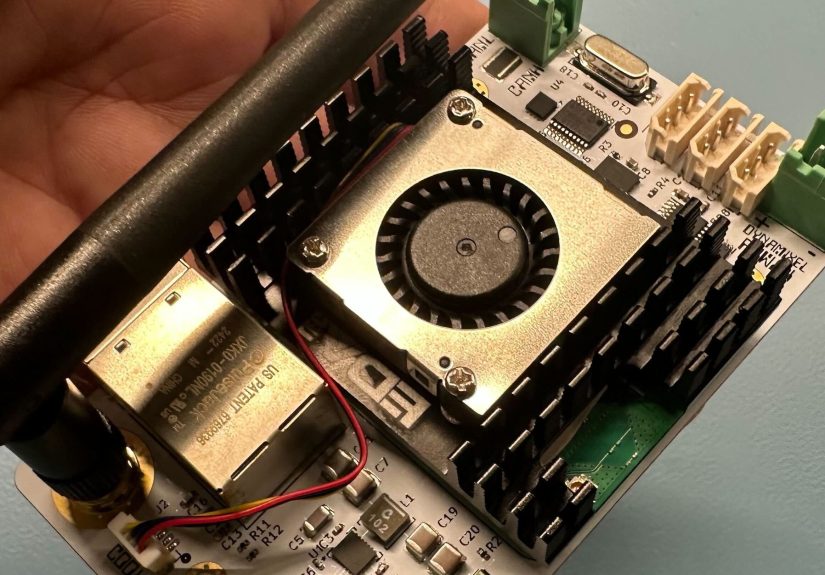
CAN Bus: The Robot’s Reliable Conversation Line
One of the most important features in many CM5 robot-controller builds is CAN bus support. CAN was born for noisy, real-world machines, and robots definitely qualify as noisy real-world machines. Motors create electrical noise. Long wires act like antennas. Batteries sag. Connectors wiggle. Somewhere, a wheel encoder is judging your cable management.
CAN helps because it is built for robust multi-device communication. Instead of giving every motor controller a separate serial connection, multiple nodes can share the same bus. Smart motors, drive controllers, sensors, and expansion modules can exchange compact messages in a predictable way. Linux can expose CAN interfaces through SocketCAN, allowing developers to work with CAN devices using familiar networking-style tools and libraries.
MCP2515 and TJA1051: A Practical CAN Pair
A common architecture uses an MCP2515 CAN controller connected to the host over SPI and a TJA1051 transceiver connected to the physical CAN bus. The controller handles CAN frames, filtering, and bus logic, while the transceiver deals with the electrical layer. This pairing is popular because it is well understood, widely supported, and friendly to Linux-based development.
In a robot controller based on CM5, this setup can connect the high-level computer to smart motors such as CAN-enabled BLDC actuators, industrial sensors, or distributed microcontroller nodes. It is not the only way to add CAN, and designers should consider CAN FD if their application needs higher data throughput, but for many classical CAN robotics projects, it is a practical and proven starting point.
The IMU: Giving the Robot a Sense of Balance
A robot without motion sensing is basically guessing where “upright” is, which is charming in a toddler and less charming in a wheeled balancing platform. An inertial measurement unit, or IMU, gives the controller information about acceleration, angular velocity, orientation, and heading. In the Overlord-inspired CM5 controller concept, a BNO055-style 9-axis IMU provides onboard orientation sensing and sensor fusion.
Sensor fusion matters because raw accelerometer, gyroscope, and magnetometer data can be messy. A smart IMU can combine those signals into more usable orientation data, reducing the amount of low-level math the main controller must handle. For mobile robots, robotic arms, camera gimbals, and self-balancing machines, that can simplify development significantly.
Placement Matters More Than Beginners Expect
Putting an IMU on the board is helpful, but where the board sits inside the robot also matters. An IMU mounted near heavy vibration, high-current motor wiring, or magnetic interference may produce data that looks like it came from a washing machine riding a skateboard. A good controller design considers mechanical mounting, grounding, cable routing, and calibration access from the start.
Software Stack: Linux, ROS 2, and Real-World Control
The Compute Module 5 shines when it runs the high-level software that makes modern robots feel intelligent. ROS 2 is the obvious example. It provides a framework for nodes, topics, services, transforms, sensor processing, robot descriptions, navigation, and simulation workflows. On Raspberry Pi-class hardware, developers can run ROS 2 on a 64-bit Ubuntu setup or use Docker on Raspberry Pi OS to keep the Raspberry Pi ecosystem while still using ROS packages.
That flexibility is valuable. A beginner can start with Raspberry Pi OS, a few Python scripts, and command-line CAN testing. Later, the same robot can grow into a ROS 2 system with separate nodes for motor control, localization, camera processing, diagnostics, and remote monitoring. The CM5 does not force one software path. It supports a gradual climb from “the motor finally spins” to “the robot maps the hallway and avoids the chair that everyone keeps moving.”
High-Level Control vs. Real-Time Control
It is important to be honest about what a Linux-based controller should and should not do. Linux is excellent for high-level logic, perception, networking, data logging, and coordination. It is not always the best choice for microsecond-level deterministic motor control. A smart architecture gives hard real-time tasks to motor drivers, microcontrollers, or dedicated control boards, then lets the CM5 coordinate them.
For example, the CM5 can send velocity targets over CAN, receive encoder feedback, run path planning, and publish telemetry. Meanwhile, each motor controller handles current loops, commutation, and safety cutoffs locally. This layered approach is how many reliable robots are built: the brain makes decisions, while the reflexes stay close to the hardware.
Designing a CM5 Robot Controller Board
A custom CM5 carrier board can be simple or ambitious. A basic robot controller may include regulated 5V power, CAN, USB, GPIO headers, and an IMU. A more advanced version might add isolated CAN, RS-485, digital inputs, protected outputs, power monitoring, fan control, an RTC battery, status LEDs, watchdog circuitry, and connectors rated for vibration.
Power deserves special attention. Many robots run from battery voltages such as 12V, 24V, or higher. The CM5 needs stable regulated power, and motor loads can cause voltage dips and noise. A strong buck converter, input filtering, reverse-polarity protection, fuse strategy, and proper grounding are not glamorous, but they are the difference between a reliable controller and a board that reboots every time the robot accelerates.
Thermal Planning Is Not Optional
Robots are often enclosed, dusty, warm, and moving. The CM5 can do serious work, and serious work creates heat. A production-ready controller should include a thermal plan: heatsink, airflow path, thermal pads, enclosure ventilation, or workload limits. During testing, monitor CPU temperature under realistic loads, not just while the robot is sitting politely on a desk.
Where This Controller Fits Best
A CM5 robot controller is especially attractive for robots that need more than simple motor control. Autonomous rovers, research platforms, inspection robots, robotic arms, telepresence machines, mobile manipulators, and education platforms can all benefit from a compact Linux-capable controller with strong expansion options.
It is also a good fit for teams that want a bridge between maker hardware and industrial design. Raspberry Pi has a huge community, familiar software tools, and accessible documentation. The Compute Module format adds a more product-friendly structure: custom connectors, onboard eMMC, embedded mounting, and carrier-board control.
When a CM5 Is Overkill
Of course, not every robot needs a Compute Module 5. A line-following robot, tiny servo toy, or simple obstacle-avoiding bot may be happier with a microcontroller. Using a CM5 just to blink LEDs and drive two H-bridges is like hiring a symphony conductor to ring a bicycle bell. It will work, but your budget may raise an eyebrow.
The CM5 makes the most sense when the robot needs Linux, networking, data processing, camera support, ROS 2, storage, or multi-device communication. If the project only needs tight real-time control and no high-level intelligence, a microcontroller remains the simpler and cheaper answer.
Specific Example: A CM5 Controller for Smart Motors
Imagine a four-wheel robot using smart BLDC motors with CAN communication. The CM5 carrier board includes a CAN controller and transceiver, an IMU, a 24V-to-5V power stage, USB ports for a depth camera and LiDAR, and Ethernet for development. The software stack runs ROS 2. One node receives joystick commands or navigation goals. Another sends motor targets over CAN. A third reads IMU orientation. A fourth logs battery voltage and temperature.
In this design, the CM5 is not directly switching motor phases. It is coordinating the robot. The motor controllers handle their local control loops, while the CM5 runs planning, supervision, diagnostics, and communication. That separation keeps the system easier to debug and safer to scale.
Practical Build Tips for Developers
First, prototype with an official or well-documented CM5 IO board before committing to a custom PCB. Confirm boot behavior, storage setup, cooling, camera support, PCIe needs, and software compatibility. Second, test CAN communication on the bench with known-good tools before connecting expensive motors. Third, add status LEDs. Developers always think they will not need them, then spend three evenings wondering whether the board is powered, booted, flashed, angry, or simply ignoring them.
Fourth, keep connectors serviceable. A robot that requires tweezers, prayer, and removing six panels just to unplug the CAN bus will eventually teach you new vocabulary. Fifth, document every pin assignment. CM5 alternate functions are powerful, but pin multiplexing can surprise even experienced designers. A small spreadsheet can prevent a large redesign.
Security and Maintainability
A robot controller is also a networked computer. That means software updates, secure remote access, account management, firewall rules, and backup images matter. If the robot operates in a lab, school, workshop, or business environment, maintainability should be part of the design from day one.
Use repeatable OS images, version-controlled configuration files, and clear recovery procedures. If eMMC is used, keep a flashing workflow ready. If Docker is used for ROS 2, pin container versions and document how to rebuild them. Future-you will be grateful. Future-you may even stop blaming past-you for “just testing something quickly” and never writing it down.
Why This Trend Is Exciting
The Compute Module 5 represents a sweet spot in robotics: powerful enough for modern software, small enough for embedded design, familiar enough for rapid development, and flexible enough for custom hardware. It lowers the barrier between a prototype and a purpose-built controller.
The most exciting part is not that someone can put a fast Arm computer on a robot. That has been possible for years. The exciting part is that builders can now design around a compact module while still using the Raspberry Pi ecosystem. That combination encourages more polished open-source robot controllers, smarter education platforms, better lab robots, and more accessible automation experiments.
Field Notes and Build Experience: What You Learn After the First Robot Moves
The first lesson from building a robot controller around the Compute Module 5 is that the computer is rarely the hardest part. The hard part is the ecosystem around it: clean power, predictable booting, bus stability, mechanical vibration, thermal behavior, and the thousand tiny choices that decide whether a robot feels professional or like a science fair project held together by optimism.
During early testing, the biggest win is usually modularity. A CM5 carrier board with clearly separated power, communication, sensing, and expansion sections is easier to debug. When the CAN bus fails, you can isolate the transceiver, verify SPI, check termination, and test with command-line tools. When the IMU reports nonsense, you can inspect placement, magnetic interference, and calibration. When the robot reboots under acceleration, you know to blame power integrity before accusing Linux of having a bad attitude.
Another practical experience is that eMMC changes the feel of a robot project. Booting from removable media is convenient, but onboard storage makes the controller feel more appliance-like. It encourages repeatable images, controlled updates, and less casual card swapping. For teams building multiple robots, that consistency is valuable. Flashing the same image across controllers can save hours of setup time and reduce mysterious “but it worked on the other robot” moments.
Cooling is also more important than it looks in the CAD model. A controller that behaves perfectly on an open bench may throttle inside a compact enclosure near motor drivers and batteries. It is wise to test the robot with the lid closed, the motors active, the camera streaming, and ROS 2 running. Bench tests should imitate real life, because real life has a talent for finding the one condition your test skipped.
Software discipline matters just as much. A CM5 makes it easy to install packages, clone repositories, try drivers, run Docker containers, and experiment quickly. That freedom is wonderful until nobody remembers which command fixed the robot. Use scripts, configuration management, and version control early. Even a simple setup document can turn a late-night repair from detective work into maintenance.
Finally, the best CM5 robot-controller designs respect the boundary between high-level intelligence and low-level safety. Let the Compute Module plan, coordinate, log, visualize, and communicate. Let dedicated motor electronics enforce current limits, watchdog behavior, and emergency stops. Robots become more dependable when every layer has a clear job. The CM5 is an excellent brain, but the rest of the nervous system still needs reflexes.
Conclusion
A robot controller with the Compute Module 5 is not just a faster Raspberry Pi project. It is a practical way to build a compact, Linux-capable, robotics-focused control platform that can talk to smart motors, read sensors, run ROS 2, manage telemetry, and fit into a custom machine. The CM5 gives developers performance and flexibility; the carrier board turns that potential into a real robot controller.
For simple robots, a microcontroller may still be the right tool. But for robots that need perception, networking, logging, CAN communication, and high-level autonomy, the Compute Module 5 is a serious contender. It gives builders the freedom to create the controller they wish existed, which is usually how the best robotics hardware begins.