Table of Contents >> Show >> Hide
- Why a Clay Pot Bird Bath Is Such a Great DIY Project
- Materials You’ll Need
- How to Make a DIY Bird Bath From a Clay Garden Pot
- Tips to Make Your Homemade Bird Bath More Attractive to Birds
- Common Mistakes to Avoid
- How to Clean and Maintain a Terra-Cotta Bird Bath
- What About Winter?
- Creative Design Ideas for a Clay Pot Bird Bath
- Why This DIY Project Is Worth It
- Experience: What It’s Really Like to Make and Live With a DIY Bird Bath From a Clay Garden Pot
- Conclusion
If your garden is missing that one charming detail that says, “Yes, I am outdoorsy, but I also appreciate cute things,” a DIY bird bath from a clay garden pot is a smart place to start. It’s affordable, easy to build, and surprisingly stylish for something that begins life as a humble terra-cotta pot and saucer. Better yet, it gives backyard birds a reliable place to drink, splash, preen, and hold what appears to be a tiny feathered pool party.
This project is ideal for beginner DIYers because it doesn’t require advanced carpentry, a workshop full of tools, or the confidence of a home renovation TV host. At its simplest, you turn a clay pot upside down, place a saucer on top, add water, and call it a day. But if you want to make it sturdier, prettier, and more bird-friendly, there are a few important details that make a big difference.
In this guide, you’ll learn how to make a homemade bird bath from a clay garden pot, choose the right materials, place it properly, keep it clean, and avoid the common mistakes that turn a lovely garden feature into a mosquito lounge. We’ll also cover design ideas, maintenance tips, and real-life experience so your terra-cotta bird bath looks good and actually gets used.
Why a Clay Pot Bird Bath Is Such a Great DIY Project
A DIY bird bath made from a clay garden pot works because it checks three important boxes: it’s simple, functional, and attractive. The clay pot becomes a pedestal, while the saucer acts as the basin. That shape naturally creates a classic bird bath look without the price tag of a store-bought stone version.
It also blends beautifully into most garden styles. Whether your yard leans cottage, farmhouse, naturalistic, or “I buy plants first and ask questions later,” a terra-cotta bird bath fits right in. The warm, earthy color looks organic among flowers, herbs, shrubs, and raised beds.
From a bird-friendly perspective, this kind of bird bath can be excellent because the saucer is shallow, which is exactly what many birds prefer. Songbirds generally want a safe place to sip and flutter, not a backyard diving pool. Add a couple of small stones for grip, and your budget project suddenly becomes a smart backyard wildlife feature.
Materials You’ll Need
- 1 clay garden pot, around 8 to 12 inches wide
- 1 terra-cotta saucer, ideally 12 to 16 inches wide
- Optional second clay pot for added height
- Exterior-grade waterproof adhesive or silicone, optional
- Level or flat paver stone for the base
- Small smooth rocks or pebbles
- Outdoor paint for the exterior only, optional
- Clean water
If you want the fastest version, all you truly need is one pot and one saucer. If you want a more polished homemade bird bath, add adhesive for stability and a paver beneath the base so it sits level. That keeps the basin from wobbling and stops your birds from feeling like they’ve landed on a tiny carnival ride.
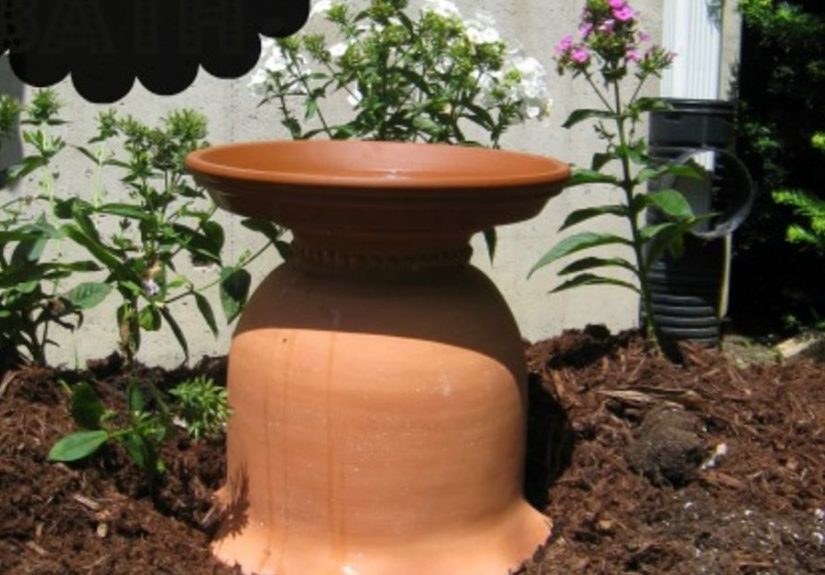
How to Make a DIY Bird Bath From a Clay Garden Pot
1. Choose the Right Pot and Saucer
Start with a sturdy clay pot that feels heavy enough to anchor the bird bath. Pair it with a saucer that is wider than the pot so it creates a stable basin on top. The saucer should be shallow rather than bowl-like. A wide, shallow saucer is much more useful than a deep one because birds prefer easy footing and a gentle slope.
A classic combination is a 10-inch pot with a 14-inch saucer. That size gives you enough surface area for birds without creating a giant water feature that becomes harder to clean.
2. Prep the Pieces
Wipe down the pot and saucer to remove dust and loose clay residue. If you want to decorate the outside, now is the time. You can leave the natural terra-cotta finish for a classic garden look, whitewash it for cottage charm, or paint only the exterior in a soft garden color.
Skip painting the inside of the saucer unless the product is clearly labeled as appropriate for water exposure and fully cured outdoor use. Birds are better served by a simple, clean basin than by a glamorous finish that may not age well.
3. Create a Stable Base
Set the pot upside down on a flat surface in the garden. If the ground is soft or uneven, place a paver stone underneath first. This matters more than people think. A level bird bath holds water evenly, looks better, and is far less likely to tip.
If you want extra height, place a larger upside-down pot on the bottom and a smaller one above it, but make sure the whole stack feels solid. A shorter, sturdier bird bath is usually better than a tall, dramatic one that topples the first time a squirrel gives it side-eye.
4. Attach or Set the Saucer on Top
Place the saucer on the flat bottom of the upside-down pot. For a removable setup, simply set it in place. For a more permanent clay pot bird bath, use a bead of exterior-grade waterproof adhesive or silicone between the pot and saucer, then let it cure fully according to the product instructions.
A removable top is easier to clean and store. A bonded top is more secure in windy areas. Either method works, so choose the one that best suits your climate and how often you plan to refresh the setup.
5. Add Rocks for Traction and Safety
Place a few small smooth stones or flat pebbles in the saucer. This gives birds better footing, creates slightly varied water depths, and helps smaller birds feel safer. It also adds a natural look that makes the bird bath seem less like a garden accessory and more like a tiny woodland spa.
Now add water, but keep it shallow. About 1 to 2 inches is ideal for most backyard birds. If the center is a bit deeper, that’s fine, as long as the edges stay easy to access.
6. Place It in the Right Spot
The best location for a DIY bird bath balances safety, visibility, and cleanliness. Birds like nearby shrubs or low branches where they can perch and check for danger, but you do not want the bath directly under trees that dump leaves, seeds, berries, or other debris into the water.
A partially shaded area is usually best. Shade helps keep the water cooler and slows evaporation in summer. It also helps the bath stay fresher longer. Keep the bird bath far enough from feeders that seed hulls and droppings do not constantly land in the basin.
If possible, place it where you can see it from a window or patio. Because yes, part of the magic here is pretending you are simply watering the garden when really you are conducting highly serious bird surveillance.
Tips to Make Your Homemade Bird Bath More Attractive to Birds
If birds do not arrive immediately, do not take it personally. Backyard birds are curious, but they are also cautious. A new bird bath may take a little time to become part of their routine.
- Keep the water fresh and in the same location consistently
- Add a few stones or gravel for natural texture
- Try a gentle dripper or solar bubbler for moving water
- Make sure the bath is visible from the air
- Keep cats and other predators away from the area
Moving water is especially attractive. Even a simple drip feature can increase interest because birds often notice sound before they notice a still basin. If you add a bubbler, choose one gentle enough that it does not turn your elegant clay pot bird bath into a miniature geyser.
Common Mistakes to Avoid
Making the Basin Too Deep
This is the big one. A deep bowl may look pretty, but it is less useful for small birds. Shallow water is safer, more inviting, and easier to maintain.
Putting It in Full Sun All Day
Full sun speeds evaporation and encourages warm, stagnant water. In hot climates, that means more frequent refilling and a faster buildup of algae.
Setting It Under Messy Trees
Shade is helpful, but constant falling debris is not. If your saucer turns into leaf soup every afternoon, move it.
Using Slippery Surfaces Only
Even though terra-cotta has some texture, birds appreciate a bit of extra footing. Pebbles, flat stones, or a lightly textured saucer bottom help a lot.
Ignoring Stability
A wobbly bird bath is not charming. It is a hazard. Always test the setup before filling it, especially if you stacked more than one pot.
How to Clean and Maintain a Terra-Cotta Bird Bath
A bird bath only helps wildlife if it stays clean. Dirty water can spread disease, attract mosquitoes, and send birds elsewhere. The good news is that maintenance is simple.
Empty and refill the water every day or two in warm weather, or whenever it looks dirty. Once or twice a week, give the saucer a proper scrub. A diluted vinegar solution is a common bird-safe cleaning method for routine maintenance. After scrubbing, rinse thoroughly and let the basin dry before refilling.
Avoid harsh household cleaners, strong fragrances, and anything that may leave residue. Birds do not need lemon-scented sparkle. They just need fresh water.
If algae starts forming quickly, move the bird bath into a slightly shadier spot and clean it more often. You can also reduce buildup by avoiding “top-offs.” Dump the old water and replace it rather than simply adding more on top.
What About Winter?
A clay garden pot bird bath looks wonderful in the garden, but terra-cotta has one weakness: freezing weather. Because unglazed clay is porous, it can absorb moisture. When temperatures drop and that moisture freezes, the pot or saucer can crack.
If you live in a cold climate, it is smart to bring the saucer indoors during hard freezes or store the entire bird bath in a sheltered space for winter. Some gardeners switch to a plastic or heated winter bird bath during the coldest months and bring the terra-cotta version back in spring.
If you leave it outdoors during chilly weather, empty it often and never let water sit in the saucer when a freeze is coming. That single habit can save your project from becoming a pile of very artistic shards.
Creative Design Ideas for a Clay Pot Bird Bath
- Rustic garden style: Leave the pot natural and surround the base with mulch, herbs, or creeping thyme.
- Cottage garden style: Whitewash the pot exterior and place it among daisies, coneflowers, and lavender.
- Mosaic accent: Decorate only the outside of the saucer rim with tile or broken pottery pieces.
- Tiered look: Stack two inverted pots of different sizes for a taller pedestal.
- Mini patio version: Use a smaller pot and saucer on a balcony or deck.
No matter how you style it, the most important feature is still function. Birds do not care whether your bird bath matches your outdoor throw pillows. They do care whether the water is shallow, clean, and safe.
Why This DIY Project Is Worth It
A homemade bird bath from a clay pot is one of those rare garden projects that delivers quick results without much fuss. It gives your outdoor space a handmade touch, supports local birds, and turns an ordinary garden supply into something useful and charming.
It is also flexible. You can make one for almost no money using leftover pots, or dress it up into a decorative focal point. You can keep it simple, paint it, stack it, or accessorize it with a dripper. However you build it, the core idea remains delightfully uncomplicated: shallow water, stable base, good placement, regular cleaning.
Experience: What It’s Really Like to Make and Live With a DIY Bird Bath From a Clay Garden Pot
The first time you make a DIY bird bath from a clay garden pot, you might assume the project is mostly about garden decor. It feels like one of those cheerful weekend crafts you do because you have an extra pot, a matching saucer, and just enough optimism to believe your backyard is about to become a wildlife documentary. Then something funny happens: the bird bath actually changes how you use the garden.
At first, the experience is practical. You test spots. You step back. You move the pot three inches to the left like it is a priceless sculpture. You fill the saucer, wait, and notice absolutely nothing for a day or two. This is the stage where many people start questioning the project. Was the water too deep? Was the location wrong? Did the birds hold a meeting and reject your design choices?
Then one morning, a sparrow lands on the rim. It does not jump in right away. It looks around with the seriousness of a building inspector. It sips. Maybe it flicks a wing. Then it leaves. But after that first visit, the bird bath starts getting traffic. A robin may show up in the afternoon. A finch may stop in for a quick drink. Before long, you realize the bird bath is no longer just a garden object. It has become part of the daily rhythm of the yard.
One of the biggest real-world lessons is that maintenance matters more than decoration. You can paint the outside, add pretty stones, and style the base with flowers, but birds respond most to clean water and a safe setup. When the basin is fresh, visits increase. When the water gets cloudy or hot, activity drops. It is a very honest little system. The birds do not care about your aesthetic ambitions. They care whether the bath works.
Another common experience is discovering how much placement affects success. A clay pot bird bath in blazing afternoon sun may look lovely for photos, but you will be refilling it constantly. One tucked directly under a messy tree may fill with leaves faster than with birds. The sweet spot is usually a place with partial shade, a clear line of sight, and nearby cover. Once you find that location, the whole project starts performing better.
People are often surprised by how calming the bird bath becomes. You may head outside to water plants and end up standing still for ten minutes watching birds splash around like tiny children on summer break. It adds motion, sound, and life to the garden in a way that feels subtle but noticeable. Even on busy days, that little pause can be the best part of being outside.
There is also a learning curve with clay itself. Terra-cotta looks timeless, but it is not indestructible. After using one through changing weather, most gardeners become more careful about cleaning, emptying, and winter storage. That is not a drawback so much as part of the relationship with the project. A terra-cotta bird bath asks for a little care, but in return it offers a lot of charm.
In the end, the experience of making a homemade bird bath from a clay garden pot is rewarding because it feels both useful and personal. It is a simple object you built yourself, yet it supports real wildlife and gives your outdoor space more character. That is a pretty great return for a project built from a flowerpot, a saucer, and a modest amount of backyard ambition.
Conclusion
A DIY bird bath from a clay garden pot is one of the easiest ways to add beauty and function to your yard. It is inexpensive, beginner-friendly, and surprisingly elegant when done well. The secret is not fancy materials. It is choosing a shallow saucer, building a stable base, placing it in a bird-safe location, and keeping the water fresh.
If you want a simple weekend project that supports backyard birds and upgrades your garden at the same time, this terra-cotta bird bath is a solid choice. It looks handmade in the best way, works with almost any landscape style, and gives you a front-row seat to the small, busy drama of local birds living their lives one splash at a time.


