Table of Contents >> Show >> Hide
- Start Like a Designer: A Tiny Plan Saves Big Money
- The DIY Home Decor Toolkit (Keep It Simple)
- Project Category #1: Walls That Look Custom (Without a Contractor)
- Project Category #2: Small Swaps That Make a Room Look “Updated”
- Project Category #3: Furniture Flips and Upcycling That Look Intentional
- Project Category #4: Shelves, Storage, and Styling (The “Make It Look Nice” Part)
- Room-by-Room DIY Home Decor Ideas
- Renter-Friendly DIY Home Decor That Won’t Start a Security Deposit War
- Common DIY Mistakes (And How to Avoid Them)
- Safety Notes (Because Decor Shouldn’t Be an ER Visit)
- Conclusion: DIY Home Decor That Looks Like You Meant It
- Real-World DIY Home Decor Experiences (Lessons DIYers Learn)
DIY home decor is the sweet spot between “I want my home to feel like me” and “I do not want to sell a kidney for a new coffee table.”
With a few smart materials, basic tools, and a plan that doesn’t involve panic-buying 47 throw pillows, you can make a space look intentional,
custom, and downright expensivewithout the expensive part.
This guide pulls together the most practical ideas DIY experts and home editors consistently recommend: quick paint upgrades, renter-friendly wall
tricks, high-impact hardware swaps, simple shelves, and easy art you can make even if you think “palette” is something you clean paint off of.
You’ll get step-by-step project ideas, styling rules that keep things cohesive, and real-life lessons DIYers learn the hard wayso you don’t have to.
Start Like a Designer: A Tiny Plan Saves Big Money
The fastest way to turn DIY into “Why is my living room full of unfinished boards?” is skipping the planning step. A good plan doesn’t need a mood
board worthy of a museumit just needs three decisions:
- Pick a vibe: modern, farmhouse, boho, coastal, traditional, or “I just like cozy.”
- Pick a palette: one main neutral + one accent color + one metal finish (brass, black, chrome, etc.).
- Pick your focus: one “hero” upgrade (accent wall, big art, statement light) and a couple of supporting upgrades.
If you do only one thing today, do this: walk room-to-room and write down what feels off. Is it empty walls? Bad lighting? Clutter? Mismatched
finishes? DIY home decor works best when you’re solving a specific problem, not just collecting craft supplies like they’re Pokémon.
The DIY Home Decor Toolkit (Keep It Simple)
You don’t need a garage full of tools to create budget-friendly home decor. Most projects in this article use a starter kit:
- Measuring tape, pencil, level
- Painter’s tape, drop cloth, spackle + putty knife
- Drill/driver + basic bits, stud finder (optional but helpful)
- Sandpaper or sanding block, microfiber cloth
- Paint supplies: angled brush, small roller, tray
- Command strips/hooks (for renter-friendly upgrades)
Pro tip: keep a small “touch-up box” with leftover paint, spackle, a mini roller, and extra hardware screws. Future-you will feel like you just
hired a tiny home improvement assistant.
Project Category #1: Walls That Look Custom (Without a Contractor)
1) The One-Day Accent Wall (Paint, Stripes, or Panels)
Accent walls are popular because they’re dramatic, affordable, and forgiving. You can go classic with one bold color, or add personality with
simple stripes or geometric blocks.
- Choose the right wall: typically behind a bed, sofa, or dining tablewhere furniture “frames” the feature.
- Prep: patch holes, lightly sand rough spots, wipe dust.
- Paint: use painter’s tape for crisp edges; do two coats for saturation.
- Optional upgrade: add trim, picture-frame molding, or board-and-batten for texture.
If you’re nervous about bold color, pick a deeper shade of a color already in the room (like navy if you have blue accents). It feels cohesive,
not chaotic.
2) Peel-and-Stick Wallpaper (Big Style, Low Commitment)
Peel-and-stick wallpaper is a favorite for renters and commitment-phobes. It can instantly add pattern behind a desk, inside bookcase backs,
or on a small powder room wall.
- Best spots: one feature wall, backsplash area (check heat/moisture suitability), inside closets, or behind open shelving.
- Make it easier: measure twice, start with a straight plumb line, smooth slowly to avoid bubbles.
- Reality check: textured walls can be trickytest a small section first.
3) DIY Gallery Wall That Doesn’t Look Random
A gallery wall is basically your home’s personality on displayif it’s done well. If it’s done poorly, it’s a confusing hallway of frames that
makes visitors squint like they’re solving a mystery.
- Pick a unifier: matching frame color, consistent matting, or a shared color theme.
- Lay it out on the floor: take a photo once it looks right.
- Use paper templates: tape templates to the wall to confirm spacing before you nail anything.
- Spacing rule: keep gaps consistent (typically 2–3 inches).
Want a faster option? Do a “duo” or “trio” arrangement above a sofa: three larger pieces reads modern and intentional.
4) DIY Wall Art You Can Actually Finish
DIY wall art is one of the best ways to add custom home decor on a budget. You can create oversized art with simple shapes, textured paint,
fabric panels, or framed wallpaper samples.
- Textured canvas: joint compound + a putty knife, let dry, paint in one tone.
- Fabric “art”: stretch linen or patterned fabric over a frame, staple, hang.
- Wallpaper sample frames: frame bold patterns for a designer look without designer prices.
Project Category #2: Small Swaps That Make a Room Look “Updated”
5) Hardware and Faucet Upgrades (Tiny Change, Huge Impact)
Swapping cabinet pulls, knobs, and faucets is one of the quickest ways to modernize kitchens and bathrooms. The trick is consistency:
choose one metal finish per room and stick with it.
- Measure first: pull spacing mattersmatch existing holes if you want the easiest install.
- Upgrade order: cabinet pulls → towel bars/hooks → faucet (if you’re ready).
- Budget tip: prioritize what you touch daily. That’s where “new” is most noticeable.
6) Paint a Door (Yes, Just One Door)
Painting an interior doorespecially a front door, pantry door, or bathroom dooradds a punch of color without overwhelming a space.
Pair it with updated hinges or a new knob for maximum effect.
7) Upgrade Lighting Without Rewiring Your Life
Lighting changes the mood of a room more than people realize. If you can’t install hardwired fixtures, use plug-in options:
sconces, picture lights, and floor lamps with warm bulbs.
- Layer lighting: overhead + task (reading) + accent (lamps/candles).
- Bulb matters: “soft white/warm” typically feels cozier than cool white.
- DIY win: add a dimmer (plug-in dimmers work for many lamps).
Project Category #3: Furniture Flips and Upcycling That Look Intentional
8) The Thrift Flip: Paint + New Hardware = “Custom Piece”
Upcycling furniture is a classic DIY home decor move because it’s sustainable, creative, and surprisingly forgiving.
The secret is prepmost bad paint jobs are actually bad sanding jobs wearing a trench coat.
- Clean thoroughly (degreaser helps for older pieces).
- Lightly sand (or use a deglosser) so paint grips.
- Prime if needed (especially for glossy finishes or stained wood).
- Paint in thin coats; let it cure before heavy use.
Choose a finish that matches your style: matte for modern, satin for traditional, or a slightly distressed finish for farmhouse/cottage looks.
9) Contact Paper/Vinyl as a Temporary “Material Upgrade”
Self-adhesive vinyl (often called contact paper) can mimic marble, wood, or tile and works well for temporary upgradeslike lining drawers,
refreshing a tabletop, or giving cabinet fronts a new look. Use it where wear-and-tear is manageable, and always test removal first.
Project Category #4: Shelves, Storage, and Styling (The “Make It Look Nice” Part)
10) DIY Wall Shelves That Add Storage and Decor
Wall shelves are a practical DIY that also doubles as decor. A simple board with sturdy brackets can become a book display, a plant ledge,
or a kitchen coffee station.
- Anchor safely: use studs when possible; otherwise use heavy-duty anchors rated for the load.
- Style smarter: combine books, baskets, and a few meaningful objects (not 37 tiny trinkets).
- Finish: stain for warmth, paint to match walls for a built-in look.
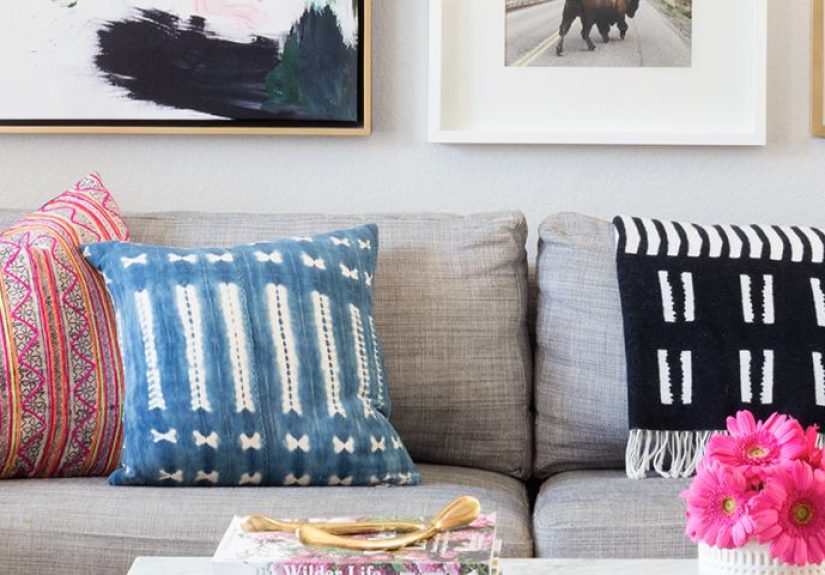
11) The “Refined Layering” Styling Trick
Designers often talk about layering textures to make a room feel finished: wood + linen + metal, or ceramic + glass + woven baskets.
The goal isn’t clutter; it’s depth. Start with bigger anchors (a rug, curtains, a large basket), then add smaller accents (candles, art books,
a tray) to make it feel curated.
12) Make Open Storage Look Intentional
Open shelves and visible kitchenware can look charmingif you treat them like a display. Group similar items, repeat colors, and mix in
practical pieces (like bowls) with a few decorative ones (like a small plant or framed print).
Room-by-Room DIY Home Decor Ideas
Living Room
- DIY coffee table styling: tray + book stack + one sculptural object + a small plant.
- Instant cozy: add a large rug, then layer a throw and textured pillows (varied fabrics, not just matching patterns).
- Wall upgrade: large-scale art or a balanced gallery wall.
Bedroom
- Headboard hack: upholstered panel (foam + batting + fabric) mounted for a custom look.
- Bedside lighting: plug-in sconces free up nightstand space and feel “boutique hotel.”
- Paint move: color-drenching a small nook (walls + trim in one shade) creates a calm, high-end vibe.
Kitchen
- Hardware refresh: pulls and knobs for immediate modern impact.
- Shelf moment: a short run of wall shelves for cookbooks, mugs, or a spice display.
- Decor that works: pretty cutting boards, a crock of utensils, a small framed print.
Bathroom
- Swap the mirror: even a small upgrade changes the whole room.
- Add storage: hooks, baskets, or a narrow shelf above the toilet.
- Soft goods: new towels and a washable rug are underrated “mini remodels.”
Entryway
- Command center: hooks, a small shelf, a tray for keysclutter control is decor.
- Mirror trick: a mirror bounces light and makes the space feel bigger.
- Runner rug: adds warmth and hides dirt like a champion.
Renter-Friendly DIY Home Decor That Won’t Start a Security Deposit War
Renter-friendly home decor is about reversibility. The best upgrades are removable, portable, or easily patched:
- Peel-and-stick wallpaper (test a patch first)
- Removable hooks and picture hanging strips
- Plug-in lighting and sconces
- Temporary vinyl/contact paper for cabinets or countertops
- Textiles: rugs, curtains, bedding, pillow covers
- Freestanding shelves and room dividers
Translation: if you can take it with you in a moving box, it’s probably a safe DIY.
Common DIY Mistakes (And How to Avoid Them)
Mistake: Choosing paint by holding a tiny swatch in the air like it’s a magic spell
Paint changes with lighting. Sample on the wall in multiple spots and check morning vs. night before committing.
Mistake: Ignoring scale
Tiny art above a large sofa looks lost. Go larger, or group pieces together so the display matches the furniture’s visual weight.
Mistake: Too many “statement” items
One statement wall, one bold rug, one dramatic lightpick your heroes. The rest should support the story, not start shouting over it.
Mistake: Skipping prep
Cleaning, sanding, and priming aren’t glamorous, but they’re the difference between “custom” and “peeling by Tuesday.”
Safety Notes (Because Decor Shouldn’t Be an ER Visit)
- Use a stud finder and proper anchors for shelves and heavy frames.
- Wear eye protection when drilling or sanding.
- Ventilate when painting or using adhesives.
- Follow weight limits for hooks, strips, and anchors.
Conclusion: DIY Home Decor That Looks Like You Meant It
The best DIY home decor ideas aren’t about doing everythingthey’re about doing a few things well. Start with one high-impact upgrade
(an accent wall, a gallery wall, or better lighting), then layer in smaller improvements (hardware, textiles, shelves, art).
Stick to a simple palette, repeat a few materials, and give your projects enough time to cure and settle before judging them.
Most importantly: your home doesn’t need to look like a catalog. It should look like you live therejust with better lighting and fewer
“Where did I put my keys?” moments.
Real-World DIY Home Decor Experiences (Lessons DIYers Learn)
DIY home decor looks effortless on the internet, but real homes come with real-life complicationscrooked walls, surprise pipes, moody lighting,
and pets who treat fresh paint like a personal challenge. Over time, many DIYers discover that the “experience” of decorating is as much about
problem-solving as it is about creativity.
One of the most common experiences is learning how much lighting changes everything. People often start by buying decor itemsvases, pillows,
wall artonly to realize the room still feels flat. Then they swap bulbs to a warmer tone, add a floor lamp in a dark corner, or install a plug-in
sconce near the sofa, and suddenly the same furniture looks intentionally styled. It’s a classic “I didn’t change the room, I changed the mood”
momentand it’s why experienced DIYers treat lighting as a core design tool, not an afterthought.
Another frequent lesson: paint is powerful, but paint is also a liarat least, it lies a little. A color that looks calm and creamy in the store
can turn yellow at night under warm bulbs, or look icy in a bright room with cool daylight. Many DIYers end up with a patchwork of test swatches on
the wall and a new appreciation for sampling first. The “experienced” approach becomes: test, wait 24 hours, check it in different light, then decide.
It saves money and prevents the dreaded cycle of repainting while muttering, “But the swatch said ‘Soft Linen.’”
Furniture flips create their own set of experiences. Beginners often assume the magic is in the paint color, but seasoned DIYers know the magic is
in prep and patience. Cleaning and sanding feel boringuntil someone skips them and watches paint peel off a tabletop after the first spilled drink.
After that, the process becomes almost ritual: clean, scuff-sand, prime if needed, thin coats, proper dry time, and a gentle cure period before
heavy use. The project might take longer, but the finish looks smoother and lasts.
There’s also a universal DIY experience that could be titled: “The Great Measurement Humbling.” Hanging a gallery wall, installing shelves,
or placing curtain rods teaches people that eyeballing is not a measurement system. Many DIYers eventually adopt the same habits pros use:
mark center points, use a level, step back often, and measure twice before drilling once. It feels slower, but it prevents a wall full of patch jobs.
Finally, DIYers often learn that a cohesive room isn’t built from identical itemsit’s built from repeated cues. A black metal finish echoed in a
lamp base, picture frames, and cabinet pulls. A warm wood tone repeated in a shelf and a bowl. A single accent color that shows up in a pillow,
a piece of art, and a small vase. Over time, those repeated cues make a room feel “done,” even if the decor is collected from thrift stores,
big-box finds, and handmade projects. That’s the real DIY win: your space looks personal, polished, and practicalbecause it was designed for how you
actually live.