Table of Contents >> Show >> Hide
- Why Turn a Desk into a Dry Erase Surface?
- What Is Dry Erase Paint, Exactly?
- Best Desks and Surfaces for a Dry Erase Makeover
- Supplies You’ll Need for a Dry Erase Painted Desk
- Step-by-Step: How to Paint a Desk with Dry Erase Paint
- How to Keep Your Dry Erase Desk Looking New
- Pros and Cons of a Dry Erase Painted Desk
- Design Ideas for a Remodelaholic-Style Dry Erase Desk
- Is a Dry Erase Painted Desk Right for You?
- Real-Life Experiences with Dry Erase Desks
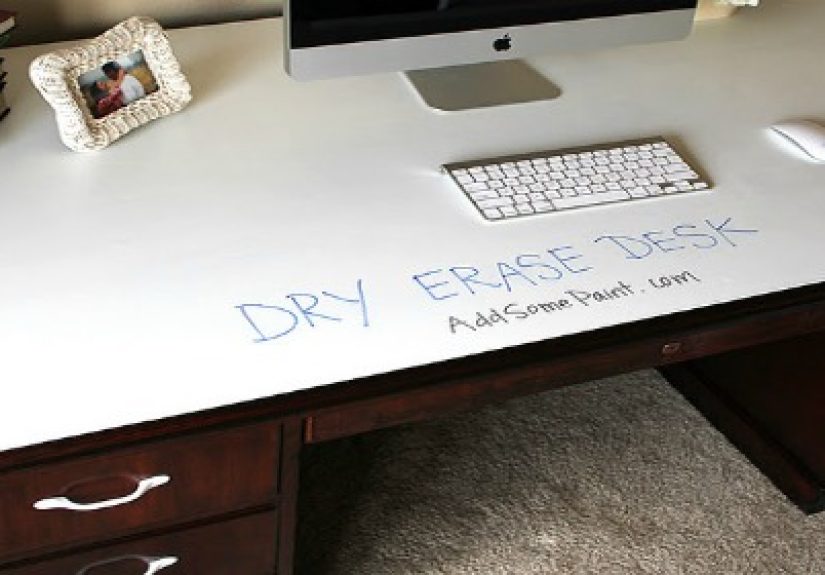
If you’ve ever looked at your boring desk and thought, “I wish I could just draw all over this,” you’re in exactly the right place. A dry erase painted desk lets you brainstorm, doodle, and make to-do lists right on the surfacethen wipe it all away when you’re done. It’s part DIY project, part productivity hack, and part excuse to buy more markers than any adult truly needs.
Inspired by the creative spirit of Remodelaholic-style makeovers, this guide walks you through how to turn an ordinary desk into a sleek whiteboard work surface. We’ll cover what dry erase paint is, how to prep and paint your desk, the pros and cons, and real-life tips so your new dry erase painted desk looks great and actually erases like it should.
Why Turn a Desk into a Dry Erase Surface?
A dry erase desk isn’t just a quirky DIY project; it’s surprisingly practical. Think of it as a built-in giant sticky note that never runs out.
- Built-in brainstorming space: Sketch ideas, map out workflows, or scribble formulas without hunting for paper.
- Clutter control: Short-term notes live on the desktop instead of in a sea of sticky notes.
- Kid-friendly: For kids, a dry erase painted desk is half furniture, half art station. Homework up top, doodles on the side.
- Budget upgrade: Instead of replacing a beat-up laminate or MDF desk, you can give it a modern whiteboard-style makeover for the cost of a paint kit and some elbow grease.
And aesthetically, a glossy white or clear-coated surface can make a dated desk look more modern and intentionalvery “I-saw-this-on-Remodelaholic-and-now-my-house-is-fancy.”
What Is Dry Erase Paint, Exactly?
Dry erase or whiteboard paint is a specialty coating that turns a smooth surface into something you can write on with dry erase markers and wipe clean. Most high-quality options are two-part epoxy or polyurethane systems that you mix right before application. Once cured, they form a hard, slick surface similar to a whiteboard.
You can usually choose between:
- White dry erase paint: Gives your desk a crisp, traditional whiteboard look.
- Clear dry erase paint: Lets the existing color or wood tone show through, so you get a writable surface without changing the overall look of the desk.
Brands differ in gloss level, odor, and cure time, but they all require careful prep and patience. The smoother and cleaner the desk, the better the final dry erase surface will be.
Best Desks and Surfaces for a Dry Erase Makeover
Before you crack open that dry erase paint kit, take a good look at your desk. Not every surface is an ideal candidate, but most can be coaxed into cooperating with the right prep work.
Good Candidates
- Laminate desks: Very common, very plain, and perfect for a painted desk makeover as long as you sand and prime.
- MDF or particleboard desks: Smooth once primed, but they need sealing so they don’t soak up paint.
- Solid wood desks: Great if you’re okay with painting over the wood or using clear dry erase paint on top of a solid-color base coat.
Surfaces to Avoid or Fix First
- Rough, damaged, or heavily textured tops: Chips, deep scratches, or heavy texture will show through and make erasing harder. Fill and sand before painting.
- Shiny, oily, or greasy surfaces: They’ll cause adhesion problems. Degreasing and sanding are non-negotiable.
As a rule of thumb: if the desk is smooth to the touch and solid enough to use daily, you can probably turn it into a dry erase desk with the right prep.
Supplies You’ll Need for a Dry Erase Painted Desk
Here’s a basic shopping list for a successful dry erase painted desk project:
- Dry erase / whiteboard paint kit (white or clear)
- High-quality primer (especially for laminate, MDF, or glossy finishes)
- Fine-grit sandpaper (around 220 grit)
- Tack cloth or microfiber cloth for dust removal
- Painter’s tape to mask edges, drawers, or hardware
- Foam or microfiber roller recommended by the paint manufacturer
- Small angled brush for edges and tight spots
- Drop cloths and gloves (epoxy can be messy and stubborn)
- Dry erase markers and eraser (reward yourself at the end)
Always read your specific product’s instructionssome whiteboard paints have a narrow working time once mixed, and they may require a particular type of roller for a smooth finish.
Step-by-Step: How to Paint a Desk with Dry Erase Paint
Every brand will have its own instructions, but this step-by-step walkthrough gives you a solid, Remodelaholic-style roadmap for turning your desk into a writable surface.
Step 1: Clear, Clean, and Sand
- Empty the desk. Remove everything from the top and, if possible, take off drawers or hardware you don’t want painted.
- Clean thoroughly. Use a degreaser or a mix of mild soap and water to remove fingerprints, oils, and old spills. Let it dry completely.
- Sand the surface. Lightly sand with fine-grit (around 220) sandpaper to scuff the finish. You don’t need to remove all the old finish, but you do want to knock down gloss and give the primer something to grip.
- Wipe away dust. Use a vacuum and a tack cloth or microfiber rag so the surface is smooth and dust-free.
Step 2: Prime the Desk
Most desks, especially laminate or glossy ones, need a good bonding primer. This step helps prevent peeling, bubbling, and uneven sheen.
- Apply a thin, even coat of primer using a roller on flat areas and a brush on edges.
- Let it dry according to the manufacturer’s directions, usually a few hours.
- Lightly sand any rough spots and wipe clean again.
If you’re using clear dry erase paint, this is also where you’d apply your base color (for example, white, soft gray, or a fun accent color) and let it fully dry before the clear coating.
Step 3: Mix and Apply the Dry Erase Paint
Once you open and mix the dry erase paint components, the clock starts tickingso do a quick rehearsal in your head before you start.
- Mask off edges and surrounding areas. Use painter’s tape to protect walls, drawers, and legs from stray roller marks.
- Mix both components thoroughly. Many kits require you to stir Part A and Part B together for a set time. Scrape the sides and bottom of the container so everything blends evenly.
- Cut in edges with a brush. Start by carefully painting the outer edges and corners so they’re fully covered.
- Roll the main surface. Use smooth, overlapping strokes with a foam or microfiber roller. Avoid pressing too hard or overworking the surface; that can cause ridges or bubbles.
- Apply a second coat if required. Some products need two coats applied within a short window. Follow your kit’s timing closely.
Work under good lighting so you can spot missed areas or drips before the paint starts to set. It’s much easier to fix now than after everything cures.
Step 4: Let the Desk Cure (Yes, Really Wait)
This is the part where patience matters more than enthusiasm. Most dry erase paints require a cure timeoften anywhere from 24 hours up to several daysbefore you can draw on the surface.
- Don’t rush it. Writing or placing heavy items on the surface too soon can leave permanent impressions or stains.
- Keep dust away. Let the desk cure in a low-traffic area if possible so nothing sticks to the surface.
Once the cure time is up, do a small test with a dry erase marker in an inconspicuous corner. Let it sit for a few minutes, then erase. If it wipes clean, your dry erase painted desk is officially open for business.
How to Keep Your Dry Erase Desk Looking New
A dry erase painted desk is only fun if it actually erases well. A little maintenance goes a long way toward keeping that surface glossy and ghost-free.
- Use quality dry erase markers. Cheaper markers can stain or ghost. Dark blue, green, and black tend to erase more cleanly than neon or red tones.
- Erase regularly. The longer the ink sits, the more likely it is to leave a shadow. Make it a habit to wipe the desk at the end of the day.
- Clean gently. Use a microfiber cloth or whiteboard eraser, plus a whiteboard cleaner or lightly damp cloth as needed.
- Skip abrasive scrubs. Rough sponges or powders can scratch the surface, making ghosting worse over time.
- Protect from sharp objects. Use a cutting mat for crafts or knife work, and avoid dragging metal items across the top.
If ghosting does appear, a gentle polish with a whiteboard cleaner or a bit of rubbing alcohol on a soft cloth often restores the surface. Just avoid harsh chemicals not recommended by your paint manufacturer.
Pros and Cons of a Dry Erase Painted Desk
Advantages
- Huge custom writing surface: Unlike a standard framed whiteboard, your entire desktop becomes your canvas.
- Space-saving: No wall space neededin small rooms, a writable desk can replace bulky boards.
- Stylish and modern: A smooth white or clear-coated top looks sleek and fresh, especially in home offices or kids’ rooms.
- Upcycling win: It’s a great way to give an old, scratched desk a completely new look and purpose.
Drawbacks
- Prep and cure time: This isn’t a slap-on-and-go project. You’ll spend more time on sanding, priming, and waiting than actual painting.
- Possible ghosting: Some products can stain or ghost if ink sits for too long or if you use certain colors.
- Not as tough as glass or solid whiteboard panels: Heavy abuse, sharp objects, or harsh cleaners can damage the paint film.
- Smell and ventilation: Two-part paints often have strong fumes during application and curing, so good ventilation is a must.
If you love the concept but are worried about wear and tear, a hybrid approach can work: paint the desk white or another color, then lay a sheet of glass on top. You can write on top of the glass with dry erase markers and swap out paper or art underneath whenever you like.
Design Ideas for a Remodelaholic-Style Dry Erase Desk
Once you’ve committed to the dry erase look, you can customize the desk to fit your style and space.
- Minimalist home office: White top, simple wood or black legs, and a small caddy of markers and erasers. Perfect for task lists and big-picture planning.
- Kids’ homework station: Clear dry erase paint over a light-colored base. Add a ruler line or subtle grid in the base coat for math practice and handwriting.
- Creative studio desk: Use the desk as a giant sketchpad for thumbnails, storyboards, or design notes, then snap a photo before you erase.
- Shared family command center: Turn a corner desk into a weekly planner with labeled sections for each family member right on the surface.
You can also divide the top visually by taping off sections when you paint the base color: one area for a weekly calendar, another for quick notes, and a blank zone for scribbles and doodles.
Is a Dry Erase Painted Desk Right for You?
Ask yourself a few questions before you commit:
- Do you like to think visually and jot down ideas quickly?
- Do you have an older desk that could use a makeover anyway?
- Are you okay with some maintenance to keep the surface looking fresh?
- Do the people using the desk (kids, coworkers, roommates) understand that it’s not a cutting board?
If you’re nodding along, a dry erase painted desk can be a fun, functional project that brings a little Remodelaholic-style creativity into your daily routine. You’ll end up with a custom whiteboard desk that fits your space, your personality, and your to-do list obsession.
Real-Life Experiences with Dry Erase Desks
DIYers who’ve actually lived with dry erase desks tend to have the same reaction: “This is awesome… but there are a few things I wish I’d known.” Consider this your friendly reality check before you pop open that paint can.
The Marker Color Problem
One of the most common lessons learned is that not all marker colors behave the same way on a painted whiteboard surface. Deep blacks and blues generally erase cleanly, while bright reds, oranges, and neon shades are more likely to leave a faint shadow. Over time, those ghosts can add up to a slightly dingy-looking desk.
A simple strategy is to create a “desk-approved” marker set. Keep a small cup on the desktop with only the colors you know erase well, and store the troublemakers elsewhere for use on traditional boards or paper. It’s amazing how much better your surface will look when you control what goes on it.
Ink Sitting Too Long
Another big factor is how long writing stays on the desk. Dry erase paint is designed for frequent writing and wiping. When notes sit for days or weeksespecially in sunny spots where heat and light can “bake” the ink inyou’re more likely to see ghosting. Many people find that if they treat the surface like a daily scratch pad and erase it at the end of each work session, the desk stays much cleaner over time.
Make it a habit: before you shut down your laptop, wipe the desk clean. It’s oddly satisfying and gives you a blank slate for tomorrow, both literally and mentally.
Cleaning Products and Tools
When ghosting does show up, the first instinct is often to scrub harder. But with dry erase painted surfaces, pressure plus abrasives equals tiny scratches that actually hold onto ink. That’s why it’s smarter to focus on better cleaners rather than tougher scrubbing tools.
Many people have good luck with dedicated whiteboard cleaners, a little rubbing alcohol on a soft cloth, or even a magic-eraser-style sponge used gently. The key is to let the cleaner do the work instead of grinding the surface. After cleaning, go back over the desk with a damp cloth and then a dry microfiber to remove any residue.
Desk vs. Heavy Use
Daily desk life is no joke. Laptops, coffee mugs, notebooks, elbows, and the occasional mystery object all hit the surface. Over time, that traffic can create micro-scratches or small dull areas in the paint film, especially around the keyboard area where your arms rest.
To extend the life of your dry erase painted desk, consider a few small habits:
- Use soft-bottomed coasters and mouse pads.
- Avoid sliding heavy items across the top; lift instead.
- Skip metal desk organizers with sharp edges or burrs on the bottom.
These little adjustments dramatically cut down on wear and keep your writing area smoother for longer.
When a Hybrid Desk Makes Sense
Some people discover that they love the concept of a dry erase desk but want something even more durable. That’s where the hybrid setup comes in: a painted or plain desktop with a custom-cut sheet of glass on top. You still get a huge writable area, but you’re actually writing on the glass, not the paint.
This approach has a few perks:
- The glass is extremely smooth and easy to erase.
- You can slip photos, calendars, or artwork under the glass and still write on top.
- If the surface ever gets scratched, you can replace the glass without repainting the whole desk.
It does cost more upfront, but if your desk is in a high-traffic area or you’re rough on work surfaces, it might be worth it.
Kids, Creativity, and Expectations
For kids, a dry erase painted desk feels like permission to write on furniturewhich is a dream come true. It can be fantastic for practicing spelling words, math problems, or free drawing. But it’s also a good idea to set expectations early: the desk is for dry erase markers only, not permanent markers, crayons, or random mystery pens from the bottom of a backpack.
Many parents find it helpful to do a quick “marker check” together and let kids test each pen on a small corner of the desk. If it erases cleanly, it’s approved. If not, it goes into a different bin. This turns the rules into a fun little experiment instead of a lecture.
Living with Your New Dry Erase Painted Desk
Once you’ve used a dry erase desk for a while, you start to wonder how you managed without it. Brain dumps during meetings, quick sketches during calls, shopping lists, project timelinesthey all naturally migrate to the desktop. When it gets crowded, you snap a photo with your phone and wipe the slate clean.
Is it perfect? No. You’ll probably see a few faint marks over time, maybe a tiny scratch or two. But if you go in with realistic expectations and the right habits, a dry erase painted desk is a fun, functional upgrade that makes your workspace feel more creative and more “you.” And honestly, any project that makes paying bills slightly more entertaining is a win.