Table of Contents >> Show >> Hide
- Why Dollar Store Pots Are Worth Upgrading
- Before You Decorate: The Plant-Health Checklist
- The 10-Minute Prep That Makes Any Makeover Last
- 8 Easy Upgrades That Make Cheap Pots Look High-End
- 1) The “Stoneware” Spray-Paint Makeover
- 2) Color-Block with Crisp Tape Lines
- 3) “Aged Terracotta” Patina (Without Waiting 10 Years)
- 4) Whitewash or “Limewash-Look” for Soft, Chalky Texture
- 5) No-Sew Burlap Wrap (Instant “Rustic”)
- 6) Decoupage with Napkins or Paper (Pretty Without Hand-Painting)
- 7) Rope-Wrapped Hanging Pot (Dollar Store Meets Boutique)
- 8) Mosaic “Statement Pot” (The One That Gets Comments)
- Small Details That Make a Big Difference
- Troubleshooting: When a Pot Glow-Up Gets Dramatic
- Fast Planning Guide: Pick Your Upgrade by Time and Location
- Conclusion: Your Pots Don’t Need a Bigger BudgetJust Better Details
- Experiences & Real-World Lessons from Upgrading Dollar Store Pots (The Part No One Tells You)
Dollar store pots have a special talent: they look like they cost exactly what you paid for them. The good news? They also have another talent:
they’re basically a blank canvas that’s begging for a glow-up. With a little paint, texture, and a few smart plant-friendly tweaks, those
bargain planters can go from “meh” to “my neighbor just asked where I bought these.”
This guide is for real life: quick makeovers, low-stress techniques, and upgrades that don’t crumble the first time you water your pothos.
We’ll cover what actually helps paint stick, how to make plastic look expensive, and the little details (like drainage) that keep your plants
alive while your decor gets all the compliments.
Why Dollar Store Pots Are Worth Upgrading
Cheap pots are the perfect “practice round.” You can try bold colors, trendy finishes, or a pattern you’re not totally sure aboutwithout the
pressure of ruining a $40 ceramic planter. They’re also great for creating a coordinated set. Five mismatched pots can look like a curated
collection when they share a common color palette, finish, or design detail.
And let’s be honest: upgrading what you already have is satisfying. It’s the DIY equivalent of turning a plain bagel into a full brunch moment.
Before You Decorate: The Plant-Health Checklist
A pot can be gorgeous and still be a terrible home for a plant. Do these quick checks firstyour future self (and your roots) will thank you.
1) Make sure there’s drainage
If your pot has no holes, water has nowhere to go. That’s how you end up with soggy soil, stressed roots, and a plant that looks personally
offended by your care. If you need to add drainage, drill slowly and start small.
- Plastic pots: Use a sharp twist bit, start with a pilot hole, and go slow so the plastic doesn’t melt and close back up.
- Terra-cotta/un-glazed ceramic: Use the right bit (often masonry/tile style) and drill at low speed to reduce cracking risk.
2) Decide what gets painted (and what shouldn’t)
For pots that will hold plants directly, focus paint and finishes on the outside. Keeping the interior uncoated helps avoid
peeling or flaking where moisture constantly lives. If you want a dramatic interior color anyway, consider using a nursery pot liner inside the
decorative oneyour plant gets a practical home, your eyes get the pretty.
3) Think about sun, rain, and freeze
Some upgrades are “covered-porch gorgeous,” and others are “bring it on, thunderstorm.” Matching the finish to the environment is the secret
to makeovers that last.
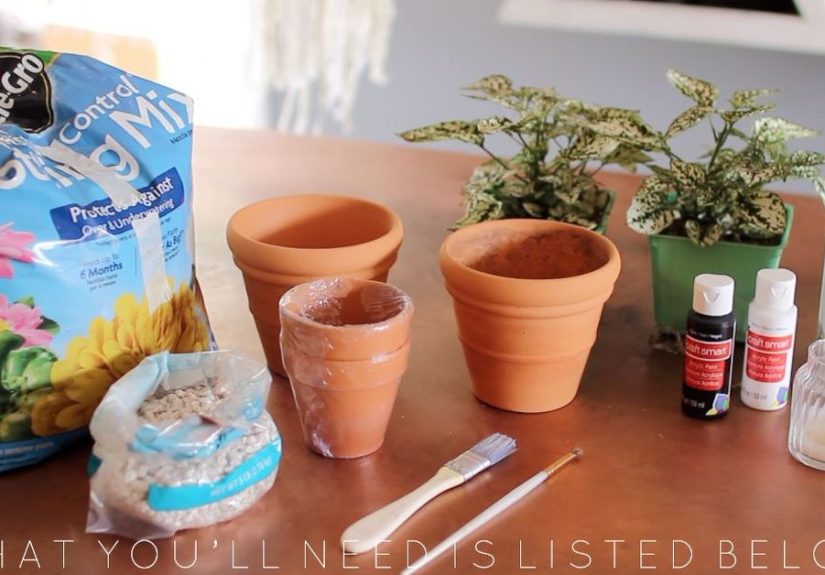
The 10-Minute Prep That Makes Any Makeover Last
Most “my paint peeled!” stories begin with skipping prep. The goal is simple: remove grime, add a little tooth (grip), and use the right
products for the surface.
Step 1: Wash like you mean it
Dollar store pots often have residue from manufacturing, labels, and general store life. Wash with warm soapy water, rinse well, and let fully
dry. No shortcuts herewater trapped under paint is like putting a banana peel under your phone case and hoping no one notices.
Step 2: Lightly scuff shiny surfaces
If the pot is smooth plastic or glossy ceramic, lightly sand the outside with fine-grit sandpaper. You’re not sanding a deckjust giving the
surface a little grip so primer and paint can hold on.
Step 3: Prime (unless your paint is designed to skip it)
Plastic is notoriously stubborn. A plastic primer or a paint made specifically for plastic can make a big difference. Some spray paints are
formulated to bond well to plastic; if you’re using one of those, follow the can directions and don’t add extra steps “just because.”
Step 4: Paint in thin coats
Thick coats are how you get drips, fingerprints, and sadness. Thin, even coats cure better, look smoother, and hold up longer outdoors. Let each
coat dry before adding the next.
Step 5: Seal smart
A topcoat helps with scuffs and weather exposure. But pick the right one: outdoor-rated clear coats for outdoor pots, and be cautious with
anything that will constantly be soaked or left in direct rain. “Water-resistant” is not the same as “waterproof.”
8 Easy Upgrades That Make Cheap Pots Look High-End
Choose one technique or mix a few across a set of pots. The easiest way to look “designer” is consistencyrepeat a color, texture, or pattern in
different sizes.
1) The “Stoneware” Spray-Paint Makeover
Best for: Plastic pots and basic ceramic planters.
Vibe: Modern, minimal, expensive-looking.
- Clean and dry the pot, then lightly scuff if it’s glossy.
- Use a plastic-friendly primer if needed.
- Spray several light coats of a matte or textured finish, keeping the can moving.
- Optional: finish with a non-yellowing clear coat for extra protection.
Pro tip: Textured “stone” spray finishes are great at hiding cheap plastic vibes. It’s basically makeup… for pots.
2) Color-Block with Crisp Tape Lines
Best for: Terra-cotta and smooth plastic pots.
Vibe: Boutique shop shelf, but your shelf.
- Paint the pot a base color and let dry completely.
- Use painter’s tape to mask off sections (bands, diagonals, or a half-dipped look).
- Paint the second color in thin coats, then remove tape carefully once the paint sets.
- Seal the outside if the pot will be handled a lot or used outdoors.
Pro tip: If you want a glossy, sealed look on terra-cotta, a protective spray topcoat can help keep the finish smooth and resilient.
3) “Aged Terracotta” Patina (Without Waiting 10 Years)
Best for: New terra-cotta pots (or anything trying to look old and charming).
Vibe: Cottage garden, antique market, “this was here when the house was built.”
- Start with a clean, dry terra-cotta pot.
- Brush on a thin coat of plain yogurt for a natural-looking patina effect over time.
- Set the pot in a shaded place and let nature do its thing (this is the slow-burn glow-up).
- For more texture, some DIYers use a buttermilk-and-moss mix to encourage a weathered look.
Pro tip: The charm here is imperfection. If it looks too “even,” it can read fakelike distressed jeans that were distressed in a boardroom.
4) Whitewash or “Limewash-Look” for Soft, Chalky Texture
Best for: Terra-cotta and porous pots.
Vibe: Airy, Mediterranean, soft neutral heaven.
- Mix a small amount of paint with water to thin it out.
- Brush on, then wipe back with a rag so the clay shows through.
- Build layers until you get that gently aged, chalky look.
- Seal lightly if the pot will be handled often (test first to avoid changing the finish).
Pro tip: This finish hides chips and scuffs better than glossy paint, which is basically a miracle.
5) No-Sew Burlap Wrap (Instant “Rustic”)
Best for: Larger plastic pots that look a little… plasticky.
Vibe: Farmhouse porch, cozy patio, “I grow herbs and feelings.”
- Cut burlap wide enough to wrap the pot with overlap.
- Fold and wrap like a present; secure with hot glue or strong craft adhesive.
- Add a painted stripe, stencil, or twine bow if you want extra personality.
- Use in a covered area for the best longevity.
6) Decoupage with Napkins or Paper (Pretty Without Hand-Painting)
Best for: Terra-cotta and smooth pots you want to “pattern” fast.
Vibe: Boutique gift shop, but you made it.
- Paint a base coat (optional but helps the pattern pop) and let dry.
- Use just the printed layer of a napkin (separate the plies).
- Apply a thin coat of decoupage medium, place the napkin, and smooth gently (plastic wrap can help prevent tearing).
- Seal the outside with an outdoor, water-resistant formula.
- Let it cure before planting or placing outdoors; keep decoupage pots in a covered spot since “water-resistant” isn’t “rain-proof.”
Pro tip: If it starts looking tired later, another protective coat can refresh it without redoing the whole design.
7) Rope-Wrapped Hanging Pot (Dollar Store Meets Boutique)
Best for: Plastic pots sturdy enough to drill, small-to-medium sizes.
Vibe: Boho hanging planter without the boho price tag.
- Drill evenly spaced holes near the rim for rope supports.
- Paint the pot first (optional) and let fully dry.
- Thread rope through holes, knot securely, and create a hanger loop at the top.
- Use a liner pot inside to make watering easier and reduce mess.
Pro tip: Keep weight in mind. Wet soil is heavier than it looks, and gravity is an unforgiving critic.
8) Mosaic “Statement Pot” (The One That Gets Comments)
Best for: Terra-cotta or heavier planters (mosaic adds weight).
Vibe: Artistic, colorful, one-of-a-kind.
- Lightly sand or rough up the surface so adhesive grips.
- Optional: seal terra-cotta first to reduce moisture absorption and help adhesives cure properly.
- Attach tiles or broken ceramic pieces with appropriate adhesive; let set.
- Apply grout, wipe clean, and let cure.
- Seal the grout to reduce staining and moisture issues, especially outdoors.
Pro tip: Keep mosaic pots in a spot where they won’t be constantly soaked or frozen solid. They’re tough, but they’re not invincible.
Small Details That Make a Big Difference
Top-dress the soil
A layer of pebbles, moss, or bark on top of the soil instantly looks more finishedand it can help reduce splash marks when you water.
Upgrade the base
Add a matching saucer, a thrifted tray, or small pot feet to lift the planter slightly and let water escape. It looks intentional and helps
prevent that “mystery puddle” situation.
Group like a stylist
Odd numbers tend to look good (three pots, five pots), and varying heights makes it feel designed. A simple trick: put one pot on a small stand
or an upside-down bowl to create a “hero” pot in the arrangement.
Troubleshooting: When a Pot Glow-Up Gets Dramatic
Problem: Paint peels on plastic
Usually caused by skipping primer, painting over residue, or applying coats too thick. Next time: clean better, scuff lightly, prime if needed,
and build thin coats.
Problem: Terra-cotta paint looks blotchy
Terra-cotta is porous, so it drinks paint. Use a base coat, or expect to need more coats than you would on plastic. Sealing the exterior after
painting can also help even out the finish.
Problem: Decoupage wrinkles or tears
Napkins are delicate. Use the printed layer only, apply decoupage medium thinly, and smooth gentlypressure is your friend, friction is not.
Problem: Water stains or “chalky streaks” appear outdoors
Hard water, rain splash, and sun can wear finishes. A protective topcoat can help, but sometimes the best solution is placement: covered porch,
less direct rain, and a little shade if possible.
Fast Planning Guide: Pick Your Upgrade by Time and Location
| Upgrade | Time Needed | Skill Level | Best Location |
|---|---|---|---|
| Stoneware spray-paint look | 30–60 min + dry time | Beginner | Outdoor-friendly (with proper products) |
| Color-block tape design | 45–90 min + dry time | Beginner | Indoor / Covered porch |
| Aged terracotta patina | 15 min + time to develop | Beginner | Outdoor / Shaded spot |
| Whitewash / limewash look | 30–60 min | Beginner | Indoor / Covered porch |
| No-sew burlap wrap | 20–40 min | Beginner | Covered porch recommended |
| Decoupage pattern | 60–90 min + curing | Beginner+ | Covered porch (water-resistant, not waterproof) |
| Rope hanging planter | 45–90 min | Beginner+ | Indoor / Covered outdoor |
| Mosaic statement pot | 2–4 hrs + curing | Intermediate | Outdoor (with sealing and smart placement) |
Conclusion: Your Pots Don’t Need a Bigger BudgetJust Better Details
Upgrading dollar store pots is one of the easiest ways to make your space feel more intentional without spending a fortune. The secret isn’t
complicated: prep well, choose a finish that matches your environment, and don’t forget the plant basics like drainage. From stone-texture spray
paint to cozy burlap wraps and patterned decoupage, you can build a whole collection that looks curatedeven if it started in aisle five next to
the glitter glue.
Pick one technique, do a “test pot,” and then repeat it across a few sizes for that designer-set vibe. Your plants get a better home, your patio
gets a glow-up, and you get the quiet thrill of knowing you made it happen with pocket change and confidence.
Experiences & Real-World Lessons from Upgrading Dollar Store Pots (The Part No One Tells You)
The first thing most people notice after upgrading a stack of dollar store pots is that prep time is not the boring partit’s
the “make it last” part. The difference between a pot that looks great for a weekend and a pot that still looks good a season later often comes
down to the unglamorous steps: washing, drying, and giving glossy plastic a quick scuff. Many DIYers start out thinking, “It’s a pot. How serious
can this be?” and then learn that plastic is basically the cat of crafting: it only cooperates when you respect its boundaries.
Another common experience: thin coats feel slow, but they’re faster in the end. Heavy paint goes on quickly… and then drips,
stays tacky, collects dust, and fingerprints like it’s auditioning for a crime show. Thin coats dry more evenly and look smoother, especially
with spray paint. The “I’ll just do one thick coat” decision tends to become the “Why is this still sticky?” chapter of your DIY story.
Outdoor placement also changes everything. A finish that’s flawless indoors can get humbled outside. Direct sun can fade bright colors. Wind can
carry gritty dust that sticks to fresh paint. Rain can test whether “water-resistant” really meant “water-resistant in a meaningful, adult way”
or “water-resistant in a marketing way.” A lot of people end up creating two categories: pots that are front-porch tough (good
primer, outdoor spray paint, sealed properly) and pots that are covered-area pretty (decoupage, fabric wraps, delicate finishes).
That’s not a failureit’s strategy.
If you try decoupage, you’ll probably learn that napkins are both magical and dramatic. They look incredible when they behave, and they can tear
if you rush the smoothing step. Many crafters get better results by pressing gently (sometimes with plastic wrap) instead of rubbing directly with
fingertips. Then comes the patience lesson: letting the sealer cure before planting or moving outdoors. It’s tempting to “finish today,” but
curing time is what keeps the edges from lifting later.
With painted pots, a surprisingly satisfying experience is discovering how one repeating detail can make everything look intentional.
Maybe it’s a thin metallic band near the rim, a matte finish across all pots, or a single accent color that ties your set together. People who
upgrade five cheap pots at once often realize the “expensive look” isn’t about complexityit’s about cohesion. A simple color-block pattern repeated
on different sizes can look like a coordinated collection from a home store.
The plant side has its own lessons. Adding drainage holes is a game-changer, but it also introduces the “where does the water go?” question.
Many folks end up loving saucers, trays, or pot feet because they keep surfaces cleaner and reduce mess. And while it’s a classic myth that rocks
at the bottom “fix drainage,” most people find that proper holes + the right potting mix does more for happy roots than a layer
of random pebbles. (Top-dressing the soil, though? That’s the aesthetic upgrade that keeps on giving.)
Finally, there’s the emotional experience: the tiny rush of pride when someone says, “Waitthose are dollar store pots?” It’s proof that style
isn’t always about spending more; it’s about knowing what to change. Once you’ve upgraded a few, you start seeing cheap containers everywhere as
potentialblank canvases that can look custom with the right prep, finish, and a little restraint. That’s when you know you’ve officially become
the kind of person who says things like, “I’m just going to do a quick pot makeover,” and means it (mostly).