Table of Contents >> Show >> Hide
- Why Measuring a Chainsaw Chain Correctly Matters
- What You Need Before You Start
- Easy Ways to Measure Chainsaw Chain: 8 Steps
- Step 1: Make the Saw Safe Before You Touch the Chain
- Step 2: Check the Guide Bar and Existing Chain for Stamped Information
- Step 3: Count the Drive Links
- Step 4: Measure the Pitch
- Step 5: Measure the Gauge
- Step 6: Confirm the Bar Length the Right Way
- Step 7: Match the Three Key Numbers Before You Buy
- Step 8: Test Fit Carefully and Watch for Red Flags
- Common Mistakes When Measuring a Chainsaw Chain
- A Simple Example of Chainsaw Chain Sizing
- Experience and Lessons From Real-World Chain Measuring
- Final Thoughts
- SEO Tags
Buying the wrong chainsaw chain is one of those tiny mistakes that somehow becomes a full afternoon project. You start with confidence, stroll into a store, pick up a “16-inch chain,” and five minutes later you are staring at your saw like it has betrayed your family. The truth is simple: chainsaw chain sizing is not based on bar length alone. To get the right replacement, you need a few specific measurements, and once you know them, the process is much easier than it looks.
This guide breaks down exactly how to measure a chainsaw chain in eight easy steps. We will cover the three numbers that matter most, explain what they mean in plain English, and show you how to avoid the most common sizing mistakes. Whether you are replacing a worn-out chain, shopping for a backup, or just trying to decode the mysterious numbers stamped on your bar, this article will help you measure with confidence and buy smarter.
Why Measuring a Chainsaw Chain Correctly Matters
A chainsaw chain has to match your saw’s setup precisely. A mismatch in pitch, gauge, or drive-link count can lead to poor cutting performance, tension problems, extra wear, or a chain that simply does not fit. In other words, close enough is not actually close enough.
The good news is that you do not need to be a professional arborist or the sort of person who casually says things like “kerf” at cookouts. You just need to identify three core measurements:
- Pitch the size of the chain, based on the spacing between rivets
- Gauge the thickness of the drive links that sit in the guide bar groove
- Drive-link count the total number of drive links on the chain
Once you have those three numbers, you are in business. Bar length still matters, but it works more like supporting information than the whole answer.
What You Need Before You Start
You do not need a workshop full of tools for this job. A few basic items will do:
- Work gloves
- A tape measure or ruler
- A caliper, if you have one
- A marker, twist tie, or small piece of tape for counting links
- A notepad or your phone for writing down the measurements
- The old chain and guide bar
If the chain is still mounted on the saw, that is fine. In fact, many people measure it that way. Just make sure the saw is fully off and safe to handle before you start poking around the sharp parts. That is not fear talking. That is common sense with all ten fingers still attached.
Easy Ways to Measure Chainsaw Chain: 8 Steps
Step 1: Make the Saw Safe Before You Touch the Chain
Before measuring anything, power the saw down completely. If it is a battery chainsaw, remove the battery. If it is a gas saw, make sure it is off, cool, and unable to start accidentally. Engage the chain brake and wear gloves so you can handle the chain without turning your knuckles into a cautionary tale.
This step sounds obvious, but it matters. Even a stationary chain is sharp, and a saw that can accidentally move is not a measuring project anymore. It is a regrettable life choice.
Step 2: Check the Guide Bar and Existing Chain for Stamped Information
Before you measure manually, inspect the guide bar near the base, close to the saw body. Many chainsaws have useful sizing information stamped or printed there. You may see the bar length, chain pitch, gauge, and sometimes the drive-link count. You might also find a code or a size sequence that your owner’s manual can decode.
This is the easiest shortcut in the whole process. If the bar clearly says something like 3/8 LP, .050, 56DL, write that down. That usually means:
- 3/8 LP = 3/8-inch low-profile pitch
- .050 = .050-inch gauge
- 56DL = 56 drive links
If the markings are worn off, missing, or less helpful than a fortune cookie, move on to the manual measuring steps below.
Step 3: Count the Drive Links
The drive links are the little tabs on the underside of the chain. They sit inside the groove of the guide bar and are one of the key details for sizing a replacement chain. Count every drive link all the way around the loop.
To make this easier, mark one link with tape or a marker, then start counting from that point. This prevents the classic “Was I at 47 or 74?” problem that hits almost everyone at least once.
Take your time here. A chain with 56 drive links is not interchangeable with one that has 52 or 59 just because the bar length looks similar. Two chains can both fit a 16-inch bar and still require different drive-link counts. This is why shopping by bar length alone often goes sideways.
Step 4: Measure the Pitch
Pitch tells you the size of the chain. To find it, measure the distance between the centers of three consecutive rivets, then divide that number by two.
Here is the easy version:
- Find three rivets in a row
- Measure from the center of the first rivet to the center of the third rivet
- Divide that measurement by 2
For example, if the distance across those three rivets is 3/4 inch, divide by 2 and you get 3/8 inch pitch.
Common chainsaw chain pitches include:
- 1/4 inch
- .325 inch
- 3/8 inch low profile
- 3/8 inch
- .404 inch
For many homeowner saws, 3/8-inch low-profile chain is very common. On larger or more powerful saws, you may see .325, standard 3/8, or .404. The key is not guessing. Measure it or confirm it from the bar stamp.
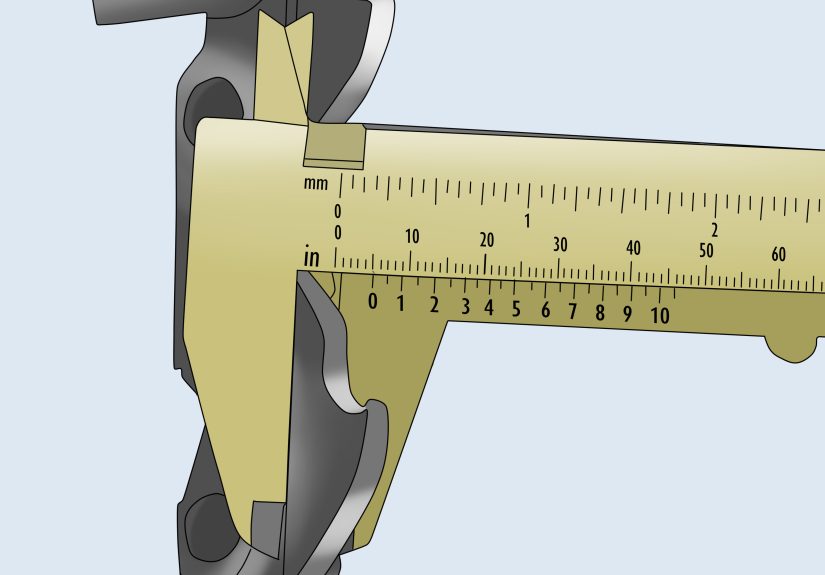
Step 5: Measure the Gauge
Gauge refers to the thickness of the drive links, the part that rides in the guide bar groove. The chain gauge must match the bar groove correctly. Too thick and it will not fit. Too thin and it can wobble around like a shopping cart wheel with emotional issues.
The most accurate way to measure gauge is with a caliper. Measure the thickness of one drive link. Common gauge sizes include:
- .043 inch
- .050 inch
- .058 inch
- .063 inch
If your old chain is heavily worn, a caliper reading can be a little misleading because wear may reduce the thickness slightly. In that case, the bar stamp, old packaging, or owner’s manual is usually a more reliable way to verify gauge. Manual measurement helps, but factory markings are still the gold standard when available.
Step 6: Confirm the Bar Length the Right Way
Now check the guide bar length. This part is useful, but it is not the whole story. Measure the usable cutting length of the bar, which is the distance from the front edge of the saw body to the tip of the bar. Do not measure the part buried inside the powerhead housing.
Round to the nearest whole inch. If the visible cutting portion measures about 15.5 inches, it is typically sold as a 16-inch bar. If it measures around 13.5 inches, it is usually marketed as a 14-inch bar.
This number helps narrow your search, but it does not identify the chain by itself. Plenty of chainsaws with the same nominal bar length use different pitch, gauge, or drive-link counts. So yes, bar length matters. No, it is not the star of the show.
Step 7: Match the Three Key Numbers Before You Buy
Once you have the measurements, put them together. A replacement chain should match:
- Pitch
- Gauge
- Drive-link count
For example, if your chain measures:
- 3/8-inch low-profile pitch
- .050-inch gauge
- 56 drive links
Then that is exactly the spec you should shop for. Not “something for a 16-inch chainsaw.” Not “close enough.” Not “the one that looked right next to the cash register.” Exact match wins.
Also pay attention to any extra descriptions such as low profile, full chisel, or semi-chisel. These affect cutting style and performance. They are not usually part of the three basic measurements, but they do matter once you start comparing replacement options.
Step 8: Test Fit Carefully and Watch for Red Flags
After buying a replacement chain, install it according to your saw’s instructions and check the fit carefully. A correct chain should seat properly in the bar groove, wrap around the sprocket correctly, and tension normally.
Warning signs of a mismatch include:
- The chain will not sit fully in the bar groove
- The chain feels too loose even when adjusted
- The chain binds or will not move smoothly by hand
- The drive links do not match the bar groove or sprocket
If anything looks off, stop and verify the numbers again. Do not force a chain to fit. Chainsaws are not forgiving tools, and stubbornness is not a measurement method.
Common Mistakes When Measuring a Chainsaw Chain
Most sizing problems come from a few familiar mistakes:
- Using only bar length: A 16-inch bar can use more than one chain spec.
- Miscounting drive links: One skipped link can send you home with the wrong replacement.
- Confusing pitch and gauge: They are different measurements and both matter.
- Measuring worn parts too casually: Heavy wear can throw off a gauge reading.
- Ignoring “LP” or “low profile” labels: Standard 3/8 and 3/8 low profile are not the same thing.
If you avoid those traps, you are already ahead of a surprising number of chain buyers.
A Simple Example of Chainsaw Chain Sizing
Let’s say you have a homeowner saw with a 16-inch bar. You inspect the bar, but the numbers are too faded to read. So you measure manually.
You count 56 drive links. Then you measure across three rivets and get 3/4 inch, which means the pitch is 3/8 inch. Next, you measure the drive-link thickness and confirm the gauge is .043 inch.
Your replacement spec becomes:
3/8-inch pitch, .043-inch gauge, 56 drive links
That is the information you need when shopping online or in a store. The 16-inch bar helps, but the exact match comes from those three numbers.
Experience and Lessons From Real-World Chain Measuring
One of the most common experiences people have with chainsaw chain measurement starts with overconfidence. The saw has a 16-inch bar, so the thinking goes, “I just need a 16-inch chain.” That sounds reasonable right up until the new chain arrives and either hangs loose, refuses to seat in the bar groove, or fits the bar but not the sprocket. It is a surprisingly good lesson in how tools reward precision and punish assumptions.
Another frequent experience is the drive-link counting struggle. At first, counting sounds laughably easy. Then you get halfway around the chain, your phone buzzes, the dog barks, someone asks where the rake is, and suddenly you have no idea whether you counted 52, 56, or 58. That is why experienced DIYers mark a starting point with tape or a twist tie. It seems unnecessary until the moment it becomes very necessary.
Pitch measurement also teaches a useful lesson: small differences matter. A chain can look almost identical to another one but still be the wrong pitch. Many people discover this only after comparing chains side by side and realizing the spacing between links is just a little different. That “little different” is exactly what makes the chain incompatible. Measuring three rivets and dividing by two sounds old-school, but it works because it removes the guesswork.
Gauge is where people often learn to respect the guide bar. A chain is not just wrapping around the bar; it is riding in the groove. If the gauge is off, the whole setup feels wrong. Too tight, and the chain will not seat correctly. Too loose, and it can feel sloppy and unstable. People who have dealt with crooked cuts or odd chain movement often trace the problem back to using the wrong gauge or trusting a rough eyeball estimate instead of checking the actual spec.
There is also the very practical experience of discovering that old packaging, bar stamps, and manuals are worth keeping. Many users toss the box from a replacement chain and later regret it when it is time to buy the next one. The folks who have done this more than once tend to keep a note in the garage, on the saw case, or in their phone with the exact chain spec. It saves time, avoids repeat measuring, and makes future shopping much less dramatic.
Perhaps the biggest lesson, though, is that measuring a chainsaw chain is not difficult once you know what the numbers mean. The first time can feel technical. The second time feels manageable. By the third time, you are the person explaining drive links to someone else in the aisle, trying very hard not to sound smug about it. That is the natural progression of DIY tool ownership: confusion, clarity, and then a strange desire to help strangers choose the correct chain.
If there is one takeaway from all those experiences, it is this: take five extra minutes to measure properly. Those five minutes are usually much cheaper than buying the wrong chain, making a second trip to the store, and spending your Saturday explaining to yourself why “I was pretty sure it would fit” was not a sound technical strategy.
Final Thoughts
If you want to measure a chainsaw chain correctly, keep it simple. Start with the bar stamp if it is readable. Then confirm the three numbers that really matter: pitch, gauge, and drive-link count. Check the bar length as supporting information, not the only detail. Once you know those specs, buying the right replacement chain becomes much easier and a lot less annoying.
In short, measuring a chainsaw chain is less about advanced mechanics and more about careful observation. A ruler, a caliper, and a few patient minutes can save you from buying the wrong part and turning a basic maintenance task into an accidental hobby. Measure once, buy once, and let the saw do the cutting instead of your patience.


