Table of Contents >> Show >> Hide
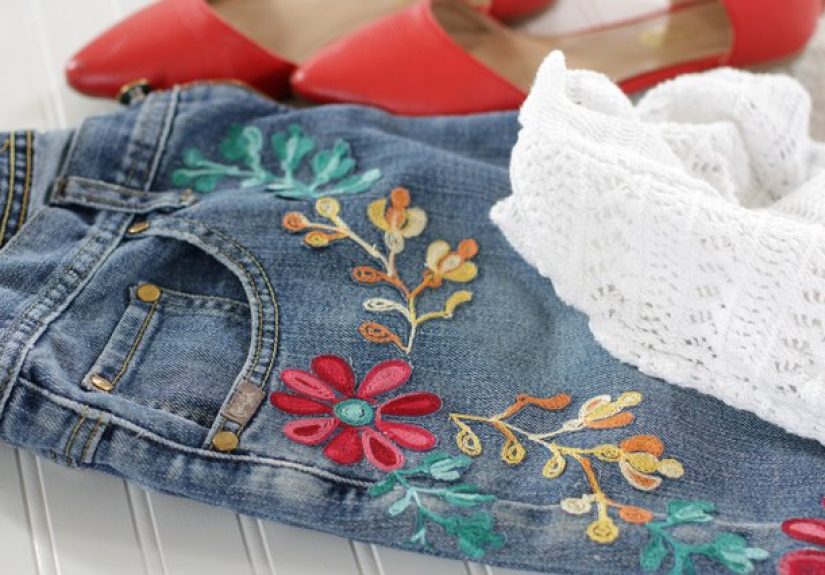
Floral embroidery is a timeless way to add a personal touch to your jeans, transforming a simple pair of denim into a beautiful and unique statement piece. Whether you’re looking to revamp an old pair or create something new, this step-by-step guide will show you how to add intricate floral designs to your jeans. You don’t need to be an expert seamstressjust a little creativity, patience, and the right tools. Let’s dive into this fun DIY project!
Materials You Will Need
Before you begin your floral embroidery project, gather these essential materials:
- Jeans: Any pair of jeans will work, but thicker denim is ideal for embroidery.
- Embroidery Floss: Choose a variety of colors to create vibrant flowers. You’ll need thread in colors like green, red, yellow, pink, and white for a classic floral look.
- Embroidery Needle: A sharp needle with a larger eye to accommodate multiple strands of thread.
- Embroidery Hoop: This will help keep your fabric taut as you stitch. It’s optional but recommended for cleaner results.
- Fabric Marker or Chalk: To sketch your design onto the jeans before stitching. Make sure it’s washable or erasable.
- Scissors: To cut your threads.
- Water Soluble Stabilizer (optional): This can be used to prevent puckering and ensure that your design stays intact.
Step 1: Prepare Your Jeans
Start by choosing the area of your jeans where you want to place the floral embroidery. Popular spots include the lower legs, back pockets, or along the waistband. Wash and dry the jeans before starting to ensure they’re free from any dirt or sizing that might interfere with the stitching.
Use a fabric marker or chalk to lightly sketch the floral design. You can draw flowers, vines, or even a combination of both. Don’t worry about making it perfectembroidery is an art, and small imperfections can add character to the design.
Step 2: Set Up Your Embroidery Hoop
Place the area of the jeans you plan to embroider in the embroidery hoop. Tighten the hoop to ensure that the fabric is taut but not stretched out. If you’re embroidering a large area, it might be helpful to work in sections, moving the hoop as you go.
Step 3: Choose Your Thread
Select the embroidery floss colors that match your floral design. For a classic floral look, you might choose vibrant reds, pinks, yellows, and greens for the leaves and stems. Separate the floss into strands to determine how thick or thin you want your stitches to be. Most embroidery projects use two to three strands for a fuller look, but feel free to experiment with different thicknesses.
Step 4: Start Stitching
Now comes the fun partembroidery! There are several different stitches you can use for floral designs, but here are a few basics to get you started:
1. Running Stitch
This is one of the simplest stitches and is great for outlining your flowers or creating delicate stems. To do this, pass the needle through the fabric, leaving small stitches in a continuous line.
2. French Knots
These create beautiful, textured flower centers. To make a French knot, wrap the thread around the needle two to three times, then push the needle back through the fabric, anchoring the knot securely.
3. Satin Stitch
This stitch is perfect for filling in the petals of your flowers. Start by stitching parallel lines next to each other, working your way across the petal area. This stitch creates a smooth, solid fill of color.
4. Lazy Daisy Stitch
This is ideal for creating flower petals. To make the lazy daisy stitch, bring the needle up at the base of a petal, loop the thread around, and insert the needle back into the fabric at the base of the petal. This stitch gives your flowers a lovely, whimsical shape.
Step 5: Add Leaves and Details
Once you’ve finished your flowers, it’s time to add the leaves and additional details. Use a simple satin stitch or a split stitch to create detailed leaves. Don’t forget to add some fine details like vines or small accents to fill in any empty spaces.
Feel free to experiment with different colors to make your design pop. You can also use metallic or variegated threads for added dimension and texture.
Step 6: Finish Your Design
After you’ve completed your floral design, carefully remove the embroidery hoop. Trim any excess thread and check for any loose ends that need to be secured. If you’ve used a water-soluble stabilizer, carefully dissolve it in water to remove any remaining marks.
For a polished finish, you can iron the jeans on the reverse side to smooth out the fabric and ensure that your embroidery sits flat. Be sure to use a low heat setting to avoid damaging the threads.
Step 7: Show Off Your New Floral Jeans!
Once your floral embroidery is complete, it’s time to show off your beautifully decorated jeans! Pair them with a simple top to let your embroidery shine, or go bold with a coordinating floral blouse. You’ve successfully added a personal, creative touch to your wardrobe!
Experience and Tips
Embroidery can be a relaxing and therapeutic hobby. The rhythmic motion of stitching, combined with the satisfaction of seeing your design take shape, can be quite rewarding. As you work on your jeans, take your time and don’t rush through the process. Each stitch contributes to a unique and meaningful design.
One of the joys of floral embroidery is that it’s entirely customizable. Whether you want to create a subtle, minimalist floral design or an extravagant, colorful garden on your jeans, you have full control over how your project turns out. The possibilities are endless!
Additionally, consider using embroidery as a way to repurpose old clothing. If you have a pair of jeans that are starting to show signs of wear or feel a little outdated, embroidery can breathe new life into them. By adding your own floral patterns, you not only create a one-of-a-kind piece but also practice sustainability by reducing textile waste.
If you’re just getting started, there’s no need to worry about perfection. Embroidery is an art form that celebrates individuality. Embrace the mistakes and imperfectionsthey often make the final piece even more special.
As you grow more comfortable with the process, try experimenting with different fabric types, color combinations, or even patterns that go beyond flowers. Who knows? You might find yourself embroidering everything from jackets to scarves in no time!
Conclusion
Floral embroidery for jeans is a fun and creative way to personalize your wardrobe while developing a new skill. With the right tools, a little patience, and a lot of creativity, you can turn a simple pair of jeans into a beautiful work of art. This tutorial has given you the basics, but the possibilities are endless when it comes to experimenting with different floral designs and embroidery techniques. So, grab your needle and thread, and start stitching your way to a unique and stylish pair of jeans!
sapo: This tutorial shows you how to add floral embroidery to your jeans, creating a personalized, stylish look. From gathering supplies to stitching techniques, follow along to turn your denim into a masterpiece!


