Table of Contents >> Show >> Hide
- Why Granola Cups Work (A Quick, Nerdy-but-Useful Explanation)
- Recipe at a Glance
- Ingredients
- Step-by-Step: How to Make Granola Cups with Yogurt and Fruit
- How to Keep Granola Cups Crisp (No One Wants a Soggy Breakfast Bowl)
- Flavor Combos That Never Get Old
- Variations for Different Diets and Moods
- Make-Ahead, Storage, and Meal Prep Tips
- Troubleshooting: When Granola Cups Get Dramatic
- Serving Ideas Beyond Breakfast
- Experience Notes: What Making Granola Cups Is Actually Like (The Real-World Version)
- Conclusion
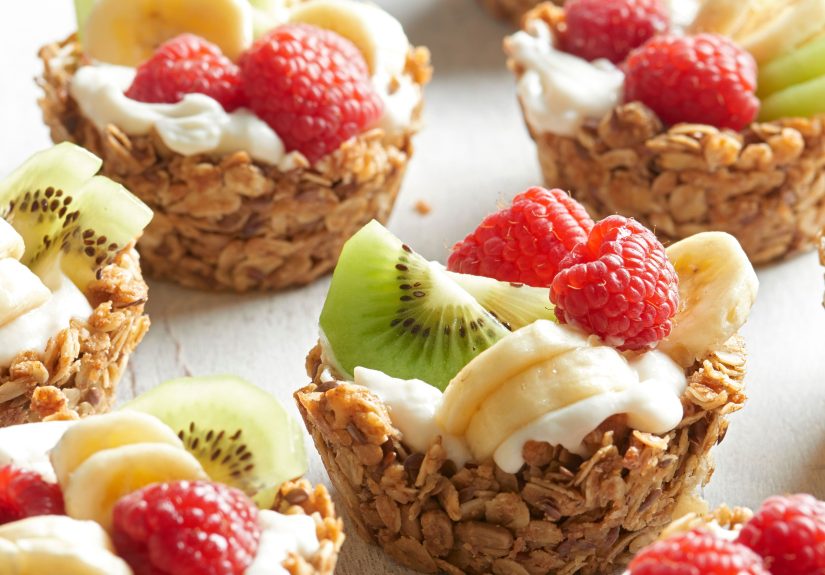
If yogurt parfaits are the dependable minivan of breakfast, granola cups with yogurt and fruit are the sporty convertible:
same practicality, way more “oooh, fancy” energy. And the best part? You don’t need pastry-school skills or a countertop full of gadgets.
You just need a muffin tin, a spoon, and the willingness to press oats into little edible bowls like you’re making tiny oat helmets for breakfast warriors.
This recipe is a make-ahead breakfast that stays crisp (if you do one important thing: don’t add yogurt too earlymore on that soon).
It’s also a “choose-your-own-adventure” situation: sweet or lightly sweet, nutty or nut-free, dairy or dairy-free, berries or whatever fruit is
doing well in your fridge right now.
Why Granola Cups Work (A Quick, Nerdy-but-Useful Explanation)
Regular granola is basically oats + mix-ins + something sticky. When you bake that sticky-coated mixture, the sweetener and fat help it brown,
and the oats toast into crunchy clusters. In cup form, the muffin tin becomes the mold, and the “sticky stuff” becomes your construction crew.
Here’s what makes a granola cup sturdy instead of crumbly:
- Old-fashioned rolled oats for structure (they’re bigger and hold together better than quick oats).
- A liquid sweetener (honey or maple syrup) to glue things together.
- A fat (butter, coconut oil, or olive oil) to help crisp and toast evenly.
- A binder option (egg white, whole egg, or a flax “egg”) to lock the cup into a real bowl shape.
- Firm pressingbecause “gently pat” is for kittens, not granola architecture.
Recipe at a Glance
- Yield: 12 granola cups
- Prep time: 15 minutes
- Bake time: 18–22 minutes
- Cool time: 20–30 minutes (yes, cooling mattersthis is when they become crisp)
- Tools: 12-cup muffin tin, mixing bowl, whisk/fork, spoon (and a little cooking spray)
Ingredients
For the Granola Cups
- 2 cups old-fashioned rolled oats
- 1/2 cup unsweetened shredded coconut (optional, but great for crunch)
- 1/2 cup sliced almonds (or chopped pecans/walnuts/pistachios)
- 1 teaspoon ground cinnamon
- 1/4 teaspoon kosher salt
- 1/3 cup honey or maple syrup
- 2 tablespoons melted butter or melted coconut oil or olive oil
- 1 large egg white (for extra crunch) or 1 whole egg (for extra sturdiness)
- 1 teaspoon vanilla extract
- 2 tablespoons plain Greek yogurt (optional, adds tenderness and helps the mixture press smoothly)
For the Filling
- 2 to 2 1/2 cups Greek yogurt (plain or vanilla)
- 1 to 2 tablespoons honey or maple syrup (optional, to sweeten plain yogurt)
- 2 to 3 cups fresh fruit (berries, diced peaches, mango, kiwi, grapes, or a mix)
- Optional toppings: chia seeds, flaxseed, toasted nuts, mini chocolate chips, cinnamon, lemon zest, or a drizzle of nut butter
Ingredient Notes (So You Don’t Get Ambushed by Your Own Breakfast)
- Oats: Old-fashioned rolled oats are the best choice for structure. Quick oats can work, but cups may be more delicate.
- Sweetener: Honey gives a classic toasty flavor; maple syrup tastes a little lighter and more caramel-like.
- Egg vs. egg white: Egg white helps crisp and bind without extra richness. Whole egg makes sturdier cups.
- Nut-free: Swap nuts for pumpkin seeds or sunflower seeds, or use extra oats + coconut.
Step-by-Step: How to Make Granola Cups with Yogurt and Fruit
1) Preheat and Prep the Pan
Preheat your oven to 325°F. Generously spray a 12-cup muffin tin with nonstick spray.
Be enthusiastic heregranola cups love commitment, but they hate being glued to metal.
2) Mix the Wet Ingredients First
In a medium bowl, whisk together the honey (or maple syrup), melted butter (or oil), egg white (or egg), vanilla, and the optional Greek yogurt.
This helps everything coat evenly so you don’t get “one sweet cup” and “one bland cup” like breakfast roulette.
3) Add the Dry Ingredients
Stir in the oats, coconut, almonds, cinnamon, and salt until the mixture looks evenly coated and slightly glossy.
If it seems dry, give it 1–2 minutes to sitthe oats will start absorbing the wet ingredients.
4) Portion and Press (This Is the Whole Game)
Divide the mixture between the muffin cups (about 1/4 cup per cup).
Spray the back of a spoon with cooking spray, then press the mixture firmly into the bottom and up the sides to form a bowl.
- Tip: Press more firmly than you think you need to. Loose packing = crumbly cups.
- Tip: Make the bottom slightly thicker than the sides, like a real bowl.
5) Bake Until Golden (But Not Fossilized)
Bake for 18–22 minutes, or until the edges are golden brown and the cups look set.
Ovens vary, so start checking at 18 minutes. If your cups are browning too fast at the edges, pull them a little earlycarryover heat continues crisping.
6) Cool, Then Remove
Let the cups cool in the pan for 10–15 minutes. This cooling time is when they firm up.
Then gently loosen the edges with a butter knife and lift out the cups. Transfer to a wire rack to cool completely.
If a cup feels fragile, give it another 5 minutes. Granola cups are like toddlers: sometimes they just need a minute to pull themselves together.
7) Fill and Top Right Before Serving
Stir yogurt with a little honey or maple syrup if needed. Spoon yogurt into each cup, add fruit, and finish with toppings.
For maximum crunch, fill the cups right before eating.
How to Keep Granola Cups Crisp (No One Wants a Soggy Breakfast Bowl)
The #1 reason granola cups get sad: moisture. Yogurt and fruit are basically delicious moisture delivery systems.
Here’s how to keep the crunch:
- Fill at the last minute whenever possible.
- Use thick yogurt (Greek yogurt or strained yogurt) to slow down sogginess.
- Pat fruit dryespecially berries and diced peaches.
- Layer smart: yogurt first, fruit on top (juicy fruit at the bottom leaks faster).
- Add a “barrier”: a thin smear of nut butter or a drizzle of melted chocolate inside the cup can help resist moisture.
Flavor Combos That Never Get Old
Classic Berry Brunch
Vanilla Greek yogurt + blueberries + strawberries + mint. Add lemon zest if you want it to taste like “I have my life together.”
Peach Cobbler Vibes
Plain Greek yogurt + diced peaches + cinnamon + chopped pecans + a tiny drizzle of honey.
Tropical Vacation (In Sweatpants)
Coconut yogurt + mango + kiwi + toasted coconut flakes. Optional: lime zest for brightness.
PB&J Energy Cup
Plain yogurt + raspberries or strawberries + a drizzle of peanut butter. Bonus points for chia seeds.
Dessert Disguised as Breakfast
Greek yogurt + banana slices + mini chocolate chips + a light honey drizzle. It’s basically a sundae that went to the gym.
Variations for Different Diets and Moods
Dairy-Free
Use melted coconut oil and skip the optional yogurt in the granola mix. Fill with coconut, almond, or soy yogurt.
For binding, use an egg white or a flax egg (1 tablespoon ground flax + 2 1/2 tablespoons water, rest 5 minutes).
Higher-Protein
Choose a high-protein Greek yogurt, add a spoonful of nut butter, and sprinkle hemp hearts or chopped nuts on top.
Nut-Free School Snack
Skip nuts and use sunflower seeds or pumpkin seeds (or more oats + coconut). Fill with yogurt and sliced fruit that travels well, like grapes or banana.
Mini Granola Cups
Use a mini muffin tin and bake a little less (start checking around 10–12 minutes). These are dangerously snackable.
Like, “Oops, I ate six” snackable.
Make-Ahead, Storage, and Meal Prep Tips
Storing the Baked Granola Cups
Once completely cool, store the empty cups in an airtight container at room temperature.
They’ll stay crisp for about a week if sealed well. (If your kitchen is humid, they may soften soonerstill tasty, just less “crunch.”)
Storing Yogurt and Fruit
Keep yogurt refrigerated and prep fruit separately. If you’re packing for work or school, bring the cups empty and carry yogurt/fruit in a small container.
Assemble right before eating for the best texture.
Can You Assemble Them Ahead?
You can, but the cups will soften. If you must assemble ahead, do it as close to serving as possible (think: same morning),
and choose thick yogurt and less-juicy fruit.
Troubleshooting: When Granola Cups Get Dramatic
“They stuck to the pan.”
Next time: spray more generously, especially around the top edges. Let them cool 10–15 minutes before removing.
A thin butter knife around the edge helps. (So does patience, but we’re all working on that.)
“They crumbled when I lifted them.”
Usually this means under-pressed or under-baked. Press firmly into the tin, and bake until the edges are golden.
Also: let them cool longerwarm granola is still setting up.
“They taste burnt around the edges.”
Your oven might run hot. Reduce bake time by a few minutes or lower the temperature slightly.
You can also rotate the pan halfway through baking for more even browning.
“They’re too sweet.”
Use the lower end of sweetener, choose plain yogurt, and rely on fruit for sweetness.
Granola cups should taste like breakfast, not like a candy bar in a costume.
Serving Ideas Beyond Breakfast
- Brunch board: Set out empty granola cups with bowls of yogurt, fruit, and toppings so everyone builds their own.
- After-school snack: Smaller cups with yogurt and berries feel like a treat but aren’t a sugar crash waiting to happen.
- Light dessert: Fill with vanilla yogurt (or whipped Greek yogurt) and top with warm berries.
- Party bite: Mini granola cups topped with fruit look adorable and disappear fast.
Experience Notes: What Making Granola Cups Is Actually Like (The Real-World Version)
Let’s talk about what tends to happen the first time people make muffin tin granola cupsbecause “easy” recipes are still
recipes, and recipes love to teach lessons. The good news: the lessons are edible.
First, there’s the moment you realize pressing matters more than mixing. The mixture looks like “wet oats,” which doesn’t exactly scream
structural integrity. But once you start packing it into the muffin tin, you’ll notice something: the more firmly you press, the more it behaves
like a real crust. This is where many folks have a tiny breakthrough. You’re not sprinkling granola into a cup; you’re building a bowl.
Think of it like making a cookie crust, except the cookie is pretending it’s health food.
Then comes the smell. About 10 minutes into baking, the kitchen starts smelling like toasted oats and cinnamon, which is basically aromatherapy
for anyone who’s ever looked at their calendar and sighed. The aroma is a reminder that you’re making something that feels special without
requiring a special occasion. That’s the sneaky magic of this recipe: it turns an ordinary morning into “I have plans and they involve brunch,”
even if your only plan is answering emails.
The next experience is the patience test: cooling. Hot granola cups are fragile and a little soft, and this is where people get betrayed by optimism.
They try to pop them out earlybecause they look doneand the cups respond by crumbling like they’re auditioning for a cookie crumble topping.
If you let them cool for 10–15 minutes in the pan, you’ll feel the difference. They release more cleanly, and the texture firms up.
Cooling isn’t downtime; it’s the final step in crispness.
Another very common real-life moment: you’ll start customizing immediately. The first batch might be “classic,” but the second batch becomes
“maple-pecan with dried cherries,” and the third batch becomes “chocolate drizzle barrier layer because I am an innovator.” Granola cups
inspire creativity because the base formula is forgiving. Swap nuts, change spices, use honey or maple, add seeds, or sneak in a pinch of cardamom.
You’ll also learn your personal preference: some people love a super-crunchy, deeply toasted cup; others like it slightly softer and chewier.
Both are valid breakfast identities.
And finally, you’ll experience the sogginess lesson. If you fill the cups too earlyespecially with juicy fruityou’ll come back later to find
a softer cup. Not ruined, just… less crisp. This is why people often end up meal-prepping in “parts”: cups in one container, yogurt in another,
fruit in a third. It sounds fussy until you do it once and realize it’s actually faster in the morning. Assembly takes about 30 seconds,
and suddenly you’re eating a breakfast that looks like it came from a café display case.
Over time, a lot of home cooks find these cups become a reliable routine: bake a batch on Sunday, store them airtight, and use them as an
easy grab-and-go base all week. They’re also a confidence builderbecause once you’ve successfully made an edible bowl, the day’s other tasks
feel slightly more possible. Is that logic? Maybe not. Is it emotionally true? Absolutely.
Conclusion
Granola cups with yogurt and fruit are the kind of recipe that delivers big payoff for small effort: crunchy, customizable,
meal-prep friendly, and genuinely fun to eat. Bake the cups once, keep them crisp, and treat yogurt and fruit like a last-minute party guest:
invited, but arriving right before the event. Your breakfast will stay crunchy, your toppings will stay fresh, and your morning will feel a little
more put togethereven if your sock drawer disagrees.


