Table of Contents >> Show >> Hide
- Why This Tumbling Tower Blocks Christmas Tree Works So Well
- Materials You Will Need
- Before You Glue: Pick Your Tree Style
- How to Build the Tree Step by Step
- How to Paint or Stain Your Wooden Christmas Tree
- Decorating Ideas That Make It Look Extra Charming
- Common Mistakes to Avoid
- Ways to Style Your Finished Tree at Home
- Is This DIY Good for Beginners?
- Conclusion
- Experience Notes: What It’s Really Like to Make and Live With This Craft
- SEO Tags
Some holiday crafts are elegant. Some are affordable. Some are so cute they make you irrationally proud of a pile of tiny wooden rectangles. This one is all three. A tumbling tower blocks Christmas tree is the kind of project that looks boutique-shop clever but starts with humble little stacking blocks and a very normal amount of seasonal ambition.
If you love rustic Christmas decor, farmhouse holiday accents, tabletop trees, or DIY decorations that do not require a garage full of power tools, this project is your festive sweet spot. It is budget-friendly, beginner-friendly, and customizable enough to suit just about any decorating style, from snowy cottage to clean Scandinavian to cheerful “my mantel believes in sparkle” energy.
In this guide, you will learn exactly how to build a charming tumbling tower blocks Christmas tree, what materials work best, how to keep the structure straight, how to paint or stain it beautifully, and how to decorate it so it looks intentional instead of “my hot glue gun and I made questionable choices.” Let’s build a tiny wooden tree that punches way above its weight class.
Why This Tumbling Tower Blocks Christmas Tree Works So Well
The appeal of this DIY Christmas tree is simple: the materials are small, lightweight, and easy to arrange into a triangular tree shape. Tumbling tower blocks already have the warm look of unfinished wood, which makes them ideal for rustic holiday decor. They also take paint, stain, whitewash, and distressing well, so you can create a polished finish without making the project complicated.
Another reason this craft is so popular is flexibility. You can make a single statement tree for a shelf, create a trio of trees in graduated sizes for a mantel, or build a whole mini forest for a centerpiece. It works in apartments, dorms, entry tables, bookshelves, office desks, and corners that need a little Christmas spirit but not a full-size evergreen invasion.
Best of all, this project feels handmade in the best possible way. The finished tree has texture, personality, and just enough imperfection to be charming. Holiday magic loves a little crookedness. Not too much, obviously. We are aiming for cozy, not architectural emergency.
Materials You Will Need
Basic Supplies
- 1 to 2 packs of tumbling tower blocks
- Wood glue, high-temp hot glue, or a combination of both
- Wax paper, foil, or a protected work surface
- Craft paintbrush or small glue brush
- A ruler or measuring tape
- Pencil for layout marks
- Sandpaper for smoothing or distressing
Finishing Supplies
- Acrylic craft paint, chalk paint, or wood stain
- Paper towels or soft cloth for wiping excess paint or stain
- Primer if you want especially even paint coverage
- Optional wax or clear sealer for durability
Decorative Extras
- Mini star topper
- Faux greenery or tiny garland
- Mini bells, beads, ribbon, or twine
- Small wood bead garland
- Battery fairy lights
- Glitter accents if your holiday personality is “subtle, but make it sparkle”
Before You Glue: Pick Your Tree Style
There is more than one way to build a tumbling tower blocks Christmas tree, but the most charming versions usually fall into two categories.
Option 1: The Layered Triangle Tree
This version uses rows of blocks arranged in decreasing widths, like a classic pixelated Christmas tree. It is easy to assemble, sturdy, and great for painting in solid colors. If you are a beginner, this is the safest choice.
Option 2: The Overlapped Branch Tree
This style uses overlapping blocks to form angled sides that look more branch-like. It has a rustic, handcrafted vibe and often looks more elevated once stained or whitewashed. It also requires a little more patience and alignment, which is another way of saying “do not start this ten minutes before bed.”
For this article, we will focus on the layered triangle tree because it is approachable, attractive, and easy to customize.
How to Build the Tree Step by Step
Step 1: Lay Out the Shape First
Before any glue touches any wood, arrange your blocks on the table to form a tree. A simple beginner layout is:
- Top row: 1 block
- Second row: 3 blocks
- Third row: 5 blocks
- Base row: 3 blocks
- Trunk: 1 block
This creates a small, balanced tabletop Christmas tree. For a larger version, expand the rows to 1, 3, 5, 7, and possibly 9 blocks depending on the height you want. Keep the rows centered so the silhouette stays symmetrical.
This step may sound basic, but it saves the project. Dry fitting lets you see spacing, check proportions, and catch problems before glue turns your craft into a permanent life lesson.
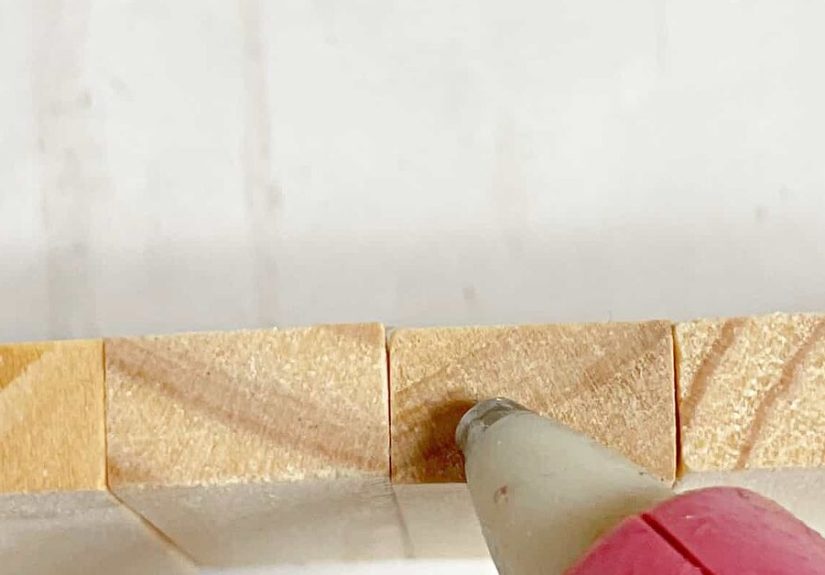
Step 2: Glue Each Row Together
Work row by row. Add a thin, even line of glue along the long edge of one block and press the next block firmly against it. Continue until the row is complete. If you are using hot glue, work quickly. If you are using wood glue, clamp or press the row together and allow extra drying time.
The secret here is not using too much glue. Excess glue squeezes out, dries shiny, and makes the tree look messy. Think “confident dab,” not “glue waterfall.”
Step 3: Assemble the Triangle
Once the rows are dry enough to handle, stack them into the tree shape. Glue the smallest row to the next row down, then continue until the full triangle is formed. Keep checking the center line as you go. A charming tree can be handmade; it should not look seasick.
At this stage, do not attach the trunk and base until the main triangle feels set. Giving the tree portion a few extra minutes to firm up is a tiny patience tax that pays big dividends.
Step 4: Add the Trunk and Base
Glue one block vertically or horizontally under the center of the lowest row to create the trunk. Then glue the base pieces together and attach them beneath the trunk. The base should feel wide enough to support the tree without wobbling. If your tree leans, add one more block to the back of the base like a hidden stabilizer. Nobody will know. You and the laws of physics will keep that secret.
Step 5: Let Everything Dry Completely
This is the least glamorous step and one of the most important. Let the entire structure dry thoroughly before painting, staining, or decorating. If the glue is still shifting, your careful paint job may end with one branch row drifting half an inch to the left like it got distracted by carols.
How to Paint or Stain Your Wooden Christmas Tree
Go Natural for Rustic Charm
If you like simple farmhouse Christmas decor, leave the wood unfinished or add a light stain. Walnut, oak, driftwood, or weathered gray tones all look beautiful. This finish works especially well with twine, greenery, and a muted star topper.
Try a Whitewash for Cozy Winter Style
A whitewashed tumbling tower blocks Christmas tree looks soft, wintry, and charming without losing the wood grain. To get the effect, thin white paint slightly, brush it on, then wipe some away with a paper towel. The result feels snowy without looking heavy.
Use Green Paint for a Classic Christmas Look
Want the tiny tree to read instantly as a Christmas tree? Paint it green. A layered shade approach looks especially nice: dark green on the lower rows, medium green in the middle, and a lighter tone near the top. It adds subtle dimension without much extra work.
Distress the Finish for Extra Character
Once the paint is dry, lightly sand edges and raised areas for a distressed look. This gives the tree age, texture, and that lovely “I found this in a dreamy antique market” vibe. Focus on corners and a few random spots. Too much distressing and your tree starts looking like it survived a dramatic holiday backstory.
Decorating Ideas That Make It Look Extra Charming
Add a Mini Star Topper
A metal star, wooden star, glitter star, or even a tiny cutout star instantly finishes the silhouette. It is a small detail, but it makes the project feel complete and intentional.
Tuck in Faux Greenery
Little snippets of faux cedar, pine, or eucalyptus can be hot-glued along the sides or near the base. This softens the geometric shape and adds natural-looking texture.
Wrap with Thin Ribbon or Twine
Ribbon brings color. Twine brings rustic warmth. Either one works beautifully. Red velvet ribbon looks classic, black-and-white ribbon feels farmhouse, and jute twine leans cozy cabin.
Use Mini Bells or Beads
Small hanging accents add motion and whimsy. Bells, wood beads, or pearl-style embellishments can be suspended in the center opening of an overlapped tree or glued onto a layered tree as faux ornaments.
Try Tiny Fairy Lights
Battery-operated fairy lights can turn a simple tabletop tree into a glowing little focal point. Wrap them lightly rather than stuffing them into every gap. You want sparkle, not electrical spaghetti.
Common Mistakes to Avoid
Using Too Much Glue
More glue does not mean more strength. It mostly means more cleanup. Thin, controlled application creates a neater result.
Skipping the Dry Layout
Eyeballing the shape without laying it out first is how cute craft projects become geometry mysteries.
Painting Before the Glue Sets
If the tree shifts while the paint is drying, the finish can crack or smear. Let structure come first, beauty second.
Making the Base Too Small
A narrow base makes the tree tip easily, especially if you add a heavier topper. Always test stability before calling it finished.
Overdecorating
This project has a naturally pretty texture. Sometimes a simple stain and one star topper look better than twelve embellishments competing for attention like they are auditioning for a holiday talent show.
Ways to Style Your Finished Tree at Home
A tumbling tower blocks Christmas tree is surprisingly versatile. Try one of these decorating approaches:
- Mantel trio: Make three trees in different heights and line them up with candles and garland.
- Kitchen shelf accent: Pair one tree with a ceramic house and a mini wreath.
- Entry table display: Use the tree beside a bowl of ornaments or a holiday sign.
- Giftable decor: Wrap a finished tree as a hostess gift, teacher gift, or stocking-sized surprise.
- Desk decor: Keep a mini version in a home office for cheerful seasonal style.
If your home leans neutral, choose stain, whitewash, and wood beads. If your style is colorful, use bold greens, metallic stars, and red ribbon. If your aesthetic is somewhere between minimalist and merry, a matte painted tree with one understated topper is a great compromise.
Is This DIY Good for Beginners?
Absolutely. This is one of the best Christmas wood crafts for beginners because it teaches a lot without demanding advanced skills. You practice layout, gluing, finishing, and decorating, but the stakes are low and the material cost is manageable.
It is also a forgiving project. If a row looks uneven, you can often sand, reposition, or disguise it with paint and embellishments. That kind of flexibility is one reason DIY Christmas decor is so satisfying. Perfection is welcome, but personality does most of the heavy lifting.
Conclusion
Learning how to build a charming tumbling tower blocks Christmas tree is less about mastering a complicated technique and more about combining simple materials with thoughtful details. A few wooden blocks, the right glue, a stable base, and a finish that suits your holiday style can turn an inexpensive craft into a decoration you genuinely look forward to unpacking every year.
Whether you go rustic with stain, snowy with whitewash, or classic with evergreen paint and a gold star, this DIY Christmas tree earns its place on the mantel. It is budget-friendly, stylish, and surprisingly fun to make. Also, it gives tumbling tower blocks a second career beyond being dramatically knocked over by competitive relatives. That alone feels festive.
Experience Notes: What It’s Really Like to Make and Live With This Craft
One of the best things about building a tumbling tower blocks Christmas tree is that it feels approachable from the very first minute. The supplies are not intimidating, the layout is easy to understand, and the project starts looking like an actual tree fairly quickly. That matters more than people think. Some holiday crafts spend so long in the “trust the process” stage that you begin to wonder whether you are making decor or documenting a personal crisis with glue. This one rewards you early, which makes it especially enjoyable.
There is also something deeply satisfying about the texture of the finished piece. The little blocks create visual rhythm, so even a plain tree with no ornaments has built-in charm. Once it is painted or stained, the edges catch light beautifully, especially on a mantel or bookshelf near a lamp. In real decorating situations, that texture is what makes the project look more expensive than it is. It does not scream “budget craft.” It quietly says, “Yes, I am handmade and adorable, thank you for noticing.”
Another real-world advantage is scale. Full-size holiday decor can overwhelm small spaces, but these trees are easy to move around until they look right. You can test one on a coffee bar, then shift it to an entry console, then decide it actually belongs next to the stockings. They are light enough to play with, which is useful during the season when everything in the house is mysteriously competing for the same three square feet of display space.
People also tend to underestimate how giftable this project is. A charming wooden Christmas tree feels personal without being overly specific. It suits neighbors, teachers, coworkers, hosts, grandparents, and that friend who somehow already owns every candle known to civilization. If you make several in one style, they look coordinated and intentional. If you customize colors and toppers, each one feels unique. That balance is rare in DIY gifting.
The most common experience crafters have with this project is discovering that small details matter a lot. A straighter base, cleaner glue lines, softer whitewash, or a better-proportioned topper can elevate the whole piece. The project is simple, but it responds well to care. That is part of its charm. It is not difficult, yet it still gives you room to be thoughtful and creative. By the end, you usually do not just have one finished tree. You have ideas for three more versions, a mental list of where they could go, and the very strong opinion that tiny wooden trees are a completely reasonable way to spend an afternoon in December.