Table of Contents >> Show >> Hide
- Why a Faux Arched Christmas Fireplace Works So Well
- Plan the Design Before You Start Cutting
- Tools and Materials for a Faux Arched Christmas Fireplace DIY
- Step-by-Step: How to Build a Faux Arched Christmas Fireplace DIY
- How to Decorate Your Faux Arched Fireplace for Christmas
- Common Mistakes to Avoid
- Holiday Safety for a Faux Christmas Fireplace
- Budget and Timeline
- Experience and Lessons From Building a Faux Arched Christmas Fireplace DIY
- Final Thoughts
If your living room is missing that cozy, movie-scene magic in December, a faux arched Christmas fireplace DIY might be the holiday upgrade you did not know you needed. It creates a focal point, gives you a mantel for stockings and garland, and makes the whole room feel more intentional. In other words, it is a decorative power move. No chimney, no masonry, no contractor convoy parked outside your house.
The best part is that this project can look expensive without requiring “I accidentally renovated the whole house” money. With a simple frame, a curved opening, a good paint finish, and smart Christmas styling, you can build a faux fireplace that feels architectural instead of flimsy. The arched shape is what gives it that designer look. Straight lines are nice. An arch says, “Yes, I own ribbon in more than one width.”
Why a Faux Arched Christmas Fireplace Works So Well
A faux fireplace is not just seasonal clutter with good lighting. It solves a real decorating problem: many rooms need a visual anchor. Mantels and surrounds naturally draw the eye, which is why they are so often the center of a room. Add an arch, and the design softens instantly. A rectangular surround can look boxy if the room is already full of sharp angles. An arched opening adds character, balance, and that custom-built feel people usually associate with older homes or high-end remodels.
For Christmas, the payoff gets even better. A faux mantel gives you a place for stockings, greenery, bows, string lights, candles, mini trees, framed art, bells, and all the little festive extras that would otherwise be wandering around your living room with no mission. Even if you do not have a real fireplace, you still get the cozy aesthetic. Frankly, the aesthetic is doing most of the work in December anyway.
Plan the Design Before You Start Cutting
Choose the Right Size
A good faux fireplace should feel proportional to the wall and the furniture around it. Too narrow, and it looks like it lost an argument with the sofa. Too large, and it can overwhelm the room. In most living rooms, a width of about 48 to 60 inches works well, with a depth of roughly 8 to 14 inches depending on whether you want a slim decorative surround or a chunkier built-in look.
Decide if It Will Be Freestanding or Anchored
A freestanding version is ideal if you want flexibility or need something renter-friendlier. An anchored version feels more permanent and is usually sturdier, especially if you plan to add a heavy mantel shelf, mirror, or layered holiday décor. Either way, it should be stable, level, and purely decorative unless you are working with a properly rated electric insert and following manufacturer clearances.
Pick a Finish Style
Before you buy materials, choose the look. Painted MDF or plywood gives you a crisp, clean traditional finish. Joint compound, plaster-style skim coats, or faux Roman clay effects can create a softer European feel. Peel-and-stick tile, stone-look panels, or a tiled hearth can make the piece feel more substantial. For Christmas, a warm white, creamy beige, greige, charcoal, or muted sage tends to play especially well with garland, brass accents, and wood tones.
Tools and Materials for a Faux Arched Christmas Fireplace DIY
You do not need a workshop that looks like a television set. A basic DIY setup will usually get the job done.
- 2×2 or 1×2 lumber for the inner frame
- 1/2-inch MDF or plywood for the face and sides
- Thin hardboard, bendable plywood, or flexible MDF for the inside curve of the arch
- Wood screws and brad nails
- Wood glue
- Jigsaw or oscillating tool for the arch cutout
- Drill and driver
- Level and tape measure
- Wood filler and paintable caulk
- Sandpaper or palm sander
- Primer and paint
- Optional mantel board, trim molding, peel-and-stick tile, or faux stone finish
- Optional battery candles, string lights, birch logs, bells, garland, and stockings
If you are after a more refined look, do not skip finishing supplies. Wood filler, caulk, sanding, and primer are where a “DIY project” turns into “Wait, you made that?”
Step-by-Step: How to Build a Faux Arched Christmas Fireplace DIY
1. Build the Basic Frame
Start by creating the carcass, which is just a fancy word for the hidden structure. Build a rectangle from 2×2 or 1×2 lumber in the overall width and height you want. Then create a second, smaller box inside it to define the firebox opening. If the piece will sit against the wall, add depth with short side supports so the surround projects forward a few inches.
Check for square as you go. If the frame starts crooked, the rest of the project becomes an ongoing apology. Secure the frame with screws, then test it against the wall before moving on.
2. Draw and Cut the Arch
This is the moment the fireplace goes from basic to beautiful. Cut a front face panel from MDF or plywood, then mark the opening. For the arch, measure the width of your firebox opening and mark the center point. A string-and-pencil trick works well here: pin the string at the center, set the radius, and draw an even curve. Another easy method is tracing a large round object if the size happens to fit your opening.
Cut the arch carefully with a jigsaw. Do not rush this step. An uneven curve is one of those details people cannot always name, but they can definitely feel. Sand the cut edge smooth before attaching the panel to the frame.
3. Skin the Fireplace Surround
Attach the front panel to the frame with wood glue and brad nails or screws. Then cover the sides and top with matching MDF or plywood panels. If you want a more built-in look, extend the face slightly proud of the side panels and plan to finish the seams with caulk.
At this stage, the piece should already look like a fireplace surround, even if it still resembles a giant unfinished gingerbread house without frosting.
4. Wrap the Inside of the Arch
The inside curve is what makes many first-time builders pause dramatically and stare into the middle distance. Do not panic. Use a thin, bendable material such as hardboard, bendable plywood, or flexible MDF. Cut a strip the depth of the opening, gently bend it along the arch, and attach it inside the curve with glue and short fasteners.
If your opening is deep, you may need to work in sections. Once it is attached, the arch will look surprisingly polished. Fill any tiny transitions with caulk or lightweight filler.
5. Add the Mantel Shelf
The mantel is the crown. You can use a solid board, a faux beam, or a built-up box shelf. For a classic look, let the mantel overhang slightly on the front and sides. For a cleaner modern look, keep the profile simple and square.
Make sure the shelf is level, secure, and scaled to the width of the surround. A mantel that is too skimpy can make the whole fireplace feel unfinished. One that is too thick can make it look like it is wearing shoulder pads from 1987.
6. Fill, Caulk, Sand, Prime, and Paint
This is where the magic happens. Fill nail holes and screw heads. Caulk the seams where boards meet. Sand every visible edge. Prime raw MDF thoroughly, because MDF drinks paint like it just crossed a desert. Then apply two coats of paint in your chosen finish.
For a softer old-world vibe, you can use a matte paint and then add a plaster-like finish around the arch or on the face. For a more traditional look, crisp white or warm ivory with subtle trim details always works.
7. Style the Firebox Opening
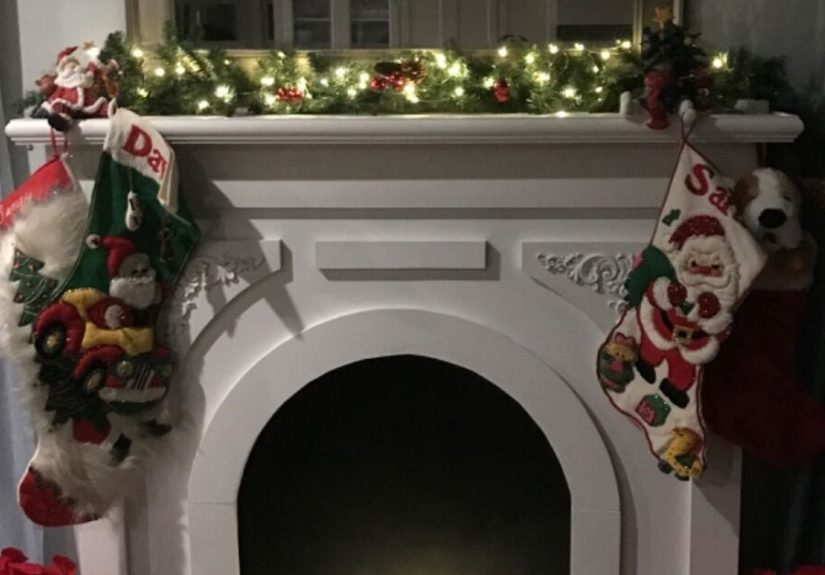
Because this is a faux fireplace, the opening is yours to style. A cluster of birch logs gives it a classic winter feel. Flameless candles create glow without the stress. Mini wrapped gifts, stacked books, or a string of warm fairy lights can also work. If you want something a little moodier, paint the inside of the firebox black or charcoal so the opening feels deeper and more realistic.
How to Decorate Your Faux Arched Fireplace for Christmas
Layer Greenery First
Start with garland. Faux cedar, pine, juniper, eucalyptus, or a mix of greenery adds volume fast. Let it drape naturally instead of forcing it into a stiff line. If the mantel is wide, doubling the garland makes it feel richer and less skimpy.
Add Lights Without Overdoing It
Warm white string lights tucked into the garland create instant coziness. Keep the lights subtle. You want “glow,” not “airport runway.” If your room already has a lit tree, candles, and other decorative lighting, the mantel should support the scene, not audition to become Times Square.
Use Height and Balance
A mirror, framed holiday art, or a wreath above the mantel creates vertical interest. On the mantel itself, use a mix of heights: taper candleholders, bottle brush trees, ceramic houses, bells, or small vases. Symmetrical styling looks classic and polished, while a looser arrangement feels more collected and relaxed.
Do Not Forget the Stockings
Stockings are the whole reason many people suddenly develop deep opinions about mantels in December. Choose hooks that are stable and not overly bulky. If the arch is the star, let the stockings support it rather than cover it. Four beautiful stockings with space between them usually look better than seven crammed together like commuters on a delayed train.
Common Mistakes to Avoid
The biggest mistake is building too fast and finishing too little. A faux fireplace can be simple, but it still needs careful measuring, clean curves, and tidy seams. Skipping filler, caulk, sanding, or primer almost always shows in the final result.
Another common issue is poor scale. A narrow opening, a tiny mantel, or an arch that is too flat can make the piece look more temporary than tailored. Also, resist the urge to overload the mantel. Even gorgeous Christmas décor can turn chaotic if every surface is fighting for attention.
Finally, remember that this is a decorative fireplace. If you want heat, use a properly rated electric insert only if your build and clearances are designed for it. Do not treat a handmade decorative surround like a real fireplace just because it looks charming in photos.
Holiday Safety for a Faux Christmas Fireplace
This part is not glamorous, but it matters. If your faux fireplace is dressed for Christmas, choose safety over drama. Use flameless candles whenever possible. If you use decorative lights, do not overload outlets or daisy-chain more than recommended. Keep cords tidy, hidden, and away from traffic paths. Avoid real flames near garland, stockings, ribbons, dried foliage, paper décor, or fabric bows. Cozy should never turn into “why is the smoke alarm singing?”
If children or pets are around, secure the piece to the wall, especially if the mantel holds candles, ceramic décor, or anything breakable. A fireplace surround looks solid, but a freestanding version can still tip if someone climbs, pulls, or grabs a stocking with Olympic enthusiasm.
Budget and Timeline
A faux arched Christmas fireplace DIY can be surprisingly budget-friendly. A basic painted build with lumber, MDF, screws, filler, primer, and paint can often stay in the lower DIY range if you keep the design simple. Costs go up when you add thick mantel boards, specialty trim, peel-and-stick tile, plaster finishes, or high-end holiday styling pieces.
As for time, many DIYers can build the structure over a weekend, then spend another day on sanding, priming, painting, and styling. If you are new to cutting arches, give yourself extra patience. Curves are not hard, but they do reward calm energy and decent lighting.
Experience and Lessons From Building a Faux Arched Christmas Fireplace DIY
Building a faux arched Christmas fireplace is one of those projects that starts as a decorating idea and ends up feeling weirdly personal. You begin because you want a cute holiday focal point. Then, somewhere between drawing the arch and vacuuming up your third snowdrift of MDF dust, you realize this little fireplace is becoming the heart of the room. Not because it heats the space, but because it changes how the space feels.
The first surprise is how much the arch matters. A standard rectangular opening can look nice, but the arched version instantly feels softer, older, and more intentional. It has a quiet elegance to it. Even before the paint goes on, you can already see the personality forming. It is the difference between “I built a thing” and “I built a thing that has taste.”
The second lesson is that finishing work deserves respect. Most people imagine the project is about lumber and tools, but the polished look comes from the boring grown-up details: filling seams, sanding edges, caulking corners, and priming properly. The glamorous part is hanging the garland. The convincing part is all the stuff you do before that while wearing paint-speckled sweatpants and questioning your life choices.
There is also something deeply satisfying about styling a mantel you made yourself. Every little object lands differently. The bells feel more charming. The stockings look more meaningful. Even a cheap strand of warm white lights suddenly seems expensive because the backdrop is custom. You notice how the mirror reflects the tree, how the arch frames the candles, how the whole wall finally looks finished. It turns a regular room into a holiday scene you actually want to sit in.
Another unexpected joy is how flexible the fireplace becomes after Christmas. Once the garland comes down, the faux surround still works. Winter candles, a vase of branches, spring florals, summer art, fall pumpkins, all of it looks better because the room now has structure. So while the project may begin as a Christmas DIY, it does not have to disappear with the wrapping paper in January.
Of course, there are a few humbling moments. Cutting a smooth arch on the first try is not guaranteed. Measuring once is optimistic. Measuring twice is smarter. Measuring three times while holding coffee is sometimes the real strategy. And yes, there is a decent chance you will stand back at some point and think the mantel looks crooked, only to discover the problem is actually the picture frame next to it. That is just part of the process. Home projects keep us humble and slightly dusty.
Still, this kind of build has a payoff that flat-pack décor rarely delivers. It becomes part project, part memory. You remember the playlist you had on while painting. You remember the first night you plugged in the lights. You remember the moment someone walked in and asked where you bought it. That question alone is worth at least half the effort.
In the end, a faux arched Christmas fireplace DIY is not just about copying a pretty trend. It is about creating atmosphere with your own hands. It is about making a room feel warmer, even without a flame. And during the holidays, that feeling goes a long way. Sometimes all a home really needs is one thoughtfully built focal point, a little glow, a strand of garland, and the confidence to say, “Yes, I absolutely built this, and yes, I am going to mention that at least four more times before New Year’s.”
Final Thoughts
If you want holiday charm without a full renovation, a faux arched Christmas fireplace DIY is one of the smartest projects you can tackle. It combines architecture, decoration, and seasonal warmth in one build. Done well, it looks custom, photographs beautifully, and gives you a mantel to style year after year. The secret is not making it complicated. The secret is making it clean, balanced, and intentional.
Build the frame carefully, cut the arch patiently, finish the surface like you mean it, and decorate with restraint. That is how you get a faux fireplace that looks less like a temporary prop and more like it has always belonged there. Which, during Christmas, is basically the decorating equivalent of applause.