Table of Contents >> Show >> Hide
- What You Need Before You Start
- How to Cut a Lace Front Wig in 11 Steps
- Step 1: Prep Your Natural Hair
- Step 2: Put the Wig On Before You Cut Anything
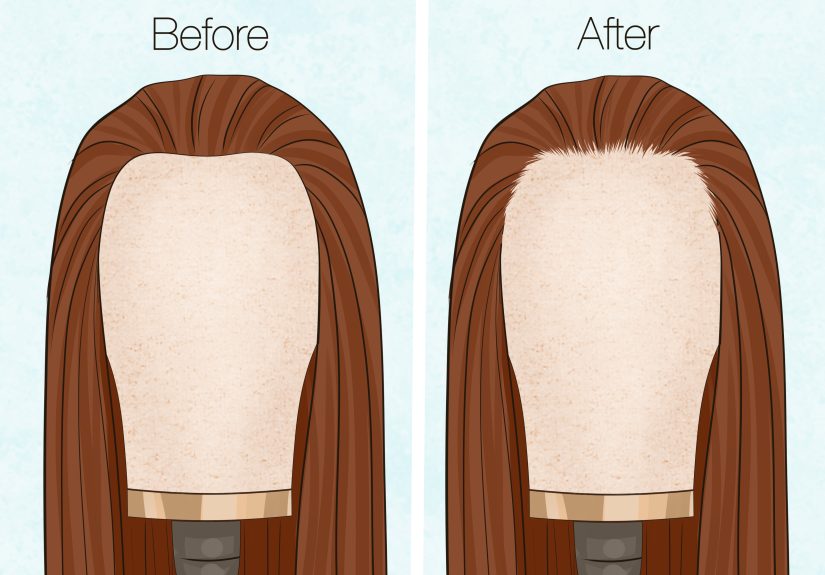
- Step 3: Decide Where the Hairline Should Sit
- Step 4: Clip the Hair Away From the Lace
- Step 5: Trim the Lace Into Small Sections
- Step 6: Follow the Hairline, Not a Perfect Straight Line
- Step 7: Leave a Tiny Bit of Lace
- Step 8: Customize Around the Ears
- Step 9: Test the Wig Again Before Final Trimming
- Step 10: Blend the Lace and Hairline
- Step 11: Secure and Style the Wig
- Common Mistakes to Avoid
- Extra Tips for a More Natural Finish
- Final Thoughts
- Real-World Experiences With Cutting a Lace Front Wig
- SEO Tags
If you have ever stared at a new lace front wig and thought, “This looks amazing… and also mildly terrifying,” welcome to the club. Cutting a lace front wig is one of those beauty tasks that feels like it should come with dramatic background music and a signed waiver. The good news? It is not nearly as scary as it looks when you take it step by step.
The goal is simple: trim away the extra lace so the hairline looks natural, sits comfortably, and blends like it belongs there. The key is not speed. The key is patience, good lighting, and resisting the urge to go full Edward Scissorhands on your forehead. A lace front wig can look beautifully realistic, but only if you trim the lace carefully and leave yourself room to adjust.
In this guide, you will learn exactly how to cut a lace front wig in 11 easy steps, plus the tools you need, the mistakes to avoid, and a few real-life lessons that can save your hairline from unnecessary drama. Whether you are brand-new to wigs or just tired of guessing your way through the process, this walkthrough will help you get a cleaner, more believable finish.
What You Need Before You Start
Before you touch the lace, gather your tools. This is not the moment to improvise with dull kitchen scissors or a mystery comb from the bottom of a bathroom drawer. A few simple tools can make the process much easier:
- Small, sharp scissors or eyebrow scissors
- Hair clips
- A rat-tail comb
- Tweezers, if you plan to lightly customize the hairline
- A wig stand or mannequin head, optional but helpful
- Wig cap
- Rubbing alcohol or a gentle skin cleanser
- Lace tint spray, powder, or foundation, optional
- Adhesive spray, glue, gel, or tape if you want extra hold
Set yourself up in front of a mirror with plenty of light. If you can see every tiny fiber of lace, that is perfect. If not, move closer to a window or grab a brighter lamp. Good lighting prevents bad decisions.
How to Cut a Lace Front Wig in 11 Steps
Step 1: Prep Your Natural Hair
Start by getting your natural hair as flat as possible. Braid it down, wrap it smoothly, or use another secure, low-bulk method that works for your hair type. The flatter your hair sits underneath the wig, the more realistic the wig will look on top. Lumps under the cap can throw off the placement and make trimming much harder.
Once your hair is secured, put on a wig cap if you use one. This helps create a smoother base and gives the wig a more even foundation. Think of it as laying the tablecloth before serving dinner. It is not glamorous, but it matters.
Step 2: Put the Wig On Before You Cut Anything
This step matters more than people think. Do not start chopping lace while the wig is still in the box or lying on your bed like a silky little houseguest. Put the wig on your head first and adjust it so the hairline sits where you actually want it.
Make sure the wig is aligned from front to back and ear to ear. Tighten the adjustable straps if needed. You want the wig to sit securely without shifting every time you blink. If the placement is wrong now, the cut will be wrong later.
Step 3: Decide Where the Hairline Should Sit
Before trimming, look closely at your face and natural hairline. The lace should not cover half your eyebrows, and the wig should not be dragged so far back that it looks shy. Aim for a believable position that flatters your forehead and matches the style you want.
If you are unsure, lightly mark reference points near your temples or forehead with a makeup pencil. This can help you see where to trim without guessing. It is especially useful if the wig has a widow’s peak, curved front, or dramatic side part.
Step 4: Clip the Hair Away From the Lace
Now separate the hair from the lace along the front edge. Use clips to pin the hair back so you can clearly see the lace line. This step helps prevent one of the most common beginner mistakes: accidentally snipping actual hair instead of the lace.
If baby hairs are already present, clip those back too. You can deal with them later. Right now, your mission is simple: expose the lace and only the lace.
Step 5: Trim the Lace Into Small Sections
Here is where the magic begins. Instead of cutting straight across the entire front in one dramatic swipe, divide the lace into small sections. You can work from the middle outward, or from one side to the other, whichever feels more controlled.
Small sections give you more accuracy and make it easier to follow the shape of the hairline. They also reduce the odds of accidentally taking off too much lace, which is a mistake no amount of confidence can fully repair.
Step 6: Follow the Hairline, Not a Perfect Straight Line
The most natural-looking lace front is not trimmed in one ruler-straight line. Real hairlines have tiny curves, slight irregularities, and soft angles. So when you cut, follow the natural contour of the wig’s front rather than forcing it into a perfectly even strip.
You can use small zigzag or jagged motions instead of one blunt edge. This creates a softer finish and helps the lace disappear more easily against the skin. A super-straight cut can look harsh and obvious, which is the exact opposite of what you want.
Step 7: Leave a Tiny Bit of Lace
This is the part where patience earns a standing ovation. Do not cut right up against the roots of the hair. Leave a very small amount of lace in front of the hairline. That tiny buffer helps protect the wig and makes it easier to blend the front edge.
If you cut too close, the lace can fray, the knots can look more exposed, and you may even cut hairs that were minding their business. Start conservative. You can always trim a little more, but you cannot glue lace back on with wishful thinking.
Step 8: Customize Around the Ears
Once the front is roughly trimmed, check the fit around your ears. Most lace front wigs need a little shaping in this area so they sit comfortably and do not bunch or lift. Use the comb to part the hair away from the ear tabs, then trim carefully around the ear curve.
Take your time here. Too much lace near the ears can look bulky and awkward, but cutting too much can ruin the fit. A good approach is to trim a little, try it on, and trim again if needed. This is one of those “measure twice, cut once” beauty moments.
Step 9: Test the Wig Again Before Final Trimming
After the first round of trimming, place the wig fully on your head again and look at it from different angles. Check the center, both temples, and the area near the ears. Smile, turn your head, and make sure the lace is sitting where it should.
If certain sections still look long or bulky, do a second pass with tiny cuts. Resist the urge to over-perfect it. A slightly uneven, soft edge usually looks more natural than an aggressively symmetrical one.
Step 10: Blend the Lace and Hairline
Once the lace is trimmed, you can blend it into your skin. Some people use lace tint spray, while others prefer foundation, pressed powder, or a little concealer that matches their skin tone. Apply lightly. The goal is to make the lace less visible, not turn your forehead into a makeup test strip.
If the hairline looks too dense, you can carefully pluck a few hairs with tweezers for a softer effect. Go slowly and work randomly rather than creating a neat little bald trench. Less is more here. A light touch looks natural; over-plucking looks like your wig had a stressful week.
Step 11: Secure and Style the Wig
Now that the lace is cut, secure the wig the way you prefer. You might use adhesive spray, glue, gel, tape, an elastic band, combs, or a glueless setup. Choose what feels comfortable for your routine and your skin. Press the lace gently into place and smooth the edge with a comb or scarf if needed.
Then style the front. Part the hair, shape any baby hairs if that is your thing, and check the final look in natural light. The best result should look polished, believable, and effortless, even if you know it took a solid chunk of your afternoon and at least one pep talk.
Common Mistakes to Avoid
Even a great wig can look off if the lace is trimmed carelessly. Here are the biggest mistakes people make when cutting a lace front wig:
- Cutting too much at once: Small snips are safer than giant chops.
- Using dull scissors: Dull blades can snag the lace and leave a messy edge.
- Cutting while the wig is off the head: You need to see how it fits your actual hairline.
- Trimming too close to the hair roots: This can damage the front and make shedding more likely.
- Ignoring the ear area: A good front can still look odd if the sides are bulky.
- Over-plucking the hairline: The goal is soft, not sparse.
- Rushing: Lace trimming is not the right time to multitask, text, or answer the door mid-snip.
Extra Tips for a More Natural Finish
If you want your lace front wig to look even more realistic, focus on the details after the cut. A little tint on the lace can help it melt into the skin. Lightly pressing the front with a scarf for a few minutes can make the edge look flatter. A subtle part and a few face-framing hairs can also soften the final look.
It also helps to treat the lace gently every time you wear the wig. Pulling on the front, stretching it while adjusting, or gripping the lace instead of the ear tabs can wear it out faster. Lace is delicate. It may look invisible and glamorous, but emotionally it is not built for rough handling.
Final Thoughts
Learning how to cut a lace front wig is really about learning how to slow down and make small, smart decisions. The best trim is not the fastest trim. It is the one that fits your face, follows the wig’s natural hairline, and leaves you enough control to refine the look without panic.
If this is your first time, give yourself permission to be imperfect. Most people get better with every wig they customize. Once you understand how much lace to leave, how to shape the ear area, and how to blend the front, the whole process becomes much less intimidating. Soon enough, you will be trimming lace with the calm confidence of someone who definitely did not once consider watching seventeen conflicting tutorials at midnight.
Real-World Experiences With Cutting a Lace Front Wig
One of the most useful things to know about cutting a lace front wig is that the experience usually feels different from the theory. On paper, it sounds easy: put on the wig, trim the lace, blend the front, done. In real life, it often looks more like this: put on the wig, stare at yourself for five minutes, trim one tiny section, remove the wig, put it back on, question your life choices, then realize you are actually doing fine.
Many beginners say the first surprise is how little lace you should remove at one time. The instinct is often to “clean it up” quickly with one long cut, but that usually leads to a harsher line. People who get the best results tend to work in short bursts. They trim a small section, check the mirror, and adjust as they go. That slower approach may feel fussy in the moment, but it usually saves the wig from looking overcut.
Another common experience is discovering that placement matters more than perfection. A wig with a slightly imperfect trim can still look fantastic if it sits in the right place on the head. On the other hand, even a beautifully trimmed lace front can look strange if the unit is too far forward, too far back, or crooked around the temples. That is why so many wig wearers eventually develop a routine: flatten the hair, position the wig, check the ear tabs, then trim only after everything feels balanced.
People also learn quickly that the ear area is where confidence goes to wobble. The front center may be easy enough, but trimming around the ears requires patience and a steady hand. It often takes two or three small adjustments before it feels comfortable. That is normal. In fact, many experienced wig wearers say the sides are the part they still approach most carefully.
There is also the emotional side of the process, and yes, it is real. A lace front wig can make someone feel polished, expressive, glamorous, or simply more like themselves. Because of that, trimming it can feel weirdly high-stakes. If you have ever whispered “Please don’t let me mess this up” before making the first cut, congratulations, you are officially having the standard human experience. The good news is that most people improve fast, especially once they realize the goal is not salon-level perfection on the first try. The goal is a believable, flattering result that works for real life.
Over time, many wearers develop their own preferences. Some like a very soft, jagged trim. Some leave a little extra lace for blending. Some prefer glueless methods, while others love the polished look of adhesive and a melt band. The more experience you get, the more you understand what works for your face shape, skin tone, and styling habits. That is the beauty of wigs: there is technique involved, but there is also room for personal style.
So if your first attempt feels slow, careful, and slightly dramatic, that does not mean you are doing it wrong. It usually means you are paying attention. And when it comes to cutting a lace front wig, paying attention is half the skill.


