Table of Contents >> Show >> Hide
- Why Alphabetizing in Excel Matters
- Before You Start: One Tiny but Important Check
- How to Alphabetize Cells in Excel: 10 Steps
- Step 1: Open Your Worksheet and Identify the Data You Want to Sort
- Step 2: Remove or Review Blank Rows and Mixed Data
- Step 3: Click Any Cell in the Column You Want to Alphabetize
- Step 4: Select the Entire Data Range if the Sheet Includes Related Columns
- Step 5: Go to the Data Tab
- Step 6: Choose “Sort A to Z” to Alphabetize
- Step 7: If Prompted, Choose “Expand the Selection”
- Step 8: Check Whether “My Data Has Headers” Is Correct
- Step 9: Use Custom Sort for More Control
- Step 10: Review the Results and Undo if Needed
- What If You Need to Sort More Than One Column?
- How to Alphabetize Last Names in Excel
- How to Sort Left to Right Instead of Top to Bottom
- Can You Alphabetize with a Formula?
- Common Mistakes to Avoid When Alphabetizing Cells in Excel
- Best Times to Use Filtering Instead of Sorting
- Final Thoughts
- Experience and Practical Lessons from Real Excel Use
- SEO Tags
If your Excel sheet looks like it was organized by a caffeinated squirrel, you are not alone. One minute you are building a simple contact list, inventory tracker, student roster, or content calendar. The next minute, names are out of order, products are scattered, and finding one cell feels like a treasure hunt with no treasure. The good news? Alphabetizing cells in Excel is easy once you know what to click and what not to click.
In this guide, you will learn exactly how to alphabetize cells in Excel in 10 clear steps. We will also cover what happens when Excel tries to be “helpful,” how to avoid scrambling your data, how to sort multiple columns, and what to do when names, headers, or blank rows get in the way. Whether you are using Excel for work, school, blogging, admin tasks, or pure spreadsheet survival, this tutorial will help you sort like you actually know what you are doing.
Why Alphabetizing in Excel Matters
Alphabetizing is one of the fastest ways to make a worksheet easier to scan. A sorted list lets you find names, categories, products, and keywords quickly. It also makes your spreadsheet look cleaner, which is a polite way of saying it helps prevent other people from silently judging your file management skills.
For example, you might alphabetize:
- a customer list by last name
- a keyword sheet by topic
- a school roster by student name
- a product table by item title
- a content plan by article category
The trick is not just clicking “A to Z.” The real skill is making sure Excel sorts the right range in the right order without turning your worksheet into modern art.
Before You Start: One Tiny but Important Check
Before you alphabetize cells in Excel, look at your data layout. Good sorting depends on clean structure. Each column should hold one type of information. Your headers should sit in the top row. And random blank rows sitting inside the list should be cleaned up first. If your sheet is messy, Excel can misread the range and sort only part of the data.
Translation: if column A holds first names, column B holds emails, and then row 12 is mysteriously blank “for aesthetics,” Excel may not share your artistic vision.
How to Alphabetize Cells in Excel: 10 Steps
Step 1: Open Your Worksheet and Identify the Data You Want to Sort
Start by opening the Excel file that contains the list you want to organize. Look closely at the column that should be alphabetized. This might be a list of names, cities, categories, blog topics, or product titles.
If your data is part of a full table, think beyond one column. Usually, you do not want to sort one column by itself while leaving the others behind. If you do that, names might separate from phone numbers, products might separate from prices, and chaos will enter the chat.
Step 2: Remove or Review Blank Rows and Mixed Data
Blank rows inside a dataset can cause trouble during sorting. So can hidden rows, odd spacing, and cells with accidental leading or trailing spaces. Take a few seconds to scan the list before you sort.
A clean worksheet gives Excel a better chance of recognizing the full range correctly. If you are sorting a professional spreadsheet, this step is not optional. It is the difference between “organized report” and “why is Nebraska attached to the wrong invoice?”
Step 3: Click Any Cell in the Column You Want to Alphabetize
For a simple alphabetical sort, click a single cell in the column you want Excel to use as the sorting key. For example, if you want to sort a contact list by last name, click any cell in the Last Name column.
In many cases, Excel can detect the surrounding data automatically. This is why a lot of users do not need to highlight the whole column first. Still, if your data is messy or broken into sections, selecting the full range manually is safer.
Step 4: Select the Entire Data Range if the Sheet Includes Related Columns
If your list has several connected columns, select the full dataset before sorting. That means including headers and all related rows, not just the column with names.
Example:
- Column A: First Name
- Column B: Last Name
- Column C: Email
- Column D: Company
If you sort only column B and leave the others behind, your sheet will become a puzzle nobody asked for. Selecting the whole range keeps each row intact.
Step 5: Go to the Data Tab
At the top of Excel, click the Data tab. This is command central for sorting and filtering. Once you are there, look for the Sort & Filter group.
You will usually see two quick buttons:
- A to Z for ascending alphabetical order
- Z to A for reverse alphabetical order
If all you need is a quick sort, you are very close to victory.
Step 6: Choose “Sort A to Z” to Alphabetize
Click Sort A to Z to put text in alphabetical order. Excel will sort text from A to Z, numbers from smallest to largest, and dates from oldest to newest. If your data is already selected properly, this may solve the problem in one click.
This is the fastest method for a simple list, like alphabetizing a single column of names or categories. It is basically the spreadsheet equivalent of combing your hair before a meeting.
Step 7: If Prompted, Choose “Expand the Selection”
If Excel notices that only one column is selected while nearby columns contain related information, it may ask whether you want to Expand the Selection or Continue with the Current Selection.
Choose Expand the Selection if the row data belongs together. This tells Excel to keep names, addresses, dates, and notes on the same row while sorting. Choosing the current selection only is how good spreadsheets go bad.
This prompt is especially common when users click one column inside a larger table and then sort too quickly. Excel is basically asking, “Are you sure you want to do this?” It is wise to listen.
Step 8: Check Whether “My Data Has Headers” Is Correct
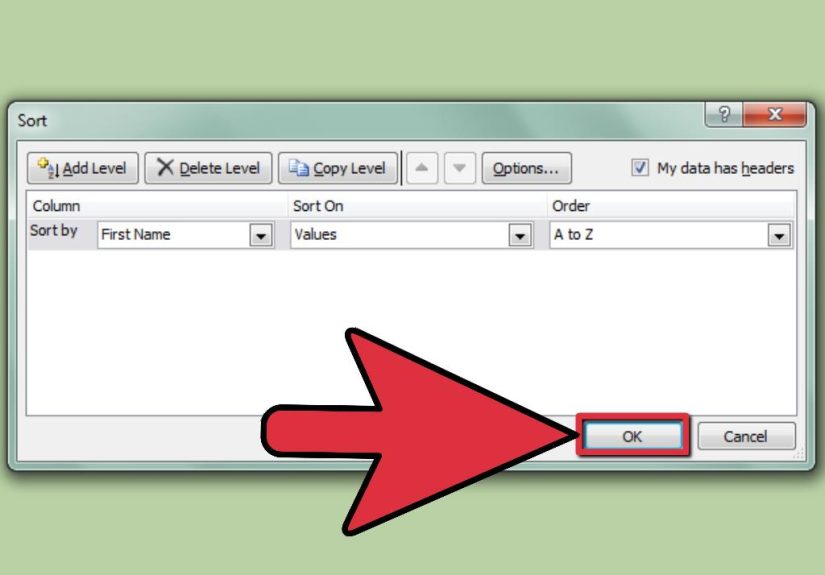
If you open the full Sort dialog box instead of using the quick A to Z button, Excel may show an option called My data has headers. Make sure this setting matches your sheet.
If your first row contains labels like Name, Email, Department, or Category, check that box. Otherwise, Excel may alphabetize the header row right into the middle of the data, which is both annoying and deeply disrespectful to your formatting.
Good headers make sorting easier because Excel can label columns clearly inside the sort tool.
Step 9: Use Custom Sort for More Control
If your worksheet is more complex, click Sort instead of the quick A to Z button. This opens the full sort window, where you can choose:
- which column to sort by
- whether to sort by values, color, font color, or icon
- whether the order should be A to Z or Z to A
- whether to add another sorting level
This is the best tool for organized spreadsheets with several fields. For example, you can sort a staff directory by Department first and then alphabetize employee names within each department. You can also use a custom list if you need a special order, such as months or days of the week, instead of normal alphabetical order.
Custom Sort is where Excel goes from “cute little helper” to “serious adult software.”
Step 10: Review the Results and Undo if Needed
Once the sort is complete, scan the worksheet. Make sure the data still lines up row by row. Check that names match the correct emails, prices match the correct products, and nothing weird happened around blank cells or merged cells.
If the results look wrong, press Ctrl + Z on Windows or Command + Z on Mac to undo immediately. Then go back and sort again with the correct range or settings.
That is it. You have officially alphabetized cells in Excel without launching a spreadsheet disaster. Please accept this silent badge of competence.
What If You Need to Sort More Than One Column?
Sometimes a single alphabetical sort is not enough. Maybe you want to group all employees by department and then alphabetize the names inside each department. Or maybe you want to sort a product sheet by category first and item name second.
Use Custom Sort and click Add Level. In the first level, choose your primary column, such as Department. In the second level, choose the secondary column, such as Employee Name. This creates a cleaner, more logical structure and is especially useful in larger datasets.
This is one of the most practical Excel skills because real-world lists are rarely just one neat column of names.
How to Alphabetize Last Names in Excel
Here is where things get interesting. If a full name is in one cell, like “Taylor Swift” or “Jordan Lee Parker,” Excel will usually sort by the beginning of the text, which means first name, not last name.
If you need to sort by last name, split the names into separate columns first. Use Text to Columns under the Data tab, choose Delimited, and separate values by spaces. Then sort using the last-name column.
This works best for simple first-name/last-name structures. If your list includes middle names, suffixes, or company names pretending to be people, you may need a helper column and a little cleanup first.
How to Sort Left to Right Instead of Top to Bottom
Most Excel sorting happens top to bottom. But sometimes your headers run across a row, and you need to sort columns from left to right. Excel can do that too.
Open the full Sort dialog, click Options, and change the orientation to Sort left to right. Then choose the row you want Excel to use as the sorting reference. This is a handy feature, although it is less common than standard column sorting.
One important detail: this works with ranges, not standard Excel tables. So if your data is formatted as a table, you may need to convert it to a range first.
Can You Alphabetize with a Formula?
Yes. In newer Excel versions, the SORT function can return an alphabetized version of a range without changing the original data. That is useful when you want a dynamic sorted list that updates automatically.
For a simple example, if your names are in cells A2 through A20, you can use a formula like this in another area of the worksheet:
=SORT(A2:A20)
This is especially useful in dashboards, helper sheets, and reports where you want a sorted output but do not want to rearrange the source data. Think of it as alphabetizing with less commitment.
Common Mistakes to Avoid When Alphabetizing Cells in Excel
Sorting Only One Column by Accident
This is the classic mistake. If related columns are not included, your rows break apart. Always make sure Excel is sorting the full data range.
Ignoring Header Settings
If Excel treats your header row like regular data, your labels may get sorted into the middle of the list. Check the header option in the Sort dialog.
Leaving Blank Rows Inside the Data
Blank rows can interrupt Excel’s range detection and cause incomplete sorts. Clean them up before sorting.
Trying to Sort Merged Cells
Merged cells are not Excel’s favorite thing. If you run into sorting problems, unmerge cells first and use a cleaner layout.
Assuming Full Names Will Sort by Last Name Automatically
Excel usually sorts text based on the first character in the cell. If you need last-name sorting, split the names into separate columns first.
Best Times to Use Filtering Instead of Sorting
Alphabetizing is great when you want to rearrange data permanently. But if you only want to find certain entries quickly, filtering may be the better move. Filters let you temporarily narrow the dataset without changing the row order of everything else.
For example, you might filter a content plan to show only “Home Improvement” topics or a client sheet to show only names that begin with B. Excel’s filter arrows can also sort A to Z right from the header dropdown, which is handy for tables and recurring admin tasks.
Final Thoughts
Learning how to alphabetize cells in Excel sounds basic, but it is one of those tiny skills that saves a ridiculous amount of time. Once you understand how Excel handles ranges, headers, and connected columns, sorting becomes quick, safe, and almost weirdly satisfying.
The short version is simple: clean your data, select the correct range, go to the Data tab, choose A to Z, and verify the result. For more control, use Custom Sort. For last names, split the text first. For dynamic results, use the SORT function. And for the love of spreadsheets, do not sort one lonely column out of a four-column dataset unless you enjoy fixing preventable mistakes.
Master this one workflow, and your Excel files will instantly look more polished, more searchable, and much less likely to spark panic five minutes before a deadline.
Experience and Practical Lessons from Real Excel Use
One of the most common real-world experiences with Excel sorting happens when someone thinks alphabetizing will take two seconds and then accidentally rearranges only one column. It usually starts innocently. You have a list of names in one column, emails in the next, maybe a phone number and status field after that. You click the name column, hit A to Z, and suddenly Susan owns Michael’s email address while David has inherited someone else’s job title. At that moment, Excel is no longer a spreadsheet tool. It is a stress generator.
That is why experienced Excel users get almost superstitious about checking the whole range before sorting. It becomes a habit. You stop trusting “quick clicks” and start asking, “What exactly is Excel about to move?” That habit alone prevents most sorting errors.
Another common lesson comes from headers. New users often assume Excel will always know the first row is a header. Sometimes it does. Sometimes it does not. When it guesses wrong, your column title gets alphabetized into the middle of the list like it is just another data point trying to live its best life. After that happens once or twice, you become very loyal to the “My data has headers” checkbox.
There is also the classic issue of names. People love storing full names in one cell because it looks tidy. Then they need to sort by last name, and suddenly tidy becomes inconvenient. Many users learn the hard way that “John Michael Smith” does not behave the same way as “Smith” in its own column. This is where Text to Columns becomes one of those features that feels boring until the exact second it saves your worksheet.
In office settings, multi-level sorting is where Excel really starts to prove its value. A simple alphabetical sort is fine for a short list. But the moment you are working with departments, regions, content types, product categories, or student grades, one sorting level is not enough. People who work with Excel every day often rely on sorting by one field and then another. That makes the data easier to read, easier to report on, and easier to explain to other people who open the file later.
There is also a practical confidence factor. Once you know how to sort safely, large spreadsheets stop feeling intimidating. Instead of scrolling endlessly to find one item, you sort or filter with purpose. That changes how fast you work. It also changes how clean your deliverables look to clients, coworkers, teachers, or managers.
So yes, alphabetizing cells in Excel is a simple skill on paper. But in practice, it teaches bigger spreadsheet instincts: keep data clean, keep rows intact, respect headers, and never assume Excel reads your mind. It does not. It just follows instructions very literally, like a brilliant intern with zero context.