Table of Contents >> Show >> Hide
- What Makes an Eye Look Realistic (Not “Sort Of Eye-ish”)
- Materials and Setup
- 7 Steps to Draw Realistic Human Eyes
- Step 1: Pick a Strong Reference and Identify the Light
- Step 2: Block In the Big Shapes (Think Simple, Not Perfect)
- Step 3: Build the Eyelids as 3D Forms (Not Just Lines)
- Step 4: Place the Dark Accents First (Pupil, Lash Line, Deep Creases)
- Step 5: Shade the Iris Like a Tiny Landscape (Texture + Value Gradient)
- Step 6: Render the Sclera and the “Wet Parts” (Yes, the Eye Is Shiny)
- Step 7: Eyelashes, Edges, and Final Highlights (The “Don’t Overdo It” Finish)
- Common Mistakes (and How to Fix Them Fast)
- Practice Drills That Make Eye Drawing Easier
- Realistic Eyes in Digital Drawing (Quick Notes)
- FAQ: Realistic Eye Drawing
- Conclusion: Your Eye-Opening (Sorry) Next Step
- Artist Experiences: What It’s Like Learning to Draw Realistic Human Eyes
Eyes are tiny, glossy weather systems. One minute they’re calm and clear; the next they’re dramatic,
stormy, and somehow judging your life choices from across the room. The good news: you don’t need a
magic pencil (or a mysterious “artist gene”) to draw realistic human eyes. You need structure, values,
and a few smart habits that keep you from outlining the eyeball like it’s a cartoon sticker.
In this guide, you’ll learn how to draw realistic human eyes in 7 clear steps,
with practical tips for shading, eyelids, eyelashes, highlights, and those little “wet” areas that make an eye look alive.
Grab a pencil, a reference photo, and your best “I can totally do this” face.
What Makes an Eye Look Realistic (Not “Sort Of Eye-ish”)
Realism comes from a few fundamentals working togethernot from drawing every single eyelash like you’re counting them for a tax audit.
Focus on these:
- Structure: The eye is a sphere (eyeball) tucked into a socket with lids wrapping around it.
- Values: Realistic eye drawing depends on a full rangefrom soft midtones to crisp dark accents.
- Edges: Some edges are sharp (pupil, lash line), others are soft (sclera transitions, reflected light).
- Highlights + moisture cues: Catchlights, tear line, and subtle shine make the eye feel “wet,” not flat.
- Asymmetry: Real eyes aren’t perfectly mirrored almonds. Tiny irregularities add believability.
Materials and Setup
You can draw realistic eyes with basic supplies. If you’re using graphite, this is a solid starter kit:
- Drawing paper (smooth or medium tooth)
- Pencils: HB, 2B, 4B (optional: 2H for light construction)
- Kneaded eraser (for lifting highlights), plus a regular eraser for cleanup
- Blending stump/tortillon (optionaluse carefully)
- Sharpener (sharp pencils = crisp details)
- Reference photo (high-resolution helps you “see” the value shapes)
Pro tip: decide the light direction before you shade. If you place highlights randomly, your drawing will look like the eye is lit by a chandelier… in a tornado.
7 Steps to Draw Realistic Human Eyes
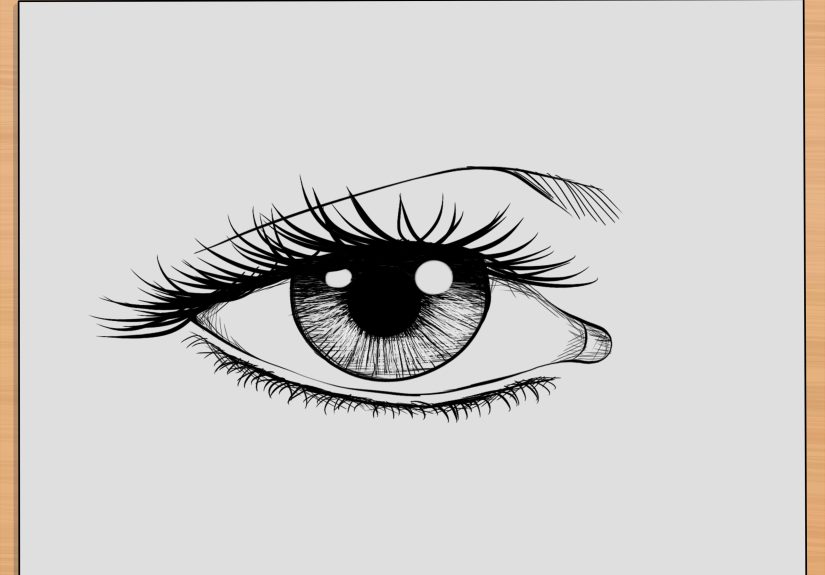
Step 1: Pick a Strong Reference and Identify the Light
If you want realism, start with a reference where you can clearly see:
the pupil, iris texture, eyelid creases, and at least one strong highlight (catchlight).
Before drawing anything, answer two questions:
- Where is the light source (upper left, upper right, straight ahead)?
- What are the darkest darks (usually pupil, lash line, deep crease, cast shadow under the upper lid)?
This step prevents “guess shading,” which is how many perfectly nice sketches end up looking like startled marbles.
Step 2: Block In the Big Shapes (Think Simple, Not Perfect)
Start lightly. Your goal is a clean map, not a finished outline.
Use simple shapes to place everything correctly:
- Eye opening: a softened almond shape (but not a hard outline)
- Iris: a circle or ellipse (it often looks slightly squashed depending on the angle)
- Pupil: centered inside the iris
- Tear duct: small wedge/rounded triangle in the inner corner
- Catchlight: mark its shape early so you don’t shade over it later
Keep the upper lid overlapping the iris slightly in most natural poses. That overlap is a realism shortcut.
Step 3: Build the Eyelids as 3D Forms (Not Just Lines)
Eyelids are the “frame” that makes an eye believable. Instead of drawing a single lid line,
show the thickness and curvature:
- Indicate the upper lid crease as a soft shadow line, not a dark stripe.
- Suggest the lower lid with a lighter edgeoften it’s subtle.
- Remember: lids wrap around a sphere. Their curves should feel like they’re hugging the eyeball.
If your eye looks flat, it’s usually because the lids don’t feel like they’re wrapping around anything.
Think “helmet visor” shape around a ball.
Step 4: Place the Dark Accents First (Pupil, Lash Line, Deep Creases)
Realistic shading works best when you establish a few anchors early. Add the darkest values carefully:
- Pupil: usually the darkest area (but keep the catchlight clean if it crosses it)
- Lash line: darker at the upper lid where lashes are denser
- Crease + corners: the inner corner and the fold under the brow can hold deeper shadows
- Cast shadow: under the upper lid across the top of the iris
This step gives your eye drawing immediate depth. Without dark accents, everything stays in the “mid-gray fog zone.”
Step 5: Shade the Iris Like a Tiny Landscape (Texture + Value Gradient)
The iris isn’t a flat colored ringit has depth, striations, and value shifts.
Here’s a reliable approach for realistic eye drawing:
- Start with a midtone base across the iris (light pressure).
- Darken the limbal ring (outer edge) slightlyoften sharper and darker than the inner iris.
- Add radial texture: short strokes that move outward/inward (not perfect spokesvary them).
- Deepen near the pupil and under the upper-lid shadow for a natural gradient.
- Keep the highlight crisp by lifting graphite with a kneaded eraser if needed.
Want a quick realism boost? Make the top of the iris darker (cast shadow) and the lower part slightly lighter,
with a gentle transition. That single gradient often makes eyes look instantly more three-dimensional.
Step 6: Render the Sclera and the “Wet Parts” (Yes, the Eye Is Shiny)
The sclera (“the white of the eye”) is not actually white in most lighting.
If you leave it paper-white, the eye can look pasted on.
- Shade the sclera lightly with soft gradientsdarker near the lids, lighter toward the center.
- Add the tear line: a thin, slightly shiny strip along the lower lid (subtle highlight).
- Inner corner (caruncle/tear duct area): treat it as a soft form with gentle shadows, not a hard outline.
Keep it understated. Realism is often “quiet.” If everything is high-contrast, it starts looking like a comic panel (which can be awesomejust different).
Step 7: Eyelashes, Edges, and Final Highlights (The “Don’t Overdo It” Finish)
Eyelashes can make or break a realistic eye drawing. The secret is to think of them as groups, not individual fence posts.
- Direction matters: lashes curve and fan outward; they’re not straight lines.
- Vary length and spacing: clusters look more natural than evenly spaced strokes.
- Roots are thicker, tips are lighter: press more at the base, lift pressure toward the end.
- Lower lashes are softer: fewer, lighter, and often less defined.
Now refine edges:
- Sharpen the pupil edge and the strongest crease accents.
- Soften transitions in the sclera and eyelid shadows.
- Lift highlights with a kneaded eraser: catchlight, tear line, tiny sparkle points.
Final check: squint at your drawing. If the eye still reads clearly (values and shapes hold up), you’re in great shape.
Common Mistakes (and How to Fix Them Fast)
- Mistake: The sclera is pure white. Fix: Add a light gray gradient and darker tones near the lids.
- Mistake: Heavy outline around the eye. Fix: Replace outlines with value transitions and soft edges.
- Mistake: Perfect circle iris in a side/tilted view. Fix: Use an ellipse and follow the perspective.
- Mistake: Lashes look like a comb. Fix: Draw grouped, curved lashes with varied spacing.
- Mistake: No strong darks. Fix: Deepen pupil, lash line, and upper-lid cast shadow.
- Mistake: “Sticker highlight” too big or too centered. Fix: Match highlight size/shape to the reference and keep it crisp.
Practice Drills That Make Eye Drawing Easier
If you want to improve quickly, don’t redraw the entire eye every time. Isolate skills:
- Value scale drill: make a 5–7 step value bar from light to dark before you start shading.
- Iris texture studies: draw four small irises in boxes, focusing only on radial strokes and gradients.
- Eyelid wrap अभ्यास: sketch the eye as a sphere with lids wrapping around it (construction only).
- 10-minute eye challenge: one timer, one goal: big shapes + correct shadows, no eyelashes.
- Edge control: practice one sharp edge (pupil) next to one soft edge (sclera gradient) in the same sketch.
Realistic Eyes in Digital Drawing (Quick Notes)
The same structure/value rules apply on tablets:
- Work from large shapes to details (don’t start with individual lashes).
- Use layers smartly: base values, iris texture, highlights.
- Keep a hard brush for crisp edges (pupil/catchlight) and a softer brush for lid shadows.
- Zoom out oftendetails are tempting, but likeness and lighting win.
FAQ: Realistic Eye Drawing
Why do my eyes look flat?
Usually it’s missing cast shadows (especially from the upper lid) or the eyelids don’t wrap around the eyeball convincingly.
Push the darkest accents and soften the sclera with subtle shading.
Should I blend with a stump?
You can, but blend lightly. Over-blending can erase texture and make the drawing look smudgy.
Many artists prefer layering with controlled pencil strokes and lifting highlights with a kneaded eraser.
How do I draw dark brown eyes realistically?
Dark eyes still have value variation. Keep the pupil slightly darker than the iris, add a soft highlight,
and show a gentle gradient under the upper-lid shadow. Texture may be subtle, but it’s still there.
Conclusion: Your Eye-Opening (Sorry) Next Step
The most realistic eyes come from a simple recipe: solid structure, intentional values, careful edges, and believable highlights.
If you follow the stepsreference, big shapes, eyelid forms, dark accents, iris texture, sclera shading, and lash controlyou’ll see improvement fast.
And if your first few tries look a little odd? Congratulations: you’re doing the most authentic art tradition of allgetting better by making imperfect work.
Keep going. Your future drawings will thank you.
Artist Experiences: What It’s Like Learning to Draw Realistic Human Eyes
If you’ve ever tried to draw a realistic eye and ended up with something that looks mildly surprisedor like it just remembered it left the oven onyou’re in familiar territory.
Many artists describe the early stage of eye drawing as a weird mix of confidence and confusion: you know what an eye looks like (you’ve seen a few),
but translating that into pencil marks feels like trying to explain a dream to someone who wasn’t there.
One common experience is the “outline trap.” Beginners often start by drawing a strong almond outline, then a perfect circle iris, then a circle pupil.
On paper, it seems logical. In practice, it can read as symbol-drawing rather than observation. The shift happens when you start thinking in forms:
the eyeball as a sphere, the lids as soft planes wrapping around it, and the shadows as shapes that describe depth. The first time you capture that upper-lid cast shadow across the iris,
the drawing tends to jump from “eye icon” to “oh… that’s a real eye.” It’s a tiny breakthrough that feels oddly dramaticlike your sketch just gained a backstory.
Another very normal milestone is realizing the sclera isn’t white. Artists often remember the moment they stop leaving the eyeball bright paper-white and instead shade it with light grays,
especially near the lids. Suddenly the eye sits in the socket instead of floating on the face like a sticker. That’s also when you begin noticing “quiet” details:
the softness of the lower lid edge, the subtle value shift near the inner corner, and the way moisture creates thin highlights along the tear line.
These details don’t scream for attention, but they whisper “real.”
Eyelashes, meanwhile, are where patience gets tested. Many learners go through a phase of drawing lashes one by one, equally spaced, all the same length.
The results can look tidybut not natural. The improvement usually comes from grouping lashes, varying pressure, and accepting a bit of messiness.
Lashes are hair; hair is chaos with a sense of direction. Once you start drawing them as curved clusters that taper, the eye looks less “designed” and more alive.
A final shared experience: progress often shows up in your process before it shows up in your finished drawings. You start squinting at references to see value masses,
you plan highlights earlier, you stop over-blending, and you become more comfortable pushing dark accents.
Over time, you don’t just draw eyes betteryou see them better. And that, honestly, is the most realistic part of becoming an artist.