Table of Contents >> Show >> Hide
- Why Build a Pool in Minecraft?
- What You Need Before You Start
- Step 1: Pick the Perfect Spot and Decide the Shape
- Step 2: Dig the Shell and Build an Infinite Water Source
- Step 3: Fill the Pool the Right Way
- Step 4: Add Steps, Lighting, and Smart Details
- Step 5: Decorate Like You Own a Blocky Resort
- Common Mistakes to Avoid
- Pool Ideas to Try Next
- Conclusion
- Pool-Building Experiences: What Players Usually Learn After the First Splash
If your Minecraft house looks great but your backyard still feels like a patch of regret and random grass blocks, a pool can fix that fast. A well-built pool makes almost any base feel more finished, more modern, and way more fun to show off. It can turn a plain survival house into a mini resort, a rooftop build into a luxury mansion, or a cave base into the world’s strangest but somehow still impressive spa.
The best part is that building a pool in Minecraft is not complicated. You do not need advanced Redstone skills, a double chest full of rare blocks, or the architectural confidence of someone who casually builds palaces before lunch. You mostly need a plan, a few smart material choices, and an understanding of how water behaves in Minecraft. That last part matters, because nothing ruins the vibe faster than a “pool” that looks more like your house lost a fight with a waterfall.
In this guide, you will learn exactly how to make a pool in Minecraft in five simple steps. We will also cover design ideas, beginner mistakes, block recommendations, and practical tips for both Creative and Survival mode. By the end, you will have a pool that looks polished, intentional, and ready for your blocky summer vacation.
Why Build a Pool in Minecraft?
A pool is one of those builds that does a lot with very little. It adds visual interest, creates a natural outdoor gathering area, and gives your base a more complete look. It also works with almost every building style. Modern houses look fantastic with sleek rectangular pools. Cozy cottages can use a smaller garden-style pool or pond. Desert builds look great with sandstone patios and bright blue water. Even underground bases can use indoor pools to create a dramatic, hidden retreat.
From a design standpoint, pools are useful because they break up big flat spaces. Instead of a giant lawn that says, “I ran out of ideas,” you get a focal point. And in Minecraft, focal points matter. They make builds feel deliberate rather than accidental.
What You Need Before You Start
You can make a simple pool with only a few items, but a better pool usually includes extra details. Here is a practical list:
- Building blocks for the shell: quartz, stone, concrete, terracotta, prismarine, or wood for the surrounding deck
- Water buckets
- A small infinite water source nearby
- Stairs for entry steps
- Slabs for clean pool edges and seating
- Glass or glass panes for stylish sides or safety barriers
- Sea lanterns, lanterns, or other lighting for nighttime
- Optional extras: trapdoors, signs, plants, fences, umbrellas, lounge chairs, and a diving board
If you are in Survival mode, start simple. A compact pool with stone, slabs, and a couple of lanterns can still look excellent. You do not need a billionaire resort to make your build feel upgraded.
Step 1: Pick the Perfect Spot and Decide the Shape
Before you place a single bucket of water, decide where your pool belongs. The location affects everything: size, style, materials, and how natural the finished build feels.
The easiest place for a pool is right next to your house, especially if you want a backyard look. Leave enough room around it for a border or patio. If you squeeze a pool into a tiny space with no walking room, it will look less like a relaxing feature and more like a hazard your Minecraft insurance definitely will not cover.
For beginners, rectangles are your best friend. A 7-by-5 or 9-by-5 pool is easy to plan, easy to fill, and easy to decorate. If you want something fancier, you can later expand into L-shapes, rooftop infinity pools, indoor spa pools, or long lap pools.
A good beginner layout
Try a pool that is 7 blocks long, 5 blocks wide, and 2 blocks deep. Around it, leave a 1- or 2-block border for slabs, decking, or lighting. This gives the build structure and keeps it from looking like a random hole with excellent hydration.
Also think about your block palette early. White concrete or quartz gives a clean modern look. Prismarine and sea lanterns feel luxurious and aquatic. Stone brick and smooth stone create a more classic pool. Terracotta can give you a resort vibe in desert or Mediterranean-style builds. Pick two or three materials and stay consistent. Pool design gets messy fast when every block in your hotbar starts demanding attention.
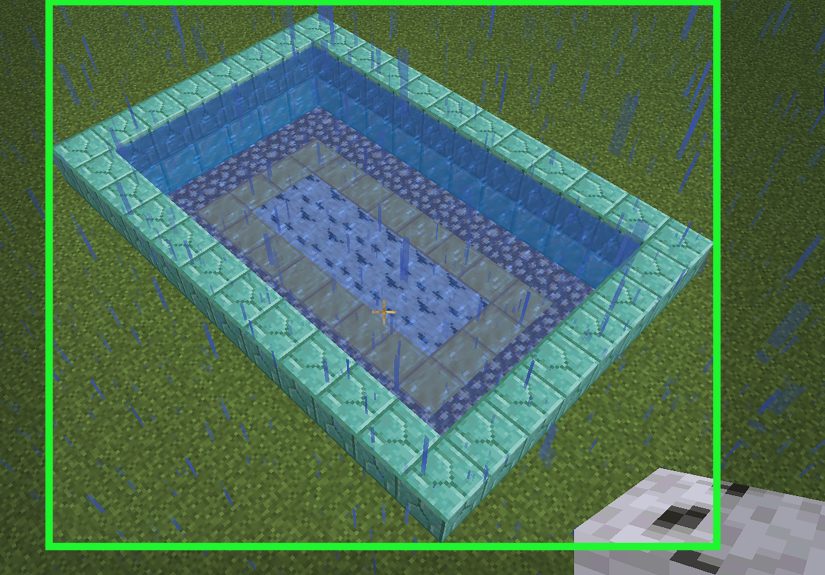
Step 2: Dig the Shell and Build an Infinite Water Source
Once you know your shape and size, dig out the pool. If you are making the 7-by-5 example pool, dig the full rectangle two blocks deep. Keep the floor flat unless you intentionally want a deeper end. Uneven floors can work, but they are easier to mess up if you are new to building with water.
After digging, line the walls and floor with your chosen blocks. This step is important because dirt walls make the pool feel unfinished, and random exposed stone gives big “I meant to renovate later” energy. Even a basic lining of stone, concrete, or quartz makes the build feel deliberate.
Make an infinite water source first
Before filling the actual pool, create a small infinite water source nearby. Dig a 2-by-2 hole that is one block deep. Place water in two opposite corners. The other two spaces will turn into source blocks. Congratulations: you now have a reliable water supply and no longer need to sprint back and forth to the nearest river like a desperate landscaper.
This tiny setup saves time, especially in Survival mode. It also helps when you want to refill spots, fix mistakes, or expand the pool later.
If you are building multiple water features, such as a fountain, hot tub, or decorative stream next to the pool, keep the infinite source in place until the full outdoor area is done. Future You will be grateful. Future You is usually the one cleaning up avoidable nonsense.
Step 3: Fill the Pool the Right Way
This is the step where many Minecraft pools go from “luxury backyard retreat” to “indoor flood simulation.” The trick is understanding that a smooth pool surface comes from source blocks, not just any water you throw into a hole.
If your pool is only one block deep, filling it is very easy: place water so the full surface becomes source blocks. For a two-block-deep pool, it is usually easiest to fill layer by layer. Make sure the top looks still and even. If parts of the water keep flowing, you are missing source blocks somewhere.
How to fill it without making a mess
One easy method is to place water methodically across the pool rather than randomly tossing it into corners and hoping Minecraft rewards your optimism. Work row by row or corner by corner until the water settles evenly.
If you want a polished modern look, make sure the water sits neatly inside the shell and does not spill over the edges. If you are experimenting with special designs, signs or trapdoors can help control water flow in certain decorative setups. These are especially useful when you want hidden edges, overflow effects, or stylish transitions between the pool and nearby features.
At this point, step back and look at the surface from multiple angles. In Minecraft, one weird-flowing block can hide in plain sight like it pays rent there. Fix any uneven sections now before you start decorating.
Step 4: Add Steps, Lighting, and Smart Details
A hole full of water is technically a pool, but it does not look finished until you add structure. This is where stairs, slabs, glass, and lighting do the heavy lifting.
Use stairs for entry
Place stairs along one end or in one corner of the pool to create built-in steps. This instantly makes the pool feel more realistic and easier to enter. It also breaks up the boxy shape in a good way.
Use slabs for the border
Slabs are perfect for pool coping, the neat trim that runs around the edge. They make the transition from deck to water look intentional instead of abrupt. Smooth stone slabs, quartz slabs, and cut sandstone slabs are especially good for this.
Add lighting under or around the water
Pools look dramatically better at night with lighting. Sea lanterns are a favorite because they look clean and work beautifully underwater. You can embed them in the floor or along the walls. Lanterns nearby also help create a cozy resort atmosphere. If you want a playful or dramatic style, you can experiment with other glowing blocks, but keep the lighting pattern balanced so the pool does not look like a disco had an argument with a submarine.
Try glass for a premium look
Glass blocks or panes can turn a standard pool into something more modern. Use them as side walls, fences, or decorative dividers. Stained glass can add color if you want a custom theme, though it is usually best used sparingly unless your goal is “luxury water park meets neon smoothie bar.”
Small details matter too. Add fences or trapdoors as design accents. Place leaves, potted plants, or bamboo around the patio. Build a simple shower with stone, a lever, and water. Suddenly, your pool area starts looking like a real destination instead of a rushed side quest.
Step 5: Decorate Like You Own a Blocky Resort
Now that the pool itself is finished, the surrounding area is what makes it memorable. Decoration is where personality shows up.
Start with the deck. A wooden patio feels warm and casual. Quartz or smooth stone feels upscale and modern. Sandstone looks great in beach or desert builds. Then add a few comfort features around the pool:
- Lounge chairs made from stairs and signs
- Umbrellas made from fences and wool or banners
- Planters with leaves, flowers, or bamboo
- A diving board built from slabs
- A hot tub next to the main pool
- A grill area or outdoor kitchen
- A glass fence for a rooftop or modern mansion build
If you want the area to feel alive, design it like a room without walls. Think about where players would walk, sit, and look. Good Minecraft building is not only about the object itself. It is also about the space around it.
And yes, this is the perfect time to add a tiny pool house or changing room if you are feeling ambitious. Once you start decorating, Minecraft has a funny habit of turning one simple project into a full home improvement show.
Common Mistakes to Avoid
- Using too little water: If the surface is uneven or flowing, add proper source blocks.
- Skipping the border: Pools look much cleaner with slabs, decking, or a frame around them.
- Ignoring lighting: A dark pool area feels unfinished and can attract unwanted mobs nearby.
- Choosing too many materials: Stick to a focused palette for a more polished result.
- Building too small: Tiny pools can work, but they need strong surrounding design so they do not look accidental.
- Forgetting the environment: A pool should connect visually to the house, garden, or patio around it.
Pool Ideas to Try Next
Once you master a basic pool, try leveling up with one of these concepts:
- Modern infinity pool: Great for cliffside or rooftop homes
- Indoor spa pool: Ideal for mountain bases or luxury mansions
- Garden pool: Surrounded by hedges, flowers, and natural stone
- Lap pool: Long, narrow, and sleek for modern builds
- Kid-friendly backyard pool: Shallow, colorful, and playful with seating and umbrellas
Conclusion
Learning how to make a pool in Minecraft is really about mastering two things: water behavior and visual design. Once you understand how source blocks work, the rest becomes a fun building exercise. Pick a smart location, dig a clean shell, fill the pool carefully, add polished details, and decorate the surrounding space so it feels like part of your world rather than an afterthought.
The beauty of a Minecraft pool is that it can be as simple or as fancy as you want. You can build a compact backyard swim spot in one afternoon or turn the idea into a full luxury resort with waterfalls, hot tubs, and glass walls. Either way, it is one of the easiest ways to make your base feel more finished, more stylish, and a lot more memorable.
Pool-Building Experiences: What Players Usually Learn After the First Splash
One of the funniest things about building a pool in Minecraft is how often it starts as a “quick little project” and ends as a full-blown renovation. Most players begin with innocent confidence. They dig a rectangle, grab a couple of buckets, and assume they will be done in five minutes. Then the water starts flowing sideways, the edges look weird, the lighting feels wrong, and suddenly they are redesigning the whole backyard at midnight while pretending this was always the plan. If that sounds familiar, congratulations, you are building correctly.
Players also tend to discover that pools teach design discipline faster than many larger projects. A giant castle can hide a lot of awkward choices because the scale is impressive. A pool cannot. Every block is visible. If the border is uneven, you notice immediately. If the lighting is too harsh, the whole thing feels off. If the materials clash, the build looks confused. That is why pool projects are surprisingly good practice for becoming a better Minecraft builder overall. They force you to think about spacing, symmetry, color balance, and texture in a compact area.
Another common experience is realizing that the best-looking pools are rarely the most complicated. New players sometimes assume they need exotic blocks, advanced Redstone, or a mansion the size of a shopping mall to make a pool look good. In reality, a clean rectangle with the right border, a few stairs, and thoughtful lighting can look incredible. Many experienced builders eventually learn that restraint is powerful. A simple build with a clear style often beats a chaotic “feature-packed” pool that has three waterfalls, six random materials, and the emotional energy of a theme park designed during a power outage.
There is also a practical lesson hidden in the experience: pools make the surrounding area matter more. Once the water is in place, the empty space around it starts demanding attention. You notice the lawn looks flat. The side of the house suddenly feels plain. The patio needs furniture. The path to the garden should probably connect to the deck. In other words, a pool often becomes the project that upgrades an entire base. It creates pressure in the best possible way, because now you want the rest of the build to rise to the same standard.
And finally, pool building tends to remind players why Minecraft stays so appealing year after year. A pool is not necessary for survival. It is not required for progression. No villager is going to hand you a medal for adding lounge chairs by the water. You build it because it makes your world feel better. That is the magic of Minecraft. Even a modest project like a pool can turn a functional base into a place with personality. It gives your world a story, a mood, and a sense that somebody actually lives there instead of merely storing potatoes and iron in the basement. So if your first pool is imperfect, do not worry. That is part of the experience too. The second one will look better, the third one will look intentional, and by the fourth one you will be casually building rooftop spas like you own the blocky real estate market.


