Table of Contents >> Show >> Hide
- What Makes a Sub Sandwich a “Sub”?
- Step 1: Choose the Right Bread (Your Sub’s Skeleton)
- Step 2: Prep Ingredients Like a Deli (Small Moves, Big Upgrade)
- Step 3: Build in the Right Order (Sub Sandwich “Architecture”)
- Step 4: Use This Easy “Base Formula” Every Time
- Step-by-Step: Classic Italian Sub (Deli-Style at Home)
- Step-by-Step: Turkey & Crunch Sub (Easy, Clean, Packable)
- How to Keep a Sub Sandwich from Getting Soggy
- Hot Subs vs. Cold Subs: Quick Adjustments
- Seasoning: The Difference Between “Fine” and “Whoa”
- Cutting, Wrapping, and Serving Like You Mean It
- Food Safety and Storage (Because Lunch Shouldn’t Fight Back)
- Quick Troubleshooting: Common Sub Sandwich Problems
- of Real-World “Experience” (What People Learn After Making Subs a Few Times)
- Conclusion
Sub. Hoagie. Grinder. Hero. Whatever you call it, a great sub sandwich is basically edible architecture: soft-but-sturdy bread, flavorful layers, and just enough “wet stuff” to taste amazingwithout turning the roll into a sponge. The good news: you don’t need a deli slicer or a neon “OPEN” sign to make one at home. You just need a smart build, a little seasoning confidence, and one crucial skill: knowing where the juicy ingredients should not hang out.
This guide walks you through easy, repeatable steps (plus a couple of “deli tricks” that make your sandwich taste like somebody else made itarguably the highest compliment in lunch). You’ll also get two foolproof example builds, storage tips, and a 500-word “experience” section at the end so you can learn from the same sandwich mistakes the rest of humanity already made for you.
What Makes a Sub Sandwich a “Sub”?
A sub sandwich is typically served on a long rolloften Italian bread, a hoagie roll, or a torpedo rollsplit lengthwise and stuffed with layered fillings. The classic format is cold cuts + cheese + crunchy veg + a tangy dressing, but subs can be hot (meatballs, chicken parm) or cold (Italian, turkey, veggie), minimalist or chaotic, neat or gloriously messy.
The real “sub secret” is balance: the bread-to-filling ratio, the order of layers, and the seasoning. Because yes, seasoning matters. A sub without salt is just a long, sad salad delivery vehicle.
Step 1: Choose the Right Bread (Your Sub’s Skeleton)
Great subs start with bread that’s sturdy enough to hold fillings, but not so tough it shreds the roof of your mouth like you angered a baguette. Look for a roll with:
- Thin, lightly crisp crust (structure without jaw fatigue)
- Soft interior (so it compresses slightly when you bite)
- Length that matches your appetite (or your willingness to share)
Quick bread tips
- Split, don’t fully separate: Slice the roll lengthwise, but keep a hinge so the fillings stay corralled.
- Toast strategically: For cold subs, a light toast on the cut sides adds crunch and helps resist moisture. For hot subs, toast the roll before adding saucy fillings to buy yourself more “not-soggy time.”
- If your roll is very soft: Consider a quick toast or a thin fat layer (mayo, butter, oil) on the bread as a moisture buffer.
Step 2: Prep Ingredients Like a Deli (Small Moves, Big Upgrade)
Most homemade subs fail because the ingredients are great… but the prep is lazy. (No judgment. Lunch is hectic.) Here’s how to prep like you mean it:
Meats and cheese
- Go thin when possible: Thin-sliced meats fold easily, trap air, and feel more tender in a bite.
- Fold, don’t stack flat: Folding meats creates height and prevents the dreaded “single slab slide-out.”
- Cheese placement matters: Cheese can act as a “raft” or barrier between bread and wet toppings.
Vegetables
- Dry your greens: Wet lettuce is basically a sponge with ambitions.
- Pat pickles/pepperoncini dry: You want tang, not puddles.
- Slice onions thin: Thick onion can bully the whole sandwich.
- Salt tomatoes lightly (optional): Salt boosts flavor, but it also pulls out moistureso use it wisely and blot if needed.
Condiments and dressing
Condiments are where subs become personal. Mayo, mustard, pesto, hot relish, vinaigrettego wild. Just remember: fats (mayo, butter, oil) help protect bread from watery ingredients, while straight vinegar or very thin sauces can speed-run sogginess if poured directly onto the roll.
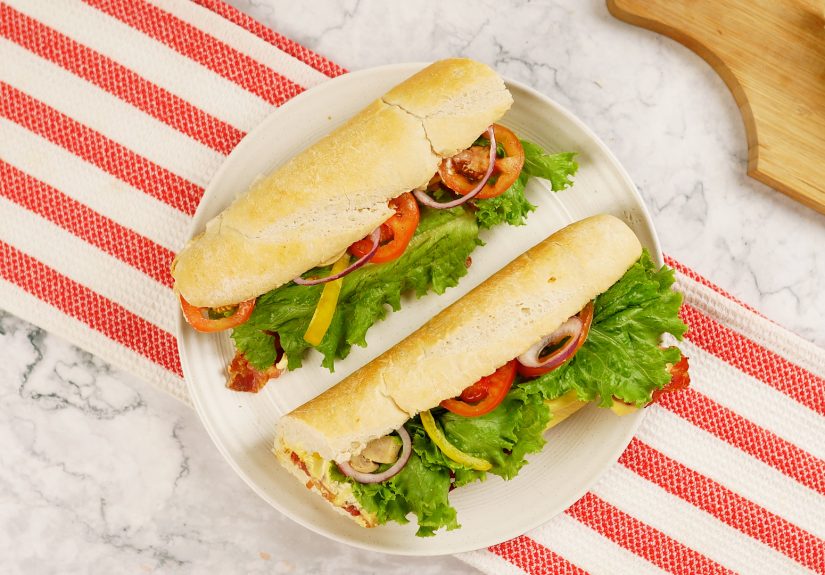
Step 3: Build in the Right Order (Sub Sandwich “Architecture”)
Here’s the simple rule: put barriers against the bread, keep wet ingredients controlled, and aim for even distribution so every bite tastes intentional.
The best layering order for most cold subs
- Spread (fat-based) on both cut sides: mayo, aioli, softened butter, pesto mayo, or a thin drizzle of olive oil.
- Cheese directly on the bottom half (helps anchor and buffer).
- Meats folded and layered (create loft and bite balance).
- Crunchy veg (lettuce, onions, cucumbers, peppers).
- Juicy toppings last (tomatoes, pickles, pepperoncini)or keep them slightly blotted.
- Seasoning before closing: salt, black pepper, oregano/Italian seasoning.
- Acid (vinegar/lemon) applied carefullyoften best on greens or in a mixed dressing.
Why this works: The bread gets a fat “raincoat,” meats and cheese stabilize the center, and wet ingredients are less likely to soak the rollespecially if you’re packing the sub for later.
Step 4: Use This Easy “Base Formula” Every Time
If you can remember one thing, remember this:
Roll + Spread + Cheese + Protein + Crunch + Tang + Seasoning
Base formula examples
- Italian sub: mayo + provolone + salami/capicola/ham + shredded lettuce/onion + tomatoes/pepperoncini + oil & vinegar + oregano + salt/pepper
- Turkey club-style sub: mayo + Swiss/cheddar + turkey + bacon + lettuce + tomato + mustard + salt/pepper
- Veggie sub: hummus or pesto mayo + provolone + cucumbers/peppers/onion + shredded lettuce + tomatoes + pickles + vinaigrette + salt/pepper
Step-by-Step: Classic Italian Sub (Deli-Style at Home)
This is the “yes, I do have my life together” sub. It’s also the easiest one to make taste restaurant-level because the flavor combo is doing most of the work.
Ingredients (1 large sub)
- 1 hoagie/sub roll (6–10 inches), split with a hinge
- 1–2 tbsp mayo (optional but highly recommended)
- 2–4 slices provolone
- 4–6 oz mixed Italian meats (salami, capicola, ham, prosciuttochoose 2–3)
- Shredded iceberg or romaine (about 1 cup), very dry
- Thin-sliced onion (a few rings)
- Tomato slices (2–3), lightly blotted
- Pepperoncini or banana peppers (a few), patted dry
- Olive oil + red wine vinegar (or a simple vinaigrette)
- Dried oregano/Italian seasoning, salt, black pepper
Instructions
- Toast (optional): Lightly toast the cut sides of the roll for extra crunch and moisture resistance.
- Spread: Apply mayo (or a thin olive oil layer) to both cut sides.
- Cheese first: Lay provolone on the bottom half.
- Add meats: Fold meats into loose ribbons and layer evenly.
- Dress the greens (smart move): Toss lettuce with a small drizzle of oil and vinegar, plus a pinch of salt, pepper, and oregano. (This seasons the sub without flooding the bread.)
- Top it off: Add dressed lettuce, onion, tomatoes, and pepperoncini.
- Season: Sprinkle oregano, salt, and pepper right before closing. Taste is built here.
- Close, press, cut: Press gently, cut on a diagonal (because physics), and serve.
Step-by-Step: Turkey & Crunch Sub (Easy, Clean, Packable)
If you want a sub that travels well, this one’s your MVP. The goal is crisp texture, controlled moisture, and enough flavor that you don’t need to drown it in ranch.
Ingredients (1 sub)
- 1 sub roll, split with hinge
- 1–2 tbsp mayo or mustard-mayo blend
- 2–4 slices Swiss or cheddar
- 4–6 oz sliced turkey
- 1–2 strips cooked bacon (optional)
- Lettuce (dry), thin-sliced onion, cucumber slices
- Tomato slices (blotted), optional
- Salt, pepper
Instructions
- Spread: Mayo (or a mayo-mustard mix) on both sides of the bread. This helps prevent sogginess and adds richness.
- Cheese barrier: Put cheese on the bottom half.
- Protein layer: Fold turkey and add bacon if using.
- Crunch layer: Add lettuce, cucumbers, onion.
- Optional tomato: Add last, lightly blotted.
- Season: Salt and pepperespecially on tomatoes and cucumbers if used.
- Close and cut: Press gently and slice.
How to Keep a Sub Sandwich from Getting Soggy
Soggy subs are the reason napkins were invented. Here’s how to keep your sandwich crisp and proud:
Moisture-control tricks that actually work
- Use a fat “seal”: Mayo, butter, or oil on bread helps repel moisture from juicy toppings.
- Keep wet ingredients away from the bottom bread: Put tomatoes/pickles higher up, or blot them first.
- Dress greens instead of the bread: Toss lettuce with oil/vinegar like a mini salad so flavor spreads without soaking the roll.
- Pack smart for later: If the sub will sit for hours, keep tomatoes/pickles separate or add them right before eating.
- Wrap like a deli: Parchment or butcher paper helps the sandwich hold its shape and keeps the bread from steaming itself into mush.
Hot Subs vs. Cold Subs: Quick Adjustments
Hot subs are a different sport. Heat creates steam, steam creates moisture, and moisture tries to turn your bread into pudding. The fix is simple:
- Toast the roll first for structure.
- Go easy on sauces (or keep sauce on the protein, not the bread).
- Add fresh veg after baking so it stays crisp.
- Let hot fillings cool 1–2 minutes before closing the sandwich to reduce steam.
Seasoning: The Difference Between “Fine” and “Whoa”
Deli sandwiches taste better partly because they’re seasoned on purpose. At home, people often forget salt and wonder why the sub tastes like “cold groceries.” A few easy wins:
- Salt your tomatoes (lightly) and your greens (a pinch) for instant flavor lift.
- Add oregano/Italian seasoning to Italian-style subs for that classic shop taste.
- Use black pepper generously if you like a little bite.
- Acid matters: A splash of vinegar, pickled peppers, or a squeeze of lemon keeps rich meats from tasting heavy.
Cutting, Wrapping, and Serving Like You Mean It
You built a masterpiece. Don’t ruin it with a chaotic cut that ejects half the fillings. Use a sharp serrated knife, press gently, and slice with a sawing motion.
The deli-wrap method (best for eating on the go)
- Place the sub diagonally on parchment/butcher paper.
- Roll tightly, folding sides inward as you go (like wrapping a burrito that has rent due).
- Let it sit 5–10 minutes before eatingthis helps the sandwich “set” so the layers behave.
Food Safety and Storage (Because Lunch Shouldn’t Fight Back)
If your sub includes deli meats, cooked meats, cheese, or mayo-based spreads, keep it cold. In general, perishable foods should be refrigerated promptly and kept at 40°F or below. If you’re packing a sub for school, work, or travel, use an insulated lunch bag and an ice pack.
- Refrigerate promptly: Don’t leave perishable sandwiches hanging out at room temperature for long.
- Store components separately for best texture: Keep tomatoes/pickles/dressing separate if you won’t eat soon.
- Wrap properly: Paper wrap for structure, then a container for protection.
Quick Troubleshooting: Common Sub Sandwich Problems
“My fillings slide out when I bite.”
Use a cheese layer against the bread, fold meats (don’t lay them flat), and wrap the sandwich tightly for a few minutes before eating.
“It tastes bland.”
Add salt and pepper (especially to tomatoes and greens), plus an acidic element like vinegar or pickled peppers. Consider an herby sprinkle (oregano/Italian seasoning) for Italian-style subs.
“It gets soggy by lunchtime.”
Toast the cut sides lightly, add a fat layer to bread, blot wet toppings, and keep dressing/tomatoes separate until eating.
of Real-World “Experience” (What People Learn After Making Subs a Few Times)
Most people’s first homemade sub sandwich experience goes like this: you buy great ingredients, pile them into a roll with optimism, take one bite, and immediately realize you built a delicious landslide. The second experience is usually a soggy bread surprise, because oil and vinegar seemed like a good idea at 7:12 a.m. when you were feeling brave, and then by noon the sub has the texture of a damp paperback. The good news is that subs teach fast lessonsbecause they are extremely honest about physics.
One common “aha” moment is discovering that where you put moisture matters more than how much moisture you add. People often assume the fix is less dressing, but the better fix is smarter dressing. Tossing shredded lettuce with a little oil, vinegar, salt, and oregano feels almost too simple, but it spreads flavor evenly and keeps the bread from taking a vinegar bath. After doing it once, many home cooks stop drizzling directly onto the roll unless they’re eating immediately.
Another frequent learning: folded meats aren’t just for looks. When meat is folded into ribbons, it creates little air pockets and grips other ingredients better, so the sub bites cleaner. Flat-stacked deli slices tend to slide out as one giant sheet, which is impressive in the way a magic trick is impressiveexcept it’s happening to your lunch, and you didn’t ask for the trick. The same goes for cheese: putting it directly on the bread can act like a non-slip mat for the whole build, especially when tomatoes or pickles are involved.
Then there’s the “tomato reality.” Tomatoes make subs taste fresh, but they also leak like they’re getting paid per drip. People who make subs regularly either (a) blot tomato slices, (b) season them lightly and let excess moisture sit on a paper towel for a minute, or (c) keep tomatoes separate for packable lunches. The best approach depends on timing. If you’re eating now, go ahead and enjoy the juiciness. If you’re eating later, treat tomato like a special guest who needs a towel at the door.
Wrapping is the sneaky experience-based skill. The first time you wrap a sub in parchment and let it sit for a few minutes, you’ll notice the whole sandwich “sets” into a more cohesive bite. It feels more deli-like and less like a chaotic picnic. And if you’re transporting the sandwich, paper wrap beats plastic because plastic traps steam and turns crust into sadness. People who pack subs often end up building them slightly tighter than they would for eating at homebecause travel adds movement, and movement adds mess.
Finally, the biggest experience lesson: a sub sandwich is not just assembledit’s seasoned. Once you start adding a pinch of salt to greens, pepper to tomatoes, and oregano to Italian-style builds, homemade subs stop tasting like “ingredients” and start tasting like “a sandwich.” It’s a small shift, but it’s the difference between a decent lunch and the kind of lunch that makes you look around like, “Wait… I made this?”
Conclusion
Making a great sub sandwich at home is simple when you build it like a pro: choose sturdy bread, prep ingredients thoughtfully, use fat as a moisture barrier, control wet toppings, and season like you’re running a deli (or at least like you’ve met salt before). Start with the base formula, try the Italian sub build, then tweak to your favorite flavors. Once you nail the layering, you’ll stop chasing “deli taste” and start creating itone crisp, glorious bite at a time.