Table of Contents >> Show >> Hide
- What Are Cracked Marbles?
- Before You Start: A Few Important Safety Notes
- What You Need
- How to Make Cracked Marbles in 11 Steps
- Step 1: Sort Your Marbles
- Step 2: Preheat the Oven
- Step 3: Prepare the Baking Dish
- Step 4: Make the Ice Bath
- Step 5: Bake the Marbles
- Step 6: Set Up a Safe Transfer Area
- Step 7: Remove the Marbles Carefully
- Step 8: Transfer the Marbles into the Ice Water
- Step 9: Let Them Cool Completely
- Step 10: Dry and Inspect Each Marble
- Step 11: Turn Them into Something Fun
- Why Some Marbles Crack Better Than Others
- Best Tips for Better Cracked Marbles
- Common Mistakes to Avoid
- Creative Ways to Use Cracked Marbles
- Are Cracked Marbles Safe to Handle?
- Final Thoughts
- Experiences, Lessons, and Real-Life Tips from Making Cracked Marbles
- SEO Metadata
Cracked marbles are one of those gloriously simple crafts that make you feel like a wizard with a baking pan. You start with plain glass marbles, add heat, introduce a dramatic cold plunge, and end up with sparkling little glass orbs filled with icy-looking internal fractures. They catch the light beautifully, cost very little to make, and can be turned into jewelry, vase fillers, fairy garden accents, or tiny conversation starters for people who appreciate shiny things.
If you have been searching for how to make cracked marbles, here is the good news: the process is straightforward. The more important news is that it also involves hot glass, which deserves a healthy amount of respect. This guide walks you through the method in 11 clear steps, explains why the cracking happens, and shares practical tips so your first batch looks intentional instead of like your oven had a nervous breakdown.
What Are Cracked Marbles?
Cracked marbles are regular glass marbles that have developed a web of tiny internal fractures after being heated and then cooled quickly. The outside usually stays mostly intact, while the inside takes on a shimmering, crackled appearance. That glittery network is what makes them so popular for crafts and DIY decor.
The science is simple enough: glass does not love sudden temperature changes. When the hot marble meets icy water, the glass experiences thermal shock. Different parts of the marble contract at different rates, which creates internal stress and produces those dramatic crack lines. In other words, this project is basically controlled chaos wearing a pretty outfit.
Before You Start: A Few Important Safety Notes
This is not the moment to be casual. Even though the project is easy, you are still handling heated glass and possible sharp edges.
- Wear protective eyewear.
- Use heat-resistant gloves or sturdy oven mitts.
- Work with metal tongs, a ladle, or a spoon designed for high heat.
- Keep children at a safe distance unless they are being closely supervised and are not handling the hot portion of the project.
- Expect that a few marbles may break completely instead of cracking neatly.
- Check each finished marble before using it in crafts. If it feels chipped or rough, do not use it where it can be handled often.
One more practical tip: use inexpensive, standard glass marbles. Avoid anything with paint, plastic coatings, glued decorations, or mystery materials from the back of a junk drawer. When it comes to heating glass, “mystery” is not the charming kind.
What You Need
- Glass marbles
- An oven
- An oven-safe metal or glass baking dish
- Aluminum foil, optional but helpful for easier cleanup
- A large heat-safe bowl
- Ice
- Cold water
- Tongs, metal spoon, or small ladle
- Safety goggles
- Oven mitts or heat-resistant gloves
- A towel for your workspace
How to Make Cracked Marbles in 11 Steps
Step 1: Sort Your Marbles
Start by choosing marbles that are clean, dry, and free of obvious chips. Similar sizes tend to heat more evenly, so if you want consistent results, do not mix giant decorative shooters with tiny toy marbles in the same batch. You can absolutely experiment later, but for your first round, keep life easy.
Step 2: Preheat the Oven
Preheat your oven to somewhere between 350°F and 500°F. Many DIY crafters report success in that range, with a common sweet spot around 450°F to 500°F for stronger crackling effects. If you are nervous about breakage, start lower. If you want more dramatic internal crack patterns, go a bit hotter. Think of it as the difference between “subtle sparkle” and “glass disco ball.”
Step 3: Prepare the Baking Dish
Line your oven-safe dish with foil if you want easier cleanup, then place the marbles in a single layer. Do not stack them. Give them a little breathing room so they heat more evenly and are easier to transfer later. A smaller pan is often easier to control than a large baking sheet when you need to move quickly.
Step 4: Make the Ice Bath
Fill a large bowl with cold water and plenty of ice. You want it ready before the marbles come out of the oven. This is not the kind of craft where you want to pause halfway through and say, “Hang on, where did I put the ice?” The faster the transfer from hot oven to cold bath, the better the crackled effect.
Step 5: Bake the Marbles
Put the tray of marbles into the preheated oven and bake them for about 15 to 20 minutes. Smaller marbles may need slightly less time, while larger ones may benefit from the full 20 minutes. The goal is to heat the glass thoroughly without turning the process into an endurance sport.
Step 6: Set Up a Safe Transfer Area
Before removing the tray, clear the space between your oven and the ice bath. Put a towel under the bowl if needed so it stays put. Put on your gloves and goggles. Grab your tongs, ladle, or spoon. This little prep step matters more than people think, because hot marbles rolling off a pan are the opposite of charming.
Step 7: Remove the Marbles Carefully
Take the tray out of the oven slowly and steadily. Do not shake it, tilt it wildly, or attempt any dramatic chef moves. These marbles are extremely hot, and while they may look innocent, they are currently tiny glass troublemakers.
Step 8: Transfer the Marbles into the Ice Water
Using your tongs, spoon, or ladle, move the marbles directly into the ice bath. Some people pour them in quickly from a small pan, but transferring them with a tool gives you more control. As they hit the cold water, you may hear faint cracking sounds. That is the effect you want. That is also why the goggles are non-negotiable.
Step 9: Let Them Cool Completely
Leave the marbles in the ice water until they are fully cool. This usually takes just a few minutes. Do not fish them out immediately because patience here improves both safety and results. Besides, after the oven drama, the marbles deserve a minute to collect themselves.
Step 10: Dry and Inspect Each Marble
Remove the cooled marbles and dry them with a towel. Then inspect every single one. The best cracked marbles have internal fracture lines but still feel smooth on the outside. If you find one with an outer crack, chipped edge, or flaking surface, set it aside and do not use it in jewelry or any project that will be handled often.
Step 11: Turn Them into Something Fun
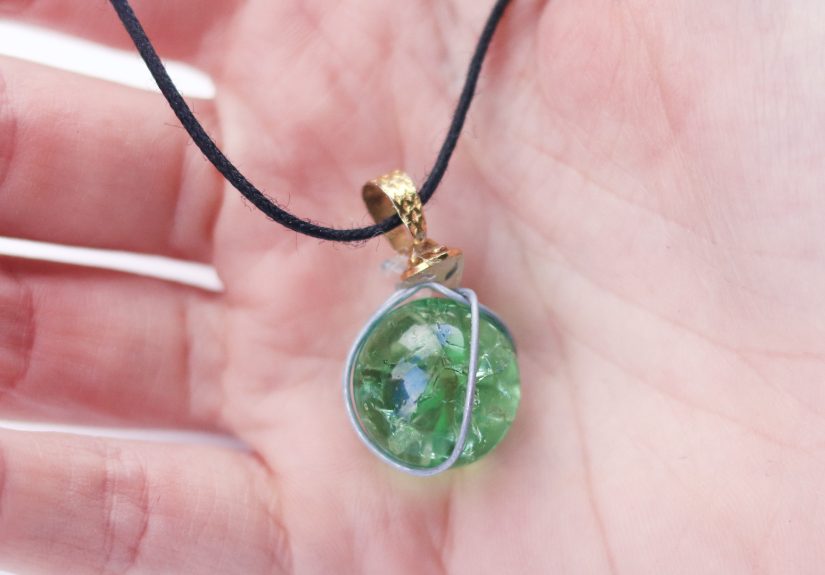
Now comes the reward. Your cracked marbles can be used in all kinds of DIY projects. Try them in pendant necklaces, bowl fillers, fairy gardens, shadow boxes, or decorative jars. They also look surprisingly elegant in clear vases, candle displays, and simple tabletop decor. If you want a quick beginner project, glue one onto a flat magnet base or tuck several into a glass dish where they can catch the light.
Why Some Marbles Crack Better Than Others
If your results vary, that does not mean you failed. It means glass has opinions.
Different marbles may have different glass compositions, thicknesses, or internal stresses from manufacturing. Those differences affect how the marble responds to heat and cold. Some create dramatic internal veining. Others barely crack at all. A few may split or shatter. That is why experienced crafters often test a small batch first before committing to their prettiest marbles.
Temperature matters too. Higher oven temperatures often create bolder crackle patterns, but they can also raise the risk of full breakage. Lower temperatures may be safer and gentler, though the effect can be subtler. There is a little trial and error involved, which is part of the fun, assuming you enjoy tiny controlled science experiments in your kitchen.
Best Tips for Better Cracked Marbles
- Use a small test batch before heating a full tray.
- Stick with a single layer in the pan.
- Have the ice bath ready before the oven timer goes off.
- Use a smaller pan if you want easier transfer and better control.
- Choose standard glass marbles instead of oddly coated decorative pieces.
- Inspect for sharp edges before crafting with them.
- Store finished marbles in a jar or padded container so they do not chip each other.
Common Mistakes to Avoid
Overcrowding the pan: Marbles heat less evenly and are harder to move safely.
Skipping safety gear: One marble can break badly enough to ruin your day.
Using unknown materials: Decorative gems are not always made from the same type of glass.
Touching them too soon: Glass can stay dangerously hot longer than it looks.
Using damaged marbles in jewelry: Pretty is not a substitute for smooth edges.
Creative Ways to Use Cracked Marbles
Once you know how to make cracked marbles, the obvious next question is what to do with them. Happily, they are surprisingly versatile.
- Jewelry: Turn them into pendants, zipper pulls, or keychain charms.
- Home decor: Display them in glass bowls, hurricane vases, or apothecary jars.
- Fairy gardens: Use them as magical ponds, gem paths, or tiny decorative accents.
- Magnets: Pair them with a simple magnet base for easy fridge decor.
- Gift toppers: Add one to wrapped gifts for a handmade touch.
- Craft embellishments: Use them in mixed-media art, shadow boxes, or seasonal centerpieces.
Are Cracked Marbles Safe to Handle?
They can be, as long as the outer surface remains smooth and intact. The ideal cracked marble has internal fractures only. If the outer shell is chipped or visibly broken, do not use it in crafts where it will be touched frequently. In general, these marbles are best treated as decorative craft pieces rather than toys for small children.
Final Thoughts
Learning how to make cracked marbles is one of those wonderfully low-cost DIY projects that delivers a surprisingly high “ooh, shiny” return on investment. The method is simple, the science is cool, and the results look far fancier than their humble marble origins suggest. As long as you respect the safety side of the process, this is an easy craft to repeat, experiment with, and turn into all kinds of creative projects.
So yes, you really can transform ordinary marbles into glittering crackled gems with heat, ice water, and a little caution. Just remember: the goal is internal sparkle, not kitchen chaos.
Experiences, Lessons, and Real-Life Tips from Making Cracked Marbles
The first time many people try this project, they expect every marble to come out looking identical. That is adorable. In reality, cracked marbles have personalities. One batch may turn out beautifully, with sharp, icy-looking fracture lines that sparkle under a lamp. The next batch may look softer and more subtle. A few may do absolutely nothing except sit there and act expensive. This unpredictability is part of the experience, and honestly, part of the charm.
A common first-time experience is realizing that preparation matters more than the actual “making” part. The heating is easy. The quick transfer is where people either feel like organized craft geniuses or like someone who should maybe not be trusted around hot objects before coffee. Setting up the ice bath early, clearing the counter, and using a smaller pan usually make the whole process smoother and less stressful.
Another lesson that comes up often is that temperature experimentation makes a real difference. Some crafters start around 350°F and get a delicate crackle effect that looks elegant and understated. Others push closer to 500°F and get bold, dramatic internal fracture lines that catch every bit of light. Neither result is wrong. It depends on the look you want and how much risk of breakage you are willing to tolerate. A small test batch is not just smart; it is basically your marble audition.
People also tend to discover that the prettiest cracked marbles are not always the fanciest ones going into the oven. Plain, inexpensive marbles can produce the best visual effect because the internal cracking becomes the star of the show. Highly patterned marbles sometimes compete with the crackle rather than enhancing it. That means this project is refreshingly budget-friendly, which is always nice in a world where craft stores can somehow convince you that one tiny bead should cost the same as lunch.
In real-life crafting, cracked marbles shine brightest when light can pass through them. They look especially good in windows, clear bowls, pendant settings, and glass jars near candles or string lights. Many people make a batch thinking they will create jewelry, then end up scattering the marbles around the house because they look great everywhere. Suddenly a simple tray on a coffee table becomes “intentional decor,” and no one needs to know the design plan began with a baking dish and a bowl of ice.
Perhaps the most practical takeaway is this: inspect every finished marble carefully. A marble that looks gorgeous can still have a rough chip you do not notice at first. Running your fingers over each piece and checking it under bright light helps you separate the safe decorative winners from the ones that belong in the discard pile. The good marbles are absolutely worth keeping. The questionable ones are not worth slicing your finger for. Crafting should be memorable for the right reasons.