Table of Contents >> Show >> Hide
- Why Paper Bats Work So Well on Lamp Shades
- What You Need
- Before You Start: Pick the Right Lamp Shade
- How To Make Paper Bats for Lamp Shades: Step by Step
- Creative Design Ideas
- Important Lamp Safety Tips
- Common Mistakes to Avoid
- What It Looks Like in Real Life
- Experience and Practical Lessons From Making Paper Bats for Lamp Shades
- Conclusion
If your lamp shade is looking a little too innocent for spooky season, paper bats are here to help. They are dramatic, cheap, easy to cut, and weirdly effective at making an ordinary lamp look like it has a social life after sunset. The best part is that you do not need fancy supplies or advanced craft skills. If you can trace, cut, and resist gluing your fingers together for ten consecutive minutes, you are fully qualified.
This project works because it hits the sweet spot between playful and polished. A cluster of paper bats can turn a plain drum shade into Halloween decor that feels intentional instead of last-minute. You can keep it minimal with a few tiny silhouettes, go full haunted mansion with layered wings, or create a swirling “flying out of the lamp” effect that looks much fancier than it actually is. That, frankly, is the dream.
Why Paper Bats Work So Well on Lamp Shades
Bats are graphic, high-contrast, and instantly recognizable. Their shape reads clearly even from across a room, especially in black cardstock against a light-colored shade. They also play nicely with curved surfaces. Unlike stiff geometric pieces that fight the shape of the lamp, bat wings can bend slightly and still look natural, as if they are mid-flight instead of suffering from craft-related confusion.
Paper bats also give you options. You can use flat silhouettes for a clean modern look, or crease the wings so they lift off the shade and cast tiny shadows. That second option is where the magic happens. The lamp turns into decor during the day and atmosphere at night. In other words, one humble lamp starts pulling double duty.
What You Need
- A plain lamp shade, preferably light-colored and smooth
- Black cardstock or heavyweight craft paper
- Bat template, stencil, or hand-drawn bat shapes
- Sharp scissors or a craft knife
- Pencil
- Double-sided tape, glue dots, or a precise paper-safe adhesive
- Ruler
- Bone folder or the dull edge of a butter knife for scoring folds
- LED bulb for the lamp
Cardstock is usually the best choice because it holds its shape better than printer paper. If you want a softer, moodier look, try matte black paper with a velvety finish. If you want crisp edges and cleaner folds, standard black cardstock is your friend. Skip flimsy paper unless you enjoy watching bat wings droop like they had a long week.
Before You Start: Pick the Right Lamp Shade
Not every shade is equally easy to decorate. Drum shades, tapered drums, and simple empire shades are the most beginner-friendly because they have relatively smooth surfaces and plenty of room for placement. If your shade has deep pleats, thick texture, heavy fringe, or a dramatic flare, you can still do the project, but you will need to work around the shape instead of pretending it does not exist.
It also helps to measure your shade before making your bats. Note the top width, bottom width, slant, and height so you can scale your bat sizes to the lamp. Small bedside lamps usually look best with bats around 2 to 4 inches wide. Medium table lamps can handle a mix of 3-, 5-, and 7-inch bats. Larger floor lamps can take oversized silhouettes for a more theatrical effect.
How To Make Paper Bats for Lamp Shades: Step by Step
1. Choose Your Bat Style
Start with one of three looks: classic flat silhouettes, lightly folded 3D bats, or layered bats in several sizes. Flat silhouettes feel clean and modern. Folded bats feel more dynamic and a little more haunted-house-chic. Layered bats create movement, especially if you arrange them in a loose spiral or upward sweep.
If you are using a printable template, print a few sizes. A good bat cluster looks more natural when the pieces vary a bit. Real bats do not show up to a party in perfect matching dimensions, and your lamp should not either.
2. Trace the Bats Onto Cardstock
Flip your template over and trace on the back side of the cardstock so the pencil marks stay hidden. Trace more bats than you think you need. Somewhere around 15 to 30 works for a medium shade, depending on the size of the lamp and how dramatic you want the result to be. If your design is meant to look airy, fewer bats will do the trick. If you want full gothic commitment, keep tracing.
3. Cut Carefully for Clean Edges
Use sharp scissors for simple shapes and a craft knife for tighter inner curves. Clean edges matter more than people think. A ragged bat looks less “stylish seasonal decor” and more “someone lost an argument with kindergarten scissors.” Work slowly, especially around ears and wing tips.
4. Add Dimension to the Wings
For 3D bats, score a light line down the body or along the fold guides in your template. Then fold the wings slightly upward or outward. You do not need dramatic bends. A subtle lift is enough to create shadow and movement. This tiny detail gives the finished lamp a lot more personality and keeps the bats from looking pasted on as an afterthought.
5. Test the Layout Before Attaching Anything
Set the lamp shade on a table and arrange the bats without adhesive first. This is the part where you get to play art director. Try one of these layouts:
- Swarm effect: Bats clustered on one side and spreading upward
- Full wrap: Small bats circling the entire shade
- Ombre flight path: Tiny bats near the bottom, larger ones near the top
- Minimalist accent: Five to seven bats grouped on one quadrant
Step back and look at the shade from several angles. Lamps are three-dimensional, and a design that looks perfect head-on can look oddly bald from the side.
6. Attach the Bats
Use double-sided tape or small glue dots for the cleanest result. These adhesives are especially handy for paper layering and dimension because they are tidy and do not soak the paper. If you use liquid glue, use a very small amount. Too much adhesive can wrinkle cardstock, leave bumps, or cause the bats to slide before they dry.
Attach the center body of each bat and leave the wings free if you want lift and shadow. If you prefer a flatter look, secure the wings too. For the prettiest result, mix both methods so some bats sit flush while others look mid-flight.
7. Style the Lamp
Once the bats are in place, put the lamp back where it belongs and style the area around it. A paper-bat shade looks especially good with stacked books, dark ceramic vases, brass candlesticks, faux ravens, or a small bowl of candy that you claim is for guests but absolutely is not. The lamp becomes part of a whole little moment instead of a lone Halloween announcement.
Creative Design Ideas
Use a Flying Pattern
Instead of spacing bats evenly, arrange them as if they are swooping around the shade. Start with a dense cluster on one side and let the bats trail off in a loose curve. This creates motion and feels more organic than perfect symmetry.
Mix Finishes
Black matte cardstock is the classic choice, but you can mix in charcoal, deep plum, metallic black, or even vellum for subtle contrast. Just keep the palette tight so the design still looks intentional.
Add Tiny Details
If you like a more decorative style, add faint silver ink lines, embossed patterns, or tiny punched stars around a few bats. Do not overdo it. The charm of this project comes from the silhouette, not from turning every bat into a formalwear event.
Decorate the Room, Not Just the Shade
Carry the idea beyond the lamp by placing a few matching bats on the wall behind it. That creates a visual trail and makes the shade feel connected to the room. It is a great trick if your lamp sits against a blank wall and needs a little extra drama.
Important Lamp Safety Tips
This is the part where we keep the project cute and not flammable. Paper and heat are not soulmates. Use a cool-running LED bulb, stay within the lamp’s maximum bulb rating, and keep all paper embellishments away from the bulb itself and any ventilation openings. The safest approach is to decorate the outer surface of the shade rather than placing paper close to the interior where heat can build up.
If your lamp uses a clip-on shade or a very small shade, be extra cautious. Smaller shades leave less space between the bulb and the material. If anything feels crowded, skip the project on that particular lamp and move your bat ambitions to a roomier shade. Good decor choices include knowing when to walk away.
Also, turn the lamp on and check it after a short period the first time you use it. The shade should stay comfortably warm at most, not hot. If it feels too warm, remove the embellishments and switch to a lower-heat bulb or a different lamp.
Common Mistakes to Avoid
Using Paper That Is Too Thin
Thin paper curls, tears, and tends to look flimsy on a curved surface. Cardstock gives a crisper silhouette and survives handling much better.
Making Every Bat the Same Size
Uniform bats can look stiff and flat. Mixing sizes adds movement and makes the lamp more visually interesting.
Overcrowding the Shade
Yes, bats are excellent. No, the lamp does not need to become a small paper volcano. Leave negative space so the design can breathe.
Skipping the Test Layout
Freehand placement sounds brave, but it often leads to awkward spacing and emergency peeling. Dry-fit first. Your future self will be less annoyed.
Forgetting the Rest of the Room
The best DIY decor feels integrated. If the lamp is spooky but everything around it says spring brunch, the overall vibe gets confused.
What It Looks Like in Real Life
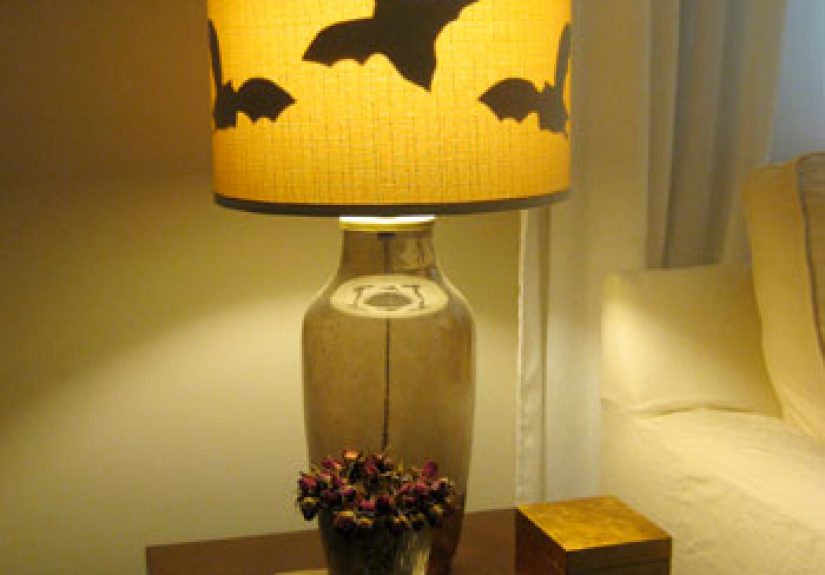
In a bedroom, paper bats on a lamp shade feel cozy-spooky rather than over-the-top. On an entry table, they create a fun first impression and look especially good when lit in the evening. In a living room, they can be surprisingly stylish if you keep the design mostly monochrome and let the silhouette do the work. This is one of those rare holiday crafts that can lean playful, moody, elegant, or family-friendly depending on how you style it.
Experience and Practical Lessons From Making Paper Bats for Lamp Shades
The first time I made paper bats for a lamp shade, I assumed it would be one of those five-minute crafts that somehow eats an entire afternoon. I was half right. The actual cutting was fast, but the layout stage became a full creative debate between “simple and chic” and “maybe this lamp needs an emotional support bat swarm.” What I learned right away is that the project looks best when you stop just before you think you are finished. The extra five bats you are tempted to add are usually the five bats that push the shade from stylish to mildly panicked.
I also learned that cardstock matters more than people think. My first test bat made from regular printer paper looked fine for about ten minutes and then started curling like it had lost the will to live. Once I switched to heavier paper, the whole project looked sharper and held its shape much better. The edges cut cleaner, the wings folded better, and the finished shade looked less homemade in the “uh-oh” sense and more homemade in the “wow, you made that?” sense.
Another thing that surprised me was how much lighting changes the result. During the day, the bats looked graphic and modern. At night, once the lamp was turned on, the folded wings cast soft little shadows that made the whole shade feel more dimensional. That was the moment the project stopped feeling like a craft and started feeling like decor. It is also why subtle folds work so well. You do not need giant bent wings. A small crease does plenty of work once the lamp is glowing.
Placement turned out to be the make-or-break step. One shade looked best with bats swirling up from one lower corner. Another looked better with a loose ring of smaller bats circling the middle. I found that centered, evenly spaced bats were technically neat but visually boring. The more successful versions had movement. They looked like the bats were arriving somewhere, leaving somewhere, or causing tiny decorative chaos on purpose.
The biggest practical lesson, though, was safety. A lamp shade is not a bulletin board. I now only use LED bulbs for this kind of project, and I keep every paper element well away from the hottest part of the lamp. That change made the whole project feel smarter and more relaxed. Instead of wondering whether my decor choice was secretly auditioning for a fire-safety lecture, I could just enjoy the finished look.
In the end, paper bats on lamp shades became one of my favorite seasonal DIY projects because they are high impact, low cost, and easy to customize. You can make them moody, funny, elegant, or kid-friendly without changing the basic method. And unlike some holiday crafts that require an engineering degree and three trips to the craft store, this one is refreshingly doable. It is just paper, scissors, a little patience, and the deeply satisfying feeling of turning an ordinary lamp into the most dramatic object in the room.
Conclusion
If you want Halloween decor that is affordable, stylish, and genuinely fun to make, paper bats for lamp shades are an easy win. With a plain shade, black cardstock, and a thoughtful layout, you can create a custom look that feels far more expensive than it is. Keep the design balanced, use a cool LED bulb, and let the bats do what they do best: make everything look a little moodier and a lot more memorable.