Table of Contents >> Show >> Hide
- Why Sewing Is Better Than Ironing Patches on Leather
- Tools and Materials You’ll Need
- Step 1: Plan the Patch Placement
- Step 2: Clean the Leather Surface
- Step 3: Secure the Patch Without Using Pins
- Step 4: Decide Whether to Hand Sew or Machine Sew
- Step 5: Hand Sewing a Patch on a Leather Vest
- Step 6: Machine Sewing a Patch on a Leather Vest
- How to Sew Through a Lined Leather Vest
- Common Mistakes to Avoid
- Best Stitches for Leather Vest Patches
- How to Care for the Vest After Sewing
- When to Ask a Professional
- Real-World Experience: What Actually Helps When Sewing Patches on a Leather Vest
- Conclusion
There are two kinds of people in this world: people who think a leather vest looks good as-is, and people who see that smooth back panel and immediately think, “That needs a patch the size of a small pizza.” If you are in the second group, welcome. Sewing patches on a leather vest is one of the best ways to personalize biker gear, clubwear, concert jackets, riding vests, cosplay pieces, or a well-loved thrift-store find that deserves a second act.
But leather is not denim. You cannot casually stab it with pins, rip out stitches, and pretend nothing happened. Leather remembers everything. Every needle hole is permanent, every crooked seam tells on you, and every rushed decision has the confidence of a bad tattoo. The good news? With the right tools, smart placement, and a patient stitch, you can attach patches securely and make your vest look custom rather than “crafted during a caffeine emergency.”
This guide explains how to sew patches on a leather vest by hand or with a sewing machine, what tools to use, how to avoid damaging the leather, and how to finish the job so the patch stays put through rides, shows, road trips, and regular life.
Why Sewing Is Better Than Ironing Patches on Leather
Many patches come with iron-on backing, which sounds convenient until leather enters the chat. Heat can dry out leather, discolor the finish, flatten texture, weaken adhesives, or leave shiny marks. Some leather vests also have linings, pockets, panels, or treatments that react badly to high heat. In other words, an iron may attach the patch, but it may also give your vest a permanent “oops.”
Sewing is usually the safer and stronger method. It creates a mechanical hold around the patch edge, works on embroidered patches and cloth patches, and lets you remove or replace the patch later if needed. Yes, the stitch holes remain in leather, but a carefully sewn patch leaves fewer regrets than scorched cowhide.
Tools and Materials You’ll Need
Before you begin, gather everything. Leather sewing rewards preparation. It punishes “I’ll just use whatever is in the junk drawer.”
Basic Supplies
- Leather vest
- Patch or patches
- Heavy-duty polyester, nylon, or waxed thread
- Leather needle, glovers needle, or heavy hand-sewing needle
- Thimble or leather finger guard
- Small clips, painter’s tape, double-sided fabric tape, or temporary adhesive spray
- Chalk pencil, silver fabric pencil, or removable marking tool
- Sharp scissors or thread snips
- Awl or stitching chisel for thick leather
- Seam ripper, only for lining worknot for casually attacking leather
For Machine Sewing
- Leather sewing machine needle, commonly size 90/14, 100/16, or 110/18 depending on thickness
- Heavy-duty polyester or nylon thread
- Walking foot, roller foot, or Teflon/nonstick presser foot
- Test scrap of similar leather if available
Polyester and nylon threads are popular because they are strong, abrasion-resistant, and less likely to break under stress than lightweight cotton thread. If you are hand sewing, waxed thread helps reduce friction and tangling. If your leather vest is thick motorcycle leather, pre-punching holes with an awl can make the job cleaner and save your fingers from filing a formal complaint.
Step 1: Plan the Patch Placement
Placement is not just decoration; it affects comfort, durability, and appearance. Put the vest on first. Stand naturally. Look in a mirror or ask someone to take photos from the front, back, and sides. A patch that looks perfectly centered while the vest is flat may shift when worn because shoulders, seams, and body shape change how the leather hangs.
For a large back patch, center it between the shoulder seams and above the waistline. For chest patches, check that they do not interfere with zippers, snaps, lapels, or inside pockets. For side patches, avoid areas that bend constantly, because repeated folding can stress stitches and make the patch curl.
Also consider the meaning of patches. On motorcycle vests, some patch placements and designs may carry club, military, or organizational significance. If you are using decorative patches, band patches, travel patches, name patches, or custom art, you are probably fine. Still, it is wise to be respectful and avoid copying insignia you have not earned or been authorized to wear.
Step 2: Clean the Leather Surface
Dust, oil, and road grime can keep tape or temporary adhesive from holding the patch in place. Wipe the area gently with a dry microfiber cloth. If the vest needs more attention, use a leather cleaner made for garments and follow the product instructions. Do not soak the leather. Do not scrub like you are cleaning a barbecue grill. Let the area dry completely before sewing.
This small step matters. A clean surface makes it easier to mark placement, keep the patch flat, and avoid trapping dirt under the patch. If the vest is vintage, cracked, suede, nubuck, or unusually delicate, test any cleaner in a hidden area first.
Step 3: Secure the Patch Without Using Pins
Regular straight pins are trouble on leather because they leave permanent holes. Instead, use sewing clips, painter’s tape, double-sided tape, or a light temporary adhesive spray. For a large back patch, a few small pieces of double-sided tape inside the patch border can keep it from shifting while you stitch.
Make sure the patch is smooth and flat. Check the position again while wearing the vest if possible. Once you start sewing, moving the patch becomes more complicated because the original holes may show. Leather is charming, stylish, and dramatic, but forgiving? Not so much.
Step 4: Decide Whether to Hand Sew or Machine Sew
Hand Sewing
Hand sewing is slower, but it gives you maximum control. It is ideal for thick leather, awkward patch placement, lined vests, small patches, and situations where a domestic sewing machine might struggle. It also lets you sew without flattening or wrestling the entire vest under a machine arm.
Machine Sewing
Machine sewing is faster and can look very clean, especially on thin or medium-weight leather. However, your machine must be able to handle the combined thickness of the patch and vest. Use a leather needle, heavy-duty thread, and a longer stitch length. A very short stitch can perforate leather like a tear-off coupon, weakening the area.
If you are unsure, test first. Place a scrap patch over scrap leather or a hidden part of the vest, then sew a few inches. Check the top and underside. If the machine skips stitches, breaks thread, stalls, or sounds like it is questioning your life choices, switch to hand sewing or visit a leather repair shop.
Step 5: Hand Sewing a Patch on a Leather Vest
To hand sew a patch, cut a length of thread about 18 to 24 inches. Longer thread may seem efficient, but it tangles more easily. Thread the needle and knot the end. If you want extra strength, double the thread. For a cleaner finish, use thread that matches the patch border; for a bold punk or battle-vest look, use contrasting thread.
Use a Whip Stitch or Running Stitch
A whip stitch is simple and strong. Bring the needle up from inside the vest or from just under the patch edge, then loop over the patch border and back through the leather. Continue around the patch with evenly spaced stitches. This works especially well for embroidered patches with a raised border.
A running stitch can also work if the patch has a flat edge. Push the needle down and up in a straight line around the patch border. Keep stitches small enough to hold the patch securely but not so close together that you weaken the leather.
Pre-Punch Holes for Thick Leather
If the leather is thick, use an awl to make tiny holes before sewing. Space them evenly around the patch. This reduces strain on your needle and hands, keeps stitches neater, and prevents accidental slips. Do not make huge holes. You are guiding the needle, not installing ventilation.
Backstitch to Lock the Thread
At the beginning and end of your seam, make two or three backstitches through existing holes. This locks the thread without creating a bulky knot. Trim the thread close, then tuck the end under the patch edge if possible.
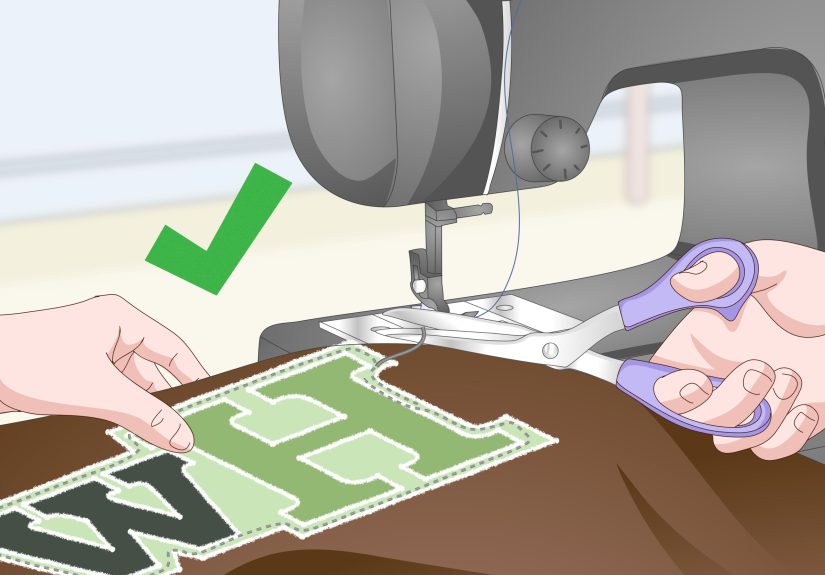
Step 6: Machine Sewing a Patch on a Leather Vest
If your vest and machine are compatible, machine sewing can create a durable, professional-looking result. Start by installing a leather needle. Use polyester or nylon thread in the top and bobbin. Set the stitch length longer than you would for regular fabric, often around 3.0 to 4.0 mm, depending on the leather and patch.
Position the patch under the presser foot and sew slowly around the edge. Keep the patch flat, but do not pull the leather. Let the feed dogs move the material. If the leather sticks under the foot, a walking foot, roller foot, or nonstick foot can help. Sew close to the embroidered border, but avoid stitching so close that the needle falls off the edge.
When turning corners, stop with the needle down, lift the presser foot, rotate the vest carefully, lower the foot, and continue. At the end, backstitch a few stitches or pull the threads to the inside and tie them securely.
How to Sew Through a Lined Leather Vest
Many leather vests have linings, and this is where things get interesting. You have two options: sew through both the leather and lining, or open part of the lining and sew only through the outer leather.
Sewing through the lining is easier, but the stitches will show inside the vest. Before doing this, check for inside pockets. You do not want to sew a pocket shut unless your goal is to create a tiny leather prison for your keys.
For a cleaner professional finish, carefully open a small section of the lining seam near the patch area. Sew the patch through the outer leather only, then hand-stitch the lining closed afterward. This takes more time, but it hides the thread and keeps the inside neat.
Common Mistakes to Avoid
Using Pins
Pins leave holes in leather. Use clips, tape, or temporary adhesive instead.
Choosing Weak Thread
Light cotton thread may snap, fray, or wear out. Use heavy-duty polyester, nylon, or waxed thread for better durability.
Stitching Too Close Together
Tiny stitches can weaken leather by creating too many holes. Longer, even stitches are stronger and cleaner.
Skipping the Test
Every vest is different. Soft lambskin, cowhide motorcycle leather, suede, faux leather, and coated leather all behave differently. Test your needle, thread, and stitch length before committing.
Rushing the Placement
Measure twice, sew once. Leather does not enjoy do-overs.
Best Stitches for Leather Vest Patches
The best stitch depends on the look and strength you want. A whip stitch is excellent for hand sewing embroidered patches because it wraps the patch edge securely. A saddle stitch is extremely strong and often used in leatherwork, but it requires two needles and pre-punched holes. A machine straight stitch is clean and efficient for flatter patches and lighter leather.
For most beginners, a neat hand whip stitch is the most forgiving option. It is easy to control, works around curves, and does not require forcing a bulky vest through a sewing machine.
How to Care for the Vest After Sewing
Once the patch is attached, inspect your stitches. Look for loose loops, skipped areas, or puckering. Gently flex the leather to make sure the patch moves with the vest. If a corner lifts, add a few extra stitches before wearing it out.
For long-term care, wipe the vest with a soft cloth after dusty rides or events. Condition the leather occasionally with a product suitable for your specific leather type, but avoid over-conditioning around patches because excess product can darken fabric or loosen adhesive backing. Store the vest on a broad hanger so the shoulders keep their shape.
When to Ask a Professional
There is no shame in handing the job to a leather tailor, cobbler, motorcycle gear shop, or alteration specialist. In fact, for expensive vests, club patches, very large back patches, thick leather, or lined garments, professional sewing may be the smartest choice. A shop with an industrial walking-foot machine can stitch through leather more evenly than most home machines.
If the vest has sentimental value, rare leather, complex lining, armor pockets, or decorative seams, professional help can prevent costly mistakes. Paying for one clean patch installation is often cheaper than trying to repair a crooked, puckered, hole-filled disaster. Leather drama is best left to fashion, not repair bills.
Real-World Experience: What Actually Helps When Sewing Patches on a Leather Vest
After working with leather vests, the biggest lesson is simple: placement takes longer than sewing, and that is normal. People often want to jump straight to the needle, but the best-looking patches are usually the ones that were positioned, photographed, adjusted, and checked on the body before a single stitch was made. A vest is not a flat poster. It curves around shoulders, pulls across the chest, and shifts when zipped or snapped. A back patch that looks centered on a table can sit slightly crooked when worn. Taking five extra minutes here can save you from staring at a crooked patch forever like it owes you money.
Another practical lesson is that temporary adhesive is helpful, but less is more. A light touch of double-sided tape or a small amount of temporary spray can keep the patch from sliding. Too much adhesive, however, can gum up the needle, make the thread drag, or leave residue near the patch edge. If using tape, keep it away from the exact sewing line. The needle should pass through leather and patch, not a sticky sandwich.
Hand sewing is often easier than beginners expect, especially for one or two patches. The trick is not to fight the leather. If the needle does not pass through easily, stop and pre-punch the hole with an awl. Forcing the needle can bend it, break it, or send it into your finger with the enthusiasm of a tiny spear. A thimble or leather finger guard is not optional if the leather is thick. Your fingertips will thank you, probably with less swelling.
Thread color also changes the final style. Matching thread creates a clean, professional look and hides beginner imperfections. Contrasting thread creates attitude and can look great on punk, metal, biker, or DIY fashion vests, but it also makes every uneven stitch more visible. If you are new to sewing leather patches, start with matching thread until your stitches become consistent. Then go wild with red, white, yellow, or whatever color makes your vest look like it has a backstory.
For large back patches, it helps to sew in sections. Start at the top center, stitch a few inches, then move evenly around the patch while smoothing as you go. This prevents the patch from creeping to one side. Curved patches need special attention because the border may ripple if pulled too tightly. Keep the thread snug, not strangled. A patch should lie flat, but it should not look like it is being held hostage.
One more useful habit: inspect the inside before sewing. Many vests hide inside pockets, labels, snaps, or lining folds exactly where you plan to stitch. Slide your hand behind the area and make sure you are not sewing through a pocket opening. If you do sew through the lining, keep the stitches neat because you will see them every time you put the vest on. If that bothers you, open the lining and sew only through the leather shell.
Finally, accept that leather patch sewing is slow craft, not speed sewing. Put on music, work under good lighting, and take breaks. A leather vest with patches should look earned, personal, and durable. Done well, it becomes more than clothing. It becomes a travel log, a music archive, a club statement, a memory board, and occasionally a conversation starter from strangers who definitely want to tell you about their cousin’s motorcycle.
Conclusion
Sewing patches on a leather vest is a satisfying project when you respect the material. Choose strong thread, use the correct needle, avoid pins, plan the placement carefully, and sew slowly. Hand sewing gives you control, while machine sewing can work well if your equipment can handle the thickness. The most important rule is to remember that leather keeps every hole, so patience is not just a virtueit is a repair bill prevention strategy.
Whether you are adding a club patch, a band logo, a travel souvenir, a name patch, or a custom design, the right technique will make your vest look intentional, durable, and uniquely yours. Take your time, protect the leather, and let each patch tell part of the story.
Note: Always test your needle, thread, adhesive, and stitch length on a hidden area or scrap material before sewing directly onto a valuable leather vest.