Table of Contents >> Show >> Hide
- What Are Sensory Bottles?
- Why Sensory Bottles Are So Popular
- How to Make Sensory Bottles: The Basic Method
- Best Fillers for Different Sensory Bottle Effects
- Simple Tips for Making Better Sensory Bottles
- Creative Sensory Bottle Ideas to Try
- Safety Tips You Should Not Skip
- How to Use Sensory Bottles at Home or in the Classroom
- Common Mistakes to Avoid
- Final Thoughts on DIY Sensory Bottles
- Real-Life Experiences With Sensory Bottles: What They Feel Like in Everyday Life
Sensory bottles are one of those rare crafts that check every box. They are easy to make, inexpensive, fun to customize, and oddly mesmerizing for kids and adults alike. Shake one, tilt it, roll it, and suddenly everyone in the room turns into a tiny scientist with excellent taste in glitter. Whether you call them calm-down bottles, glitter jars, discovery bottles, or “the thing that somehow bought me five whole quiet minutes,” sensory bottles can be used for visual focus, simple sensory play, imaginative learning, and smoother transitions during the day.
If you want to learn how to make sensory bottles without turning your kitchen into an art-supply crime scene, you are in the right place. This guide covers what sensory bottles are, why people use them, what materials work best, how to make them safely, and plenty of creative sensory bottle ideas you can try at home or in a classroom. You will also find practical tips for choosing fillers, picking themes, and avoiding the classic mistake of creating a bottle that leaks like it just heard juicy gossip.
What Are Sensory Bottles?
Sensory bottles are sealed clear containers filled with materials that create interesting visual, auditory, or tactile effects when shaken, turned, or observed. Some are fast and splashy. Others are slow and dreamy. Some are designed for calm, while others are built for searching, sorting, counting, or simply enjoying movement and color.
At their core, DIY sensory bottles are simple: you place selected materials inside a sturdy bottle, seal it tightly, and use it as a contained sensory play tool. Because everything stays inside the bottle, they offer a cleaner alternative to open sensory bins. That makes them especially appealing for homes, preschool rooms, waiting areas, calm corners, and travel bags.
A sensory bottle can be many things depending on your goal. A glitter bottle can provide a slow visual drift. An I-Spy bottle can turn into a mini seek-and-find game. A nature bottle can become a tiny portable forest. An oil-and-water bottle can double as a beginner science activity. In other words, sensory bottles are the multitaskers of the craft world. They are the Swiss Army knife of rainy-day parenting.
Why Sensory Bottles Are So Popular
People love sensory bottles because they are flexible, portable, and inviting. Children can watch colors swirl, objects float, glitter settle, or hidden items tumble into view. That kind of observation encourages attention, curiosity, and language. It also gives adults a chance to model simple conversation: “What do you notice?” “Which object sank?” “Can you find the blue bead?” “Why is that pom-pom doing the backstroke?”
Many caregivers also use sensory bottles as part of a calming routine. Watching items move through liquid can feel predictable and soothing, especially during transitions, breaks, or moments when a child needs a quieter activity. That does not mean a bottle is magic. It will not solve every big feeling in the universe. But it can be a helpful tool in a broader toolkit that includes routines, co-regulation, movement breaks, and age-appropriate emotional support.
Sensory bottles can also support learning through play. A themed bottle can encourage color recognition, vocabulary, storytelling, letter hunts, counting, pattern spotting, or simple science observations. In short, they are part craft, part toy, part visual break, and part conversation starter.
How to Make Sensory Bottles: The Basic Method
If you want a simple starting point, begin with the classic liquid sensory bottle. It is the easiest version for beginners and gives you lots of room to personalize.
Basic Supplies
- A clear plastic bottle with a tight lid
- Warm water
- Clear glue, glitter glue, or another slow-moving liquid filler
- Glitter, sequins, confetti, or small lightweight decorations
- Food coloring, if desired
- Super glue or hot glue for sealing the lid
- A funnel, if you enjoy avoiding unnecessary mess
Step-by-Step Instructions
- Choose a sturdy, clear plastic bottle. Plastic is usually the best choice for children because it is lighter and less breakable than glass.
- Clean and dry the bottle thoroughly so the contents stay clear and fresh-looking.
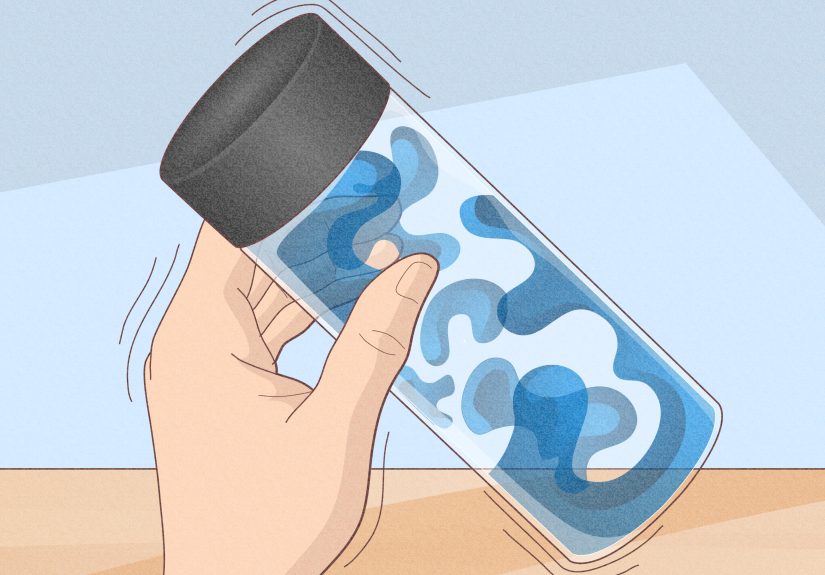
- Add your main filler. For a classic calm-down bottle, many people use warm water with clear glue or glitter glue to slow the movement of glitter and small objects.
- Add visual elements such as glitter, sequins, confetti, or small shapes. Do not overfill. A crowded bottle is like an overcrowded group chat: too much going on and nobody can shine.
- Leave a little room at the top so the contents can move freely.
- Twist the lid on tightly and test the movement. Adjust the liquid or decorations if needed.
- Once you are happy with the bottle, remove the lid, apply strong glue around the rim, and seal it shut.
- Let the glue dry completely before handing the bottle to a child.
That is the basic formula. From there, you can go in dozens of creative directions.
Best Fillers for Different Sensory Bottle Effects
The secret to great sensory bottles is choosing the right filler for the effect you want. The bottle’s “personality” depends less on the decorations and more on how the contents move.
For Slow, Calming Movement
Use clear glue, glitter glue, corn syrup, or a combination of glue and water. These create a slower drift that makes glitter and lightweight pieces float down gradually. This is the classic calm-down bottle effect.
For Fast Motion and Splashy Action
Use plain water with a small amount of food coloring. This works well when you want quick movement, bold color, and a lower-cost option.
For Layering and Wave Effects
Try oil and colored water in the same bottle. The two liquids separate and create a wave-like effect when moved. This is a favorite for ocean themes and simple science exploration.
For Search-and-Find Play
Use dry fillers such as rice, salt, dyed pasta, or sand. Add letters, beads, mini erasers, buttons, or tiny themed toys. This turns the bottle into an I-Spy game that encourages visual scanning and focus.
For Sound Bottles
Use dry materials that make interesting noise when shaken, such as beans, pasta, bells, or large beads. These can be fun, but they are better for active play than for calming moments. A true calm-down bottle should not sound like a maraca with a caffeine problem.
Simple Tips for Making Better Sensory Bottles
1. Pick Plastic Over Glass for Young Kids
Glass can look beautiful, but plastic is often safer and easier to handle for children. It is lighter, less fragile, and more forgiving if dropped.
2. Seal the Lid Like You Mean It
This is not the place for wishful thinking. Use strong glue and let it cure fully. A sensory bottle should be sealed before play, especially if it contains glitter, small objects, oil, or anything messy.
3. Match the Bottle to the Child’s Age
For babies and toddlers, keep the contents simple, high-contrast, and safely sealed. For preschoolers, you can add themes, colors, and search items. For older kids, try learning-based bottles with letters, numbers, magnetic items, or science-style layering.
4. Do Not Overstuff It
Too many decorations can make the bottle look cloudy and chaotic. Leave enough space for movement. Your glitter deserves room to perform.
5. Use Themes Kids Already Love
Ocean colors, dinosaurs, flowers, outer space, construction vehicles, and seasonal themes all make sensory bottles more engaging. Personal interest matters. A child who adores sharks will pay far more attention to a bottle full of blue shimmer and tiny fins than one filled with random craft leftovers.
6. Think About Purpose First
Ask yourself what you want the bottle to do. Do you want it to soothe, entertain, teach, or encourage searching? Once you know the goal, the materials become much easier to choose.
Creative Sensory Bottle Ideas to Try
Calm-Down Glitter Bottle
This classic sensory bottle uses clear glue, warm water, and glitter. It is visually soothing and easy to customize with favorite colors. Add chunky glitter for sparkle or fine glitter for a snow-globe effect.
Ocean Wave Bottle
Fill part of the bottle with blue-tinted water and the rest with oil. Add shell confetti or ocean-colored glitter. When tilted, the bottle creates rolling wave motion that feels peaceful and beachy without requiring sunscreen.
Nature Discovery Bottle
Use water, flower petals, leaves, smooth pebbles, or twigs collected during a walk. This is a great seasonal activity and a lovely way to connect a child’s outdoor experiences with indoor observation and language.
I-Spy Alphabet Bottle
Fill a dry bottle with rice or colored sand and hide alphabet beads or small objects inside. Invite children to find letters in their name, count objects, or identify shapes and colors.
Pom-Pom Bottle
Large colorful pom-poms in a clear container create a bright visual effect with very little prep. This is a simple option for younger children and works well as an introduction to sensory bottles.
Magnet Exploration Bottle
For older children under close adult supervision, use a sealed bottle with magnetic and nonmagnetic items. Then move a magnet wand outside the bottle and observe what shifts. This adds a science angle and encourages prediction, testing, and discussion.
Seasonal Theme Bottles
Try snowflakes in winter, flowers in spring, patriotic colors in summer, or leaves in fall. Seasonal bottles are fun for rotating classroom centers, holiday tables, or rainy weekends when everyone needs a project.
Safety Tips You Should Not Skip
Because sensory bottles often include small objects, strong liquids, and slippery fillers, safety matters. Use a durable bottle with a secure cap, glue the lid shut, and inspect the bottle regularly for cracks or leaks. Always supervise children as needed based on age and development.
Be thoughtful about what goes inside. Avoid sharp items, fragile materials, or anything that could become dangerous if the bottle breaks. If you are making bottles for very young children, keep the contents simple and sturdy.
One especially important note: skip water beads for young children or in any setting where the bottle could be opened, damaged, or mouthed. Water beads may look harmless, but they can be dangerous if swallowed or placed in the ears or nose. When in doubt, choose safer fillers such as glitter, pom-poms, rice, or large visible objects in a fully sealed bottle.
If you are using a sensory bottle with a child who has specific sensory, developmental, or self-regulation needs, think of the bottle as one tool rather than the whole toolbox. Some children may prefer fast-moving bottles, others slow drift, others sound, and others may not care about bottles at all and would rather sprint down a hallway like a caffeinated gazelle. That is normal. Preferences vary.
How to Use Sensory Bottles at Home or in the Classroom
During Transitions
Sensory bottles can help bridge moments that tend to be bumpy, such as coming inside, waiting for dinner, cleaning up, or shifting from active play to quiet time. A short visual activity can give children something predictable to focus on.
In a Calm Corner
Many families and teachers keep one or two bottles in a calm-down space with books, soft seating, or fidget tools. The goal is not punishment. It is offering a quieter place to reset.
As a Conversation Starter
Ask open-ended questions. What do you see floating? Which color moves fastest? Can you find the star? What happens when you turn it upside down? Great sensory play often comes with great language practice.
As a Learning Tool
Use themed bottles for counting, letter recognition, color sorting, seasonal vocabulary, storytelling prompts, or simple science experiments. A sensory bottle can be playful and educational without feeling like homework in a fancy tube.
Common Mistakes to Avoid
- Using a flimsy bottle that dents, leaks, or pops open
- Adding too much glitter or too many objects
- Skipping the glue on the lid
- Choosing fillers that move too fast when you wanted a calming effect
- Using materials that are unsafe if the bottle is opened or broken
- Making one bottle and assuming every child will love it the same way
The best sensory bottles usually come from a little testing and adjusting. If the glitter falls too fast, add more glue. If the search items are impossible to find, reduce the filler. If the bottle looks muddy, simplify the colors. Crafting is basically science wearing a glue stick.
Final Thoughts on DIY Sensory Bottles
Learning how to make sensory bottles is less about following one perfect recipe and more about understanding the effect you want to create. Once you know whether you want calm, curiosity, learning, or pure sparkly delight, the rest gets much easier. With a sturdy bottle, a well-chosen filler, a sealed lid, and a little imagination, you can make sensory bottles that feel personal, practical, and genuinely useful.
The beauty of sensory bottle ideas is that they can grow with a child. A baby may enjoy watching bold colors drift. A preschooler may love a themed glitter bottle. A kindergartener may search for hidden letters. An older child may build a mini science bottle with layers, magnets, or moving parts. Same basic concept, different experience, lots of possibilities.
So gather a few bottles, raid the craft drawer, and get creative. Just maybe put down an old towel first. Optimism is nice, but glitter has a long memory.
Real-Life Experiences With Sensory Bottles: What They Feel Like in Everyday Life
One of the most interesting things about sensory bottles is how differently they show up in real life compared with how they look in a craft tutorial. On paper, they seem almost too simple: a bottle, some filler, a few decorations, done. But in actual homes and classrooms, the experience is much richer. A sensory bottle often becomes part toy, part ritual, part conversation piece, and part tiny peace treaty between a child and a chaotic afternoon.
For many families, the first experience is surprise. Adults expect a child to glance at the bottle for five seconds and move on. Instead, some children become completely absorbed. They turn the bottle slowly, watch the glitter fall, point out colors, and repeat the process again and again. There is something satisfying about predictable movement in a world that often feels noisy and fast. Even adults can get hooked. Plenty of parents start by saying, “This is for the kids,” and then spend the next three minutes staring into the bottle like it contains the secrets of the universe.
In classrooms, sensory bottles often work best when they are introduced with intention. A teacher might place one in a calm corner, use one during transition time, or invite children to help make themed bottles that connect to a unit on seasons, weather, ocean life, or letters. When children help create the bottle, they usually feel more ownership over it. It becomes their project, not just another object on a shelf. That small difference matters. A child who proudly chose the blue glitter and tiny fish confetti is much more likely to return to that bottle and talk about it later.
Another common experience is trial and error. Sometimes the first bottle is perfect. More often, it is an experiment with personality issues. The glitter sinks too fast. The rice hides everything. The water is cloudy. The pom-poms do not move the way you imagined. That is normal. Making sensory bottles is one of those activities where “close enough” is often the first draft. The good news is that each bottle teaches you something. After one or two tries, most people get much better at choosing fillers, balancing colors, and deciding what kind of motion they want.
There is also a social side to sensory bottles that people do not always expect. Children often use them as prompts for communication. They describe what they see, ask questions, tell stories about the items inside, or turn a search bottle into a game with siblings or classmates. A bottle filled with tiny stars, shells, or alphabet beads can spark surprising conversations. Suddenly you are not just crafting. You are observing, comparing, imagining, and connecting.
Perhaps the best real-life experience is that sensory bottles are forgiving. They do not need to be expensive, perfect, or Pinterest-famous to be useful. A simple bottle made from recycled materials can be just as engaging as a carefully styled one. The joy comes from the interaction, not from winning a craft beauty contest. In everyday life, that is what makes sensory bottles so appealing: they are humble, creative, adaptable, and often far more meaningful than their tiny, glittery appearance suggests.


