Table of Contents >> Show >> Hide
- Why This Matters Before You Touch a Single Wire
- Step 1: Confirm What Kind of Amplifier Channel You’re Using
- Step 2: Check the Impedance Rating of Both Speakers
- Step 3: Decide Between Parallel Wiring, Series Wiring, or a Speaker Selector
- Step 4: Gather the Right Materials Before You Start
- Step 5: Turn Off the Amp and Plan the Wiring Path
- Step 6: Wire the Two Speakers Correctly
- Step 7: Double-Check Polarity So the Speakers Stay In Phase
- Step 8: Power On Slowly and Test at Low Volume First
- Step 9: Troubleshoot Common Problems Before Calling the Setup a Disaster
- Best Setup Examples for Real-World Use
- Mistakes to Avoid When Powering Two Speakers with One Amp Channel
- Final Thoughts
- Real-World Experiences and Practical Lessons from This Kind of Setup
- SEO Tags
If you have one amp channel, two speakers, and a bold belief that “wires are just spicy noodles,” take a breath. This can absolutely work, but only if you respect the one thing audio gear never forgets: impedance. Get the math right, and your setup can sound clean, balanced, and surprisingly powerful. Get it wrong, and your amp may run hot enough to audition for a role as a toaster.
This guide explains how to power two speakers with one channel amp the smart way. You’ll learn when parallel wiring makes sense, when series wiring is safer, when a speaker selector is the better answer, and why correct polarity matters more than people think. The focus here is on passive speakers, not powered speakers with built-in amplification. Also, remember one important limitation: if you feed two speakers from a single amp channel, both speakers will play the same mono signal from that channel.
Quick reality check: the best wiring method depends on your amplifier’s minimum speaker load and each speaker’s impedance rating. Two 8-ohm speakers can often be wired in parallel on a 4-ohm-stable amp. Two 4-ohm speakers on the same channel? That is where good intentions go to overheat.
Why This Matters Before You Touch a Single Wire
Most home and car audio problems in multi-speaker setups come down to the same issue: people assume “more speakers” automatically means “more better.” Sometimes it means more sound. Sometimes it means less volume, thinner bass, amp shutdowns, or protection mode. A one-channel amp can power two speakers, but the electrical load the amp sees changes depending on how you wire those speakers.
That is why the safest approach is not guessing. It is reading the amp’s rating, checking the speaker impedance, and choosing the wiring method that keeps the total load within the amp’s comfort zone. Think of the amplifier as a worker carrying boxes. One box is easy. Two boxes might be fine. Four boxes while jogging uphill? That worker is filing a complaint.
Step 1: Confirm What Kind of Amplifier Channel You’re Using
Start by identifying exactly what “one channel amp” means in your setup. Are you dealing with a mono amp, a single channel of a stereo amplifier, or a bridged channel? That difference matters.
What to check first
- The amplifier’s minimum speaker impedance per channel
- Whether the amp is rated for 4 ohms, 8 ohms, or 2 ohms
- Whether the channel is bridged, because bridged modes often require a higher minimum load
- Whether the amp manual allows multiple speakers on one output
If the rear panel or manual says the channel is stable at 4 ohms, that usually opens the door to wiring two 8-ohm speakers in parallel. If it wants to see 8 ohms minimum, you may need a series connection or an impedance-matching device instead.
Step 2: Check the Impedance Rating of Both Speakers
Look at the label on the back of each speaker. Most passive speakers are rated at 4, 6, or 8 ohms. This number tells you the nominal load each speaker presents to the amp.
Here is the quick version:
- Two 8-ohm speakers in parallel = 4 ohms total
- Two 8-ohm speakers in series = 16 ohms total
- Two 4-ohm speakers in parallel = 2 ohms total
- Two 4-ohm speakers in series = 8 ohms total
If both speakers are not the same impedance, stop and do the math before wiring anything. Mixing a 6-ohm speaker with an 8-ohm speaker is not automatically illegal in the Kingdom of Audio, but it does make load calculations and power sharing less predictable. Matching speakers are easier to manage and usually sound more consistent together.
Step 3: Decide Between Parallel Wiring, Series Wiring, or a Speaker Selector
This is the step that decides whether your setup becomes a success story or a “why does it smell warm?” story.
Use parallel wiring when:
- Your amp channel is stable at the lower combined load
- You want stronger output from the pair
- You are using two matching speakers, commonly two 8-ohm speakers on a 4-ohm-stable amp
Use series wiring when:
- Your amp should not see a low-impedance load
- You want a safer electrical load, even if output drops
- You are okay with slightly softer performance and a less common wiring approach
Use an impedance-matching speaker selector or volume control when:
- You want an easier, safer install
- You may add more speakers later
- You want zone switching for rooms, patios, workshops, or garages
- You do not want to become best friends with an ohms calculator
If you are trying to distribute one amp signal to several rooms, a proper speaker selector is often smarter than clever DIY wiring. And if you are building a bigger whole-home audio system, a 70V or 100V distributed audio system may be a better long-term solution than stacking passive speakers onto one low-impedance channel.
Step 4: Gather the Right Materials Before You Start
You do not need a laboratory. You do need a few basics.
- Speaker wire of appropriate gauge
- Wire stripper or cutter
- Banana plugs, spades, or bare wire, depending on your terminals
- Electrical tape or heat shrink if you are making joins
- The amplifier manual
- A flashlight, because speaker terminals love living in dark corners
Keep wire runs neat and avoid loose strands. A single wandering strand touching the other terminal can short the output. That is not a fun surprise.
Step 5: Turn Off the Amp and Plan the Wiring Path
Before touching any connections, turn the amplifier off and unplug it. Then sketch the route in your head or on paper. This reduces mistakes and makes it easier to keep polarity consistent from start to finish.
Ask yourself three questions:
- Where is the amp located?
- Where will each speaker sit?
- Which wiring method am I using: parallel, series, or selector?
If this is a home setup with speakers in different areas, label your wire runs. Future You will be very grateful. Future You is tired of playing “guess which cable goes to the patio.”
Step 6: Wire the Two Speakers Correctly
Now we get to the main event.
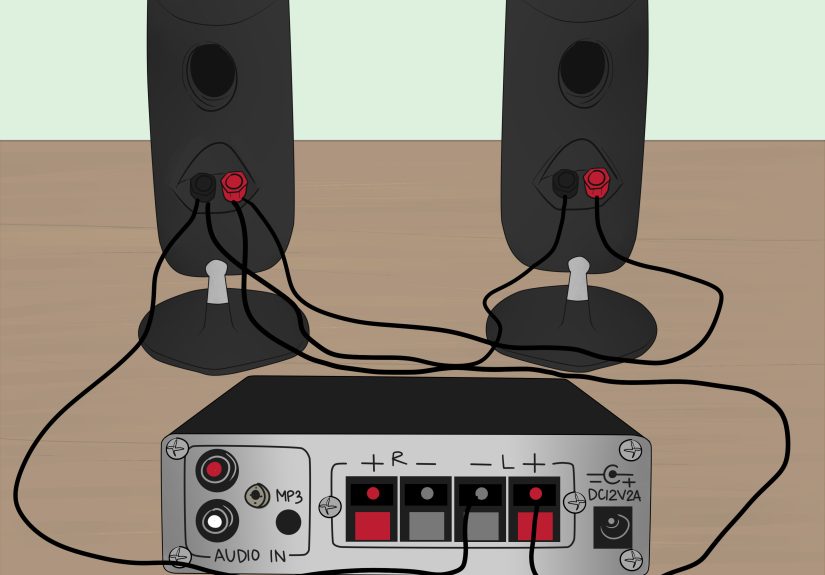
Option A: Parallel wiring
Parallel wiring is the most common method when an amp can handle the lower load.
How to wire it:
- Connect the amp’s positive terminal to Speaker A positive
- Connect the amp’s positive terminal to Speaker B positive
- Connect the amp’s negative terminal to Speaker A negative
- Connect the amp’s negative terminal to Speaker B negative
Example: If you wire two 8-ohm speakers in parallel, the amp sees 4 ohms. This is usually the sweet spot for a 4-ohm-stable channel and often gives the best balance of volume and efficiency.
Option B: Series wiring
Series wiring is often safer for amps that do not like low impedance, but it usually produces less output.
How to wire it:
- Connect the amp’s positive terminal to Speaker A positive
- Connect Speaker A negative to Speaker B positive
- Connect Speaker B negative to the amp’s negative terminal
Example: Two 8-ohm speakers in series create a 16-ohm load. Most amplifiers will be very comfortable with that, but you may notice lower overall power. It is safe, not flashy.
Option C: Through a speaker selector
If you use an impedance-matching speaker selector, connect the amp output to the selector input, then connect each speaker pair to the selector outputs according to the manufacturer instructions. This method is often cleaner, safer, and easier to troubleshoot later.
Step 7: Double-Check Polarity So the Speakers Stay In Phase
Correct polarity means positive goes to positive and negative goes to negative. If one speaker is wired backward, the two speakers can work against each other. The result is weak bass, strange imaging, and a sound that feels oddly hollow, like your favorite song moved into an empty hallway.
Most speaker wire has some kind of marking on one conductor, such as a stripe, ridge, text, or color. Pick one side as positive and stay consistent all the way through.
| Connection Point | What to Match |
|---|---|
| Amp terminal | Red or + to speaker red or + |
| Amp terminal | Black or – to speaker black or – |
| Both speakers | Use the same wire orientation on each speaker |
Do not rush this step. A correct impedance setup with reversed polarity can still sound terrible.
Step 8: Power On Slowly and Test at Low Volume First
Once everything is connected, power on the amp with the volume low. Play a familiar track, not the loudest thing in your playlist. This is not the moment for dramatic bass drops.
Listen for these signs
- Both speakers are playing clearly
- Bass sounds solid, not thin or canceled
- The amp stays cool and stable
- No distortion appears at modest volume
- No protection lights, shutdowns, or odd buzzing
Let the system play for several minutes, then check the amplifier. Warm is normal. Extremely hot is not. If the amp gets too hot quickly, turn it off and recheck your wiring and impedance math.
Step 9: Troubleshoot Common Problems Before Calling the Setup a Disaster
If something sounds off, the problem is usually one of a few repeat offenders.
Problem: The amp shuts down or gets very hot
Your total speaker load is probably too low for that channel. Recheck whether you accidentally wired two 4-ohm speakers in parallel or used a bridged channel with too little impedance.
Problem: The sound is weak or bass is missing
Check polarity. One backward-wired speaker can suck the life out of the low end faster than a bad karaoke version of your favorite song.
Problem: The volume is lower than expected
If you used series wiring, that is normal. Higher total impedance usually means the amp delivers less power. If the amp supports it, parallel wiring may restore output.
Problem: One speaker is louder than the other
Make sure the speakers have matching impedance and sensitivity. Also check for a loose connection, damaged wire, or a selector setting that is not configured correctly.
Best Setup Examples for Real-World Use
Example 1: Garage audio
You have one channel available and two 8-ohm passive speakers. Your amp channel is stable at 4 ohms. Parallel wiring is usually the practical choice here. It keeps the setup simple and gives useful output for a larger space.
Example 2: Vintage stereo amp that prefers lighter loads
You want to feed two bookshelf speakers from one channel, but the amp is happier with higher impedance. Series wiring may be safer, especially if you are more concerned with background listening than shaking the windows.
Example 3: Kitchen and patio from one source
This is where an impedance-matching speaker selector earns its paycheck. You get easier switching, cleaner wiring, and less risk of overloading the amplifier.
Mistakes to Avoid When Powering Two Speakers with One Amp Channel
- Ignoring the amp’s minimum ohm rating
- Assuming all speaker outputs are the same in stereo and bridged modes
- Mixing odd speaker impedances without calculating total load
- Reversing polarity on one speaker
- Using sloppy bare wire with stray strands
- Testing at high volume first
- Trying to run powered speakers as if they were passive speakers
Final Thoughts
If you want to power two speakers with a one channel amp, the project is not hard, but it does demand respect for the numbers. The secret is simple: know your amp’s minimum load, know your speakers’ impedance, and choose the right wiring method. Parallel wiring is often best when the amp can handle the lower load. Series wiring is safer when it cannot. A speaker selector is the adult-in-the-room option when the setup starts growing beyond a basic pair.
Do it right, and one channel can run two speakers without drama. Do it wrong, and your amp may begin a very loud protest by going silent. In audio, as in life, the details matter.
Real-World Experiences and Practical Lessons from This Kind of Setup
People who try this setup for the first time often expect the challenge to be “how do I physically connect the wires?” In reality, the bigger challenge is understanding what happens after the wires are connected. A very common real-world experience is that the system works immediately, but the sound does not match expectations until the wiring method matches the amp. Someone wires two speakers in series, turns the system on, hears music from both boxes, and assumes success. Then they realize the volume is lower than expected and the system feels polite when they wanted confident. That is not necessarily a failure; it is just the tradeoff of a higher total load.
Another common experience happens with parallel wiring. The sound often comes alive right away. The speakers feel more energetic, the room fills out better, and the listener thinks, “Perfect, I am a genius.” Then twenty minutes later the amplifier feels much hotter than usual. That is the moment when people discover the difference between “it works” and “it works safely for the long haul.” A setup that sounds great at first can still be stressing the amp if the total impedance drops too low.
In garages, workshops, and small retail spaces, people usually prefer parallel wiring when the amp supports it because it gives a more satisfying everyday listening experience. In bedrooms, offices, or vintage stereo systems, people often end up liking series wiring more than they expected because it is stable, quiet, and low-stress. It may not win a loudness contest, but it tends to win the “I just want this to work every day” contest.
There is also the polarity lesson, which many people learn only after a frustrating hour. One speaker plays, the other plays, and yet somehow the music sounds thin and unimpressive. After checking the source, the amp, and the speakers themselves, they finally discover one positive and one negative lead reversed on a single speaker. Fixing that one mistake often brings back bass, center image, and overall balance in a way that feels almost magical. It is not magic, of course. It is just physics wearing a dramatic costume.
Perhaps the most useful real-world lesson is that speaker selectors and impedance-matching controls are not “cheating.” Many people begin with the idea that direct wiring is the purest path, but after dealing with extra rooms, long wire runs, and future upgrades, they realize those devices exist for a reason. They simplify installation, protect the amplifier, and make the whole system easier to live with. That matters. The best audio setup is not only the one that sounds good on day one, but the one you still enjoy six months later without mystery shutdowns, loose cables, or random bursts of troubleshooting energy.