Table of Contents >> Show >> Hide
- Why Grow Chrysanthemums From Cuttings?
- Best Time to Take Chrysanthemum Cuttings
- What You Need Before You Start
- How to Choose the Right Stem
- Step-by-Step: How to Root Chrysanthemum Cuttings
- Best Conditions for Rooting Chrysanthemum Cuttings
- Common Mistakes to Avoid
- Aftercare for Rooted Chrysanthemum Cuttings
- Can You Root Chrysanthemum Cuttings in Water?
- How Long Does It Take to Root Chrysanthemum Cuttings?
- Practical Example for Home Gardeners
- What the Experience of Rooting Chrysanthemum Cuttings Is Really Like
- Final Thoughts
If you have ever looked at a gorgeous chrysanthemum and thought, “I wish I had ten more of you,” good news: you do not need a magic wand, a greenhouse empire, or a suspiciously expensive gadget. You just need healthy stems, a clean setup, a little patience, and the self-control not to poke the cuttings every 12 minutes to “see if roots are happening yet.”
Rooting chrysanthemum cuttings is one of the easiest ways to multiply your favorite mums. It is fast, affordable, and wonderfully practical for home gardeners who want more plants without rolling the dice on seeds. Even better, cuttings create new plants that stay true to the parent, so if you love the flower color, shape, growth habit, or bloom timing of your existing mum, cuttings are the shortcut to more of the same.
In this guide, you will learn exactly how to root chrysanthemum cuttings, when to do it, which tools to use, what mistakes to avoid, and how to care for the new plants after roots form. Whether you are a first-time propagator or a seasoned backyard plant whisperer, this step-by-step method will help you turn one healthy chrysanthemum into many.
Why Grow Chrysanthemums From Cuttings?
There are several reasons gardeners prefer chrysanthemum propagation by cuttings over seed. First, seeds do not always produce plants that look like the parent. That can be fun if you enjoy surprises. It is less fun if you wanted that exact bronze pompon mum and ended up with a floral mystery guest.
Cuttings solve that problem. Because they are clones of the parent plant, they preserve the traits you already like. Rooting cuttings is also quicker than starting mums from seed, and it is a smart way to refresh aging garden plants. Over time, old clumps can become crowded and tired. New plants from vigorous stem tips often grow with better energy and a cleaner start.
From an SEO point of view and a gardener point of view, the big takeaway is simple: if you want a reliable, affordable, and beginner-friendly method, rooting chrysanthemum cuttings is hard to beat.
Best Time to Take Chrysanthemum Cuttings
The best time to take chrysanthemum cuttings is in spring or early summer, when the plant is actively producing fresh, soft growth. This stage matters because soft, non-woody stems root faster and more easily than older, tougher growth.
Look for stems that are healthy, flexible, and not yet trying to flower. If the stem is too mature, too woody, or already loaded with buds, it is usually less cooperative. For the highest success rate, take cuttings in the morning, when the plant is hydrated and stems are less likely to wilt.
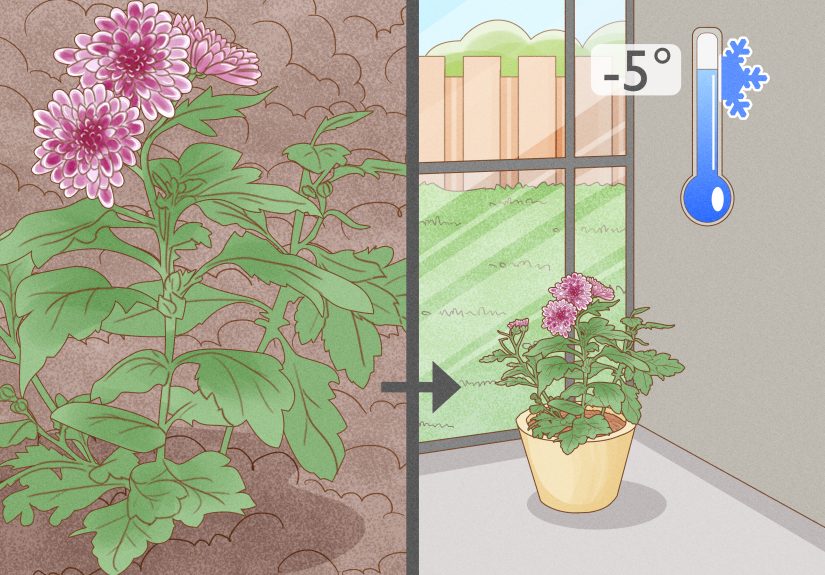
If your plant is blooming heavily in fall, admire it, compliment it, and wait. Fall is great for flowers, but spring is better for propagation.
What You Need Before You Start
- Healthy chrysanthemum plant
- Clean, sharp scissors, pruners, or knife
- Small pots, trays, or a shallow propagation container
- Rooting medium such as perlite, vermiculite, coarse sand, or a light peat-based mix
- Rooting hormone, optional but helpful
- Clear plastic cover, plastic bag, or humidity dome
- Water mister or small watering can
- Plant labels if you are rooting more than one variety
The key here is cleanliness and drainage. Chrysanthemum cuttings like moisture, but they do not enjoy sitting in soggy, stale media like they are trapped in a botanical swamp.
How to Choose the Right Stem
Pick healthy new growth
Select non-flowering shoots from a vigorous parent plant. The ideal cutting is usually about 3 to 6 inches long, depending on the cultivar and the amount of tender growth available. The stem should look fresh, sturdy, and free from disease, insect damage, yellowing, or blackened tissue.
Avoid weak or stressed material
Do not take cuttings from a plant that is wilted, diseased, overcrowded, or clearly having a bad week. Healthy stock plants produce healthier cuttings, and healthy cuttings are far more likely to root quickly.
Skip stems with flower buds
If possible, avoid stems that are setting buds or blooming. Flowers pull energy away from root formation. Your cutting has one job right now, and that job is growing roots, not auditioning for a fall centerpiece.
Step-by-Step: How to Root Chrysanthemum Cuttings
1. Prepare the rooting medium
Fill your container with a loose, well-draining rooting medium. Good choices include perlite, vermiculite, coarse sand, or a blend made for propagation. Moisten the medium before inserting cuttings so it feels evenly damp but not soaked. Think “wrung-out sponge,” not “mini rice paddy.”
2. Take the cutting
Using a clean blade, cut a 3- to 6-inch stem tip just below a leaf node. Nodes are important because that is where roots commonly emerge. Make a clean cut rather than crushing the stem.
3. Remove lower leaves
Strip off the leaves from the lower one-third to one-half of the cutting. You want enough bare stem to insert into the medium without burying leaves. If the remaining leaves are especially large, you can trim them in half to reduce moisture loss.
4. Apply rooting hormone
Dip the cut end into rooting hormone if you have it. This step is optional, but it can improve rooting speed and encourage a stronger root system. Tap off the excess so you are not dumping half the container into one pot.
5. Insert the cutting
Use a pencil, dibber, or finger to make a planting hole in the medium. Insert the cutting so the bare lower stem is below the surface, then gently firm the medium around it. Space multiple cuttings so the leaves are not crowded together.
6. Create humidity
Cover the pot or tray with a clear plastic bag, plastic tent, or humidity dome. This helps keep moisture around the cutting while it has no roots to replace lost water. Make sure the plastic does not mash the leaves like cling wrap on leftovers. Prop it up if needed.
7. Place in bright, indirect light
Put the cuttings in a warm area with bright, indirect light. Avoid strong direct afternoon sun, which can overheat the enclosure and cook your cuttings faster than a forgotten dashboard succulent. Gentle morning light is usually fine.
8. Keep evenly moist
Check the medium regularly and keep it moist, not waterlogged. Excess water can lead to rot, while dryness causes wilting and failure. Good propagation is less about heroic intervention and more about steady, boring consistency.
9. Check for roots
After about 2 to 5 weeks, depending on conditions and variety, gently tug the cutting. If you feel resistance, roots are forming. You may also notice new leaf growth, which is another encouraging sign.
10. Harden off and transplant
Once roots are established, gradually increase air circulation by opening the plastic cover or poking holes in it over several days. Then transplant the rooted cuttings into small pots with quality potting mix or directly into the garden if conditions are right.
Best Conditions for Rooting Chrysanthemum Cuttings
Light
Bright, indirect light is ideal. Too little light slows rooting. Too much direct sun overheats the cutting and increases water loss.
Temperature
Mild warmth works best. A comfortable range for many home setups is around 65 to 75 degrees Fahrenheit. If it feels pleasant to you and not like the inside of a parked car, you are probably close.
Humidity
High humidity helps prevent wilting before roots form. This is why plastic covers work so well. Just remember that completely stagnant, dripping-wet air can encourage fungal trouble, so some airflow matters once rooting begins.
Moisture
Even moisture is critical. Chrysanthemum cuttings do not want to dry out, but they also do not want to sit in soupy media. The sweet spot is consistently damp and airy.
Common Mistakes to Avoid
Using old or flowering stems
Soft, fresh growth roots faster. Woody stems and blooming stems are more difficult and less reliable.
Overwatering
Too much water is a classic propagation mistake. It feels caring, but it can suffocate the stem base and invite rot.
Poor sanitation
Dirty tools, old containers, or contaminated media can introduce disease before the cutting even gets started. Clean tools and fresh media are not glamorous, but they are powerful.
Too much sun
A cutting under plastic in direct hot sun can turn into a tiny steam room. Chrysanthemum cuttings need light, but not a sauna.
Transplanting too soon
If you move the cutting before roots are established, it may stall or collapse. Wait until there is clear resistance when gently tugged and some new growth appears.
Aftercare for Rooted Chrysanthemum Cuttings
Once your cuttings have rooted, move them into individual pots filled with a well-draining potting mix. Water them thoroughly after transplanting, then let the top layer of soil dry slightly between waterings. At this stage, they still like regular moisture, but they no longer need to live inside a humidity bubble.
Place the young plants in a bright location and gradually expose them to more sun if they will eventually live outdoors. This hardening-off process prevents shock. If you move a pampered indoor cutting straight into blazing sun and wind, it may react like someone sent it from a spa directly into boot camp.
Once the plant begins active growth, you can feed lightly with a balanced fertilizer. If you want bushier mums with more branching, pinch back the tips after the plant has put on a bit of size. This encourages fuller growth and, later on, a better flower display.
Can You Root Chrysanthemum Cuttings in Water?
Some gardeners try rooting chrysanthemum cuttings in water, and sometimes it works. But rooting in a loose propagation medium is generally more reliable. Water-rooted stems can produce fragile roots that do not always transition smoothly into potting soil.
If you are experimenting for fun, go for it. If you want the most dependable path, use perlite, vermiculite, sand, or a similar airy rooting mix. Chrysanthemum cuttings usually respond better to that setup.
How Long Does It Take to Root Chrysanthemum Cuttings?
Most chrysanthemum cuttings root in about 2 to 5 weeks. Timing depends on temperature, light, humidity, cutting quality, and the variety you are growing. Fast, healthy tip cuttings in good spring conditions tend to move quickly. Slower results do not always mean failure, so do not panic if yours need extra time.
Remember: propagation rewards patience. Roots are not dramatic performers. They are more like backstage crew members quietly making the whole show possible.
Practical Example for Home Gardeners
Let us say you have a healthy garden mum in spring that is producing several new shoots. You take six tip cuttings, each about 4 inches long. You remove the lower leaves, dip the bases in rooting hormone, and insert them into a tray filled with damp perlite and vermiculite. Then you cover the tray with a clear plastic dome and place it near a bright east-facing window.
Over the next two weeks, you keep the medium lightly moist and vent the dome occasionally so it does not stay overly wet. By week three, several cuttings resist a gentle tug. By week four, all six have rooted well enough to pot up individually. A few weeks later, you pinch them once to encourage branching. By the time fall arrives, you have multiple sturdy chrysanthemum plants instead of one. That is a very satisfying return on a few snips and a little patience.
What the Experience of Rooting Chrysanthemum Cuttings Is Really Like
On paper, rooting chrysanthemum cuttings sounds almost suspiciously simple: cut stem, remove leaves, stick in medium, wait. In real life, the experience is part science project, part gardening ritual, and part emotional test of whether you can leave well enough alone. Many gardeners start out thinking propagation is complicated, only to discover that mums are refreshingly cooperative when the basics are right.
The first experience most people have is surprise at how quickly cuttings wilt right after they are taken. A fresh cutting can look perky one moment and dramatically offended the next. That brief wilt tends to make beginners think they have already failed. Usually, they have not. Once the cutting is inserted into moist medium and covered to hold humidity, it often recovers nicely. This teaches one of the most useful lessons in gardening: early drama is not always final doom.
Another common experience is learning the difference between “moist” and “too wet.” Many gardeners, out of kindness, water cuttings like they are trying to rescue them from a desert. Then the stem bases rot. After one or two attempts, most people get much better at reading the medium. Damp, airy, and lightly humid works. Sopping wet does not. Chrysanthemum cuttings are a wonderful teacher of restraint.
There is also the oddly exciting phase of checking for roots. You tell yourself you will wait patiently for three weeks. In reality, you peer through the plastic every day like you are monitoring a major archaeological dig. Then comes the famous gentle tug test. That tiny bit of resistance feels ridiculously rewarding. It is one of those small gardening victories that makes you feel more competent than you did a month ago.
Experienced gardeners often say rooting mums builds confidence because the process is repeatable. Once you successfully root one batch, the mystery disappears. You begin noticing which stems root fastest, which containers dry out sooner, and how much light is just right in your home or garden setup. The experience becomes less about following rules and more about reading plants.
There is also a practical pleasure in multiplying a plant you already love. A favorite chrysanthemum can become border fillers, porch pots, gifts for neighbors, or backups in case the original plant struggles. That sense of abundance is one of the nicest parts of propagation. Instead of buying more plants every season, you start building your own little supply chain with scissors and a tray.
Perhaps the best part of the experience is that it connects gardeners to the seasonal rhythm of plant growth. Spring no longer feels like just another warm stretch of weather. It becomes cutting season. You begin to notice soft new shoots, healthy nodes, and the quiet energy of plants waking up. Rooting chrysanthemum cuttings turns observation into action, and action into more flowers. Honestly, that is one of gardening’s better deals.
Final Thoughts
If you want more mums without buying more mums, learning how to root chrysanthemum cuttings is the move. It is simple, budget-friendly, and surprisingly satisfying. Start with healthy spring growth, use a clean and airy rooting medium, keep humidity high, avoid soggy conditions, and give the cuttings bright indirect light. That formula gets results.
Once you do it successfully, you may start looking at every healthy chrysanthemum stem as a future plant. That is how propagation begins: first with one tray of cuttings, then with confidence, then with a mild but charming inability to stop multiplying plants.