Table of Contents >> Show >> Hide
- Why This Layered Ice Cream Cake Actually Works
- Ingredients
- Equipment You’ll Be Glad You Used
- Step-by-Step: How to Build the Perfect Layered Ice Cream Cake
- Flavor Combos That Never Miss
- Make-Ahead, Storage, and Serving
- Troubleshooting: Save the Cake, Save the Day
- Finishing Touches That Make It Look Bakery-Level
- Conclusion
- Real-Life Layered Ice Cream Cake Experiences (So You Don’t Learn the Hard Way)
If summer had a love language, it would be ice cream cake. Specifically, a
layered ice cream cake recipe that looks like you hired a pastry chef… but was actually
assembled by you in socks, standing in front of the freezer like it’s an open mic night.
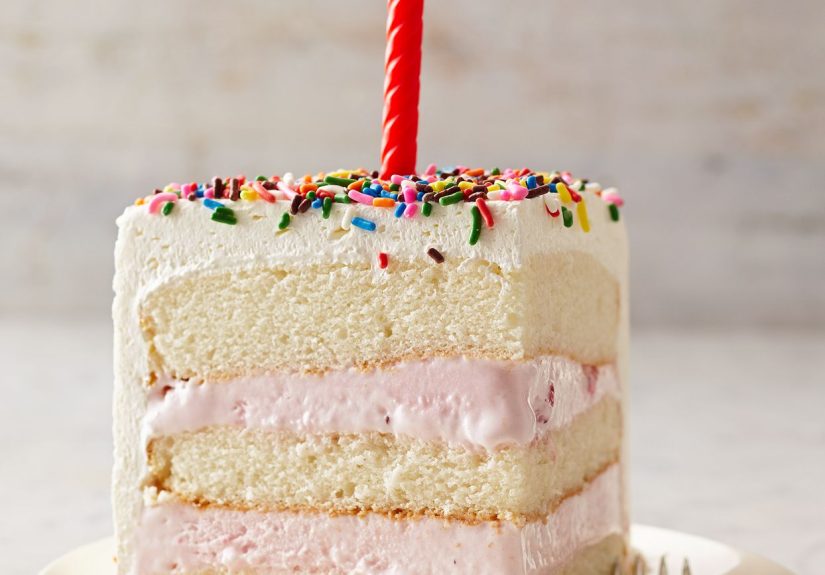
This is a no-bake dessert with big “birthday cake energy”: a crunchy cookie crust, a
fudgy middle that tastes like a sundae’s best day, two dreamy layers of ice cream, and a fluffy topping that
forgives all your life choices. It’s make-ahead, sliceable, and dangerously popular at BBQs.
Why This Layered Ice Cream Cake Actually Works
Ice cream cake succeeds or fails for one simple reason: temperature control. The goal is to keep each
layer cold enough to stay distinct, but soft enough to spread smoothly.
- Softened ice cream spreads like frosting, then refreezes into clean layers.
- A cookie crust adds structure so slices don’t slump like a melting snowman.
- Fudge acts as a “flexible glue”it freezes firm but still bites pleasantly (unlike a rock-hard candy bar situation).
- Freeze-between-layers is the secret to sharp stripes instead of “abstract art.”
Bonus: it’s customizable. You can build a classic cookies-and-cream vibe, a strawberry shortcake mood, or a
full-on sundae explosionwithout turning on the oven.
Ingredients
This recipe is designed for a 9-inch springform pan (or a deep 9-inch cake pan). It yields
about 10–12 generous slices.
For the Crust
- 24–26 chocolate sandwich cookies (like Oreos), finely crushed
- 4 tablespoons unsalted butter, melted
- Pinch of salt (optional, but it makes chocolate taste more like chocolate)
For the Layers
- 1.5 quarts vanilla or cookies-and-cream ice cream
- 1.5 quarts chocolate (or your favorite contrasting flavor) ice cream
- 1 to 1 1/4 cups hot fudge sauce, warmed until spreadable
- 1 to 1 1/2 cups “crunchies” (see options below)
For the Topping
- 2 cups heavy cream or 8–12 ounces whipped topping
- 2–3 tablespoons powdered sugar (if using heavy cream)
- 1 teaspoon vanilla extract (if using heavy cream)
- Sprinkles, mini chocolate chips, cookie crumbs, or chopped candy for decorating
Crunchy Layer Options (Pick One)
- Classic cookie crunch: crushed chocolate wafer cookies or Oreos
- DQ-style crunchies: crushed cookies tossed with a bit of melted butter and cocoa powder
- Chocolate shavings + cookies: thin shavings bite better than chunky chips once frozen
- Toasted nuts: almonds or peanuts for a sundae-shop vibe
Equipment You’ll Be Glad You Used
- 9-inch springform pan (best for unmolding)
- Plastic wrap or parchment (for easy lift-out)
- Offset spatula or the back of a spoon (spreading MVP)
- Sheet pan (to keep your freezer from becoming a crime scene)
- Warm, clean kitchen towel (for quick wipe-downs between layers)
Step-by-Step: How to Build the Perfect Layered Ice Cream Cake
Step 1: Prep the Pan Like You Mean It
- Line the bottom and sides with plastic wrap, leaving extra overhang (this helps lift and unmold).
- If using a springform pan, you can also line just the base and lightly grease the sides for easier release.
Step 2: Make the Cookie Crust
- Mix crushed cookies with melted butter (and salt if using) until it looks like wet sand.
- Press firmly into the bottom of the pan using a measuring cup (compact = sturdy slices).
- Freeze 10–15 minutes while you prep the first ice cream layer.
Step 3: Soften Ice Cream the Smart Way
You want “spreadable,” not “soup.” The best move is to let ice cream sit in the refrigerator until it softens
around the edges, then stir it in a bowl to even out the texture. If you microwave, do it in very short bursts
and stop before it turns glossy.
Step 4: First Ice Cream Layer
- Spoon half of your first ice cream flavor onto the crust.
- Spread into an even layer. Dip your spatula in hot water, wipe dry, then smoothrepeat as needed.
- Freeze 20–30 minutes (long enough to set the top so the next layer doesn’t sink).
Step 5: The Fudge Layer (AKA the “Sundae Spine”)
- Warm hot fudge until it’s spreadable, not steaming.
- Spread a thin, even layer over the ice cream.
- Freeze 10–15 minutes to firm it up.
Tip: If your fudge is too hot, it’ll melt the ice cream and create a marbled layer. Not tragicjust less “layered.”
Step 6: Add the Crunch
- Sprinkle crunchies evenly over the fudge layer.
- Gently press them in so they stick and don’t migrate when slicing.
- Freeze 10 minutes.
Step 7: Second Ice Cream Layer
- Spoon on the remaining ice cream (same flavor or your contrasting flavor).
- Spread smooth, working quickly.
- Freeze at least 6 hours, ideally overnight, for clean slices and solid structure.
Step 8: Frost and Decorate
Option A: Whipped cream topping (homemade)
- Whip heavy cream with powdered sugar and vanilla to stiff peaks.
- Spread over the top and (optionally) the sides.
Option B: Whipped topping (super fast)
- Spread thawed whipped topping over the cake.
- Decorate immediately with sprinkles, cookie crumbs, or mini chips.
Freeze 30–60 minutes after topping so everything firms up again before the grand reveal.
Flavor Combos That Never Miss
A good ice cream cake is basically a choose-your-own-adventure book you can eat. Here are
combinations that balance sweet, creamy, and crunchy:
Classic Cookies & Fudge
- Cookies-and-cream + chocolate
- Hot fudge + Oreo crunch
- Finish with cookie crumbs and mini chocolate chips
Strawberry Shortcake Vibes
- Vanilla + strawberry
- Swap fudge for strawberry sauce (thick, jammy is best)
- Crunch layer: crushed vanilla wafers + freeze-dried strawberries
Peanut Butter Sundae
- Chocolate + peanut butter
- Fudge layer + chopped peanuts
- Top with peanut butter cups (mini ones slice easier)
Mint Night at the Movies
- Mint chip + chocolate
- Crunch layer: chocolate wafer crumbs
- Top with crushed thin mints or chocolate curls
Make-Ahead, Storage, and Serving
Make-Ahead Timeline
- Best: Assemble the cake 1 day ahead and freeze overnight.
- Great: Make the crust and first layer in the morning; finish at night.
- Life-saving: Fully decorate and refreezethen you only need to slice and accept compliments.
Storage Tips (So It Tastes Fresh, Not “Freezer”)
- Wrap tightly in plastic wrap, then foil. Air is the enemy (it causes freezer burn).
- Store up to 1 week for best flavor and texture; longer is possible but quality drops.
- Keep the cake flat and away from foods with strong odors (ice cream is basically a sponge in a tuxedo).
How to Slice Cleanly
- Let the cake sit at room temperature 5–10 minutes (just enough to soften slightly).
- Use a long knife dipped in hot water and wiped dry between cuts.
- If slices start to slump, pop the cake back into the freezer for 10 minutes and resume.
Troubleshooting: Save the Cake, Save the Day
My layers are blending together
Either the ice cream was too soft or the previous layer didn’t freeze long enough. Next time: freeze between
layers and keep the ice cream cold until the last second. This time: call it “swirled” and keep walking.
My crust is crumbly
You likely need a bit more butter or firmer pressing. Pack it down like you’re building a patio. A quick
chill before adding ice cream also helps it set.
My crunchies are too hard
Big chunks freeze into tooth risks. Aim for small bitesthink “chickpea-sized” pieces, not “pebble in a shoe.”
Thin chocolate shavings and fine cookie crumbs stay more pleasant when frozen.
My cake won’t release from the pan
Warm the outside of the pan briefly with a warm towel or your hands, then open the springform. Lining with
plastic wrap or parchment is the easiest insurance policy.
Finishing Touches That Make It Look Bakery-Level
- Hot spatula trick: Dip an offset spatula in hot water, wipe dry, then smooth the sides.
- Sprinkle timing: Add sprinkles right after frosting so they stick.
- Texture upgrade: Add a thin extra drizzle of fudge right before serving.
- Theme upgrade: Match toppings to the ice cream flavor (mint + chocolate curls, strawberry + berries, etc.).
If you want piped swirls, freeze the frosted cake first so the surface is firmthen pipe whipped cream like
you’re frosting a cloud that pays rent.
Conclusion
This layered ice cream cake recipe is the ultimate make-ahead celebration dessert: crunchy crust,
creamy layers, a fudgy middle, and toppings that invite creativity. Once you learn the simple rhythmsoften, spread,
freeze, repeatyou can build endless flavor combos with clean slices and zero oven drama.
Real-Life Layered Ice Cream Cake Experiences (So You Don’t Learn the Hard Way)
After you make one ice cream cake, you start noticing a very specific pattern in the universe: people who
“aren’t dessert people” suddenly become dessert people. Like, intensely. They’ll hover near the freezer,
offering to “help” in ways that are mostly just… standing there… breathing near your hard work.
The first time I made a layered ice cream cake, I underestimated how quickly ice cream changes personality.
In the carton, it’s calm and stable. The second it hits a bowl, it becomes a drama student: overly emotional,
prone to collapse, and desperate for attention. I tried to spread it slowly and neatly, like frosting.
That’s adorable. What actually worked was treating the process like a pit stop: have everything ready, move
fast, and get the cake back into the freezer before it starts auditioning for “Puddle: The Musical.”
One of my favorite “wins” was a cookies-and-cream + chocolate version for a backyard birthday. I froze each layer
properly, used the hot-water spatula trick, and unmolded it like a proud reality show contestant revealing a
three-tier masterpiece. The crowd reaction was wildpeople love neat layers. Clean stripes make everyone think
you have your life together. (You can be behind on laundry; no one will know. They’ll be too busy taking photos
of the cross-section.)
I’ve also had the classic crunch-layer lesson: bigger isn’t better. The first time I threw in big chunks of candy,
I created a cake that required both enthusiasm and strong molars. Now I keep mix-ins smallfine cookie crumbs,
thin chocolate shavings, or chopped mini candy. The cake becomes easier to slice, easier to eat, and nobody has to
schedule a dentist appointment just to enjoy dessert.
Potlucks taught me the value of “transport engineering.” Ice cream cake is not the moment to be casual about
wrapping. I once carried a lightly covered cake to a friend’s house and discovered that freezer odors are real,
and ice cream is basically an aroma sponge. Since then, I wrap tightly in plastic wrap and foil, and I always
transport the cake on a sheet pan or sturdy board. If it’s a longer trip, I bring an insulated bag or cooler with
ice packsbecause nothing ruins a party like showing up with “Layered Ice Cream Soup (Rustic).”
The best tip I ever picked up is also the simplest: plan your layers like you’re designing a great bite. You want
creamy + crunchy + something rich. The fudge layer does heavy lifting hereit bridges textures and makes the cake
feel like a legit sundae. If you don’t have hot fudge, a thick ganache or even a firm chocolate sauce can work,
but avoid watery sauces that turn icy. Ice crystals are the villains of a smooth slice.
Finally, the “serving moment” is where you earn your medal. Don’t leave the cake out too long. Give it a short
rest for slicing, cut what you need, then return it to the freezer. This little rhythm keeps slices photogenic,
holds the layers together, and ensures the last piece tastes as good as the first. And trust methere will be a
last piece only if you hide it behind the frozen peas.
Once you’ve made this recipe a couple of times, you’ll start riffing: swapping crusts, changing flavors, playing
with toppings, and building signature combos that friends request by name. That’s when you know you’ve crossed
over from “person who made ice cream cake” to “official keeper of birthdays.” No cape required. Just a freezer
shelf and a little confidence.


