Table of Contents >> Show >> Hide
- Why Acrylic Pour + Upcycled Jars Works So Well
- What You’ll Need
- Step 1: Prep Your Jar Like You Mean It
- Step 2: Create the Acrylic Pour Look
- Step 3: Seal the Acrylic Pour Finish
- Step 4: Make the Candle (Container Style)
- Burn-Test Like a Grown-Up (Even If You’re Not One Yet)
- Troubleshooting: Quick Fixes for Common Issues
- Make It Giftable: Design Themes People Actually Want
- Real-Life Experiences: What I’ve Learned from Upcycling Jars into Acrylic Pour Candles (500-ish Words)
- Conclusion
- SEO Tags
Somewhere in your kitchen right now, an empty salsa jar is living its best life as… a future craft supply. (It just
doesn’t know it yet.) If you’ve been collecting glass jars “just in case,” this is your sign: we’re turning those
leftovers into glossy, marbled, acrylic-pour candle jars that look boutique-level fancywithout boutique-level
prices.
This project combines two crowd-pleasers: acrylic pouring (aka “paint that does the work while you
pretend you planned it”) and container candle making (aka “make your room smell like a spa and
your brain stop spinning”). You’ll end up with a giftable DIY jar candle that feels high-end,
looks custom, and starts conversations like: “Wait… you made that from an old pickle jar?”
Safety note: Candle-making involves heat and hot wax. If you’re under 18, get an adult to help with the
melting and pouring steps. Whether you’re 14 or 40, never leave heating wax unattendedyour “cozy hobby” should not
become an “exciting insurance claim.”
Why Acrylic Pour + Upcycled Jars Works So Well
Upcycling jars is already a win: glass is durable, reusable, and easy to clean. Add acrylic pouring, and you get a
one-of-a-kind pattern every single timeno two jars will look identical (which is also a convenient excuse if one
turns out looking like a zebra had a midlife crisis).
The real secret is keeping the painted design on the outside and the candle on the
inside. That way, your wax stays clean, your scent stays true, and your jar stays decorative. You’re
basically making a “designer candle vessel” out of something that used to contain marinara.
What You’ll Need
Upcycled jar essentials
- Clean glass jar with a wide opening (mason jars work great)
- Dish soap + warm water
- Rubbing alcohol (for final wipe-down)
- Oil (to remove labels) + a scraper or old card
Acrylic pour supplies
- Fluid acrylic paint (craft acrylics work; “ready-to-pour” paints make life easier)
- Pouring medium (optional but helps flow and shine)
- Small cups + stir sticks
- Gloves + drop cloth or cardboard
- Optional: painter’s tape (for clean edges)
Sealing and candle-making supplies
- Clear sealer (spray acrylic sealer or brush-on water-based sealer)
- Candle wax (soy wax flakes are beginner-friendly)
- Wick (pre-tabbed cotton wick is easiest)
- Wick sticker or heat-safe adhesive
- Wick centering tool (or a pencil/chopstick across the jar)
- Optional: candle-safe fragrance oil
- Thermometer (recommended) and a double-boiler setup
Jar tip: Not every glass container is ideal for a candle. Choose thick, sturdy glass and skip
anything chipped or hairline-cracked. If you want maximum peace of mind, use containers made specifically for
candles. (Yes, your old jam jar is adorable. No, it doesn’t need to be a hero.)
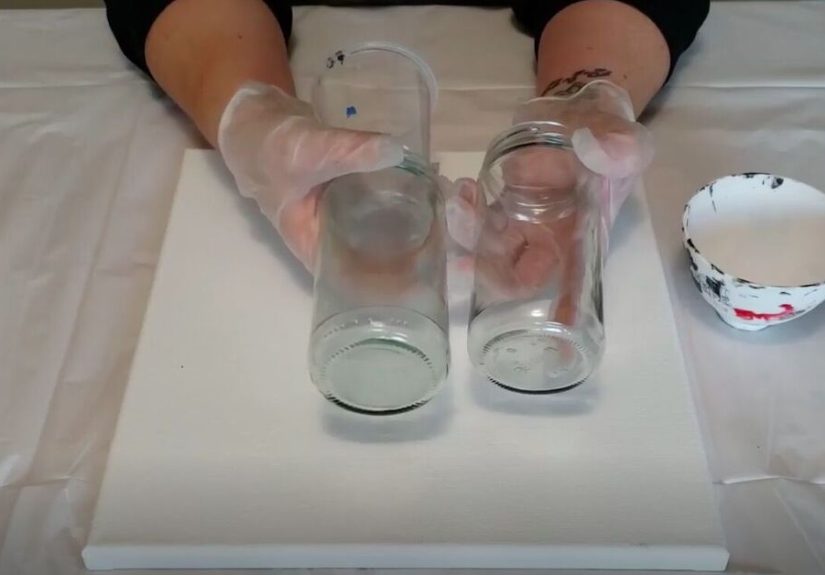
Step 1: Prep Your Jar Like You Mean It
Remove labels (without losing your will to live)
Soak the jar in warm, soapy water. Peel what you can. Then apply oil over any stubborn label residue, let it sit,
and scrape gently. Wash again to remove oil.
Deep-clean for paint adhesion
Once the jar is clean and dry, wipe the outside with rubbing alcohol. This removes fingerprints and leftover
residue that can make paint slide, separate, or flake later. Think of it as skincare for glass: cleanse, then
moisturize… except the moisturizer is paint and your jar is about to glow up.
Optional: Tape off the “hot zone”
For extra safety and a cleaner look, tape off the top 1–2 inches of the jar so paint never sits right near where
heat is strongest. This gives you a nice “label-free” rim and keeps decorative finishes away from the hottest
area during burns.
Step 2: Create the Acrylic Pour Look
Pick a color palette that doesn’t fight itself
Here are a few combos that almost always look good:
- Modern spa: white + sage + charcoal + a hint of gold
- Cozy bakery: cream + caramel + cocoa + soft blush
- Ocean mood: navy + teal + turquoise + pearl white
- Minimal luxe: black + white + one bold accent (emerald or rust)
Mix paint for flow (but don’t drown it)
If your paint is thick, mix in pouring medium until it’s smooth and runnylike warm honey, not soup. Ready-to-pour
paints are already at the right consistency, which is why they’re popular for beginners.
Two easy pour methods for jars
Method A: The “Flip Cup” (classic, dramatic, slightly chaotic)
- Layer two to four colors into one cup (no need to stir much).
- Place the jar upside down on a protected surface (use a cup or small stand inside the jar opening if needed).
- Flip the paint cup onto the jar and lift slowly so paint begins to flow down the sides.
- Rotate the jar gently to guide the pattern. Let gravity do most of the work.
Method B: The “Dirty Pour” (controlled, beginner-friendly)
- Pour layered colors into a cup.
- Slowly pour around the top edge of the jar so paint drips and stretches into ribbons.
- Tilt and rotate until you love the coverage.
Pro move: Less is more. You can always add a little extra paint to bare spots, but it’s harder to
“un-pour” a jar that’s wearing three pounds of acrylic like a winter coat.
Let it dry completely
Set the jar on a protected surface where it won’t be disturbed. Dry time depends on paint thickness and humidity.
It may feel dry to the touch quickly, but deeper layers can stay soft longer. Give it timerushing this step is how
fingerprints become “texture.”
Step 3: Seal the Acrylic Pour Finish
Sealing protects your design from scuffs and makes the jar easier to wipe clean. Use a clear acrylic spray sealer
(easy, even coverage) or a brush-on water-based sealer (great control, fewer fumes). Apply light coats and let each
coat dry as directed on the product label.
Important: Keep sealers and paint on the outside only. Avoid sealing inside the jar where
wax will sit. Also avoid coating the top rim where heat and direct contact happen.
Want the safest option? Turn the finished jar into a candle holder for a store-bought candle (or use an LED
candle). You still get the marbled lookwithout working with hot wax at all.
Step 4: Make the Candle (Container Style)
Choose wax + wick with the jar size in mind
Wick choice affects everything: flame size, scent throw, and whether your candle tunnels or burns evenly. Container
candle makers typically select wicks based on the jar’s inside diameter and wax type, then do a burn test to confirm
performance. If you’re new, start with a beginner wick recommended for your wax and jar size, and plan to test.
Attach and center the wick
- Place a wick sticker on the wick tab.
- Stick the wick tab firmly in the center of the jar bottom.
- Keep the wick upright and centered using a centering tool (or a pencil laid across the top).
Melt wax gently and follow manufacturer instructions
Melt wax using a double boiler setup (wax should never be heated directly on a burner). Stir occasionally. If
adding fragrance, follow the wax and fragrance manufacturer recommendations for when and how much to add. Too much
fragrance can separate, sweat, or create burn issuesmore isn’t always better.
Pour slowly, cool calmly
Pour wax into the jar slowly to avoid bubbles. Let it cool undisturbed on a level surface. While cooling, avoid
moving the jar around like it’s a newborn kitten. Wobbly cooling can lead to surface imperfections and wick drift.
Trim wick and let it cure
Once fully set, trim the wick to about ¼ inch. Many waxes also benefit from a cure time (often a
few days to a couple weeks) for stronger scent and a more consistent burn. Patience pays off here: curing is where
the fragrance gets its act together.
Burn-Test Like a Grown-Up (Even If You’re Not One Yet)
The first burn matters because it helps prevent “tunneling” (when a candle burns down the middle and leaves wax on
the sides like a sad donut). A good first burn usually melts the surface evenly across the jar.
Simple burn-test checklist
- Burn on a stable, heat-resistant surface away from drafts.
- Keep the wax pool free of debris (matches, wick trimmings, etc.).
- Don’t burn too long in one sessionmany safety guides recommend a few hours max.
- Trim the wick to ¼ inch before each burn for a cleaner flame and less soot.
- Never leave a burning candle unattended. Ever.
If your flame is huge and sooty, the wick may be too large. If it struggles to melt to the edges over time, the
wick may be too small. That’s normal candle-making science: tweak, test, repeat. (It’s like baking, but with more
spreadsheets and fewer cookies.)
Troubleshooting: Quick Fixes for Common Issues
Paint “cells” didn’t appear
Cells often depend on paint density, pouring medium, and technique. Try higher-contrast colors, use ready-to-pour
paints, and tilt more slowly so layers can stretch instead of blending into one flat tone.
Paint slid off the jar
Usually this is a prep issue. Make sure the glass is squeaky clean, oil-free, and wiped with alcohol before
painting.
Sealer looks cloudy
Heavy coats or high humidity can cause cloudiness. Apply thin coats, allow full dry time, and test on a small area
if you’re trying a new product.
Candle tunnels
Let the candle burn long enough for the melt pool to reach the edges (especially on early burns), and confirm your
wick size is appropriate for the jar diameter.
Jar gets too hot
Extinguish the candle and re-evaluate wick size and burn time. Some glass containers can crack or break if
overheated, which is why candle-safe containers and sensible burn sessions matter.
Make It Giftable: Design Themes People Actually Want
Want your upcycled jar candle to look like it came from a chic little shop with a line out the door? Try one of
these “ready-made vibe” combos:
- “Fresh Laundry” aesthetic: white/gray pour + clean cotton scent + simple kraft label
- “Holiday cabin” mood: deep green/burgundy pour + pine/cinnamon scent + twine bow
- “Coastal calm” look: blues/white pour + sea salt scent + minimal white label
- “Bookish” candle: warm neutrals pour + vanilla/amber scent + label that says “One More Chapter”
Add a warning label or a small care card for safe burning. It’s practical, it’s thoughtful, and it saves your
friend from treating your candle like a bonfire experiment.
Real-Life Experiences: What I’ve Learned from Upcycling Jars into Acrylic Pour Candles (500-ish Words)
The first time I tried an acrylic pour on a jar, I was wildly confident for someone who had not yet learned that
gravity is undefeated. I used way too much paint, spun the jar like I was auditioning for a pottery show,
and watched a beautiful marbled pattern slowly… migrate… right onto my table. The jar looked amazing. The table
looked like it had survived a modern art festival.
Lesson one: set up your “paint crime scene” properly. A drop cloth, cardboard, and gloves turn this from “oops” into
“planned.” I also learned to keep a stack of paper towels nearby because acrylic pour projects are basically a
glamorous mess with good PR.
The second surprise was how much cleaning matters. If you skip the alcohol wipe, the paint can bead up or slide in
thin patcheslike it’s actively trying to escape the jar. Once I started cleaning like a professional (or at least
like someone who has made the same mistake twice), the paint behaved dramatically better.
Then came sealing. I used to think sealer was optionallike the tiny parsley garnish you ignore. Not true. The jars
I didn’t seal scratched easily, and one got a smudge just from being wiped with a slightly damp cloth. After that,
I became Team Seal-It. Light coats made the finish look glossy and intentional, and the jar stayed prettier longer.
When I finally started adding wax, I learned the candle side is where “cute craft” meets “basic engineering.” Wick
size matters. Burn time matters. Drafts matter. I had one candle that tunneled like it was trying to reach the
center of the earth. Another burned too aggressively and made the jar hotter than I liked. The best candles were
the ones where I did a simple burn test, trimmed the wick, and stopped treating the first burn like a speed run.
I also learned that upcycled jars are not all created equal. Thick glass jars (like canning-style jars) felt more
reliable than thin, decorative glass. And I now avoid anything with tiny cracks or chips, because that’s just
tempting fate.
My favorite “unexpected win” was gifting these. People love the story: “This used to be a pasta sauce jar, and now
it’s a fancy candle.” It feels eco-friendly, personal, and creative. Plus, no one expects a recycled jar to look
like it belongs on a minimalist shelf next to expensive skincareso the surprise factor is strong.
Final takeaway: the best part of this project isn’t perfection. It’s that every jar looks different. If the paint
pattern goes a little rogue, congratulationsyou made art. If your candle needs a wick tweak, congratulationsyou
did science. Either way, your old jars just got promoted from “recycling bin” to “home decor.”