Table of Contents >> Show >> Hide
- Why Faux Magnolia Leaves Are a Smart (and Slightly Genius) Choice
- Main Keywords and LSI Keywords to Weave In Naturally
- What to Buy at Michaels (Simple Shopping List)
- Before You Build: The Secret Step Most People Skip
- How to Make a Magnolia Wreath: Step-by-Step
- Step 1: Decide on Full Circle vs. Asymmetrical (and Commit Like an Adult)
- Step 2: Prep Your Leaves
- Step 3: Build a Base Layer (The “Coverage” Pass)
- Step 4: Add Depth (The “Make It Look Real” Pass)
- Step 5: Glue Strategically, Not Emotionally
- Step 6: Finish the Back (So It Doesn’t Scratch Your Door Like a Gremlin)
- Step 7: Add a Bow or Hanging Loop
- Design Variations: Same Magnolia Base, Different Personalities
- Common Mistakes (and How to Fix Them Fast)
- How to Hang Your Magnolia Wreath Without Damaging the Door
- Care and Storage: Make It Last for Years
- Conclusion
- Extra: of Real-World Experience (So You Don’t Learn the Hard Way)
Magnolia wreaths have a special talent: they look expensive even when they’re not. It’s like they come with their own little “I definitely have my life together” badge. And the best part? You don’t need a fresh-cut magnolia tree, a secret garden, or a friend named “Cynthia” who owns wire cutters “for fun.” With faux magnolia leaves from Michaels, you can make a full, glossy, front-door-worthy wreath that holds up through weather swings, shipping delays, and the emotional rollercoaster of seasonal decor.
This guide walks you through the best ways to build a magnolia wreath using Michaels faux stems/garlands/leaves, with practical tips to make it look natural (not “fresh from aisle seven”), plus design variations for every vibe: classic Southern, modern minimal, holiday glam, and “I want greenery but make it neutral.”
Why Faux Magnolia Leaves Are a Smart (and Slightly Genius) Choice
Fresh magnolia wreaths are gorgeous, but they dry, curl, and evolve into a crackly patina over time. That can be charminguntil pieces start shedding like glitter’s sophisticated cousin. Faux magnolia gives you the same signature look (glossy green tops, warm brown undersides) with none of the upkeep and a lot more reuse potential.
Michaels carries faux magnolia options in multiple formsstems, picks, garlands, and pre-made wreaths you can customizeso you can control both budget and fullness. Faux also lets you build a wreath that survives repeated hanging, storage, and the occasional door slam that sounds like a movie trailer.
Main Keywords and LSI Keywords to Weave In Naturally
As you publish this tutorial, you’ll naturally hit search-friendly phrases like magnolia wreath, DIY magnolia wreath, faux magnolia leaves, Michaels magnolia stems, front door wreath, and related terms like grapevine wreath form, wreath wire, floral wire, hot glue, seasonal wreath decor, and evergreen wreath alternative. The goal is to sound human, not like you swallowed a keyword list.
What to Buy at Michaels (Simple Shopping List)
You can absolutely freestyle this, but here’s a reliable supply list that consistently produces a full, balanced wreath. Choose your base style first (grapevine = rustic and forgiving; wire ring = modern and light).
Core Supplies
- Faux magnolia leaves (stems, picks, or garlandwhatever looks lush and has wired stems)
- Wreath base: grapevine wreath form (16–20″) or wire ring (14–18″)
- Floral wire (green paddle wire is easiest) or pre-cut craft wire
- Wire cutters (or sturdy scissors rated for floral stems)
- Hot glue gun + glue sticks (high-temp tends to grip better)
- Optional stronger adhesive (great for outdoor wreaths and heavier accents)
Optional “Make It Look Custom” Add-Ons
- Neutral ribbon (linen, cotton, velvet) or wired bow ribbon
- Berry picks, eucalyptus sprigs, lamb’s ear, or subtle florals
- Mini pinecones (holiday or rustic)
- Wreath hanger or a damage-free hanging method
- Matte spray sealer (optional for extra durability)
Before You Build: The Secret Step Most People Skip
Fluff and Shape the Faux Leaves
Faux greenery usually comes flattened from packaging. If you attach it straight to your wreath form, you’ll get a wreath that looks… politely tired. Take 5–10 minutes to bend and fan out each wired stem so it creates volume. Think “natural arcs,” not “straight out like jazz hands.”
Pro tip: shape in layers. Start by opening the main branches, then adjust smaller offshoots so they radiate outward and slightly forward. This hides mechanics and makes the leaves look like they grew there on purpose.
How to Make a Magnolia Wreath: Step-by-Step
Step 1: Decide on Full Circle vs. Asymmetrical (and Commit Like an Adult)
A full-circle magnolia wreath is classic and balancedperfect for traditional doors and year-round decor. An asymmetrical magnolia wreath (half, crescent, or corner-heavy) looks modern and intentional, and it usually costs less because you use fewer stems.
Step 2: Prep Your Leaves
If you’re using stems or picks, clip leaves into smaller clusters (2–5 leaves per bundle). If you’re using garland, cut it into workable sections (6–10 inches) so you can curve it around the base cleanly. Keep some longer pieces for “flow” and some shorter pieces for filling gaps.
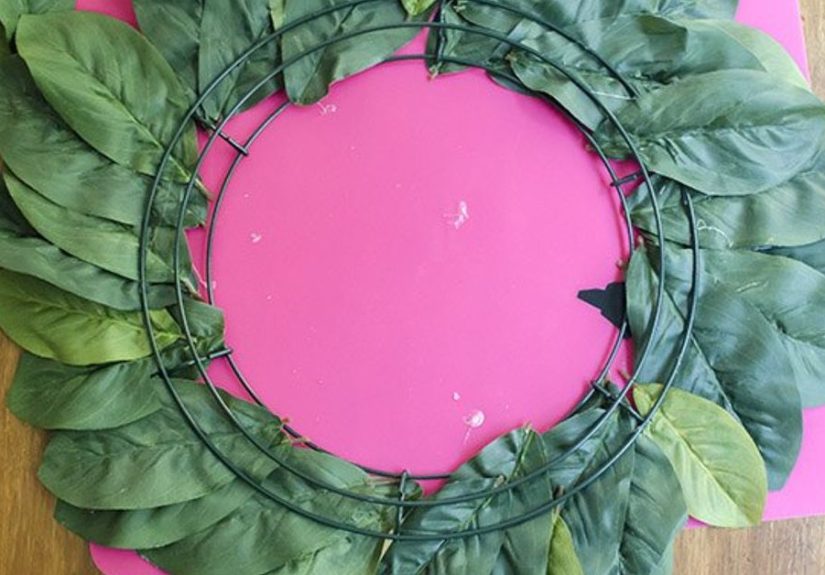
Step 3: Build a Base Layer (The “Coverage” Pass)
Place your first cluster at the bottom of the wreath form. Angle leaves slightly upward and outward. Secure with floral wire: wrap tightly around the stem and the form 2–3 times, then twist to lock. If you’re using a grapevine form, you can tuck stems into the twigs and wire them down for extra grip.
Overlap each new cluster by about one-third to one-half, moving in the same direction around the form. This creates a natural “shingled” look and prevents awkward gaps where the form peeks through like it’s trying to photobomb your decor.
Step 4: Add Depth (The “Make It Look Real” Pass)
Once the form is mostly covered, step back and look for flat spots. Now you’ll add a second layerclusters placed slightly forward and at varied angles. Mix in a few leaves with the brown underside showing (magnolia’s signature contrast) so it doesn’t look like a perfect green donut.
This is also where you sneak in subtle texture: a few eucalyptus sprigs, a touch of lamb’s ear, or tiny berry accents. The goal is dimension, not “I hot-glued the entire floral department to my front door.”
Step 5: Glue Strategically, Not Emotionally
Use hot glue as a helper, not the main structural plan. Hot glue is fantastic for quick tackslike keeping a leaf tip from lifting or anchoring a small accent pick. But for stems under tension, wire is your best friend.
If your wreath will live outdoors (sun, heat, cold, humidity), consider reinforcing critical connection points with a stronger adhesive where appropriateespecially for heavier embellishments. A “wire + glue” combo is the durability sweet spot.
Step 6: Finish the Back (So It Doesn’t Scratch Your Door Like a Gremlin)
Grapevine forms can be scratchy. If your door is delicate (painted, stained, or you just love it deeply), add small felt pads to contact points on the back. For wire rings, tuck sharp wire ends inward and dab a little glue over twists so nothing snags.
Step 7: Add a Bow or Hanging Loop
If you want a bow, attach it with floral wire (hot glue alone can surrender in heat). For hanging, use a wired loop or zip tie at the top. Keep the loop hidden behind leaves so the wreath appears to floatlike it’s fancy enough to defy gravity.
Design Variations: Same Magnolia Base, Different Personalities
1) Minimal Modern Magnolia (Half-Wreath)
Cover only the bottom half or one side of a wire ring with magnolia clusters. Keep it clean. Add one small bow or none at all. This style is great for apartments, small doors, and anyone who loves “decor, but whisper it.”
2) Southern Classic Magnolia (Full and Lush)
Go full circle on a grapevine base. Include a few deeper-toned leaves and let some brown undersides show. Add a thick ribbon bow in neutral linen or deep velvet for a warm, traditional look.
3) Holiday Magnolia (Gold, Brass, and Cozy)
Keep magnolia as the main greenery, then add pinecones, subtle berries, and a few metallic accents (gold leaves or brass bells). The key is restraint: magnolia is already dramatic.
4) Spring Magnolia (Soft Florals, Not a Flower Explosion)
Add two or three small floral picks (white, blush, or pale yellow) and one secondary greenery like eucalyptus. Anchor florals off-center for a designer feel.
Common Mistakes (and How to Fix Them Fast)
“My wreath looks flat.”
You need more forward-facing leaves. Add a second layer with stems angled outward, and bend leaf tips forward. Also: fluff more than you think you need to. Faux greenery loves a little drama.
“I can see the wreath form.”
Fill gaps with smaller leaf clusters placed perpendicular to the base layer. Think of them as “gap-cover bandaids,” but prettier.
“It looks too perfect / fake.”
Introduce variation: show some brown undersides, vary angles, and mix leaf sizes. Nature is charmingly inconsistent; your wreath should be too.
“Stuff keeps falling off.”
For anything heavy (bows, pinecones, chunky picks), wire it first, then glue as backup. Outdoors? Reinforce key points and avoid relying on hot glue alone for structural hold.
How to Hang Your Magnolia Wreath Without Damaging the Door
If you can use an over-the-door wreath hanger, that’s the simplest. If you’re trying to avoid scratches, add felt pads where the hanger touches. For a damage-free option, many people use strong adhesive hooks on the inside of the door with a ribbon looped over the top to hold the wreath in front. Just make sure the hook is rated for the wreath’s weight and your door surface is clean and dry before applying.
Care and Storage: Make It Last for Years
The easiest way to ruin a faux magnolia wreath is to crush it in a closet like it owes you money. Store it in a wreath storage bag or a large box, and avoid stacking heavy items on top. Before rehanging, fluff and reshape stems the same way you did at the beginning. Faux magnolia is low-maintenance, not no-maintenance.
Conclusion
A magnolia wreath made with faux leaves from Michaels is one of those rare DIY wins: it looks upscale, it’s beginner-friendly, and it can be re-styled season after season. Whether you go full and classic or modern and asymmetrical, the real magic is in layering, shaping, and attaching your stems like you mean it. Build it once, tweak it forever, and enjoy the glow of having a front door that quietly says, “Yes, I do have taste.”
Extra: of Real-World Experience (So You Don’t Learn the Hard Way)
The first time I made a faux magnolia wreath, I had one goal: “Pretty.” I achieved something closer to “leafy pancake.” What I learned immediately is that magnolia leaves don’t naturally sit flat the way some faux greenery does. They want to curve, lift, and overlaplike they’re auditioning for a runway show. If you don’t shape them, they’ll cling to the wreath form and look like they’re trying to hide. So now I treat fluffing like it’s part of the craft, not a suggestion. I open every stem, bend the main branch into a gentle arc, and then adjust individual leaves so some face forward, some tilt sideways, and a few show that brown underside. That tiny bit of contrast is what makes people squint and ask, “Is that real?”
Another lesson: attaching methods matter more than enthusiasm. Hot glue is wonderfully satisfyingthe instant bond, the little “click” feeling in your soulbut outdoors it can become unreliable, especially if your wreath gets direct sun. I’ve had a bow slowly sag like it was emotionally overwhelmed by summer. The fix was simple: wire first, glue second. Wire is the responsible adult; hot glue is the fun cousin who shows up with snacks and questionable advice. When I started wiring heavier accents (bows, pinecones, chunky floral picks), things stopped migrating down the wreath like they were on a lazy river.
I also learned that “symmetry” can be a trap. When you’re crafting, the instinct is to make everything perfectly even. But magnolia looks best when it’s slightly imperfect: leaf clusters overlapping in varied directions, little pockets of depth, and one or two leaves that stick out farther than the rest. Now, I build the base evenly, then intentionally “mess it up” in a controlled way by adding a few forward-facing clusters off-center. It’s the difference between “store-bought” and “styled.”
Finally, storage is the make-or-break for whether you’ll love this wreath next year. I used to toss wreaths into a closet and hope for the best. The best did not show up. Now I store mine upright in a wreath bag, and if I must stack, I keep magnolia on top like the diva it is. When I pull it out, I give it a two-minute fluff, and it looks brand newno frantic repairs, no glue-gun emergency, no whispered threats. If you want a wreath you’ll actually reuse (and feel smug about), treat shaping and storage as part of the project. Your future self will thank youprobably while holding a coffee and admiring the door.