Table of Contents >> Show >> Hide
- Why a Mason Jar Herb Planter Works (and When It Doesn’t)
- What You’ll Need
- Three Best Mason Jar Herb Planter Setups
- The Best Herbs for a Mason Jar Herb Planter
- Light: The Make-or-Break Ingredient
- Watering Without Turning Your Jar into a Bog
- Feeding Your Herbs (Because Water Isn’t a Meal)
- How to Harvest So Your Herbs Get Bushier (Not Bitter)
- Troubleshooting: When Your Herb Planter Starts Acting Dramatic
- Design Ideas That Look Expensive (But Aren’t)
- Frequently Asked Questions
- Conclusion
A mason jar is basically the Swiss Army knife of the kitchen: it holds pickles, overnight oats, questionable “starter” projects,
andyesfresh herbs. If you’ve ever looked at a $29 “rustic farmhouse herb station” and thought, “I can absolutely DIY that for
the price of a latte,” welcome home.
This guide walks you through building a mason jar herb planter that actually keeps herbs alive (not just photogenic for 48 hours).
We’ll cover three smart setupssoil-in-jar (done safely), self-watering, and hydroponicplus the best herbs, lighting, watering,
troubleshooting, and a few design tricks so your kitchen looks like it has its life together.
Why a Mason Jar Herb Planter Works (and When It Doesn’t)
Glass jars are adorable, inexpensive, easy to clean, and let you see what’s happening insideroots, moisture levels, and whether you
accidentally created a tiny swamp ecosystem. They’re also space-friendly, which makes them perfect for apartment counters and sunny windowsills.
The big catch: mason jars don’t have drainage
Most herbs hate sitting in soggy soil. Classic plant containers have drainage holes; mason jars don’t. That means a “dump soil in a jar and hope”
approach can turn into root rot faster than you can say “but it looked cute on Pinterest.”
The fix is simple: choose a jar-friendly method that manages water on purposeeither:
(1) use an inner pot so excess water can be removed,
(2) build a self-watering system that controls moisture,
or (3) go hydroponic and skip soil entirely.
What You’ll Need
Core supplies (for any method)
- Mason jar (pint for one small herb, quart for larger plants like basil)
- Herb plant (a small nursery start is easiest)
- Bright light (sunny window or a grow light)
- Label (because “mystery herb” is fun until it’s mint in your pasta sauce)
Method-specific supplies
- Soil-in-jar (safe version): a small nursery pot or plastic cup that fits inside the jar, plus a saucer or way to pour off water
- Self-watering: cotton wick (or thick cotton cord), a small inner pot/net cup, and a lid ring (optional)
- Hydroponic (Kratky-style): net cup, growing medium (like clay pebbles), hydroponic nutrients, and something to block light from the jar
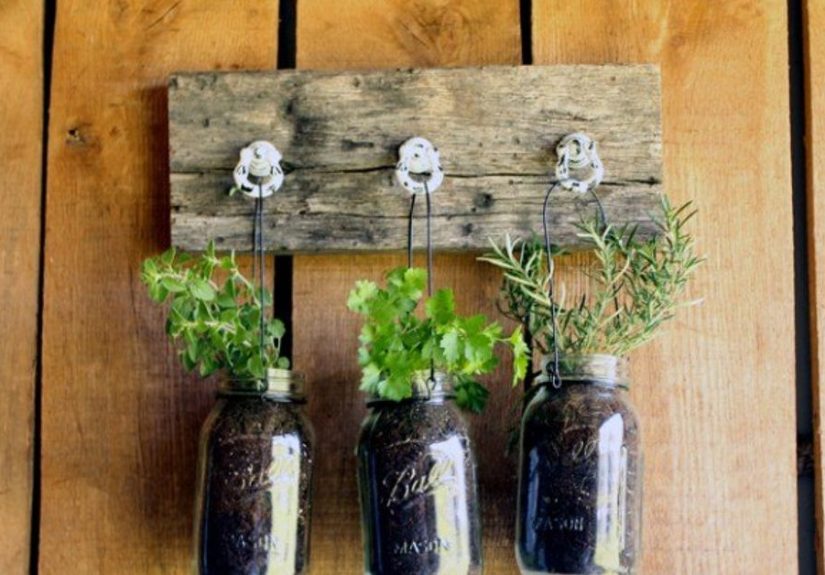
Three Best Mason Jar Herb Planter Setups
Option 1: “Soil, But Make It Safe” (Inner Pot Method)
This is the most beginner-friendly approach because it gives you what herbs want: soil that can drain. The jar becomes a decorative sleeve
(like a tiny plant tuxedo), while the inner pot does the real work.
- Pick an inner pot: Use a small nursery pot that fits inside the jar. No pot? Poke drainage holes in a sturdy plastic cup.
-
Add a little spacer: Drop a few pebbles in the bottom of the jar (not as “drainage magic,” just to lift the pot slightly).
The goal is to keep the inner pot from sitting flat in runoff. -
Fill with potting mix: Use a lightweight potting mix (not dense garden soil). If you have perlite, mixing some in helps keep
things airy and less swamp-prone. - Plant your herb: Loosen the roots gently, set it at the same depth it was growing, and firm the soil lightly.
-
Water smart: Water until it drains. Then pour off extra water that collects in the jar after 10–15 minutes.
This one habit is what separates “thriving herb planter” from “jar of regret.”
Best for: basil, parsley, cilantro, chives, oregano, thyme, mint (mint will eventually want a bigger homemint always does).
Option 2: Self-Watering Mason Jar Herb Planter (Wick Method)
If you travel, forget to water, or simply enjoy the idea of your jar doing chores, go self-watering. The jar holds a water reservoir; a wick
pulls moisture upward as the plant needs it. It’s basically a tiny hydration butler.
- Choose an inner container: A small net cup or perforated cup works great.
- Thread the wick: Pull cotton cord through the bottom so a few inches hang into the jar reservoir and a few inches sit in the soil area.
- Fill the reservoir: Add water to the jar (not so high that it fully submerges the soil).
- Add potting mix: Pack soil around the wick in the inner container, then plant the herb.
- Prime it: Water from the top once to get the wick working. After that, refill the reservoir as needed.
Pro tip: Herbs that like to dry slightly between watering (like thyme) can still work herejust keep the reservoir lower and
let it empty before refilling.
Option 3: Hydroponic Mason Jar Herb Planter (Kratky-Style)
Want maximum “science fair chic” with minimal mess? Hydroponics is your move. In a Kratky-style setup, the plant sits in a net cup above
nutrient solution. As the water level drops, roots grow down and also get oxygen from the air gapno pump required.
- Block the light: Wrap the jar in paper, fabric, or paint the outside. Light + nutrient water = algae party.
- Install a net cup: Use a net cup that fits the jar mouth (often held by the metal ring).
- Add medium and plant: Clay pebbles hold the plant upright while roots grow.
- Mix nutrient solution: Follow the nutrient label carefully (this is not the time for “eyeballing it”).
-
Set the fill level: The bottom of the net cup should touch the solution at first so roots can access it.
Later, allow an air gap for oxygen. - Top off thoughtfully: Don’t keep refilling to the brimmaintain that air gap once roots are established.
Best for: basil, mint, lettuce-like herbs and leafy greens, and enthusiastic experimenters who enjoy saying,
“It’s not dirt, it’s nutrients.”
The Best Herbs for a Mason Jar Herb Planter
Pick herbs that match your light and your cooking habits. The healthiest herb in the world is useless if it’s the one you never use.
Top picks for most kitchens
- Basil: Loves bright light and regular pinching. Great “quick win” herb.
- Chives: Compact, hardy, and forgiving (like the friend who still likes you after you cancel plans).
- Parsley: Steady grower; appreciates consistent moisture.
- Mint: Thrives… almost too well. Keep it solo, or it will try to annex neighboring plants.
- Thyme & oregano: Prefer drier soil and lots of light; ideal for the inner-pot method.
- Cilantro: Can be finicky indoors; cooler temps help. Succession plant if you love it.
Herbs that are trickier in jars
- Rosemary: Likes lots of sun and excellent drainage; can be fussy indoors without strong light and airflow.
- Dill/fennel: Tend to get tall and need more space than a jar typically offers.
Light: The Make-or-Break Ingredient
You can buy the cutest jars on Earth, but herbs still run on photosynthesis. For most culinary herbs, aim for
at least 5–6 hours of strong light from a bright window, ideally south or west facing. If winter light is weak or your window is basically decorative,
a grow light turns “struggling” into “snipping.”
Easy lighting setups that actually work
- Sunny windowsill: Rotate jars every few days so plants don’t lean like they’re trying to eavesdrop.
- Simple grow light: Run it ~12–16 hours/day and keep plants relatively close, following the light’s instructions.
- Combo approach: Window by day + grow light boost in the evening during darker months.
Clue your herb needs more light: long, weak stems (“leggy”), pale leaves, and slow growth. The fix is usually brighter light,
not more water.
Watering Without Turning Your Jar into a Bog
Overwatering kills more indoor herbs than lack of love ever could. The trick is understanding what “dry” means:
you’re not waiting for a desertyou’re waiting for the top inch or so to feel dry (varies by herb).
Jar-specific watering rules
-
If you’re using an inner pot: water thoroughly, then dump the excess water that collects in the jar.
Never let the pot sit in standing water. - If you’re using a self-watering wick: refill the reservoir only when it’s mostly empty, and avoid keeping the soil constantly saturated.
- If you’re hydroponic: keep the jar blocked from light, follow nutrient directions, and preserve an air gap once roots are established.
About the “rocks for drainage” idea
You’ll see many DIY tutorials suggest rocks at the bottom of a container for drainage. In traditional pots with drainage holes, rocks can reduce soil volume,
and in containers without holes, rocks don’t magically remove waterthey just give water a place to pool. The safest route is still:
use drainage (inner pot), self-watering, or hydroponics.
Feeding Your Herbs (Because Water Isn’t a Meal)
Herbs in containers eventually use up available nutrients. If you’re growing in soil, a light, occasional fertilizer helps.
If you’re hydroponic, nutrients are the whole show.
Soil-based planters
- Start with fresh potting mix (it usually includes some nutrients).
- Fertilize lightly once or twice a month during active growth (more is not better).
- Watch the leaves: pale growth can mean hungeror it can mean low light. Diagnose before you dose.
Hydroponic planters
- Follow nutrient instructions precisely.
- Prevent algae by blocking light and keeping things clean.
- Check roots: healthy roots look light-colored; brown slime is a red flag.
How to Harvest So Your Herbs Get Bushier (Not Bitter)
Harvesting isn’t just the rewardit’s also training. Most herbs respond to regular trimming by branching out, which means more leaves for you.
Your plant is basically thinking, “Oh no, I lost a stembetter make three more.”
Simple harvesting moves
- Basil: pinch above a pair of leaves to encourage branching; remove flower buds to keep leaves coming.
- Chives: snip like a haircutleave some green so it can regrow.
- Mint: trim often; it rebounds quickly and will happily take over your countertop if you let it.
- Woody herbs (thyme/oregano): snip tips regularly; avoid stripping the plant bare.
Troubleshooting: When Your Herb Planter Starts Acting Dramatic
Problem: Yellow leaves
Usually overwatering or poor drainage. Let soil dry a bit, dump excess water, and confirm your plant has bright light.
Problem: Leggy, floppy growth
Light issue. Move to a brighter window or add a grow light. Also pinch back growth to encourage branching.
Problem: Moldy soil surface
Too wet + not enough airflow. Water less, increase air circulation, and consider top-dressing with a thin layer of coarse material
(like horticultural sand) to reduce surface moisture.
Problem: Tiny flying bugs (fungus gnats)
They love consistently damp soil. Let the top layer dry more between watering, and consider sticky traps while you reset your watering habits.
(Yes, your herbs can have houseguests. No, you didn’t invite them.)
Design Ideas That Look Expensive (But Aren’t)
- Label everything: chalk labels, metal tags, or a strip of painter’s tape. Minimal effort, maximum “organized adult” vibes.
- Use uniform jars: a row of matching jars instantly looks intentionaleven if your life is not.
- Hide the plastic inner pot: wrap the jar in twine, kraft paper, or a fabric sleeve.
- Create a “herb flight”: basil, chives, parsleylike a tasting flight, but greener.
- Go vertical: if you’re confident with drilling or mounting, jars on a board can become a living kitchen display.
Frequently Asked Questions
Can I grow herbs directly in a mason jar with soil?
You can, but it’s risky without drainage. The safer version is using an inner pot you can remove and drain, or choosing a self-watering/hydroponic method.
How long will a mason jar herb planter last?
With good light and watering, many herbs can produce for weeks to months. Fast growers like basil may need refreshing or replanting more often,
especially indoors.
Do I need charcoal, rocks, or special layers?
Not necessarily. What matters most is controlling moisture and providing enough light. Fancy layers can be decorative, but they don’t replace proper drainage.
Conclusion
A mason jar herb planter is one of the easiest ways to keep fresh herbs within arm’s reachright where you cook, snack, and
pretend you’re only in the kitchen for “a glass of water.” The secret isn’t the jar. It’s the system.
If you want the simplest path, use the inner pot method. If you forget watering exists, go self-watering.
If you love clean counters and tiny science projects, try hydroponic mason jar herbs. Pair any method with strong light,
harvest regularly, and your kitchen will start producing flavors that store-bought clamshell herbs can only dream about.
Bonus: of Real-World “Mason Jar Herb Planter” Experience
Here’s what tends to happen after the first week of mason jar herb enthusiasm wears off (and the herbs stop posing for photos).
The first surprise is usually water behavior. In a normal pot, extra water disappears out the bottom. In a jar, it doesn’t.
People often assume, “I’ll just add a few rocks and the plant will be fine.” What actually happens is that the water collects somewhereeither
in the soil itself or in a little reservoir at the bottomand your herb decides it’s auditioning for a role as “tragic wilted extra.”
The moment you switch to an inner pot and start dumping excess water, the entire project becomes dramatically easier.
The second surprise is how thirsty “bright light” really is. Many kitchens feel sunny to humans but are basically a dim lounge
to a basil plant. When herbs get leggy, people instinctively water morebecause droopy equals thirsty, right? Indoors, droopy often equals
“I’m stretching for light like a cartoon character reaching for a cookie on a high shelf.” The experience-based fix is to treat light like
a first-class ingredient: move jars right up to a bright window, rotate them, or add a small grow light. Once the light improves, watering
becomes more predictable and the plant starts producing tighter, leafier growth.
The third surprise is mint’s personality. Mint is that friend who says they’ll “just stay for one drink” and then is suddenly
hosting a karaoke night in your living room. In jar planters, mint grows fast, crowds itself, and keeps trying to expand. If you love mint,
give it its own jar and harvest often. If you don’t love mint, don’t plant mint “just in case.” Mint does not understand “just in case.”
Another real-world lesson: small jars reward small plants. Grocery-store herb pots are often multiple plants crammed together.
They look lush, but they’re basically a tiny herb traffic jam. When you transplant into a jar, splitting that clump into two or three smaller
plantings can prevent a slow-motion collapse later. You’ll get better airflow, less mildew risk, and more consistent growth. It also makes you
feel like a responsible plant manager, which is fun.
Finally, the best “experience” tip is the least glamorous: make harvesting part of cooking. Snip basil while the pasta water
boils. Cut chives while the eggs cook. Grab parsley while you plate. When harvesting becomes a habit, herbs stay bushy and productive instead
of flowering and getting scraggly. Your mason jar herb planter stops being decor and becomes a tiny, reliable pantryone that doesn’t expire
in the crisper drawer under a bag of carrots you forgot you bought.