Table of Contents >> Show >> Hide
- What Makes Oven “Fried” Chicken Actually Crispy?
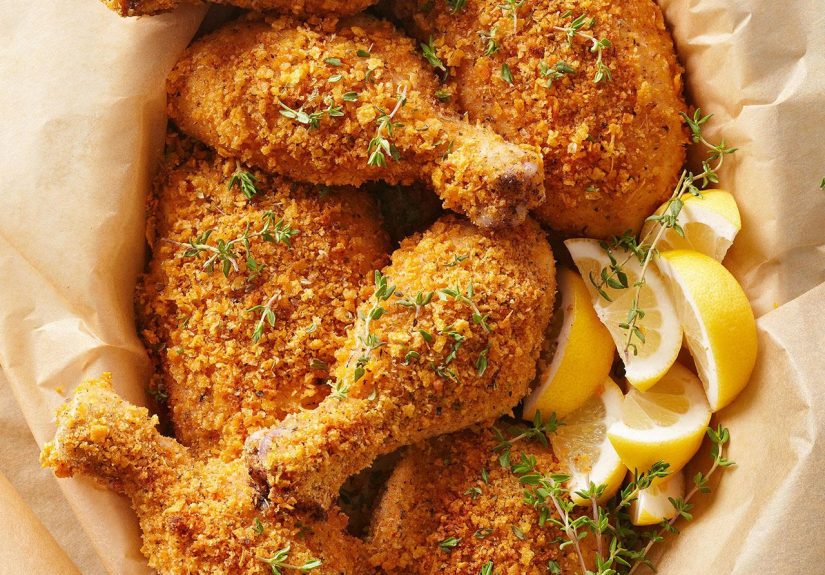
- Oven Fried Chicken Recipe (Crispy, Juicy, No Deep Fryer)
- Timing Guide (So You Don’t Guess Like It’s a Game Show)
- Pro Tips for Next-Level Crunch
- Flavor Variations (Same Crunch, Different Personality)
- What to Serve With Oven Fried Chicken
- Storage, Leftovers, and Reheating Without Ruining the Crunch
- Food Safety Notes (The Boring Part That Keeps Dinner Fun)
- Frequently Asked Questions
- Conclusion
- Experiences: What Making Oven Fried Chicken Is Really Like (The Relatable Edition)
Fried chicken is delicious. Deep-frying it at home is… an event. Oil splatters, your kitchen smells like a county fair for two days,
and you start questioning your life choices while filtering hot grease through a coffee filter like some kind of culinary alchemist.
Enter: oven fried chickenthat magical middle ground where you get a crunchy, golden crust and juicy chicken,
but your smoke alarm stays employed only as a backup. This recipe borrows the best tricks from classic “oven-fried” methods:
a tangy buttermilk soak, a crisp-loving breadcrumb crunch, and high-heat baking with airflow so the coating actually stays crispy.
What Makes Oven “Fried” Chicken Actually Crispy?
Let’s be honest: the oven doesn’t “fry” anything. What it can do is drive off moisture, brown the coating, and set you up for that
shatter-y crunchif you stack the deck in your favor.
- Dry surface = better crunch: Moisture is the villain. Pat your chicken dry before breading.
- Airflow matters: A wire rack helps hot air circulate so the bottom doesn’t steam itself into sadness.
- Big-crumb coatings win: Panko and crushed cornflakes stay crunchier than fine breadcrumbs.
- A little starch helps: A touch of cornstarch in the dredge encourages a lighter, crispier crust.
- High heat + fat: A light oil/butter layer helps browning and gives the coating that “fried” vibe.
Oven Fried Chicken Recipe (Crispy, Juicy, No Deep Fryer)
Best for: bone-in, skin-on thighs and drumsticks (most forgiving and juiciest). Works for breasts toosee timing notes.
Ingredients
Chicken + Buttermilk Soak
- 3 to 3 1/2 pounds chicken pieces (mix of thighs and drumsticks recommended)
- 2 cups buttermilk
- 1 1/2 tablespoons kosher salt (or 1 tablespoon fine salt)
- 1 teaspoon black pepper
- 1 teaspoon garlic powder
- 1 teaspoon paprika (smoked paprika is great too)
- 1 to 2 teaspoons hot sauce (optional, but highly encouraged)
Crispy Coating
- 1 cup all-purpose flour
- 2 tablespoons cornstarch
- 1 1/2 cups panko breadcrumbs
- 1 1/2 cups crushed cornflakes (lightly crushedthink “craggy,” not dust)
- 1 1/2 teaspoons baking powder
- 2 teaspoons kosher salt
- 1 teaspoon black pepper
- 2 teaspoons paprika
- 1 1/2 teaspoons onion powder
- 1 1/2 teaspoons garlic powder
- 1/2 to 1 teaspoon cayenne (optional, adjust to your bravery)
For Baking
- Nonstick cooking spray or 3 tablespoons neutral oil (avocado/canola/vegetable)
- 2 tablespoons melted butter (optional but delicious)
- Wire rack + rimmed baking sheet (recommended)
Instructions
-
Soak the chicken (4 hours to overnight).
In a large bowl or zip-top bag, combine buttermilk, salt, pepper, garlic powder, paprika, and hot sauce.
Add chicken, turn to coat, cover, and refrigerate at least 4 hours (overnight is even better). -
Prep your oven setup.
Heat oven to 425°F. Place a wire rack on a rimmed baking sheet and coat the rack generously with cooking spray.
(If you don’t have a rack, use a parchment-lined sheet and plan to flip carefullystill works, just slightly less crispy underneath.) -
Mix the coating.
In a wide shallow dish, whisk together flour, cornstarch, panko, crushed cornflakes, baking powder, salt, pepper, paprika, onion powder,
garlic powder, and cayenne. -
Drain + dry (the secret handshake).
Remove chicken from the buttermilk soak and let excess drip off. Pat each piece lightly with paper towels.
You’re not undoing the marinadeyou’re just preventing the coating from turning gluey. -
Coat like you mean it.
Press each piece firmly into the coating, turning and pressing so the crumbs stick in a thick, craggy layer.
Place coated chicken on a clean tray while you finish the rest. -
Add a little fat for “fried” vibes.
Lightly spray the top of each chicken piece with cooking spray, or drizzle very lightly with oil.
For extra flavor, whisk melted butter with the oil and brush a thin layer over the chicken.
(Don’t drown itthis isn’t a chicken spa day.) -
Bake.
Arrange chicken on the prepared rack with space between pieces.
Bake 20 minutes. -
Flip + finish.
Flip chicken carefully (tongs help). Bake another 15 to 25 minutes,
until the coating is deeply golden and the thickest part reads 165°F on an instant-read thermometer.
(Dark meat is often best in the 175–185°F range for tendernessstill check that you’ve cleared 165°F.) -
Rest (yes, even crispy chicken needs a nap).
Rest 5–10 minutes before serving. This helps juices redistribute and keeps the crust from sliding off in a tragic, crispy shell.
Timing Guide (So You Don’t Guess Like It’s a Game Show)
- Drumsticks: ~35–45 minutes total at 425°F
- Thighs (bone-in): ~35–50 minutes total at 425°F
- Breasts (bone-in): ~30–40 minutes total at 425°F (watch closelybreasts dry out faster)
- Boneless breasts/thighs: often 18–28 minutes total, depending on thickness
Ovens vary, chicken pieces vary, and time is a liar. A thermometer is the only friend who will tell you the truth.
Pro Tips for Next-Level Crunch
1) Convection? Use it.
If you have convection bake/roast, use it for crispier results. As a general rule, drop the temperature by about 25°F
(try 400°F convection) and start checking a little early.
2) Don’t crowd the pan.
Crowding traps steam. Steam is basically the coating’s evil twin. Give pieces breathing room or use two pans.
3) Make the coating “craggy.”
Press crumbs in firmly. Those rough edges brown faster, crunch louder, and generally make you feel like you nailed dinner.
4) Want old-school oven-fried style?
Instead of a rack, you can melt butter directly in a preheating baking dish or sheet pan, then place coated chicken in the sizzling fat.
It’s a classic method for that “fried” flavorjust flip once to brown both sides.
Flavor Variations (Same Crunch, Different Personality)
Spicy BBQ-Lover
- Add 1 teaspoon chili powder + 1 teaspoon brown sugar to the coating.
- Brush with a thin layer of BBQ sauce for the last 5 minutes (not earliersugar burns fast).
Lemon-Pepper
- Add 2 teaspoons lemon zest to the coating.
- Swap cayenne for extra coarse black pepper.
- Finish with a squeeze of lemon right before serving.
Parmesan-Herb
- Mix 1/2 cup finely grated Parmesan into the coating.
- Add 1 teaspoon dried rosemary or thyme (or both).
Gluten-Free
- Use gluten-free panko and a 1:1 gluten-free flour blend.
- Keep the cornstarchit’s naturally gluten-free and helps crisp.
What to Serve With Oven Fried Chicken
- Crunchy + tangy: slaw, pickles, vinegar-based cucumber salad
- Comfort mode: mashed potatoes, mac and cheese, biscuits
- Light-ish balance: roasted green beans, corn on the cob, big salad
- Sauce options: honey mustard, hot sauce, ranch, Alabama-style white sauce
Storage, Leftovers, and Reheating Without Ruining the Crunch
Store leftovers in an airtight container in the fridge and eat within 3–4 days. For best texture, reheat in the ovennot the microwave.
- Oven reheat: 400°F for ~15–20 minutes on a wire rack until hot and crisp again.
- Air fryer reheat: 350–375°F for a few minutes, flipping once.
Food Safety Notes (The Boring Part That Keeps Dinner Fun)
- Cook chicken to 165°F in the thickest part.
- Use separate boards/utensils for raw chicken and wash hands well.
- Don’t leave cooked chicken out at room temp for more than 2 hours (1 hour if it’s hot out).
Frequently Asked Questions
Why is my coating not browning?
Usually one of three things: oven temp is low, chicken is crowded (steam!), or there isn’t enough fat on the surface.
Use an oven thermometer if you suspect your oven runs cool, and don’t be shy with a light spray of oil.
Why did the breading fall off?
Too much wet marinade clinging to the chicken, not pressing the coating firmly, or flipping too early.
Let the coating bake long enough to “set” before you flip, and use tongs gently.
Can I use only panko or only cornflakes?
Yes. All panko = crisp and tidy. All cornflakes = extra craggy and dramatic crunch.
The combo gives you the best of both worlds.
Conclusion
Oven fried chicken is the weeknight-friendly compromise that doesn’t feel like a compromise: crunchy coating, juicy meat,
and none of the deep-fryer aftermath. The big wins are simpledry the chicken, build a bold coating, bake hot, give it airflow,
and use a thermometer so you pull it at the right moment. Once you’ve nailed the base method, you can spin flavors endlessly,
from lemon-pepper to spicy BBQ to cheesy herb crunch. Your future self (and your kitchen walls) will thank you.
Experiences: What Making Oven Fried Chicken Is Really Like (The Relatable Edition)
People tend to approach oven fried chicken with cautious optimismthe same energy as saying, “This parking spot looks legal,”
and then still checking the sign three times. The first big “aha” moment usually happens right after breading: you set those
beautifully coated pieces on a rack, step back, and realize you’ve created something that looks dangerously close to
real fried chicken… without sacrificing a gallon of oil to the dinner gods.
The second moment comes when you open the oven halfway through. If you used a rack and didn’t crowd the pan, you’ll hear it:
that faint, promising crackle. It’s not a full-on deep-fryer roar, but it’s enough to make you feel like you’re winning.
If you did crowd the pan, this is also when you learn what “steaming” smells likekind of like regret with a hint of paprika.
Most home cooks only make that mistake once, because nothing motivates good spacing like a less-than-crispy first batch.
Another common experience: becoming emotionally invested in your cooking spray. A quick mist feels too small to matter,
but it’s often the difference between “golden, crunchy perfection” and “why is my coating still beige?” The funny part is
how precise you getsuddenly you’re spraying from different angles like you’re painting a tiny masterpiece.
And when the chicken finally turns that deep, toasty brown, you’ll catch yourself peeking through the oven window like it’s
a season finale.
Families have their own oven-fried chicken rituals. Some people swear by a buttermilk soak that starts the night before,
because it feels like you’re setting yourself up for success (and also because it makes you feel extremely responsible).
Others go “same-day soak” and still get great resultsthen tell everyone it was planned. Kids often love the breading step,
but in a “helpful tornado” way: crumbs everywhere, chicken pieces getting extra-pressed, and someone inevitably asking if you can
make it “less spicy but also more spicy.” It’s chaos, but it’s the kind of chaos that smells like dinner is going to be good.
Leftovers are where oven fried chicken earns bonus points. People frequently report that the chicken stays surprisingly crisp
in the fridgeespecially if it cooled on a rack before being packed up. Reheating becomes its own mini-tradition, too:
the oven or air fryer brings back the crunch, while the microwave… well, the microwave makes it edible, but it also makes it
obvious you had a choice. A lot of folks end up reheating a couple extra pieces “just to test,” which is a completely normal
and scientifically valid behavior.
And then there’s the pride factor. Oven fried chicken is one of those dishes that makes people say, “Wait, you baked this?”
That reaction never gets old. It’s the satisfaction of pulling off something comfort-food iconic with a method that feels
doable on a regular Tuesday. Once you’ve made it a few times, you start riffingdifferent spice blends, crushed pretzels,
extra pepper, a drizzle of honey, a new dipping sauceand suddenly it’s not just a recipe. It’s your chicken night.