Table of Contents >> Show >> Hide
- Before You Reinvent: A 10-Minute Sorting & Safety Routine
- Reinvention Ideas That Still “Act Like a Shaker”
- Reinvention Ideas That Turn Shakers Into Decor
- Reinvention Ideas for Hobby Storage & Home Organization
- How to Make the Reinvention Look Intentional
- Troubleshooting: Common Problems & Easy Fixes
- When “Reinvent” Should Mean “Retire”
- Conclusion: Small Objects, Big Payoff
- Experience Notes: What It’s Actually Like Reinventing Old Shakers ()
- SEO Tags
Old salt and pepper shakers are the ultimate “tiny but mighty” thrift-store score. They’re small enough to experiment on, sturdy enough to survive real life,
and cute enough to earn permanent counter space. Best of all, they’re already designed to dispense somethingso reinventing them is less “arts-and-crafts chaos”
and more “clever upgrade with a satisfying click.”
This guide walks through smart, safe ways to reinvent old salt and pepper shakersfrom practical repurposes (hello, glitter control) to decor
projects that look intentional, not “I panicked with a hot glue gun.” You’ll get cleaning steps, safety checks, and a menu of ideas you can actually finish.
Before You Reinvent: A 10-Minute Sorting & Safety Routine
1) Decide: treasure, “practice piece,” or project-ready
Some vintage shaker sets can be collectible. If yours are signed, hand-painted, unusually detailed, from a well-known maker, or part of a themed set
(animals, holiday, mid-century kitsch), consider leaving them as-is. Reinvent the common ones; display (or resell) the rare ones.
2) Food-safety reality check (especially for older ceramics)
If you’re planning to use a shaker for anything edible, be cautious with older or imported ceramic piecesespecially if they’re brightly colored, cracked, or
have a worn glaze. When you can’t confirm food-safety, use the shaker for decor or non-food storage instead (craft supplies, pins, beads, etc.).
Rule of thumb: if it’s chipped, crazed (hairline crackle), or you’re unsure of its history, keep it out of the “consumption zone.”
3) Deep clean & de-gunk the right way
Reinvention is hard when your shaker smells like 2014 pepper. A solid clean fixes odor, clogs, grease, and mystery grime.
- Empty it completely. Tap out clumps. Use a toothpick to poke the holes from the outside.
- Disassemble if you can. Remove the lid/top, and take out any inner plug or insert if present.
-
Soak the body. Warm soapy water works for most glass and glazed ceramic. For greasy buildup, a wipe-down with a diluted vinegar-water
solution on the outside can help (avoid soaking delicate metal parts). - Detail clean. Use an old toothbrush, cotton swab, or small bottle brush around threads and holes.
- Rinse thoroughly. Make sure no cleaner residue remains.
- Dry completely. Air-dry upside down for several hours (or overnight). Any trapped moisture invites clumping and funk.
Reinvention Ideas That Still “Act Like a Shaker”
These keep the original superpower: controlled dispensing through small holes. In other words, your shaker continues to earn its rent.
1) The sprinkle station (cinnamon sugar, cocoa, powdered sugar)
If you bake (or even just toast things with confidence), dedicate one shaker to cinnamon sugar and another to cocoa. Glass shakers are perfect because you can
see what’s inside. Add a label and suddenly you’re the kind of person who has “stations.”
- Cinnamon sugar: 1/4 cup sugar + 1 tbsp cinnamon (tweak to taste).
- Taco sprinkle: salt + chili powder + cumin + smoked paprika (make it your own).
- Garnish dust: flaky salt isn’t ideal for small holes, but fine salt blends work great.
2) Glitter, sprinkles, and craft “confetti” dispensers
Craft glitter loves chaos. A shaker gives glitter rules. Fill with fine glitter, micro-beads, confetti, embossing powder, or tiny sequins. The holes act like a
built-in “less is more” coach.
Pro move: keep one empty shaker as your “mixing jar.” Combine colors, shake, and dispense. It’s like being a DJ, but for sparkles.
3) Travel spice kit (tiny but surprisingly heroic)
Going camping, renting a cabin, or visiting family who thinks “seasoning” is an attitude? Clean a couple of shakers and fill them with your essentials:
garlic powder, chili flakes, seasoned salt, or your favorite rub. Toss them into a zip bag and suddenly you’re the adult in the trip group.
4) The “pinch prevention” salt for humid kitchens
If humidity turns your salt into a sculpture, a reinvention strategy is to improve flow: use a clean, fully dry shaker, store it away from the stove, and
keep moisture out. If clumping is a constant battle, some people add a few grains of dry rice as a moisture buffer (works best with larger shakers and
larger openings). The key is still drynessno method beats “bone-dry before refilling.”
Reinvention Ideas That Turn Shakers Into Decor
These projects lean into what shakers already are: small vessels that look good in pairs. Yes, even the weird mushroom one.
5) Bud vases (the easiest glow-up)
One of the most charming transformations is turning shakers into bud vases. Clean them, remove the tops, and pop in a single stem: baby’s breath, a mini
rose, eucalyptus, or a clipped herb sprig. Arrange a few along a windowsill or use them as table settingseach guest gets a tiny flower moment.
Want the “soft vintage” look? Paint the exterior in a chalky finish, lightly sand edges, and add a simple label. The goal is “antique shop finds,” not “I
spilled paint and called it rustic.”
6) Mini lanterns with LED tea lights
Taller shakers can become tiny lanterns. Paint the outside, add a ribbon or twine wrap, and place a small battery LED tea light inside (only if it fits
safely and you can still remove it). Cluster three on a tray for a cozy centerpiece that doesn’t involve actual flames and regret.
7) “Winter scene” snow-globes (minus the leaking)
Clear shakers are perfect for tiny seasonal scenes. Fill with faux snow or small white beads, add a miniature tree or figure, and close the lid. It’s a
snow-globe vibe without the “why is there water on the mantel?” drama.
8) Photo or place-card holders
Turn a sturdy shaker into a small photo/label stand by attaching a coiled wire clip to the top (or using a removable topper). Use them for place cards at a
dinner party, recipe labels on a buffet, or Polaroids on a shelf. They look especially good when the set is mismatched on purposelike curated chaos.
Reinvention Ideas for Hobby Storage & Home Organization
Shakers were born for tiny stuff. That’s basically their entire personality.
9) Craft supply holders (beads, pins, sequins, paperclips)
Fill glass shakers with small supplies and label them. You get visibility, tidy storage, and controlled pouringespecially helpful for beads and sequins that
otherwise escape like they’re late for a meeting.
10) Toothpick holder, match holder, or mini “bar cart” garnish jar
Use a shaker as a toothpick dispenser (remove the lid and replace with a wide-mouth top if possible, or keep toothpicks in a small bundle inside). For a
bar cart, use one for cocktail rimming salt or sugar. It’s functional and looks like you know what you’re doing.
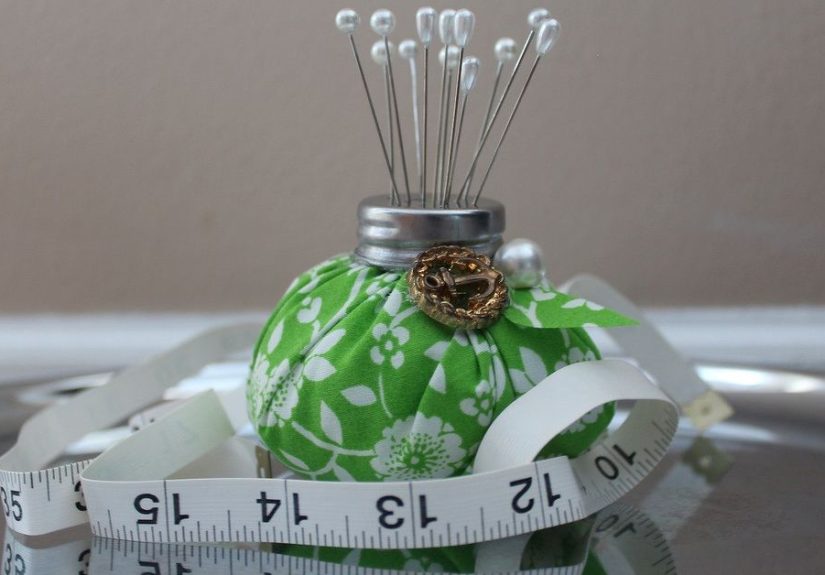
11) Sewing station upgrades: pincushion topper or needle home
A heavier shaker base is great for a pincushion topper: add a stuffed fabric “puff” on the top, secure it, and store needles safely. It becomes a stable
little workstation that won’t roll away mid-project like a dramatic teen.
12) Desk calmers: “permission to be organized” containers
Paperclips, pushpins, tiny binder clipsthese are exactly the kind of items that vanish when you need them. Shakers keep them visible, separated, and
reasonably contained. Bonus: your desk immediately looks more intentional.
How to Make the Reinvention Look Intentional
Pick a design strategy (so it doesn’t look like five random DIYs arguing)
- Monochrome pair: paint both shakers the same color; change labels instead of paint.
- “Thrifted but curated” set: keep shapes mismatched, unify with one finish (matte, gloss, or metallic).
- Seasonal rotation: neutral base year-round; swap ribbons/tags for holidays.
Label like a grown-up (it’s a vibe)
Labels instantly turn “random container” into “system.” Use a simple paint pen, vinyl labels, or small paper tags tied with twine. Keep it readable from
arm’s length. If you need a magnifying glass, it’s not a labelit’s a secret.
Don’t paint where food touches (unless you truly know it’s food-safe)
For anything edible: keep paint on the exterior only, avoid painting rims/threads, and let finishes cure fully. If a project is purely decorative or for
craft supplies, you can be much more adventurous with paints, glues, and embellishmentsjust work in a ventilated area and follow product labels.
Troubleshooting: Common Problems & Easy Fixes
Problem: The lid is stuck like it’s guarding state secrets
Try a warm soapy soak for the non-metal parts, then use a rubber jar-grip for traction. If it’s metal-on-glass and corroded, go slow: forcing it can crack
the neck. Patience wins here.
Problem: Rusty metal tops
If the tops are structurally sound but rusty, clean gently and consider repurposing the shaker for non-food use (glitter, pins, beads). If you want it back
on the table, replace the tops with new ones that fit (many standard sizes exist), or turn the shaker into a bud vase and retire the lid entirely.
Problem: Clumping inside
Clumping usually means moisture. Make sure the shaker is completely dry before refilling, store it away from steam and stovetop grease, and don’t “top off”
new spices onto old damp ones. That’s how you end up with a pepper brick.
Problem: Missing stopper or plug
If your shaker leaks from the bottom (common with some novelty shakers), don’t toss it. Use it for display, or create a non-food container and seal the
bottom with a snug-fitting replacement plug. For edible use, only do this if the solution is truly stable and appropriate for food contact.
Problem: The holes are too big (everything dumps out)
Congratulationsyou’ve got a “sprinkle pourer,” not a shaker. Reassign it to larger textures: coarse sugar blends, flaky herbs, or craft supplies like
confetti. Sometimes the shaker chooses its destiny.
When “Reinvent” Should Mean “Retire”
If a shaker is cracked, has flaking paint, smells permanently musty even after cleaning, or raises safety questions you can’t answer, don’t force it into
food duty. Use it as decor, store non-food items, or display it in a shadow box as a quirky memory. Reinvention is supposed to make life easiernot make you
Google “is my pepper haunted?”
Conclusion: Small Objects, Big Payoff
Reinventing old salt and pepper shakers is the kind of project that feels instantly satisfying: quick wins, low cost, and a result you’ll actually use or
display. Whether you turn them into bud vases, glitter dispensers, a travel spice kit, or tidy organizers, the secret is the sameclean them well, choose a
purpose that fits the material, and make the finish look deliberate.
Start with one pair. Keep it simple. Then watch yourself become the kind of person who says, unironically, “I have a shaker for that.”
Experience Notes: What It’s Actually Like Reinventing Old Shakers ()
Here’s the part nobody puts in the perfectly lit tutorial: reinventing old salt and pepper shakers is a journey through three emotional stagesdelight,
mild confusion, and victory (usually with a paper towel stuck to your elbow).
Stage one is the thrift-store moment. You see a mismatched pairmaybe a tiny ceramic pineapple and a glass bottle shaped like a lighthouseand you instantly
imagine them living their best life on your kitchen shelf. You bring them home like they’re rescue puppies. Then you realize they smell like someone stored
pepper in them during the last presidential administration. That’s when stage two begins.
Stage two: cleaning. The outside wipes down easily, which makes you overconfident. Then the lid refuses to budge, the holes are clogged, and a suspicious
pepper clump rattles around inside like a maraca. This is where patience pays off. A warm soak, a toothpick, a little gentle scrubbingsuddenly the shaker
goes from “antique mystery” to “ready for a second act.” The biggest surprise is how much better everything looks once it’s truly clean. Half the time, you
don’t even need paint; you just needed to remove the grime that was impersonating “patina.”
Then comes the choosing part, which is where most people accidentally create a “drawer of future projects.” The trick is to pick a reinvention that matches
the shaker’s personality. A shaker with tiny holes is practically begging to be a glitter dispenser or a cinnamon-sugar shaker. A taller, wider shaker wants
to be a bud vase. One with a slightly wobbly base is a great desk organizer (because it’ll sit still) and a terrible food shaker (because it’ll tip the first
time somebody seasons with enthusiasm).
Painting is where people either level up or spiral. The best “I meant to do this” finishes are usually simple: one solid color, a soft matte look, and a
label that’s readable from across the room. If you do add embellishments, keep them like accessories, not armor. A little twine wrap? Charming. A full
rhinestone jacket with a lace collar? That shaker is now a performer, and it demands attention at every meal.
Finally, the victory moment: you use it. You sprinkle cinnamon sugar without dumping half the jar. You pour glitter without turning your craft table into a
disco crime scene. You place a single flower in a bud vase and suddenly your kitchen looks like it has its life together. That’s the real magicthese are
tiny upgrades that make everyday routines feel just a bit more thoughtful, more organized, and honestly, more fun. And if one project flops? It’s still a
shaker. Give it a new job. Shakers are forgiving like that.