Table of Contents >> Show >> Hide
- The Brilliant Trick: One Row Becomes a Garden “Multi-Tool”
- Why Cinder Blocks Work So Well in Gardens
- Before You Start: A Quick Safety & Common-Sense Check
- Materials and Tools
- How to Build the Colorful Cinder Block Garden Feature
- Step 1: Choose the location and layout
- Step 2: Prep the ground (don’t skip this if you like straight lines)
- Step 3: Clean the blocks
- Step 4: Prime first (your future self will thank you)
- Step 5: Paint your rainbow (or your classy monochrome, we respect all aesthetics)
- Step 6: Stack and position
- Step 7: Line and fill planting pockets
- Step 8: Fill the bed area (if you’re making a raised bed)
- Step 9: Plant smart
- Planting Ideas That Look Like You Planned This on Purpose
- Maintenance Tips (So It Stays Brilliant)
- Troubleshooting: Common Issues and Easy Fixes
- Conclusion: Clever, Colorful, and Shockingly Practical
- Real-World Experiences and Lessons Learned (Extra )
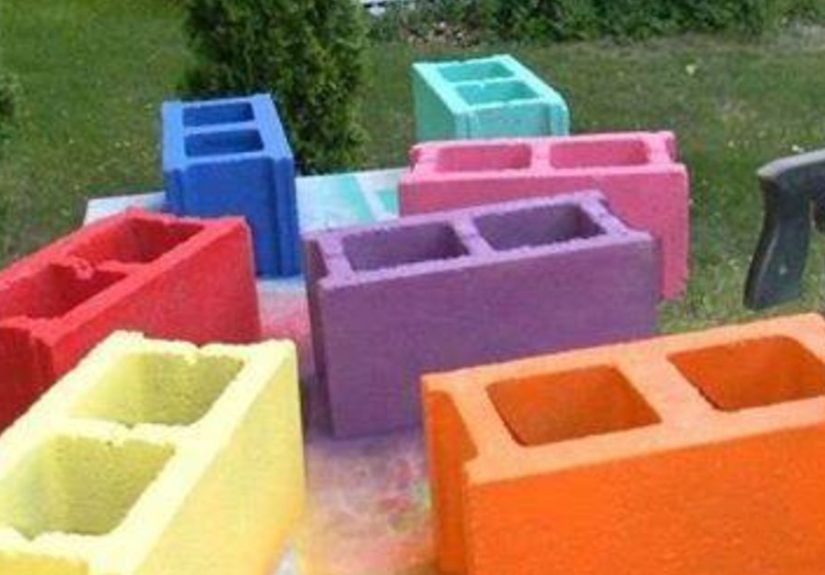
You know those humble cinder blocks that usually scream “construction site” and “please don’t stub your toe”?
Now picture them lined up in your garden like a tidy little parade… except they’re painted in bright, cheerful colors
and quietly plotting to become the most useful thing in your yard.
The “brilliant” part isn’t just the color (though it helps). It’s what happens after the blocks are stacked:
each hollow becomes a ready-made planting pocket, the row doubles as edging, the whole thing can turn into a raised bed,
andif you plan it rightyou can even create a low bench or a modular planting wall. In other words: the blocks stop being blocks
and start being a flexible garden system.
The Brilliant Trick: One Row Becomes a Garden “Multi-Tool”
The core idea is simple: stack cinder blocks (or concrete blocks) in a straight line, L-shape, U-shape, or rectangle,
then use the openings as built-in planters. From there, you can scale up in a few smart steps:
- Step 1: Make a colorful border that keeps mulch and soil where it belongs.
- Step 2: Turn that border into a raised bed by continuing the shape and adding a second layer.
- Step 3: Rotate a few blocks sideways to create planting “faces” for herbs or flowers.
- Step 4: Add a cap (wood plank or pavers) and you’ve got a surprisingly sturdy garden perch.
The magic is that you don’t need fancy carpentry skills. Your biggest challenge is choosing colors without falling into a
“now my garden looks like a pack of highlighters exploded” situation. (Unless that’s your vibe. No judgment.)
Why Cinder Blocks Work So Well in Gardens
1) They’re modular (translation: forgiving)
If you mess up the layout, you’re not stuck. You can unstack, scoot, rotate, and rebuild without ripping out posts or
re-cutting lumber. It’s garden Lego for adultswith fewer tiny pieces hiding in your shoes.
2) They add structure without a big budget
Wood raised beds can look gorgeous, but they often cost more and may eventually rot or warp depending on material, climate, and soil contact.
Concrete blocks are heavy and stable, which is exactly what you want when you’re holding back soil and mulch.
3) They help with drainage and soil control
Raised beds warm up earlier in spring, drain better than compacted ground, and let you “import” good soil even if your native soil is sandy,
rocky, heavy clay, or basically just decorative dirt.
Before You Start: A Quick Safety & Common-Sense Check
If you’re growing edible plants (herbs, greens, vegetables), use new blocks when possible and avoid salvaged blocks of unknown origin.
Some blocks may contain fly ash or other materials, and guidance varies because manufacturing ingredients aren’t always transparent.
If you want extra peace of mind, line the inside faces with a barrier fabric where soil sits against the blocks, and don’t grind/cut blocks into dust.
Also: concrete can be alkaline. Over time, that can gently nudge soil pH upward, especially if water repeatedly leaches across the surface.
Most garden plants are fine with small swings, but if your veggies start acting moody, a simple soil test and minor amendments can bring things back in range.
Materials and Tools
What you’ll need
- Cinder blocks / concrete blocks (standard size works great)
- Exterior masonry primer (highly recommended)
- Exterior masonry paint or breathable concrete stain
- Paintbrushes/rollers and a drop cloth
- Level, measuring tape, and garden gloves
- Crushed gravel or paver base (optional but helpful for leveling)
- Landscape fabric (for lining and weed control)
- Soil mix + compost
- Plants (herbs, flowers, succulents, strawberrieswhatever fits your plan)
Helpful extras
- Construction adhesive (if you’re stacking multiple layers and want added stability)
- Pavers or capstones for a finished top edge
- A 1×10 or 2×12 board (if you want a bench cap)
- Drip line or soaker hose (to water like a responsible adult)
How to Build the Colorful Cinder Block Garden Feature
Step 1: Choose the location and layout
Pick a spot with the light your plants need. Full-sun veggies usually want 6+ hours of sun; shade-lovers will crisp up if you put them in the spotlight.
Mark your shape with a hose or string. A classic beginner-friendly size is a bed you can reach across without climbing inthink roughly 4 feet wide
if you can access both sides.
Step 2: Prep the ground (don’t skip this if you like straight lines)
Remove grass and roots. Rake the surface level. If your ground is lumpy, add a thin layer of crushed gravel or paver base and tamp it down.
This helps your blocks sit evenly so your “colorful row” doesn’t turn into a leaning tower of garden drama.
Step 3: Clean the blocks
Cinder blocks are dusty and porous. Brush them off, rinse if needed, and let them dry completely.
Paint sticks better when the blocks are clean and drykind of like how stickers work better on notebooks than on wet spaghetti.
Step 4: Prime first (your future self will thank you)
Because concrete is porous, a masonry primer helps seal and prep the surface so paint adheres and lasts longer.
If you skip primer, you may end up using a ton of paint and still get a patchy finish.
Step 5: Paint your rainbow (or your classy monochrome, we respect all aesthetics)
Use exterior masonry paint or a breathable stain meant for concrete/masonry. Work in good weather: not too cold, not too hot, not too humid,
and absolutely not while the blocks are wet. For a crisp look, paint the outer faces and leave the inside planting pockets unpainted
(or seal them with an appropriate product if you want color everywhere).
Design tip: paint a repeating patternlike alternating colors or ombré from light to darkso it looks intentional rather than “I grabbed whatever was on sale.”
Step 6: Stack and position
Lay the first row, check level, and adjust as needed. If you’re building higher than one layer, stagger the joints like brickwork
(offset the blocks) for stability. For tall or retaining-wall-like builds, consider reinforcement or professional guidance,
especially on slopes.
Step 7: Line and fill planting pockets
For each block opening you’ll plant in, add a small piece of landscape fabric to keep soil from washing out while still allowing drainage.
Fill with a quality potting/raised-bed mixlighter mixes are friendlier in small pockets than heavy clay soil.
Step 8: Fill the bed area (if you’re making a raised bed)
If your blocks form a full bed, lay cardboard or landscape fabric at the bottom to suppress weeds (avoid plastic that traps water).
Then fill with a blend of topsoil and compost. A practical approach is “good soil + organic matter” rather than mystery fill,
because plants can be surprisingly dramatic about poor soil.
Step 9: Plant smart
The openings are perfect for compact plants: herbs, strawberries, sedums, marigolds, alyssum, lettuce, green onions,
and trailing flowers that spill over the edges. Save large, deep-rooted plants for the main bed area.
Planting Ideas That Look Like You Planned This on Purpose
The “Kitchen Door Herb Bar”
Use the block pockets for basil, thyme, oregano, chives, and parsley. Put mint in its own pocket (or pot) because mint treats gardens like a hostile takeover.
The “Pollinator Parade”
Fill pockets with nectar-friendly flowers like zinnias, alyssum, and compact salvia varieties. Add a few herbs that flower (like thyme)
and you’ll see bees and butterflies show up like you’re hosting an outdoor café.
The “Succulent Rainbow Wall”
Rotate some blocks so openings face outward (on a stable base), then plant succulents. Use gritty soil and don’t overwater.
This is the low-maintenance option for people who love plants but also occasionally forget plants are alive.
The “Strawberry + Flowers Combo”
Strawberries do great in pockets where they can trail. Mix in marigolds for color and a classic garden look.
Bonus: fewer berries resting on damp soil.
Maintenance Tips (So It Stays Brilliant)
Watering
Block pockets dry out faster than in-ground soil. Expect to water more often, especially in summer.
Drip irrigation or a soaker hose can make this almost effortless.
Drainage
Don’t pack pockets too tightly. Use a fabric barrier so water can drain while soil stays put.
If you notice soggy soil, lighten the mix with perlite or compost and check for blocked drainage paths.
Paint longevity
Masonry paint can last well, but outdoor exposure is a tough job. Touch up chips as needed.
If you want a softer look that weathers naturally, consider concrete stain instead of thick paint.
Troubleshooting: Common Issues and Easy Fixes
“My blocks aren’t level.”
Re-level the base. Use paver base/gravel and tamp it. A few minutes here saves months of side-eye every time you walk past.
“Soil keeps washing out of the openings.”
Add landscape fabric or mesh inside each pocket. You can also top the soil with a little mulch to reduce splash-out.
“Plants look thirsty even when I water.”
Pockets can become hydrophobic if they dry completely. Water slowly, twice: once to moisten, again to soak.
Adding compost improves moisture retention without turning the pocket into a swamp.
“I’m worried about growing food in blocks.”
Use new blocks, avoid unknown salvaged materials, minimize dust, and consider lining the interior surfaces where soil contacts the blocks.
If you want to be extra cautious, reserve pocket plantings for flowers and use the main bed area for edible crops.
Conclusion: Clever, Colorful, and Shockingly Practical
A colorful row of cinder blocks looks fun, surebut the real genius is how much function you get from something so simple.
You’re creating structure, boosting planting space, improving soil control, and adding design flair without building a complicated frame.
Whether you stop at “cute border” or go full “modular raised-bed masterpiece,” this is the kind of DIY that makes your yard feel upgraded
without making your wallet cry.
Real-World Experiences and Lessons Learned (Extra )
The first time I tried a cinder block garden feature, I made the classic mistake: I got excited about the painting part and treated the prep work
like an optional side quest. I cleaned the blocks “good enough,” skipped primer because I convinced myself I was too busy, and painted them anyway.
They looked fantastic for about two weeks. Then the summer weather did what summer weather doessun, sprinklers, and humidity teamed up like a villain
trioand the finish started looking blotchy and tired. The fix was simple (sand/scrub, prime, repaint), but the lesson stuck: the boring steps are what
make the pretty steps last.
I also learned that planting in the pockets is a different beast than planting in a raised bed. Those openings are basically mini containers, which means
they heat up faster, dry out faster, and punish you faster if your soil mix is too heavy. The “aha” moment came when I switched from leftover garden soil
(dense and clumpy) to a lighter raised-bed/potting blend with compost mixed in. Suddenly the herbs stopped sulking, the flowers perked up, and I wasn’t
watering like I was running a small hydration spa for plants.
Another surprisingly useful discovery: color can be functional. I started with random bright colors because I wanted it to pop, but I noticed darker shades
warmed the soil more quickly in spring, while lighter colors stayed cooler in peak summer sun. If you garden in a hot climate, this can matter for tender
plantsbasil loves warmth, lettuce not so much. It made me more intentional: I used lighter colors near greens and darker colors near heat-lovers,
and I spaced plants so the sunniest pockets didn’t become tiny ovens.
The most “brilliant” part, though, was how the blocks changed how I used the space. A plain garden bed is great, but it doesn’t guide the eye.
Once the blocks went in, the garden looked finished even before it was fully planted. And when I added a simple capstone edge along one section,
it became a place to sit for a minutecoffee in hand, inspecting seedlings like a judge on a tiny plant reality show. That’s when I realized why this DIY
keeps going viral: it doesn’t just add planting space. It makes the garden feel designed, lived-in, and a lot more enjoyable to be around.