Table of Contents >> Show >> Hide
- Why the PAX + Desk Combo Works So Well
- Planning: Measure First, Cry Less
- Materials and Tools: What You’ll Typically Need
- Step-by-Step: Building the PAX Desk Wall
- Finishes That Make It Look Expensive (Without Being Expensive)
- Smart Variations: Make the Hack Fit Your Life
- Common Mistakes (So You Don’t Learn Them the Hard Way)
- Budget and Timeline: What to Expect
- Conclusion: A Wall That Works Harder Than Your Group Chat
- Bonus: The Real-Life “Experience” After You Build It (500+ Words of Truth)
Somewhere between “I need a home office” and “I do not have home-office space,” there’s a magical land called IKEA hacking. It’s where one wall can become a calm, built-in-looking command center: closed storage to hide the chaos, an integrated desk to do the work, and enough visual polish to make your video calls feel like you have your life together (even if your browser has 43 tabs open).
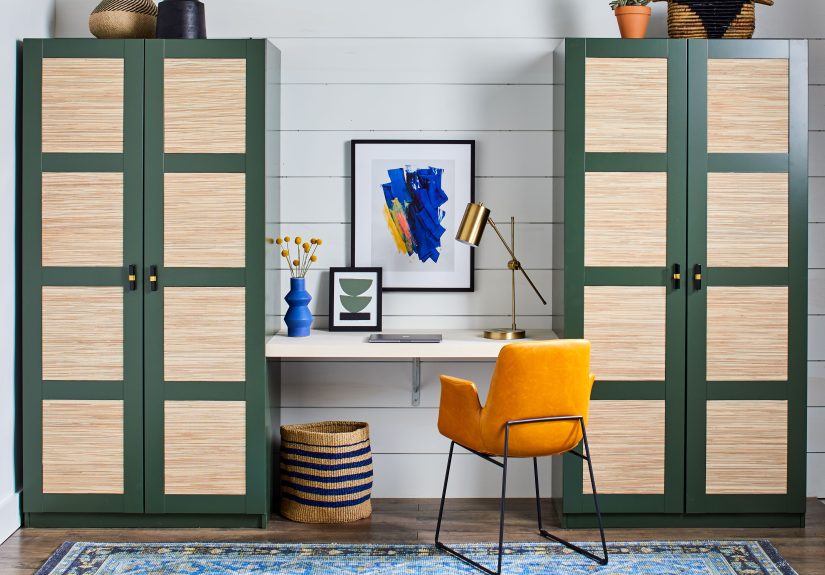
The star of today’s show is the IKEA PAX hack that combines built-in storage and a desk in one streamlined setup. The concept is simple: two tall PAX wardrobe frames anchor the ends, and a sturdy desktop bridges the gap in the middle. The result reads like custom millworkwithout the custom millwork invoice.
Why the PAX + Desk Combo Works So Well
PAX is basically the “blank canvas” of closet systems. It’s modular, comes in multiple sizes, and pairs with interior organizers so you can build a storage plan that matches how you actually live (instead of how Pinterest thinks you live). When you place two PAX wardrobes on a wall and add a desk between them, you get three wins:
- Vertical storage that eats clutter for breakfast.
- A dedicated workspace that doesn’t require taking over the dining table.
- Symmetrythe design cheat code that makes everything look intentional.
And because the desk is “built in” between the cabinets, the whole wall can feel architecturally grounded more like a planned feature and less like furniture you pushed together during a late-night organizing spiral.
Planning: Measure First, Cry Less
A built-in look is mostly a math problem disguised as a weekend project. Before you buy anything, figure out:
1) Your wall dimensions (and your wall’s personality)
Measure the full wall width, ceiling height, and baseboard depth. Then check if your floor slopes or your wall bows. Older homes are charming like that. Also note outlets, HVAC vents, and window trim that could interfere with cabinet placement or desk comfort.
2) How wide you want the desk opening
A “just-right” desk gap depends on how you work. A laptop-only setup can be slimmer; dual monitors and a printer want more breathing room. A common approach is to set the wardrobes with a gap sized for a desktop panel (and your chair) so everything lands centered and functional.
3) Your desk height preference
Standard desk height is typically around 30 inches. If you want a standing option, you can place the work surface higher, and if you’re going for a counter-height perch, you can split the difference. Decide now, because your cleats/brackets will be installed at a specific height.
4) Your storage strategy
Use the PAX planning tool or sketch a layout. Think in categories: office supplies, paperwork, tech gear, craft items, kids’ homework, gift wrap, seasonal décorwhatever keeps trying to colonize your living room. Add drawers for small items, shelves for bins, and taller sections for awkward stuff (tripods, wrapping paper rolls, yoga mats, the emotional baggage of your inbox).
Materials and Tools: What You’ll Typically Need
Your exact list depends on finishes and how “built-in” you want to go, but most PAX desk walls include:
- 2 IKEA PAX wardrobe frames (plus doors and interior organizers as desired)
- A desktop surface (plywood, butcher block, or a finished panel)
- Cleats/brackets to support the desk (and fasteners appropriate for your wall type)
- Trim materials (optional): filler strips, baseboard returns, crown molding, or face trim
- Paint and primer (optional): especially if you want a custom, built-in paint finish
- Basic tools: drill/driver, level, stud finder, saw (or have wood cut at the store), clamps, sander
Safety note: Tall storage units should be anchored to the wall using the correct hardware for your wall construction. This isn’t the fun part, but it’s the important part.
Step-by-Step: Building the PAX Desk Wall
There are two popular “paths” here: (A) the streamlined desk-bridge build (fast, clean, great for offices), and (B) the full built-in illusion (trim, filler panels, maybe crownmaximum custom vibes). You can absolutely combine them.
Path A: The Streamlined Desk-Bridge Build
- Prep the wall. Clear the area, protect the floor, and mark your cabinet positions. If you’re painting, decide whether you’ll paint before or after assembly. Painting panels before assembly can be easier, but touch-ups are inevitable.
- Assemble the PAX frames. Follow the manufacturer instructions carefully. Many people find it easier to assemble frames on the floor and then tip them uprightjust confirm your ceiling height gives you enough clearance.
- Position the wardrobes. Place the two PAX units against the wall, leaving a measured gap for your desk. Use a level and shims as needed so the frames are plumb and aligned. If the cabinets aren’t level, doors can swing oddly, drawers may feel fussy, and you’ll invent new words.
- Anchor the wardrobes. Secure each unit to the wall using proper wall hardware. If possible, anchor into studs for maximum stability.
- Build (or install) the desktop. A simple, sturdy approach is a plywood top with a finished front edge (a “nose” piece) so it looks thicker and more furniture-like. If you want a premium feel, butcher block is popular and forgiving.
- Install desk supports. Many builds use cleats (wood supports) attached inside the wardrobes at the chosen height, plus a wall bracket into a stud (or heavy-duty anchors) for added stability. The goal is a desk that doesn’t flex when you type an angry email.
- Attach the desktop. Set the surface on the supports, then secure it from below so the top stays clean. Add the wall bracket connection if you’re using one.
- Finish and style. Install doors, hardware, and organizers. Add task lighting, route cords neatly, and enjoy the strangely satisfying moment when your desk no longer travels around the house like a lost shopping cart.
Path B: The “Wait, That’s IKEA?” Built-In Illusion
If you want your PAX wall to look truly built in, the details matter. Here are the upgrades that sell the illusion:
- Remove or modify baseboards behind the units so the frames sit closer to the wall. Then reinstall baseboard around the front for a seamless edge.
- Build a simple platform base so the cabinets sit on a level, consistent footprint. This also creates a toe-kick effect that reads like custom cabinetry.
- Add filler panels (thin MDF strips) between the cabinet sides and the wall if there are gaps. Caulk and paint make the transitions disappear.
- Go to the ceiling with crown molding or a top trim panel. This is the “custom built-in” mic dropespecially in rooms where you want that floor-to-ceiling architecture.
- Paint everything one color (units + trim, and sometimes the wall behind). Color drenching is a sneaky way to make separate parts read as one intentional feature.
Finishes That Make It Look Expensive (Without Being Expensive)
Paint like you mean it
IKEA surfaces can be slick, so prep is everything. Light sanding, thorough cleaning, and the right primer help paint stick and stay put. Finish with a durable cabinet/trim paint if you want a professional look that can handle daily use.
Wallpaper or panel inserts inside door frames
Adding texture inside door insets (like grasscloth-style wallpaper or a patterned liner) is a high-impact detail. It’s basically jewelry for your cabinetssubtle, but it makes the whole wall feel more “designed.”
Hardware that sets the tone
Swapping basic pulls for something with shape (arched, knurled, oversized, vintage-inspired) is one of the easiest ways to shift the look from “stock closet” to “custom built-in storage.” Think of it as the difference between sweatpants and pants with a button. Both work. One looks like you tried.
Smart Variations: Make the Hack Fit Your Life
Home office powerhouse
Put drawers low for heavy items (paper, tech) and shelves up high for storage bins. Add a pull-out tray for a printer or a charging station shelf for laptops and tablets.
Kids’ workstation + hidden mess
The desk becomes homework central, while cabinets swallow art supplies, board games, and the 9,000 tiny objects your kid insists are “collections.” Bonus: you can create a bench/desk hybrid by designing a removable top or a second height for the surface in the middle.
Craft room command center
Use one wardrobe for tall vertical storage (wrapping paper, rolls of vinyl, cutting mats), and the other for bins and drawers. Add under-cabinet lighting above the desk for detailed work.
Common Mistakes (So You Don’t Learn Them the Hard Way)
- Skipping level and plumb. If the cabinets aren’t square, doors won’t behave, gaps will look weird, and you’ll blame IKEA when it’s actually physics.
- Under-supporting the desk. A long span needs proper cleats/brackets. If you plan to lean, write, or mount monitor arms, build for real loadnot vibes.
- Forgetting cord management. Plan where power lives. Consider a grommet hole, a mounted power strip, or a cable channel so your setup looks calm instead of spaghetti-themed.
- Rushing the finish. Caulk, wood filler, sanding between coats, and cure time aren’t glamorousbut they’re the difference between “DIY” and “built-in.”
- Not anchoring tall units. Secure to the wall properly. Safety is not optional, even if your vibe is “minimalist.”
Budget and Timeline: What to Expect
Cost varies wildly depending on doors, organizers, and desk surface. The good news is you can stage this build: start with frames + a simple desktop, then add drawers, lighting, trim, and paint later.
Timeline is also flexible. A straightforward build can happen over a weekend if you’re organized. A fully trimmed, painted, and customized “built-in” version can take several weekendsmostly because paint and caulk have the audacity to require drying time.
Conclusion: A Wall That Works Harder Than Your Group Chat
This IKEA PAX hack is popular for a reason: it turns an ordinary wall into a high-functioning feature with built-in storage and an integrated desk. Whether you keep it simple or go full custom with trim and paint, the formula is the sameplan carefully, build for stability, and finish with intention. The payoff is huge: less clutter, more focus, and a workspace you actually want to sit down at.
Bonus: The Real-Life “Experience” After You Build It (500+ Words of Truth)
The day you finish this project is a strange emotional cocktail. There’s pride (“I made this!”), relief (“it’s done!”), and a tiny existential moment when you realize your house now contains a wall that looks like it has always been there. It’s a little like getting a haircut that’s so flattering your friends assume you were born that way.
In the first week, you’ll notice the biggest change isn’t the deskit’s the silence created by closed doors. Those tall wardrobes are basically noise-canceling headphones for your stuff. The printer paper. The cable bin. The half-used notebooks. The “important” pile that is actually a “future me” problem. It all disappears behind doors, and your brain stops tripping over it every time you walk past.
Then the desk starts to change your habits. Because it’s anchored in placeand framed by storageit becomes a default landing spot for work. You sit down “just to answer one email” and, shockingly, it stays work instead of migrating to the couch where your posture becomes a question mark. You might even start keeping your laptop charger in the same place every day, which feels suspiciously like adulthood.
You’ll also discover your personal threshold for “desk clutter.” A built-in setup looks so clean that even a couple of random objects can feel louder than they did before. The fix is simple: assign micro-homes. A top drawer for daily items (pens, sticky notes, headphones). A shelf for your router or tech hub. A basket for mail. When everything has a spot, tidying takes two minutes instead of a full theatrical production involving deep sighs.
If you paint the units, expect a brief adjustment period where you treat the cabinets like a new car: you’ll close doors gently, wipe fingerprints you didn’t know you cared about, and feel mildly offended by the concept of dust. Over time, the finish settles into real life. That’s when you appreciate durable paint and a good clear coat on the desktopbecause a desk isn’t a museum display, it’s a working surface that will meet coffee mugs, scuffed laptop feet, and the occasional dramatic pen slam.
The final “experience” surprise is how customizable the wall becomes after it’s built. You’ll tweak it. You’ll move shelves. You’ll add a drawer insert. You’ll upgrade a pull. You’ll mount a small light. That’s the hidden superpower of using a modular system: your storage can evolve as your life changes. Today it’s a home office. Tomorrow it’s a homework station. Next year it’s a hybrid office/craft corner because you discovered the joy of owning a label maker and now nothing is safe.
And honestly? The best part might be this: when someone asks where you got your built-ins, you get to say, “Oh, it’s an IKEA PAX hack,” with the casual confidence of someone who definitely owns a miter saw and not a pile of unopened returns in the trunk of their car.