Table of Contents >> Show >> Hide
- Before You Build Anything: Read This So You Keep All Your Eyebrows
- Way #1: Turn a Vacuum Desiccator Into a Simple Chamber
- Way #2: Build a Stainless-Steel Chamber With a Clear Lid
- Way #3: Make a Mini Vacuum Chamber With a Canister System
- How to Choose the Right Method
- Common Mistakes That Make DIY Chambers Miserable
- What Using a DIY Vacuum Chamber Actually Feels Like
- Final Thoughts
If you have ever watched resin bubbles vanish, marshmallows puff up like tiny ego balloons, or a damp part dry out faster under reduced pressure, you already know why vacuum chambers are catnip for DIYers. They are practical, a little theatrical, and just science-y enough to make you feel smarter than your garage probably deserves.
But let’s get one thing straight before we start pretending we are all part-time engineers: a vacuum chamber is not “just a container with air removed.” It is a vessel under stress. The air outside is pushing in, and it does not negotiate. So the best way to make a vacuum chamber is not to grab the nearest random jar and hope for a cinematic montage. It is to choose a build that matches your needs, your budget, and your tolerance for risk.
Below are three realistic ways to make a vacuum chamber, from easiest to most capable. You will also get the safety rules, the pros and cons, and a very honest look at what using one is actually like.
Before You Build Anything: Read This So You Keep All Your Eyebrows
A good vacuum chamber starts with a boring truth: boring parts are your friends. Use containers, lids, valves, seals, and hoses that are intended for vacuum service. Avoid damaged glass, mystery plastics, scratched lids, cracked fittings, and “it looked sturdy in the shed” engineering. That sentence alone has probably prevented at least three bad weekends.
For most hobby use, you also want to stay in the rough-vacuum world. That means simple pumps, simple gauges, and simple jobs such as degassing resin, drying small items, or doing classroom-style demonstrations. Once your project starts sounding like a research lab, a solvent-processing rig, or a small moon mission, you are beyond casual DIY territory.
As a rule of thumb, wear eye protection, keep the chamber on a stable surface, use a splash or implosion shield when appropriate, vent slowly, and never move the vessel while it is under vacuum. If your setup may pull in vapors or liquids, use a trap between the chamber and the pump. That little extra component can save your pump from becoming an expensive paperweight.
Way #1: Turn a Vacuum Desiccator Into a Simple Chamber
Best for
Beginners, classrooms, drying small parts, light degassing, and anyone who wants the easiest “plug-it-together-and-test-it” option.
What it is
A vacuum desiccator is basically the overachiever of sealed containers. It is already designed to hold a vacuum, it usually includes a valve, and many modern versions use safer plastics or heavy-duty materials with an O-ring seal. In other words, this is the least dramatic path to getting real results.
What you need
A vacuum desiccator, compatible hose, a small roughing pump or compatible vacuum source, and optionally a gauge if the unit does not include one. If you are choosing between materials, a modern plastic or polycarbonate-style unit is often the friendlier beginner choice than glass.
How to make it work
Inspect the chamber first. The seal should be clean, the valve should move smoothly, and the body should not have cracks, chips, or cloudy damage. Place the chamber on a flat bench, connect the hose, make sure the lid is seated evenly, and run a dry test with nothing inside. If the chamber pulls down and holds, congratulations: you have already built a vacuum chamber by assembling the right parts instead of improvising the wrong ones.
Once it passes the empty test, add your item. Small silicone molds, freshly mixed resin, or moisture-sensitive parts are common beginner uses. Pull vacuum gradually rather than like a raccoon slamming buttons in an elevator. Slow evacuation helps reduce foaming, splashing, and general chaos.
Why this method is great
It is the most beginner-friendly route, it looks neat, it is easy to clean, and replacement seals and accessories are usually available. If your main goal is to degas small batches or create a reliable demo chamber, this method is hard to beat.
The catch
Capacity is limited, and some desiccators are better for drying and storage than heavy-duty, repeated vacuum cycling. Also, if you need a very deep vacuum or want to process larger projects, this method may feel like trying to move house with a backpack.
Way #2: Build a Stainless-Steel Chamber With a Clear Lid
Best for
Resin casting, silicone degassing, repeated hobby use, and anyone who wants a sturdier, more versatile setup.
What it is
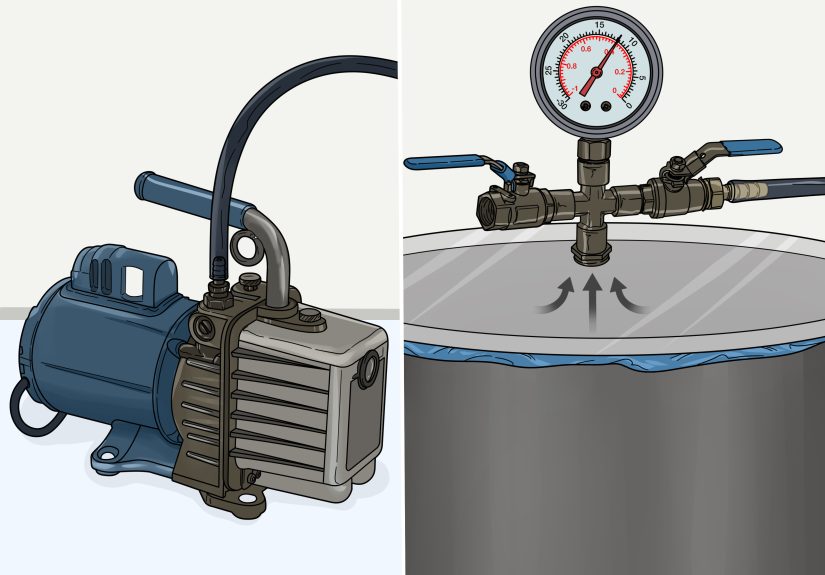
This is the classic hobbyist vacuum chamber: a metal base, a clear lid, a gasket, a valve assembly, a gauge, and a pump. Done right, it is practical, durable, and satisfying in the same way a well-organized toolbox is satisfying. Done wrong, it is a lesson in why seals matter more than optimism.
What you need
A vacuum-rated stainless-steel chamber base or vessel, a clear lid sold for vacuum service, a gasket, a shutoff valve, a vacuum gauge, vacuum-rated hose, and a small roughing pump. You can buy these components separately or as a kit and assemble them yourself. If you are “making” a chamber in the practical DIY sense, this is often the smartest route: you are building the system, not fabricating a pressure vessel from scratch.
How to assemble it
Start with the base and confirm the rim is smooth and clean. Install the lid fittings according to the hardware design, keeping threads snug but not brutally over-tightened. Set the gasket flat, place the lid evenly, then connect the hose to the pump. Before using materials, run a leak check on the empty chamber. Watch whether the gauge drops steadily and whether the chamber holds after the valve is closed.
If it leaks, do not panic. Most hobby leaks come from simple issues: lint on the gasket, fittings that need reseating, or a lid that is not fully aligned. Fix the boring thing first. The boring thing is usually guilty.
Why this method is great
Stainless steel handles repeated use well, and this style gives you more room, better durability, and more flexibility. It is a strong choice for resin and silicone work because you can see what is happening through the lid while the chamber body itself remains rugged.
The catch
It costs more, it takes a little more assembly, and it rewards patience. You also need to match your chamber size to your pump. A tiny pump on a large chamber can work, but it may feel like emptying a swimming pool with a straw and a positive attitude.
Way #3: Make a Mini Vacuum Chamber With a Canister System
Best for
Very light-duty use, food demonstrations, small educational experiments, and people who want a compact setup without stepping into full workshop mode.
What it is
This approach uses a compatible vacuum canister and either a countertop sealer with an accessory hose or a dedicated hand pump. It is not a substitute for a serious lab or casting chamber, but it can absolutely count as a small vacuum chamber for simple tasks.
What you need
A vacuum canister designed for use with a sealing system, a compatible hose or accessory port, and the matching machine or hand pump. Compatibility matters here. This is not a place for creative adapters made from leftovers in the plumbing aisle.
How to make it work
Use the canister exactly as the system intends. Seat the lid, attach the hose or pump, and evacuate until the system indicates a seal or the desired pressure is reached. This method is ideal for tiny demonstrations such as showing how trapped air affects volume, testing how quickly bubbles leave a small liquid sample, or doing food-related vacuum experiments.
Why this method is great
It is compact, affordable, and very approachable. You can set it up in minutes, store it easily, and use it without dedicating half a workbench to hoses and metal hardware.
The catch
It is light-duty by design. You should not expect the same vacuum depth, durability, or versatility as a stainless chamber. Think of it as the espresso shot of vacuum chambers: small, useful, and not pretending to be a full meal.
How to Choose the Right Method
Choose a vacuum desiccator if…
You want the easiest safe starting point, you like clean lab-style gear, and your projects are small.
Choose a stainless-steel chamber if…
You plan to do frequent resin or silicone work, want more room, and prefer a setup that can grow with your projects.
Choose a canister system if…
You want a mini chamber for demonstrations or occasional light-duty use without investing in a full bench setup.
Common Mistakes That Make DIY Chambers Miserable
The first mistake is using the wrong vessel. Ordinary jars, random glass containers, and damaged lids are not “budget-friendly alternatives.” They are plot twists.
The second mistake is ignoring leaks. If your chamber will not hold vacuum, do not immediately blame the pump. Check the gasket, clean the sealing surfaces, inspect fittings, and confirm the valve is fully closed. Tiny leaks are sneaky, common, and incredibly good at making you doubt your life choices.
The third mistake is skipping the trap. If you are pulling vapors, foam, or moisture, a trap can protect the pump from contamination. Pumps are happiest when they are moving gases, not sampling your project materials like curious toddlers.
The fourth mistake is venting too quickly. A sudden rush of air can disturb your material, splash liquids, or stress the setup. Open the valve gradually and let the pressure return in a controlled way.
The fifth mistake is expecting every chamber to do every job. A mini canister is not a resin-production workhorse. A desiccator is not automatically ideal for every wet, foamy, or vapor-heavy application. Matching the chamber to the task matters more than buying the shiniest hardware.
What Using a DIY Vacuum Chamber Actually Feels Like
The first time you use a homemade or self-assembled vacuum chamber, the experience is part science experiment, part trust exercise, and part “why is that gauge moving so slowly?” You start out feeling confident because everything looks simple. It is a container, a lid, a hose, and a pump. How hard could it be? Then you learn that vacuum work is mostly a game of patience, sealing surfaces, and listening carefully for tiny hissing sounds that somehow become the loudest thing in your house.
Most people notice the same thing right away: the chamber feels far more serious once the pump turns on. A small system can still sound purposeful. The hose firms up, the lid settles, and you suddenly become much more interested in whether you cleaned the gasket properly. That is not fear exactly. It is respect, which is the correct emotion when air pressure is doing invisible bench presses on your equipment.
If you are using the chamber for resin or silicone, the first pull-down is oddly entertaining. Bubbles rise, the material swells, and for a moment it looks like your project is trying to escape the container and become a sentient pastry. Beginners often assume something has gone wrong because the mixture expands dramatically. Usually, that is just trapped air rushing out. The real skill is learning when to stop, hold, and vent without turning your nice clean chamber into a sticky modern art installation.
Another common experience is discovering that vacuum success is less about brute force and more about small details. A single hair across the seal can ruin your afternoon. A fitting that feels tight but is not quite seated can make the gauge drift just enough to drive you nuts. And yet, when you finally solve the leak, the whole system suddenly feels elegant. The chamber holds. The gauge behaves. The pump stops sounding like a complaint department. It is deeply satisfying.
People also underestimate how much observation matters. Through a clear lid, you begin to understand your material in real time. You can see bubble size change, foam settle, moisture behavior shift, and pressure effects happen in a way that feels more hands-on than reading ten forum posts ever could. A vacuum chamber teaches you to watch carefully. It turns “remove air” into a visible process rather than an abstract concept.
Then there is the emotional arc of ownership. At first, the setup feels a little fussy. You wipe seals, check valves, route hoses neatly, and baby the system like it is a nervous houseplant. After a while, that routine becomes part of the appeal. You know how long your chamber usually takes to pull down. You recognize the sound of a healthy run. You can tell when something is off before the gauge fully confirms it. That familiarity is what makes a DIY vacuum chamber feel like a real tool instead of a weekend novelty.
In the end, the experience is equal parts technical and tactile. You hear the pump, watch the material, feel the rhythm of setup and release, and learn that good vacuum work rewards calm habits. It is not flashy every second, but when the bubbles disappear, the part dries properly, or the demo works perfectly, it feels like the kind of victory that makes you glance around the room and think, “Yes, I absolutely meant to do that.”
Final Thoughts
If you want the easiest route, start with a vacuum desiccator. If you want the most practical hobby setup, build around a stainless-steel chamber with a clear rated lid. If you only need a tiny system for demonstrations or light-duty tasks, a compatible canister setup can absolutely do the job.
The smartest way to make a vacuum chamber is not to be heroic. It is to be selective. Use rated components, respect the limits of your materials, and choose a chamber that matches the work you actually plan to do. That is how you get the fun part of vacuum experiments without accidentally auditioning for a cautionary tale.