Table of Contents >> Show >> Hide
- Why Repotting a Monstera Matters
- When Should You Repot a Monstera?
- What You Need Before Repotting
- 5 Easy Steps to Repot a Monstera
- Step 1: Prepare the Plant, Pot, and Soil
- Step 2: Remove the Monstera Gently
- Step 3: Loosen the Root Ball and Refresh the Mix
- Step 4: Place the Monstera in the New Pot and Add Support
- Step 5: Water Thoroughly and Help It Recover
- Common Monstera Repotting Mistakes to Avoid
- Aftercare for Bigger, Healthier Monstera Growth
- Experience Notes: What Repotting a Monstera Teaches You in Real Life
- Conclusion
- SEO Tags
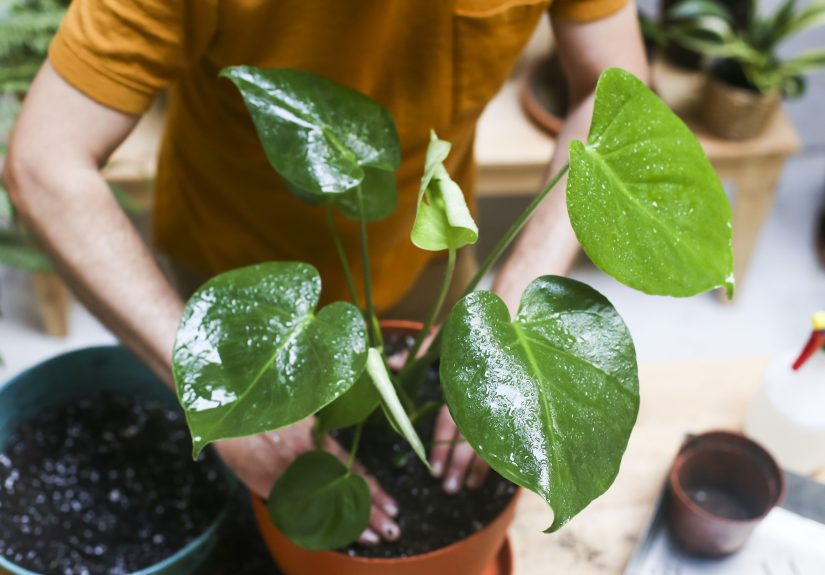
A thriving Monstera is basically the houseplant version of a dramatic celebrity: huge leaves, bold personality, and a habit of taking over the room if nobody sets boundaries. But when your Monstera starts drying out too quickly, leaning like it has given up on posture, or pushing roots out of the drainage holes, it may not be asking for attention. It may be asking for a new pot.
Learning how to repot a Monstera is one of the best things you can do for bigger, healthier growth. Repotting refreshes tired soil, gives cramped roots breathing room, improves drainage, and creates the right foundation for those famous split leaves to grow larger and stronger. Done correctly, it is not complicated. Done incorrectly, your plant may sulk like you moved its favorite chair without permission.
This guide breaks the process into five easy steps, with practical Monstera repotting tips for choosing the right pot, preparing a chunky soil mix, handling the root ball, adding support, and helping your plant recover after the move. Whether you are repotting a young Monstera deliciosa or a massive leafy beast that now requires two people and emotional support, the basics are the same.
Why Repotting a Monstera Matters
Monstera plants are tropical climbing vines with vigorous root systems. Indoors, they depend entirely on the container you give them. Over time, roots fill the pot, nutrients wash out of the soil, and the potting mix can become compacted. When that happens, water may either run straight through without soaking properly or sit too long around the roots. Neither option is great.
A well-timed Monstera repot gives the plant fresh growing media, more oxygen around the roots, better moisture control, and space to continue developing. It can also correct common problems such as unstable growth, slow new leaves, yellowing caused by poor drainage, and a plant that seems thirsty again five minutes after watering. Think of it as upgrading from a cramped studio apartment to a place with actual closet space.
When Should You Repot a Monstera?
The best time to repot a Monstera is usually late winter through spring, just before or during the active growing season. This gives the plant enough warmth, light, and energy to recover quickly. You can also repot in summer if needed, especially if the plant is extremely root-bound or the soil is staying soggy. Fall and winter repotting is possible, but it is better to be gentle because growth naturally slows when light levels drop.
Signs Your Monstera Needs Repotting
Your Monstera may be ready for a new pot if you notice roots growing out of the drainage holes, roots circling the top of the soil, water running through the pot too quickly, soil drying out within a day, or the plant becoming top-heavy and unstable. Another clue is stalled growth. If your plant has bright indirect light, proper watering, and decent humidity but still refuses to produce healthy new leaves, the roots may be out of room.
Do not repot just because you are bored on a Sunday and the plant looks “kind of same-ish.” Monsteras do not need constant upgrading. Many are happy being slightly snug in their pots. Repotting too often or choosing a pot that is much too large can lead to excess wet soil and root rot.
What You Need Before Repotting
Gather everything before you start. Once your Monstera is halfway out of its pot and leaning against your leg like a leafy toddler, you will not want to go hunting for perlite.
Basic Supplies
You will need a new pot with drainage holes, fresh well-draining potting mix, orchid bark or coco chips, perlite or pumice, clean pruning shears, gloves, a tarp or old towel, and a moss pole or sturdy support if your plant is climbing. A watering can is also helpful for settling the soil after repotting.
The Best Pot Size for Monstera
Choose a pot about 2 inches wider than the current container for most Monsteras. For very large plants, you may go slightly bigger, but avoid jumping from a modest pot to a giant decorative tub. A pot that is too large holds extra moisture around roots that are not ready to use it, which can create a soggy danger zone. Drainage holes are non-negotiable. A pretty pot without drainage is not a home; it is a swamp with branding.
The Best Soil Mix for Monstera
Monsteras prefer a chunky, airy, well-draining mix. A simple homemade blend is two parts indoor potting mix, one part orchid bark, and one part perlite or pumice. The potting mix holds some moisture and nutrients, while bark and perlite improve airflow and drainage. You can also use a commercial aroid mix if it drains well and does not stay heavy or muddy.
The goal is moisture without suffocation. Monstera roots like hydration, but they also need oxygen. If the soil feels dense, sticky, or slow to dry, improve it with bark, perlite, pumice, coco chips, or coarse amendments. Avoid garden soil in indoor pots because it can compact, drain poorly, and bring in unwanted pests.
5 Easy Steps to Repot a Monstera
Step 1: Prepare the Plant, Pot, and Soil
Water your Monstera lightly a day before repotting if the soil is very dry. Slightly moist soil helps the root ball slide out more easily and reduces breakage. Do not soak it heavily right before repotting, or the whole process becomes mud wrestling with leaves.
Next, prepare your workspace. Lay down newspaper, a tarp, or an old towel. Mix your soil before removing the plant from its pot. If you are using a moss pole, stake, or trellis, have it ready. This is also a good time to inspect the new pot. Make sure it has drainage holes and enough depth to hold the root ball at the same soil level as before.
Add a small layer of fresh potting mix to the bottom of the new container. Do not pack it down hard. Roots need oxygen, and compacting the soil too much defeats the purpose of using an airy mix. Place enough soil so the top of the root ball will sit about an inch below the rim of the pot. That little space prevents water from spilling over every time you irrigate.
Step 2: Remove the Monstera Gently
Hold the base of the plant near the soil line and gently tip the pot sideways. If the Monstera is small, you can slide it out with one hand supporting the stems and the other hand guiding the pot. If it is large, ask someone to help. This is not the moment to prove your independence to a 6-foot vine.
If the plant refuses to move, squeeze the sides of a plastic nursery pot or tap the outer edges of a rigid container. You can also run a clean tool around the inner wall of the pot to loosen the root ball. Avoid yanking the stems. Monstera stems can be sturdy, but pulling hard may damage the crown or snap roots.
Once the plant is out, examine the roots. Healthy roots are usually firm and light tan, cream, or white. Some older roots may be darker and still healthy if they feel firm. Unhealthy roots often look mushy, smell unpleasant, or fall apart when touched. Trim damaged roots with clean shears, but avoid removing too much. A little pruning is fine; a root haircut inspired by panic is not.
Step 3: Loosen the Root Ball and Refresh the Mix
If your Monstera is root-bound, the roots may circle tightly around the bottom or sides. Use your fingers to gently loosen the outer roots. You do not need to remove every bit of old soil, especially if the plant is healthy. Focus on freeing compacted areas and encouraging the roots to grow outward into the new mix.
For a severely root-bound Monstera, you may need to tease apart the bottom roots a little more firmly. If there are thick mats of circling roots, loosen them carefully and trim only the dead, damaged, or excessively tangled sections. The goal is to wake the roots up, not punish them for being successful.
This is also the right moment to decide whether your plant needs division. Many nursery Monsteras are sold with several plants in one pot. Keeping them together creates a fuller look, while separating them can reduce crowding and make each plant easier to train. If you separate them, do it slowly and keep as many roots attached to each section as possible.
Step 4: Place the Monstera in the New Pot and Add Support
Set the Monstera in the center of the new pot. Keep the plant at the same depth it was growing before. Burying the stem too deeply can invite rot, while planting it too high may expose roots and make the plant unstable.
Add fresh soil around the root ball in layers. Gently press the mix into gaps, but do not crush it into a brick. Rotate the pot as you work so the plant stays centered and upright. If your Monstera has a front and back, position the back of the plant near the support. The back is usually where aerial roots emerge, and it is the side that naturally wants to climb.
For bigger, healthier growth, give your Monstera something to climb. A moss pole, coco coir pole, wood plank, or sturdy trellis helps support the stems and encourages larger, more mature leaves over time. Tie stems loosely with soft plant ties, Velcro plant tape, or cotton string. Never tie tightly around a stem; leave room for growth.
Aerial roots can be guided toward the pole or tucked gently into the potting mix if they are flexible. Do not force stiff aerial roots into dramatic shapes. They are roots, not yoga instructors.
Step 5: Water Thoroughly and Help It Recover
After repotting, water the Monstera thoroughly until water drains from the bottom. This helps settle the soil around the roots and removes large air pockets. Empty the saucer after watering so the plant is not sitting in standing water.
Place the plant in bright, indirect light. Avoid harsh direct sun for a few days while it adjusts, especially if the roots were disturbed. Keep the environment stable: no sudden move to a dark corner, no blast from an air conditioner, and no heroic fertilizing spree. Wait several weeks before feeding, particularly if your potting mix already contains nutrients.
Your Monstera may droop slightly after repotting. A little transplant stress is normal. Give it consistent care and resist the urge to water repeatedly because it “looks sad.” Check the soil first. Water when the top couple of inches begin to dry, then water deeply and let excess drain away.
Common Monstera Repotting Mistakes to Avoid
Using a Pot That Is Too Big
Bigger pot does not always mean bigger plant. If the container is much larger than the root ball, the extra soil stays wet longer than the roots can use it. This increases the risk of root rot, fungus gnats, and yellowing leaves. Size up gradually.
Choosing Heavy, Poorly Draining Soil
Dense soil is one of the fastest ways to make a Monstera unhappy. A chunky mix helps roots breathe and reduces the chance of soggy conditions. If your potting mix looks like brownie batter after watering, it needs more structure.
Fertilizing Immediately After Repotting
Freshly repotted roots need time to settle. Fertilizer too soon can stress tender roots, especially if you trimmed or disturbed them. Wait until the plant shows signs of active growth before returning to a normal feeding schedule.
Ignoring Support
Monsteras are climbers. Without support, they often sprawl, lean, or grow unevenly. Adding a moss pole or trellis during repotting is much easier than trying to wedge one into a full pot later.
Aftercare for Bigger, Healthier Monstera Growth
Repotting is only the beginning. To encourage larger leaves and stronger growth, place your Monstera where it receives bright, indirect light. Too little light can lead to smaller leaves and long, leggy stems. Too much direct sun can scorch the foliage, especially near hot windows.
Water when the top 2 inches of soil feel dry. This timing changes depending on pot size, soil mix, season, temperature, and humidity. Instead of watering on a strict calendar, check the soil. Your finger is a surprisingly advanced moisture meter, and it does not require batteries.
Humidity can also help. Monsteras tolerate average indoor conditions, but they often grow better with moderate humidity. Grouping plants together, using a humidifier, or placing the plant away from drying vents can improve the growing environment. Wipe leaves occasionally so they can photosynthesize efficiently and continue looking like they belong in a design magazine.
During spring and summer, feed with a balanced houseplant fertilizer according to label directions. Reduce or pause fertilizer in fall and winter unless the plant is still growing strongly under excellent light. Prune yellow, damaged, or weak leaves with clean shears, and rotate the pot occasionally so growth stays balanced.
Experience Notes: What Repotting a Monstera Teaches You in Real Life
One of the biggest lessons from repotting a Monstera is that the plant usually tells the truth before the owner wants to hear it. A Monstera that dries out every day, leans dangerously, or has roots escaping from the pot is not being dramatic. It is waving a leafy flag that says, “My current living arrangement is no longer working.” Many plant owners delay repotting because the plant still looks decent from above. But the real story is often happening underground.
A practical experience is to check the root ball before assuming the problem is fertilizer, light, or humidity. For example, a Monstera may produce smaller leaves even though it sits near a bright window and receives regular care. When removed from the pot, the roots may be wrapped tightly around the bottom like noodles in a takeout container. After moving it into a slightly larger pot with fresh, chunky mix, new growth often becomes stronger within the next growing cycle.
Another useful experience: do not underestimate the weight of a mature Monstera. A large plant in a ceramic pot can be awkward, heavy, and very good at knocking things over. Before repotting, clear a wide workspace and move fragile items away. A Monstera leaf can sweep across a table like a green paddle. Coffee mugs, candles, and tiny decorative objects do not stand a chance.
It also helps to take photos before removing the plant. Monsteras often have a natural direction of growth, with a front side that displays leaves and a back side where aerial roots and stems attach to support. A quick photo makes it easier to place the plant back in a visually pleasing position. Without that reference, you may finish repotting and realize your plant is facing the wall like it is thinking about its choices.
Many people also learn that aerial roots are not an emergency. They may look strange, but they are normal. You can guide them toward a moss pole, tuck flexible ones into the potting mix, or leave them alone. Cutting them is usually unnecessary unless they are damaged or truly in the way. The better approach is to use them as clues. Aerial roots show where the plant wants support, and aligning that side with a pole can improve long-term structure.
Another real-world tip is to avoid overwatering after repotting. It is tempting to hover over the plant and water it every time one leaf droops. However, slight drooping after repotting is often temporary. The roots need oxygen and time, not a flood. Water thoroughly once, let excess drain, then wait until the top layer of soil begins to dry before watering again.
Finally, repotting teaches patience. Bigger leaves do not appear overnight. The plant may spend the first few weeks rebuilding root contact and adjusting to the new container. Then, when conditions are right, it rewards you with stronger stems, fresh leaves, and sometimes more dramatic fenestrations. Repotting is less like flipping a switch and more like giving your Monstera a better stage. Once the roots settle in, the performance improves.
Conclusion
Repotting a Monstera is not just a maintenance chore; it is a growth strategy. With the right timing, a slightly larger pot, a chunky well-draining soil mix, gentle root handling, and proper aftercare, your plant has a much better chance of producing bigger, healthier leaves. The process may look intimidating the first time, especially if your Monstera has reached furniture-sized confidence, but the steps are simple when you slow down and prepare.
Remember the golden rule: give the roots more room, but not too much. Keep the soil airy, support the climbing stems, and let the plant recover in bright, indirect light. Do that, and your Monstera can move from “surviving in the corner” to “main character of the living room.”
Note: This article was written for web publishing and synthesizes real horticultural guidance on Monstera care, repotting, drainage, container sizing, soil structure, watering, and post-repot recovery.